Which Came First?

I’m often asked what comes first for a blog post…the stitch or the stitched sample? In all honesty, it’s both. Some weeks I am inspired by new stitches I’ve used for class projects and get to share student’s wonderful stitching. Other weeks I am walking around my house on Tuesday afternoon desperately looking for something I haven’t shared with you. Today and last week were definitely Tuesday afternoon scenarios.

Click on image to see on whimsicalstitch.com's Pinterest account. Visit pinterest.com/whimsicalstitch/whimsicalwednesday for a library of all #whimsicalwednesday and #smallspacesunday stitch diagrams.

Click on image to see on whimsicalstitch.com's Pinterest account. Visit pinterest.com/whimsicalstitch/whimsicalwednesday for a library of all #whimsicalwednesday and #smallspacesunday stitch diagrams.

Click on image to see on whimsicalstitch.com's Instagram account. Visit instagram.com/whimsicalstitch to see a library of stitched samples for select #whimsicalwednesday and #smallspacesunday stitch diagrams.

Click on image to see on whimsicalstitch.com's Instagram account. Visit instagram.com/whimsicalstitch to see a library of stitched samples for select #whimsicalwednesday and #smallspacesunday stitch diagrams.

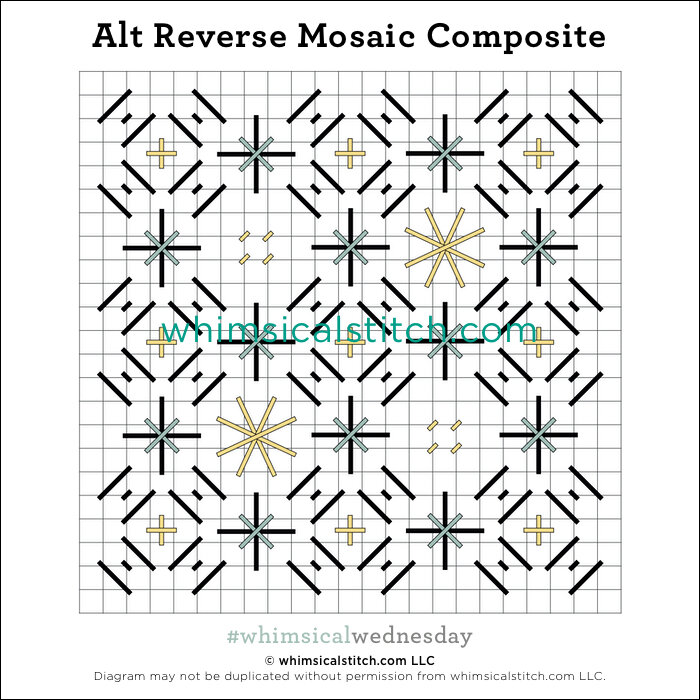
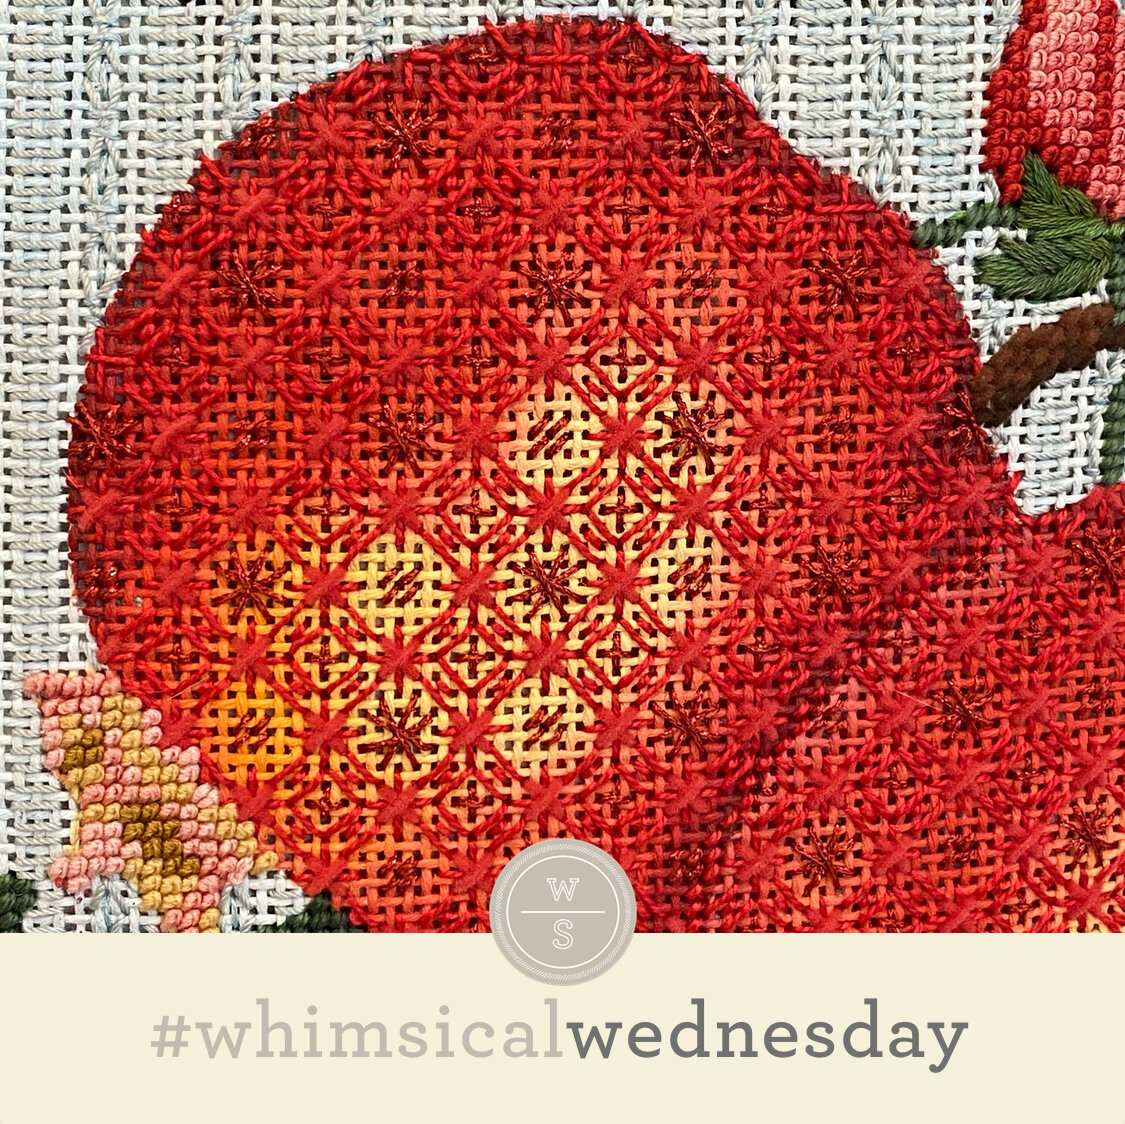
There is a LOT to unpack in today’s stitch. I stitched these pillows in the early 2000’s and I was all about dramatic composite stitches. In fact, the more dramatic, the better. In my opinion, it works here because there is so much real estate to cover. The pillow, which you can see in its entirety on today’s Instagram post, includes basketweave leaves and a low key background to balance the dramatic stitches and threads on each of the fruit. Just like your diet, needlepoint needs to have balance. And, just like your diet, I’m all about fruit in needlepoint.

The stitched sample is a retired fruit pillow from Melissa Shirley Designs and uses DMC Perle Cotton (black lines), Very Velvet (aqua lines), Very Velvet (aqua lines), and a whole lotta red size 12 Kreinik (yellow lines). I recommend stitching the black liems first, folllowed by the yellow, and wrapping up with the aqua lines.

This stitch would make a beautiful fabric of any kind, say a dress with silk floss (black lines), a lightweight metallic such as Kreinik Metallics Fine Braid (#8) or Petite Silk Lame (yellow lines), and Flair (aqua lines). Extending the fabric theme, how about a pillow with Vineyard Silk (black lines), Silk Lame (yellow lines), and size 12 Kreinik (aqua lines). I may go so far as to replace the black lines under the aqua lines with the thread used for the aqua lines.

This stitch diagram, along with all other #whimsicalwednesday and #smallspacesunday stitch diagrams, can also be found on a Pinterest board here.

Be sure to follow whimsicalstitch.com on FacebookPinterestInstagram, and Twitter.

If you like what you see on this blog, want to learn some very creative decorative stitches, and how to put them all together, whimsicalstitch.com has a book for you! Mary’s Whimsical Stitches is a contemporary how-to collection of more than 250 stitches for stitchers regardless of skill level. The book includes updated and sequenced diagrams from this blog, all-new stitches, and a chapter on the basics of needlepoint. For more information, visit here.

whimsicalstitch.com also sells Stitch Guides and Stitch Concepts for Melissa Shirley Designs, Zecca DesignsSandra Gilmore, Purple Palm, Maggie, and Penny MacLeod, and many more. Click here to see the newest guides and click here to see the entire collection.

I hope you have the perfect spot for this stitch! Please enjoy! Have a wonderful #whimsicalwednesday!

A Note about Diagrams
I use color in diagrams to make them as clear as possible.  The primary function of different colored lines is to illustrate a stitch sequence.  For example, layering of colors demonstrates you add them in that order.  They can also provide ideas on how to integrate additional threads (one line for each color).  Or, you can use the same thread for all color lines.  That's where I encourage you to use your imagination for the space you are stitching!

Thanksgiving in January

Last week was Halloween so, of course, this week is Thanksgiving, right?

Today's stitch comes from an apron on a vintage Melissa Shirley Thanksgiving stand-up.  It's a wonderful balance of open, interesting, and sweet.  

Click on image to see on pinterest.com.  Visit pinterest.com/whimsicalstitch/whimsicalwednesday for a library of all #whimsicalwednesday and #smallspacesunday stitch diagrams.

Click on image to see on pinterest.com.  Visit pinterest.com/whimsicalstitch/whimsicalwednesday for a library of all #whimsicalwednesday and #smallspacesunday stitch diagrams.

Click on image to see on instagram.com.  Visit instagram.com/whimsicalstitch to see a library of stitched samples for select #whimsicalwednesday and #smallspacesunday stitch diagrams.

Click on image to see on instagram.com.  Visit instagram.com/whimsicalstitch to see a library of stitched samples for select #whimsicalwednesday and #smallspacesunday stitch diagrams.

I recommend adding the gray lines first.  Fill the smaller diamond with a single Upright Cross, followed by four Upright Crosses in the larger diamond.  The stitched sample uses DMC Perle Cotton #8 with Shimmer Ribbon as the accent thread (on 18-mesh). 

I love the mix of thread finishes in the stitched sample.  The single hue makes for a classic look.  Along these lines, I see this stitch (and single hue combo) as perfect for a shirt, field of grass or dirt, tablecloth, clouds, maybe even water.  It strikes the right balance between open and full coverage stitches, allowing the shading to play a role in your final stitched piece.

Mixing colors and finishes would make this a great stitch for more dramatic clothing such as a coat or dress.  I imagine the gray lines with a rich red velvet, the group of four Upright Crosses in a deep red metallic, and the single Upright Cross in a gold or silver metallic.  Try it for a roof or basket with Rainbow Linen for the diagonal lines, Straw Silk for the single Upright Cross, and an overdyed Perle Cotton for the group of four Upright Crosses.  Just a few thought-starters for you!

This stitch diagram, along with all other #whimsicalwednesday and #smallspacesunday stitch diagrams, can also be found on a Pinterest board here.

Be sure to follow whimsicalstitch.com on FacebookPinterestInstagram, and Twitter.

If you like what you see on this blog, want to learn some very creative decorative stitches, and how to put them all together, whimsicalstitch.com sells stitch guides and stitch concepts for Melissa Shirley Designs, Zecca Designs, and Patience Brewster. 48 guides are currently available and more will be announced later this week, so stay tuned!  

I hope you have the perfect spot for this stitch! Enjoy!

Halloween in January

The blog posts for the remainder of the month unveil a secret about me.  I've been negligent in returning my Christmas decorations...okay, some Halloween decorations as well...to storage.  The good news for me is I didn't have to scrounge for stitched samples.  The good news for you is today is Halloween!

Today's stitch is illustrated as a background for a vintage Melissa Shirley Halloween ornament.

Click on image to see on pinterest.com.  Visit pinterest.com/whimsicalstitch/whimsicalwednesday for a library of all #whimsicalwednesday and #smallspacesunday stitch diagrams.

Click on image to see on pinterest.com.  Visit pinterest.com/whimsicalstitch/whimsicalwednesday for a library of all #whimsicalwednesday and #smallspacesunday stitch diagrams.

Click on image to see on instagram.com.  Visit instagram.com/whimsicalstitch to see a library of stitched samples for select #whimsicalwednesday and #smallspacesunday stitch diagrams.

Click on image to see on instagram.com.  Visit instagram.com/whimsicalstitch to see a library of stitched samples for select #whimsicalwednesday and #smallspacesunday stitch diagrams.

It is very simple.  The core stitch element is five straight stitches six rows high (on the vertical).  After the core elements are complete, add an accent thread across the top in the middle on the horizontal axis.  Voila!  Perfect background, floor, wallpaper, basket, dress...even a large window!

The stitched sample uses DMC Perle Cotton #8 with Shimmer Ribbon as the accent thread (on 18-mesh). 

This stitch diagram, along with all other #whimsicalwednesday and #smallspacesunday stitch diagrams, can also be found on a Pinterest board here.

Be sure to follow whimsicalstitch.com on FacebookPinterestInstagram, and Twitter.

If you like what you see on this blog, want to learn some very creative decorative stitches, and how to put them all together, whimsicalstitch.com sells stitch guides and stitch concepts for Melissa Shirley Designs, Zecca Designs, and Patience Brewster. 48 guides are currently available and more are in the works.  I will be posting about 15 new Stitch Concepts later this month, so stay tuned!  

I hope you have the perfect spot for this stitch! Enjoy! And happy, happy 2018!

Pretty as a Peach

Today's stitch is a denser variation of the Elongated X's I shared with you last September.   

Just as the original post, this stitch is up six rows and over two.  Tying down the X's with three horizontal stitches over two rows is a way to brighten it up for the peach that inspired this post.

As you can see, thread weights play a huge role in the openness of this denser stitch.  I used size 8 DMC Pearl Cotton and size 8 Kreinik Metallics, resulting in an almost full coverage stitch looking barely there.  And, for certain artists, this is the way to stitch.  There is some beautiful shading out there.  There are times I feel guilty covering it up.  

This stitch diagram, along with all other #whimsicalwednesday and #smallspacesunday stitch diagrams, can also be found on a Pinterest board here.

Be sure to follow whimsicalstitch.com on FacebookPinterestInstagram, and Twitter.

If you like what you see on this blog, want to learn some very creative decorative stitches, and how to put them all together, whimsicalstitch.com sells stitch guides for Melissa Shirley Designs, Zecca Designs, and Patience Brewster.  31 guides are currently available and more are in the pipeline.

I hope you enjoy this stitch and have the perfect spot for it!  Enjoy!

Small Tramme

Truth be told, most Tramme stitches qualify as small space stitches.  However, I singled this background out as a small Tramme background because the stitched sample is an ornament I did many years ago.

The stitch is very straightforward.

Sequence: 1. Dark gray vertical lines (aka base threads) 2. Yellow lines (aka accent threads) 3. Black lines

Sequence: 1. Dark gray vertical lines (aka base threads) 2. Yellow lines (aka accent threads) 3. Black lines

The vertical rows are over three to add a smoothness to the background and moderate the tramme rows in the stitch.  That is a personal choice; you can do over more or fewer rows in your own piece.

The stitched sample is a combination of three different finishes in the same color family.  

The threads are DMC Pearl #8, Very Velvet, and Kreinik Metallics Very Fine Braid, all in a very light blue.  The Kreinik is a very subtle touch and may be hard to see.  That was purposeful...the light weight creates a very subtle metallic pop to the background that I love. 

The possible thread combinations and color combos are endless.  This stitch makes a fantastic background (obviously), but would also be adorable on a pair of pants with the base thread of the tramme row in a contrasting color.  It would serve well as a wallpaper, floor, rooftop (yes, again with the rooftops), or ground cover.  Its strength lies in the tramme rows, which add definition and strength to the stitch.  If you want a strong vertical (or horizontal) design element, this stitch is for you.

This stitch diagram, along with all other #whimsicalwednesday and #smallspacesunday stitch diagrams, can also be found on a Pinterest board here.

Be sure to follow whimsicalstitch.com on FacebookPinterestInstagram, and Twitter.

If you like what you see on this blog, want to learn some very creative decorative stitches, and how to put them all together, whimsicalstitch.com sells stitch guides for Melissa Shirley Designs and Zecca Designs.  28 guides are currently available, including the newest Tea by the Sea, and more are in the pipeline.

I hope you enjoy this stitch and have the perfect spot for it!  Enjoy!

Diamond Columns

This stitch is one of my favorite backgrounds, especially white-on-white.

The background is columns of diamonds connected by straight lines.  It is best to work this stitch vertically by column.

Create the diamond in the diagrammed sequence (numbered steps), illustrated in left diagram.  The next step (the lettered steps) adds the connector.  When done with B, return to A and repeat the numbered steps.  Repeat until the area is full of diamonds.  Add the Upright Crosses inside each diamond to complete the stitch. 

You can adjust the length of the connectors to suit your space.  I've done connectors over three rows, four rows (as diagrammed above), and as many as six rows.  It depends on the size of the space and the amount of open canvas you want to display.

This stitch works for baskets, floors, foliage (with a short connector), or clothing with large areas to stitch so there is room for the pattern to emerge.  More often than not, I use this as a background stitch, as illustrated by the stitched sample on Instagram.    

This stitch diagram, along with other #whimsicalwednesday and #smallspacesunday stitch diagrams, can also be found on www.pinterest.com/whimsicalstitch/whimsicalwednesday.  

Be sure to follow whimsicalstitch.com on Facebook, Pinterest, Instagram, and Twitter.

If you like what you see on this blog, want to learn some very creative decorative stitches, and how to put them all together, whimsicalstitch.com sells stitch guides for seasonal Melissa Shirley designs.  25 guides are currently available, including three new Debbie Mumm Santa guides, and more are in the pipeline.

Enjoy!

Horizontal Brick

Not the most clever of blog post titles, but it's early here.  :)

Today's stitch is one of those universal solutions.  Depending on the thread combination, it can be clothing, a background, a tabletop, a piece of fruit (as illustrated on Instagram), or foliage.

It's really simple.

As I mentioned earlier, the thread combination defines its use.  For an area you'd like to recede a little, I recommend a lightweight pearl silk or cotton, such as Elegance, Thread Gatherer Silken Pearl, DMC (or Anchor) Pearl #8 for the gray lines and a lightweight metallic for the yellow lines, such as Neon Rays, Shimmer, or Kreinik Metallics #4 or #8. 

For a more intense area, such as a coat, Very Velvet, Pepper Pot Silk, Vineyard Silk, or a multi-ply wool are great alternatives.  Flair, Frosty Rays, Kreinik Metallics #12 or #16 balance these threads well.  

On a separate but related subject, I would love to receive feedback on whimsicalstitch.com.  Please visit this link to fill out a short survey.  Thank you!

This stitch diagram, along with other #whimsicalwednesday and #smallspacesunday stitch diagrams, can also be found on www.pinterest.com/whimsicalstitch/whimsicalwednesday.  

Be sure to follow whimsicalstitch.com on FacebookPinterestInstagram, and Twitter.

If you like what you see on this blog, want to learn some very creative decorative stitches, and how to put them all together, whimsicalstitch.com sells stitch guides for seasonal Melissa Shirley designs.  22 guides are currently available and more are in the pipeline.

Enjoy!

Cross My Heart...Again!

Today's stitch is Tied Oblong Crosses.  As I diagrammed this stitch, I quickly realized I could have added an indefinite number of variations, so please consider these nothing more than thought starters!

Scalability and versatility define this stitch.  The three possibilities illustrated below include oblong crosses five rows high and two rows wide.  You can make it as small as three rows high and literally as tall as he space.  

The chart on the left includes three base patterns that differ based on their accent stitches (the gray lines).  You can center the accents on the vertical, horizontal, or both.  To make the vertical accent work, the underlying cross (the aqua lines) needs to be at least two rows wide (as illustrated).  The diagram on the right illustrates how a base pattern is put together to create the overall look.   

Generally speaking, I prefer a matte thread for the crosses and a metallic thread for the accent stitches.  If you use the bottom pattern with two accent threads, be sure to use threads with enough color contrast between them to distinguish the look.

The stitched sample on Instagram is from a roof on piece I'm currently stitching.  It would make a great border stitch, especially on clothing.  There is so much you can do with this...let your imagination go wild!

On a separate but related subject, I would love to receive feedback on whimsicalstitch.com.  Please visit this link to fill out a short survey.  Thank you!

This stitch diagram, along with other #whimsicalwednesday and #smallspacesunday stitch diagrams, can also be found on www.pinterest.com/whimsicalstitch/whimsicalwednesday.  

Be sure to follow whimsicalstitch.com on FacebookPinterestInstagram, and Twitter.

If you like what you see on this blog, want to learn some very creative decorative stitches, and how to put them all together, whimsicalstitch.com sells stitch guides for seasonal Melissa Shirley designs.  22 guides are currently available and more are in the pipeline.

Enjoy!

Connections Part 1

I am a huge fan of open stitches, especially for backgrounds.  Open stitches are a way to integrate wonderful stitches without completely obscuring truly beautiful painting, especially skies, by our favorite needlepoint artists.  It also is a tactic to draw the eye to a desired area by downplaying the area the open stitch is covering.  The most understandable example for the second reason are backgrounds.  

Today's stitch is one of my favorite backgrounds.  It's an easy pattern to pick up, fills up an area quickly due to its deceivingly large size, and is evenly spaced.  It's also very easy to determine if you missed a stitch within the the pattern.  I call it Diamond Connections.  

It's also a very appealing combination of vertical and diagonal stitches, which adds a nice texture to the area.  Consider rotating the diagram 90 degrees and having horizontal connectors instead of vertical!  There are no rules here.  The stitched sample on Instagram is from one of Melissa Shirley's recent holiday baskets.

This stitch diagram, along with other #whimsicalwednesday and #smallspacesunday stitch diagrams, can also be found on www.pinterest.com/whimsicalstitch/whimsicalwednesday.  

Be sure to follow whimsicalstitch.com on FacebookPinterestInstagram, and Twitter.

If you like what you see on this blog, want to learn some very creative decorative stitches, and how to put them all together, whimsicalstitch.com sells stitch guides for seasonal Melissa Shirley designs.  20 guides are currently available and more are in the pipeline.

Enjoy!