Back to Backgammon

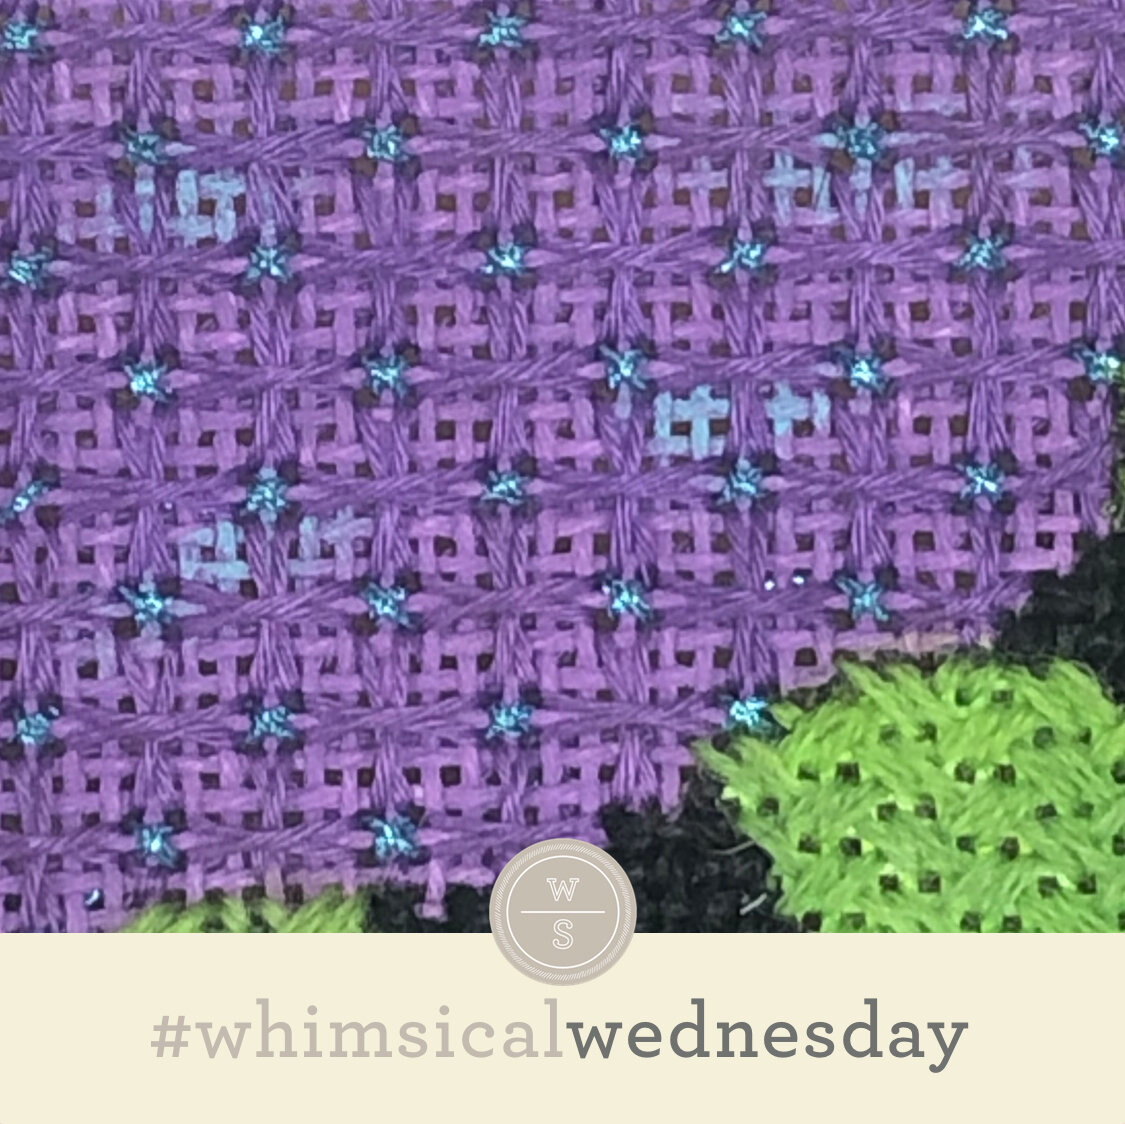
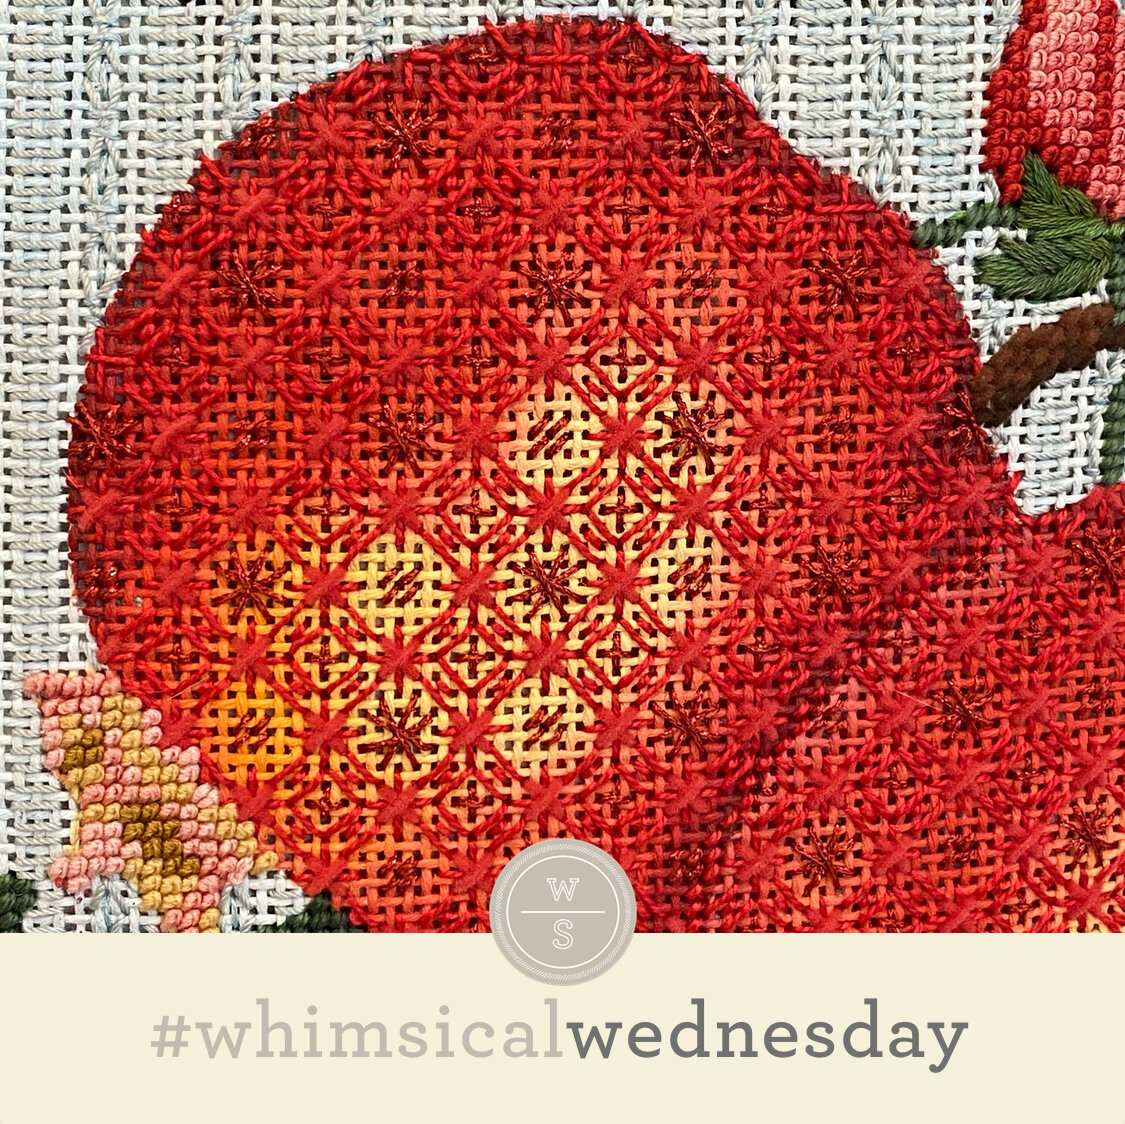
I’ve had a fun time playing with and sharing stitches with you for the past few weeks. The truth is I was auditioning background stitches for a Zecca backgammon board and we have a winner! Today’s stitch made me the happiest!

Click image to see the whimsicalstitch Stitch Library on pinterest.com. Includes all #whimsicalwednesday and #smallspacesunday stitch diagrams.

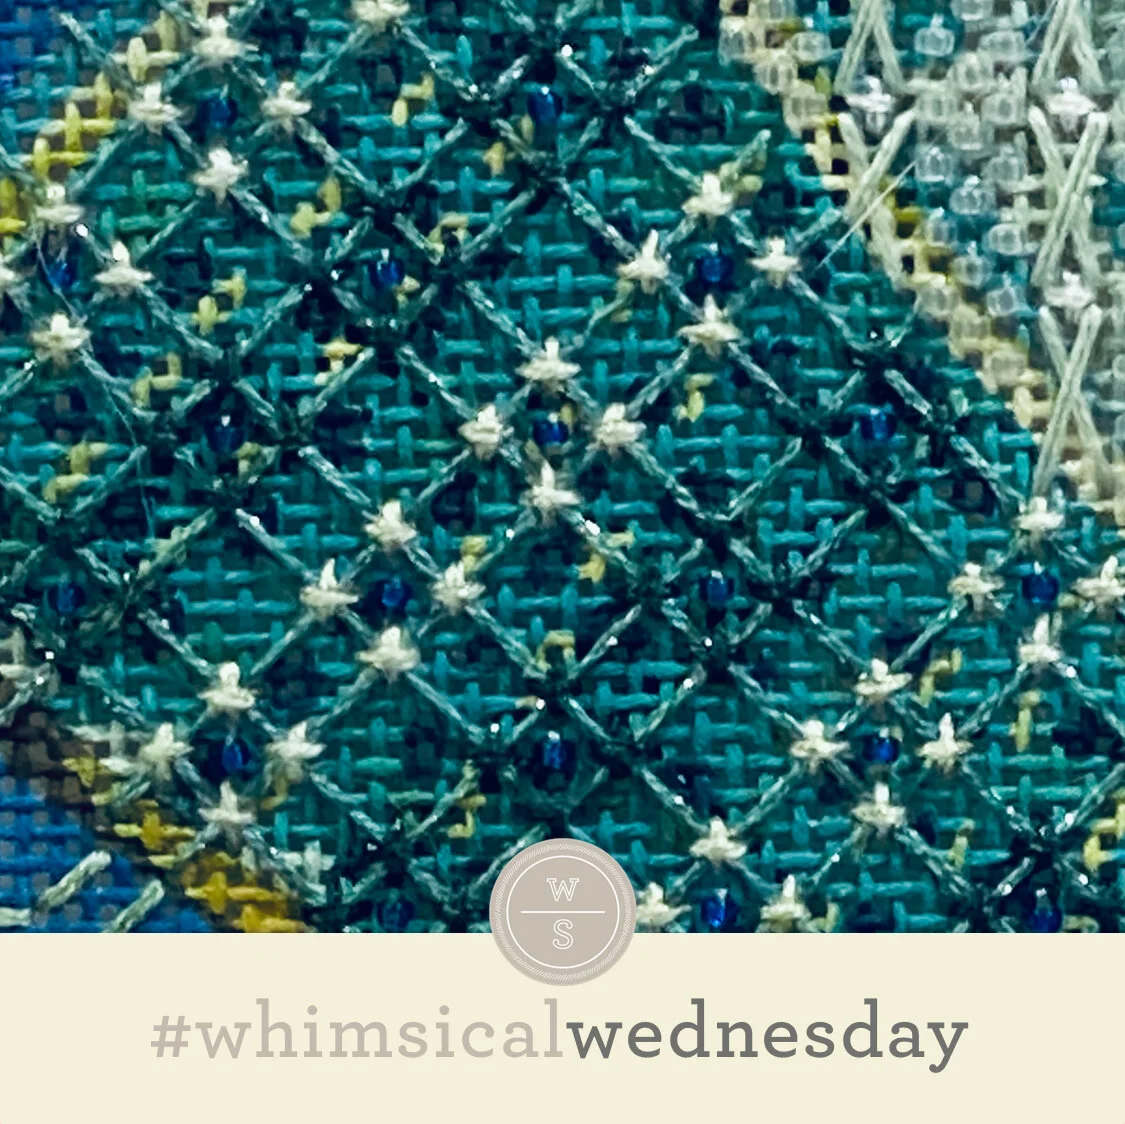
Click image to see #whimsicalwednesday and #smallspacesunday Stitched Sample Gallery on Instagram.

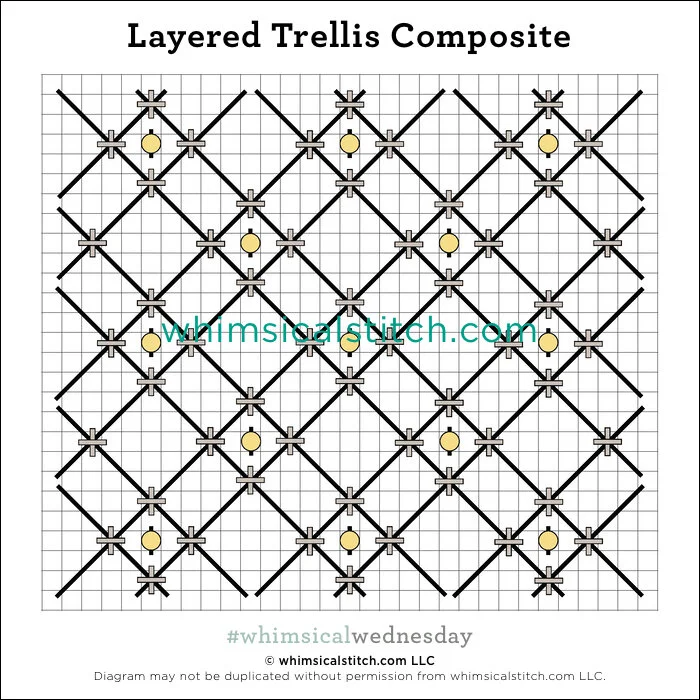
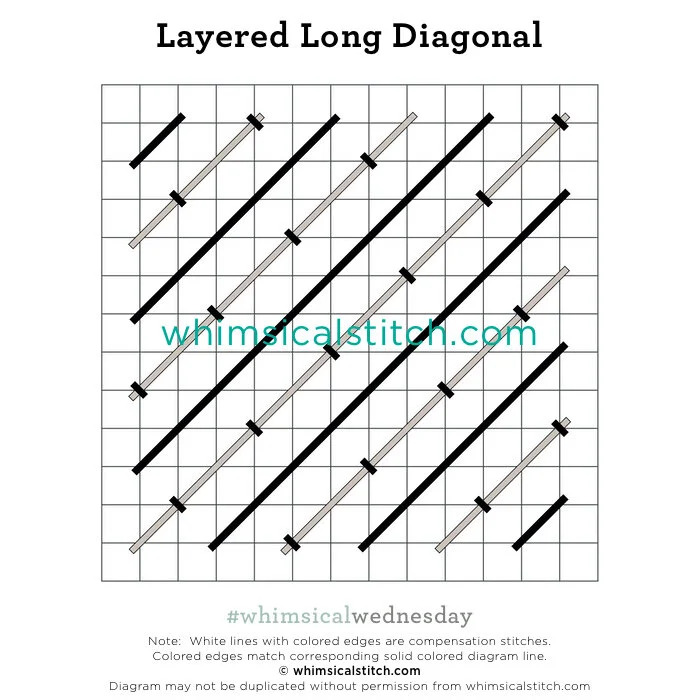
The stitched sample uses Petite Silk Lame (black lines) with two plies of Soie D’Alger (yellow lines) layered on top. I love the flatness and symmetry of the stitch for the backgammon board background. This will help the soon-to-be-beaded birds pop.

I’m looking forward to adding this stitch to some stitch plans I’m working on. I’m playing with the idea of using two shades of green Vineyard Silk for the two threads to help add interest to a hat that is painted with beautiful green shading. Using two colors for this stitch will make the stitch pop even more. For example, at some point, I will use this stitch for a white background, say behind a floral still life. I would use a metallic in a color pulled from the flowers for the black lines with a white matte thread on top. This way, the white remains the primary color (as it’s on top) but there will be a lovely accent color integrated into the background.

I stitched the first layer of diamonds (the black lines) in what I call a modified back stitch, flipping directions as I added stitches, so there would be no visible threads. Alternatively, you could add the stitches with literal back stitches over five rows following the diagonal direction from top right to bottom left and then from top left to bottom right. Repeat with the second layer.

This stitch diagram, along with all other #whimsicalwednesday and #smallspacesunday stitch diagrams, can also be found on a Pinterest board here. Be sure to follow whimsicalstitch.com on FacebookPinterestInstagram, and Twitter.

If you like what you see on this blog, there's more. Mary’s Whimsical Stitches is a series of three books offering contemporary how-to collections of more than 250 stitches (in each volume) for all stitchers, regardless of skill level. All books include updated and sequenced diagrams from this blog plus a collection of all-new stitches from private lessons and other class projects. All three books include chapters on Balanced, Diagonal, Layered, Oblique, Small, and Straight stitches. Volume 1 also includes a chapter on Borders. Volume 2 includes a chapter on Beading, and Volume 3 includes a chapter on Tent Pattern Stitches. Any or all are a great enhancement to your stitch library. Visit here to find a needlepoint retailer that carries my books.

Also, you can download for free the first chapter from my first book which covers basic needlepoint stitches and stitch compensation techniques along with new top-line information on needlepoint materials and tools, how to handle threads, and other helpful needlepoint resources.

whimsicalstitch.com also sells Stitch Guides and Stitch Concepts for Melissa Shirley Designs, Zecca DesignsSandra Gilmore, Purple Palm, Maggie, and Penny MacLeod, and many more. Click here to see the newest guides and click here to see the entire collection.

I hope you have the perfect spot for this stitch! Please enjoy! Have a wonderful #whimsicalwednesday!

A Note about Diagrams
I use color in diagrams to make them as clear as possible.  The primary function of different colored lines is to illustrate a stitch sequence.  For example, layering of colors demonstrates you add them in that order.  They can also provide ideas on how to integrate additional threads (one line for each color).  Or, you can use the same thread for all color lines.  That's where I encourage you to use your imagination for the space you are stitching!

It's an Extravaganza

It’s an extravaganza of straight and oblique layers…in pink! ::Swoon::

Click on image to see on whimsicalstitch.com's Pinterest account. Visit pinterest.com/whimsicalstitch/whimsicalwednesday for a library of all #whimsicalwednesday and #smallspacesunday stitch diagrams.

Click on image to see on whimsicalstitch.com's Pinterest account. Visit pinterest.com/whimsicalstitch/whimsicalwednesday for a library of all #whimsicalwednesday and #smallspacesunday stitch diagrams.

Click on image to see on whimsicalstitch.com's Instagram account. Visit instagram.com/whimsicalstitch to see a library of stitched samples for select #whimsicalwednesday and #smallspacesunday stitch diagrams.

Click on image to see on whimsicalstitch.com's Instagram account. Visit instagram.com/whimsicalstitch to see a library of stitched samples for select #whimsicalwednesday and #smallspacesunday stitch diagrams.

The stitched sample uses two plies of Impressions (black lines) and Neon Rays (aqua lines). The layering of the aqua lines plays a critical role in the final look. The black edges of those lines will help you navigate those layers. (Note: This is the last stitch I’ll be sharing from the pink, red, and white sampler.)

I’m looking forward to using this stitch again for a pretty skirt with silk floss and Petite Silk Lame. Flip it 90° for some stunning slacks for Santa with Petite Very Velvet (black lines) and an appropriately sized Kreinik (size 8 for 18 mesh and size 12 for 13 mesh). I also think it would be very intriguing as a tree you want to draw attention to. Use an overdyed floss or wool for the black lines and a solid wool or matte for the aqua lines. Consider using two shade of the same thread as well.

This stitch diagram, along with all other #whimsicalwednesday and #smallspacesunday stitch diagrams, can also be found on a Pinterest board here.

Be sure to follow whimsicalstitch.com on FacebookPinterestInstagram, and Twitter.

If you like what you see on this blog, want to learn some very creative decorative stitches, and how to put them all together, whimsicalstitch.com has a book for you! Mary’s Whimsical Stitches is a contemporary how-to collection of more than 250 stitches for stitchers regardless of skill level. The book includes updated and sequenced diagrams from this blog, all-new stitches, and a chapter on the basics of needlepoint. For more information, visit here.

whimsicalstitch.com also sells Stitch Guides and Stitch Concepts for Melissa Shirley Designs, Zecca DesignsSandra Gilmore, Purple Palm, Maggie, and Penny MacLeod, and many more. Click here to see the newest guides and click here to see the entire collection.

I hope you have the perfect spot for this stitch! Please enjoy! Have a wonderful #whimsicalwednesday!

A Note about Diagrams
I use color in diagrams to make them as clear as possible.  The primary function of different colored lines is to illustrate a stitch sequence.  For example, layering of colors demonstrates you add them in that order.  They can also provide ideas on how to integrate additional threads (one line for each color).  Or, you can use the same thread for all color lines.  That's where I encourage you to use your imagination for the space you are stitching!

Swooning

I’m swooning over the colors in today’s stitch and, yes, the stitch is kinda cute as well. I love the simplicity of today’s stitch and how it still adds a bit of interest to an area.

Click on image to see on whimsicalstitch.com's Pinterest account. Visit pinterest.com/whimsicalstitch/whimsicalwednesday for a library of all #whimsicalwednesday and #smallspacesunday stitch diagrams.

Click on image to see on whimsicalstitch.com's Pinterest account. Visit pinterest.com/whimsicalstitch/whimsicalwednesday for a library of all #whimsicalwednesday and #smallspacesunday stitch diagrams.

Click on image to see on whimsicalstitch.com's Instagram account. Visit instagram.com/whimsicalstitch to see a library of stitched samples for select #whimsicalwednesday and #smallspacesunday stitch diagrams.

Click on image to see on whimsicalstitch.com's Instagram account. Visit instagram.com/whimsicalstitch to see a library of stitched samples for select #whimsicalwednesday and #smallspacesunday stitch diagrams.

The stitched sample is the sky from my Ruff Life in the Wine Country Stitch Concept. It uses a single strand of Floche (gray lines) and Kreinik Metallics Fine Braid (#8) (yellow lines).

This is a sweet all-purpose open stitch, suitable for any medium-sized area you want to add a little something-something to. (That’s a whole lotta hyphens in one sentence.) It will make a great tree with overdyed silk floss (gray lines) and a subtle metallic, such as Silk Lame, or even a solid silk floss in a related color for a subtle contrast (yellow lines). Consider it for most architectural areas, such as a fireplace or a chimney. I would love to see a chimney in a brick colored wool (gray lines) with Rainbow Linen accents (yellow lines).

This stitch diagram, along with all other #whimsicalwednesday and #smallspacesunday stitch diagrams, can also be found on a Pinterest board here.

Be sure to follow whimsicalstitch.com on FacebookPinterestInstagram, and Twitter.

If you like what you see on this blog, want to learn some very creative decorative stitches, and how to put them all together, whimsicalstitch.com has a book for you! Mary’s Whimsical Stitches is a contemporary how-to collection of more than 250 stitches for stitchers regardless of skill level. The book includes updated and sequenced diagrams from this blog, all-new stitches, and a chapter on the basics of needlepoint. For more information, visit here.

whimsicalstitch.com also sells Stitch Guides and Stitch Concepts for Melissa Shirley Designs, Zecca DesignsSandra Gilmore, Purple Palm, Maggie, and Penny MacLeod, and many more. Click here to see the newest guides and click here to see the entire collection.

I hope you have the perfect spot for this stitch! Please enjoy! Have a wonderful #whimsicalwednesday!

A Note about Diagrams
I use color in diagrams to make them as clear as possible.  The primary function of different colored lines is to illustrate a stitch sequence.  For example, layering of colors demonstrates you add them in that order.  They can also provide ideas on how to integrate additional threads (one line for each color).  Or, you can use the same thread for all color lines.  That's where I encourage you to use your imagination for the space you are stitching!

A in Geometry

Yes, I got an A in high school Geometry but that doesn’t mean I remember any of it and have laughable billiards skills. So, after trying to research the more precise terms to describe the three different sized shapes that emerge in today’s stitch, I leave you with…today’s wide open stitch is really pretty, uses lots of yummy threads, and please pay attention to the spacing of the base threads (black lines).

Click on image to see on whimsicalstitch.com's Pinterest account. Visit pinterest.com/whimsicalstitch/whimsicalwednesday for a library of all #whimsicalwednesday and #smallspacesunday stitch diagrams.

Click on image to see on whimsicalstitch.com's Pinterest account. Visit pinterest.com/whimsicalstitch/whimsicalwednesday for a library of all #whimsicalwednesday and #smallspacesunday stitch diagrams.

Click on image to see on whimsicalstitch.com's Instagram account. Visit instagram.com/whimsicalstitch to see a library of stitched samples for select #whimsicalwednesday and #smallspacesunday stitch diagrams.

Click on image to see on whimsicalstitch.com's Instagram account. Visit instagram.com/whimsicalstitch to see a library of stitched samples for select #whimsicalwednesday and #smallspacesunday stitch diagrams.

Before I talk about the threads, I want to bring your attention to the spacing of the black lines. What draws me to this stitch is the emerging shapes are not the same size. The stitch is composed of pairs of black lines with three empty rows between the stitches in a pair. There are five empty rows between pairs of stitches.

Today’s stitched sample is a great example of some of the beautifully painted canvases out there that scream for open stitches because the painting is almost too pretty to cover up. I like to consider the stitching on canvases like this as gently placed enhancements. The stitched sample is from an upcoming new Stitch Guide and uses three shade of Petite Silk Lame and Sundance Beads on 18M.

The first shade matches the dominant color in the area to be stitched and is represented by the black lines. Subsequent shades align with smaller color areas in the piece and are represented by the gray lines. (I used two different colors for the gray lines.) The bead color (represented by the yellow circles) was selected based on the dots on the painted canvas. (When this guide is ready, I’ll be able to show the whole thing in context.)

This stitch will make beautiful clothing with a silk Perle (such as Elegance) for the black lines, a lightweight Kreinik (gray lines) and a seed bead. I would love to see this in a sampler with more dramatic threads (dramatic = larger) such as Kreinik Medium Braid (size 16) for the black lines, Very Velvet (gray lines) and a larger bead for the bead accent. It will make a really pretty tabletop with silk floss (black lines) and Petite Silk Lame (gray lines). In this scenario, I would replace the bead with another Upright Cross and use a contrasting thread (either color or finish or both).

This stitch diagram, along with all other #whimsicalwednesday and #smallspacesunday stitch diagrams, can also be found on a Pinterest board here.

Be sure to follow whimsicalstitch.com on FacebookPinterestInstagram, and Twitter.

If you like what you see on this blog, want to learn some very creative decorative stitches, and how to put them all together, whimsicalstitch.com has a book for you! Mary’s Whimsical Stitches is a contemporary how-to collection of more than 250 stitches for stitchers regardless of skill level. The book includes updated and sequenced diagrams from this blog, all-new stitches, and a chapter on the basics of needlepoint. For more information, visit here.

whimsicalstitch.com also sells Stitch Guides and Stitch Concepts for Melissa Shirley Designs, Zecca DesignsSandra Gilmore, Purple Palm, Maggie, and Penny MacLeod, and many more. Click here to see the newest guides and click here to see the entire collection.

I hope you have the perfect spot for this stitch! Please enjoy! Have a wonderful #whimsicalwednesday!

A Note about Diagrams
I use color in diagrams to make them as clear as possible.  The primary function of different colored lines is to illustrate a stitch sequence.  For example, layering of colors demonstrates you add them in that order.  They can also provide ideas on how to integrate additional threads (one line for each color).  Or, you can use the same thread for all color lines.  That's where I encourage you to use your imagination for the space you are stitching!

Or What?

Or Nue is an exquisite goldwork embroidery technique that translates perfectly to needlepoint. Today’s post focuses on very simple Or Nue with standard needlepoint threads. Two examples are provided, illustrating a solid color and a pattern.

Very simply put, Or Nue combines pairs of threads on canvas with one thread covering the second thread. It’s similar to couching. However, I consider couching as a method to tack down a piece of thread on top of the canvas at strategic points to keep a shape, say attaching a piece of cording as a tendril. My version* of Or Nue covers the entirety of one of the threads in the pair with the second, creating beautiful ridges. * I use the expression “my version” because Or Nue is a elaborate technique in embroidery using silver-gilt (gold) threads, e.g. Japan Gold. A very simplified version of it is being shared here.

Click on image to see on whimsicalstitch.com's Pinterest account. Visit pinterest.com/whimsicalstitch/whimsicalwednesday for a library of all #whimsicalwednesday and #smallspacesunday stitch diagrams.

Click on image to see on whimsicalstitch.com's Pinterest account. Visit pinterest.com/whimsicalstitch/whimsicalwednesday for a library of all #whimsicalwednesday and #smallspacesunday stitch diagrams.

Click on image to see on whimsicalstitch.com's Instagram account. Visit instagram.com/whimsicalstitch to see a library of stitched samples for select #whimsicalwednesday and #smallspacesunday stitch diagrams.

Click on image to see on whimsicalstitch.com's Instagram account. Visit instagram.com/whimsicalstitch to see a library of stitched samples for select #whimsicalwednesday and #smallspacesunday stitch diagrams.

The first example above illustrates a solid color Or Nue. I numbered two separate threads in a single sequence to illustrate how to navigate the multiple threads. It’s important to complete an entire row with both threads before you proceed to the next row.

To begin, add your base thread from edge to edge on a single row (black line, step 1-2). The base thread rests in the ditch between two canvas threads. Park the first thread on the side and bring your second needle up from the hole under the first thread and return the needle in the hole immediately above, gently pulling the base thread on top of the canvas thread above. Repeat this step across the row. When you get to the end with the second thread, park it to the side and return to your first thread. Add your next base thread from edge to edge and cover with the second thread. (The numbering may appear odd but remember you are picking up your work from where you last left the thread.)

The stitched sample uses size 16 Kreinik for the base threads (black lines) and Flair for every other row of the covering stitches (gray lines) and the same size 16 Kreinik for the remaining rows of the covering stitches (gray lines).

The next example illustrates how to create a pattern. The diagram below is virtually identical, except for the numbering for the threads on top of the base threads.

Click on image to see on whimsicalstitch.com's Pinterest account. Visit pinterest.com/whimsicalstitch/whimsicalwednesday for a library of all #whimsicalwednesday and #smallspacesunday stitch diagrams.

Click on image to see on whimsicalstitch.com's Pinterest account. Visit pinterest.com/whimsicalstitch/whimsicalwednesday for a library of all #whimsicalwednesday and #smallspacesunday stitch diagrams.

Click on image to see on whimsicalstitch.com's Instagram account. Visit instagram.com/whimsicalstitch to see a library of stitched samples for select #whimsicalwednesday and #smallspacesunday stitch diagrams.

Click on image to see on whimsicalstitch.com's Instagram account. Visit instagram.com/whimsicalstitch to see a library of stitched samples for select #whimsicalwednesday and #smallspacesunday stitch diagrams.

The diagram certainly does not portray the stitched sample on the right BUT represents the numbering strategy. Simply put, when using more than one color for the top threads in a row, add each color one at a time. I like to add the color with the smallest representation first and end with the color with the most real estate. For example, in the stitched sample, I added the silver first in any row that needed it and then filled in the cream threads.

Let’s talk about threads because one thread choice really matters. Earlier, I mentioned how Or Nue creates small ridges. The base thread is what makes that work. The base thread needs to be a roundish shaped thread that holds its shape. An ideal matte thread is Very Velvet, Petite Very Velvet, a large size Perle Cotton (#3 or #5), or single strand silk. Good metallic threads include Kreinik Metallics (size 12 or 16) or Silk Lame (18 or 13). You can cover those with virtually any other thread, including silk or cotton floss. I’ve used matte threads covered with matte, metallics covered with metallics, metallics covered with matte, and matte covered with metallics. Personally, I prefer it when a tiny bit of the base thread shows through so, as an example, when I’m using silk floss over a metallic thread, I keep the floss ply count low. It’s the best of both worlds and I love the tiniest bit of sparkle that emerges.

Or Nue looks so much more difficult than it is. It’s a beautiful technique for rugs, bags, hats, purses, baskets…anything requiring a subtle texture and/or an elegant touch.

These stitch diagrams, along with all other #whimsicalwednesday and #smallspacesunday stitch diagrams, can also be found on a Pinterest board here.

Be sure to follow whimsicalstitch.com on FacebookPinterestInstagram, and Twitter.

If you like what you see on this blog, want to learn some very creative decorative stitches, and how to put them all together, whimsicalstitch.com has a book for you! Mary’s Whimsical Stitches is a contemporary how-to collection of more than 250 stitches for stitchers regardless of skill level. The book includes updated and sequenced diagrams from this blog, all-new stitches, and a chapter on the basics of needlepoint. For more information, visit here.

whimsicalstitch.com also sells Stitch Guides and Stitch Concepts for Melissa Shirley Designs, Zecca DesignsSandra Gilmore, Purple Palm, Maggie, and Penny MacLeod, and many more. Click here to see the newest guides and click here to see the entire collection.

I hope you have the perfect spot for this stitch! Please enjoy! Have a wonderful #whimsicalwednesday!

A Note about Diagrams
I use color in diagrams to make them as clear as possible.  The primary function of different colored lines is to illustrate a stitch sequence.  For example, layering of colors demonstrates you add them in that order.  They can also provide ideas on how to integrate additional threads (one line for each color).  Or, you can use the same thread for all color lines.  That's where I encourage you to use your imagination for the space you are stitching!

Which Came First?

I’m often asked what comes first for a blog post…the stitch or the stitched sample? In all honesty, it’s both. Some weeks I am inspired by new stitches I’ve used for class projects and get to share student’s wonderful stitching. Other weeks I am walking around my house on Tuesday afternoon desperately looking for something I haven’t shared with you. Today and last week were definitely Tuesday afternoon scenarios.

Click on image to see on whimsicalstitch.com's Pinterest account. Visit pinterest.com/whimsicalstitch/whimsicalwednesday for a library of all #whimsicalwednesday and #smallspacesunday stitch diagrams.

Click on image to see on whimsicalstitch.com's Pinterest account. Visit pinterest.com/whimsicalstitch/whimsicalwednesday for a library of all #whimsicalwednesday and #smallspacesunday stitch diagrams.

Click on image to see on whimsicalstitch.com's Instagram account. Visit instagram.com/whimsicalstitch to see a library of stitched samples for select #whimsicalwednesday and #smallspacesunday stitch diagrams.

Click on image to see on whimsicalstitch.com's Instagram account. Visit instagram.com/whimsicalstitch to see a library of stitched samples for select #whimsicalwednesday and #smallspacesunday stitch diagrams.

There is a LOT to unpack in today’s stitch. I stitched these pillows in the early 2000’s and I was all about dramatic composite stitches. In fact, the more dramatic, the better. In my opinion, it works here because there is so much real estate to cover. The pillow, which you can see in its entirety on today’s Instagram post, includes basketweave leaves and a low key background to balance the dramatic stitches and threads on each of the fruit. Just like your diet, needlepoint needs to have balance. And, just like your diet, I’m all about fruit in needlepoint.

The stitched sample is a retired fruit pillow from Melissa Shirley Designs and uses DMC Perle Cotton (black lines), Very Velvet (aqua lines), Very Velvet (aqua lines), and a whole lotta red size 12 Kreinik (yellow lines). I recommend stitching the black liems first, folllowed by the yellow, and wrapping up with the aqua lines.

This stitch would make a beautiful fabric of any kind, say a dress with silk floss (black lines), a lightweight metallic such as Kreinik Metallics Fine Braid (#8) or Petite Silk Lame (yellow lines), and Flair (aqua lines). Extending the fabric theme, how about a pillow with Vineyard Silk (black lines), Silk Lame (yellow lines), and size 12 Kreinik (aqua lines). I may go so far as to replace the black lines under the aqua lines with the thread used for the aqua lines.

This stitch diagram, along with all other #whimsicalwednesday and #smallspacesunday stitch diagrams, can also be found on a Pinterest board here.

Be sure to follow whimsicalstitch.com on FacebookPinterestInstagram, and Twitter.

If you like what you see on this blog, want to learn some very creative decorative stitches, and how to put them all together, whimsicalstitch.com has a book for you! Mary’s Whimsical Stitches is a contemporary how-to collection of more than 250 stitches for stitchers regardless of skill level. The book includes updated and sequenced diagrams from this blog, all-new stitches, and a chapter on the basics of needlepoint. For more information, visit here.

whimsicalstitch.com also sells Stitch Guides and Stitch Concepts for Melissa Shirley Designs, Zecca DesignsSandra Gilmore, Purple Palm, Maggie, and Penny MacLeod, and many more. Click here to see the newest guides and click here to see the entire collection.

I hope you have the perfect spot for this stitch! Please enjoy! Have a wonderful #whimsicalwednesday!

A Note about Diagrams
I use color in diagrams to make them as clear as possible.  The primary function of different colored lines is to illustrate a stitch sequence.  For example, layering of colors demonstrates you add them in that order.  They can also provide ideas on how to integrate additional threads (one line for each color).  Or, you can use the same thread for all color lines.  That's where I encourage you to use your imagination for the space you are stitching!

Cattywampus

Today’s stitch pops up in my Pinterest feed on a fairly regular basis. The offset pattern in the repeated element (over 2-3-4-3-2 rows) is definitely outside my traditional comfort zone, which is most likely why I put off sharing it with you, but I’m pleasantly surprised at how much I’m loving the wide repeated element. And the cattywampus Smyrna Cross in the center will definitely be making a repeat visit in a future stitch.

Click on image to see on whimsicalstitch.com's Pinterest account. Visit pinterest.com/whimsicalstitch/whimsicalwednesday for a library of all #whimsicalwednesday and #smallspacesunday stitch diagrams.

Click on image to see on whimsicalstitch.com's Pinterest account. Visit pinterest.com/whimsicalstitch/whimsicalwednesday for a library of all #whimsicalwednesday and #smallspacesunday stitch diagrams.

Click on image to see on whimsicalstitch.com's Instagram account. Visit instagram.com/whimsicalstitch to see a library of stitched samples for select #whimsicalwednesday and #smallspacesunday stitch diagrams.

Click on image to see on whimsicalstitch.com's Instagram account. Visit instagram.com/whimsicalstitch to see a library of stitched samples for select #whimsicalwednesday and #smallspacesunday stitch diagrams.

The stitched sample is me playing with Elegance (gray lines), red Petite Silk Lame (black lines), and blue Petite Silk Lame (turquoise lines). I love the color possibilities of this stitch, which is why I stitched the sample the way I did. I hope it gives you a great jumping-off point for ideas for your own work.

In my mind, the most obvious use for this is clothing. You can make it rugged with a matte group of heavier threads such as Petite Very Velvet (gray lines), an overdyed wool (black lines), and Pepper Pot Silk (turquoise lines). For a dress or shirt, I would use 3-4 plies of Soie D'Alger (gray lines), a size 8 Kreinik Metallic (black lines), and Flair (turquoise lines). What I really want to use this on is a snowman with Flair (gray lines), a size 8 Kreinik Metallic (black lines) and Fyre Werks (turquoise lines) to pull it all together.

If you need more or aren’t a fan of a ton of open space, consider adding an Upright Cross or some beads in the center of the open space.

This stitch diagram, along with all other #whimsicalwednesday and #smallspacesunday stitch diagrams, can also be found on a Pinterest board here.

Be sure to follow whimsicalstitch.com on FacebookPinterestInstagram, and Twitter.

IIf you like what you see on this blog, want to learn some very creative decorative stitches, and how to put them all together, whimsicalstitch.com sells Stitch Guides and Stitch Concepts for Melissa Shirley Designs, Zecca DesignsSandra Gilmore, Purple Palm, Maggie, and Penny MacLeod, and many more. Click here to see the newest guides and click here to see the entire collection.

I hope you have the perfect spot for this stitch! Please enjoy! Have a wonderful #whimsicalwednesday!

A Note about Diagrams
I use color in diagrams to make them as clear as possible.  The primary function of different colored lines is to illustrate a stitch sequence.  For example, layering of colors demonstrates you add them in that order.  They can also provide ideas on how to integrate additional threads (one line for each color).  Or, you can use the same thread for all color lines.  That's where I encourage you to use your imagination for the space you are stitching!

Deceptive Diagrams

Today’s blog post is a wonderful example of how a diagram is just the beginning of what wonderful things can come from putting threads to canvas.

Click on image to see on whimsicalstitch.com's Pinterest account. Visit pinterest.com/whimsicalstitch/whimsicalwednesday for a library of all #whimsicalwednesday and #smallspacesunday stitch diagrams.

Click on image to see on whimsicalstitch.com's Pinterest account. Visit pinterest.com/whimsicalstitch/whimsicalwednesday for a library of all #whimsicalwednesday and #smallspacesunday stitch diagrams.

Click on image to see on whimsicalstitch.com's Instagram account. Visit instagram.com/whimsicalstitch to see a library of stitched samples for select #whimsicalwednesday and #smallspacesunday stitch diagrams.

Click on image to see on whimsicalstitch.com's Instagram account. Visit instagram.com/whimsicalstitch to see a library of stitched samples for select #whimsicalwednesday and #smallspacesunday stitch diagrams.

The stitched sample uses two strands of Ruth Schmuff’s Color Dreams Floche (gray lines) and three plies of Gloriana (black lines). By using strands (or plies) of thread and laying them very carefully, it creates an even more interesting look as it appears there are three separate threads for the black lines. (Truth be told, that’s how I diagrammed it at first. Fortunately, I caught that embarrassing error before it came to you.) I love the subtlety and lightness of this thread selection.

I would love to see this stitch as a roof with overdyed wool (black lines) and Rainbow Linen or Tweedy (gray lines). It will make a beautiful grassy area with single strand silk (black lines) and Silk Lame (gray lines). My last thought is to create a beautiful tablecloth with Petite Silk Lame (black lines) and a second color of Petite Silk Lame (gray lines).

This stitched sample comes from a recent project of Ruth’s that you can find here.

This stitch diagram, along with all other #whimsicalwednesday and #smallspacesunday stitch diagrams, can also be found on a Pinterest board here.

Be sure to follow whimsicalstitch.com on FacebookPinterestInstagram, and Twitter.

IIf you like what you see on this blog, want to learn some very creative decorative stitches, and how to put them all together, whimsicalstitch.com sells Stitch Guides and Stitch Concepts for Melissa Shirley Designs, Zecca DesignsSandra Gilmore, Purple Palm, Maggie, and Penny MacLeod, and many more. Click here to see the newest guides and click here to see the entire collection.

I hope you have the perfect spot for this stitch! Please enjoy! Have a wonderful #whimsicalwednesday!

A Note about Diagrams
I use color in diagrams to make them as clear as possible.  The primary function of different colored lines is to illustrate a stitch sequence.  For example, the layering of colors demonstrates you add them in that order.  They can also provide ideas on how to integrate additional threads (one line for each color).  Or, you can use the same thread for all color lines.  That's where I encourage you to use your imagination for the space you are stitching!

What Rules?

I’m not a fan of the needlepoint police. When students ask me if I have any rules, I insist I don’t but acknowledge I have very strong opinions on certain issues. One such “very strong opinion” is plain needlepoint is best for faces. Except, of course, if it is the face of a pumpkin who is sporting purple pants and an olive green jacket. I mean, duh.

Click on image to see on whimsicalstitch.com's Pinterest account. Visit pinterest.com/whimsicalstitch/whimsicalwednesday for a library of all #whimsicalwednesday and #smallspacesunday stitch diagrams.

Click on image to see on whimsicalstitch.com's Pinterest account. Visit pinterest.com/whimsicalstitch/whimsicalwednesday for a library of all #whimsicalwednesday and #smallspacesunday stitch diagrams.

Click on image to see on whimsicalstitch.com's Instagram account. Visit instagram.com/whimsicalstitch to see a library of stitched samples for select #whimsicalwednesday and #smallspacesunday stitch diagrams.

Click on image to see on whimsicalstitch.com's Instagram account. Visit instagram.com/whimsicalstitch to see a library of stitched samples for select #whimsicalwednesday and #smallspacesunday stitch diagrams.

The stitched sample uses DMC Perle Cotton (black lines), Petite Silk Lame (aqua lines), Soie D'Alger (gray lines), and Neon Rays (turquoise lines).

So, clearly this is not your typical face stitch nor is it your typical pumpkin…which is why I don’t have rules per se. Everything is relative and you have to have an open mind based on the personality of the piece, the personality of the stitcher, and the final look you are going for.

I would love to see this stitch on any pumpkin (with or without purple pants). You could use it for the purple pants with Petite Very Velvet (black lines), a medium weight Kreinik (aqua lines), any Silk Floss (gray lines), and Silk Lame (turquoise lines). It would be a gorgeous stitch for a fruit tree with your favorite combo of greens for everything but the turquoise lines. Stitch the turquoise lines in the fruit color.

This stitch diagram, along with all other #whimsicalwednesday and #smallspacesunday stitch diagrams, can also be found on a Pinterest board here.

Be sure to follow whimsicalstitch.com on FacebookPinterestInstagram, and Twitter.

IIf you like what you see on this blog, want to learn some very creative decorative stitches, and how to put them all together, whimsicalstitch.com sells Stitch Guides and Stitch Concepts for Melissa Shirley Designs, Zecca DesignsSandra Gilmore, Purple Palm, Maggie, and Penny MacLeod, and many more. Click here to see the newest guides and click here to see the entire collection.

I hope you have the perfect spot for this stitch! Please enjoy! Have a wonderful #whimsicalwednesday!

A Note about Diagrams
I use color in diagrams to make them as clear as possible.  The primary function of different colored lines is to illustrate a stitch sequence.  For example, layering of colors demonstrates you add them in that order.  They can also provide ideas on how to integrate additional threads (one line for each color).  Or, you can use the same thread for all color lines.  That's where I encourage you to use your imagination for the space you are stitching!

Hello October

Today’s stitch is a very, very close cousin of a stitch I discussed in July. It’s a good example of how the direction and heavier threads make a substantial difference in very similar stitches.

Click on image to see on whimsicalstitch.com's Pinterest account. Visit pinterest.com/whimsicalstitch/whimsicalwednesday for a library of all #whimsicalwednesday and #smallspacesunday stitch diagrams.

Click on image to see on whimsicalstitch.com's Pinterest account. Visit pinterest.com/whimsicalstitch/whimsicalwednesday for a library of all #whimsicalwednesday and #smallspacesunday stitch diagrams.

Click on image to see on whimsicalstitch.com's Instagram account. Visit instagram.com/whimsicalstitch to see a library of stitched samples for select #whimsicalwednesday and #smallspacesunday stitch diagrams.

Click on image to see on whimsicalstitch.com's Instagram account. Visit instagram.com/whimsicalstitch to see a library of stitched samples for select #whimsicalwednesday and #smallspacesunday stitch diagrams.

The stitched sample is from the very burly chest of one of the Beach Boys, a recently added Stitch Concept. It uses all white threads, specifically Kreinik Medium Braid (#16) (gray lines), Petite Sparkle Rays (aqua lines), and Flair (black lines) on 18-mesh. I really enjoy Flair’s unique ability to absorb whatever color is painted underneath it, so the beautiful shading shows through. The larger Kreinik braid provides puffiness to each of the beetles on top of it.

Flip this stitch 90° for a choppy water, using a Kreinik Tapestry Braid (#12), Flair, and Petite Silk Lame. It will make beautiful clothing with a rich Petite Very Velvet (gray lines), Silk Lame (aqua lines), and a Kreinik Braid (#12 or #16) (black lines). For a smoother look on clothing, use a Kreinik 1/16” ribbon (gray lines) with a silk floss (such as Soie D’Alger, Planet Earth Silk, or Splendor) for the aqua lines and Flair (black lines). And, for goodness sake, don’t forget to have fun with colors. Consider using a different color for the gray to add a little surprise.

This stitch diagram, along with all other #whimsicalwednesday and #smallspacesunday stitch diagrams, can also be found on a Pinterest board here. Be sure to follow whimsicalstitch.com on FacebookPinterestInstagram, and Twitter.

If you like what you see on this blog, want to learn some very creative decorative stitches, and how to put them all together, whimsicalstitch.com sells Stitch Guides and Stitch Concepts for Melissa Shirley Designs, Zecca DesignsSandra Gilmore, Purple Palm, Maggie, and Penny MacLeod, and many more. Click here to see the newest guides and click here to see the entire collection.

I hope you have the perfect spot for this stitch! Please enjoy! Have a wonderful #whimsicalwednesday!

A Note about Diagrams
I use color in diagrams to make them as clear as possible.  The primary function of different colored lines is to illustrate a stitch sequence.  For example, layering of colors demonstrates you add them in that order.  They can also provide ideas on how to integrate additional threads (one line for each color).  Or, you can use the same thread for all color lines.  That's where I encourage you to use your imagination for the space you are stitching!The