Such a Good Kid

Today’s stitch comes from a stocking I did for one of my favorite kids ten years ago. So, said kid is at least two heads taller than me now but still thanks me for the stocking…every single Christmas. I adore him.

Click on image to see on whimsicalstitch.com's Pinterest account. Visit pinterest.com/whimsicalstitch/whimsicalwednesday for a library of all #whimsicalwednesday and #smallspacesunday stitch diagrams.

Click on image to see on whimsicalstitch.com's Pinterest account. Visit pinterest.com/whimsicalstitch/whimsicalwednesday for a library of all #whimsicalwednesday and #smallspacesunday stitch diagrams.

Click on image to see on whimsicalstitch.com's Instagram account. Visit instagram.com/whimsicalstitch to see a library of stitched samples for select #whimsicalwednesday and #smallspacesunday stitch diagrams.

Click on image to see on whimsicalstitch.com's Instagram account. Visit instagram.com/whimsicalstitch to see a library of stitched samples for select #whimsicalwednesday and #smallspacesunday stitch diagrams.

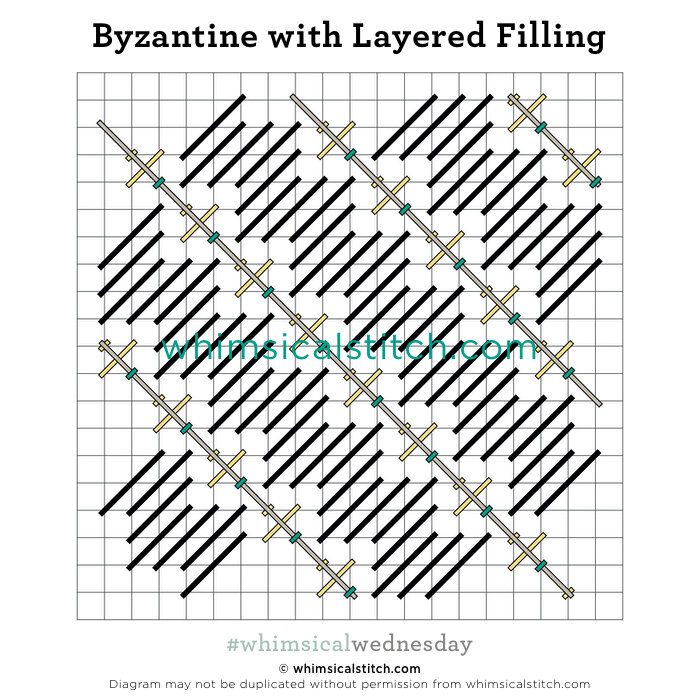
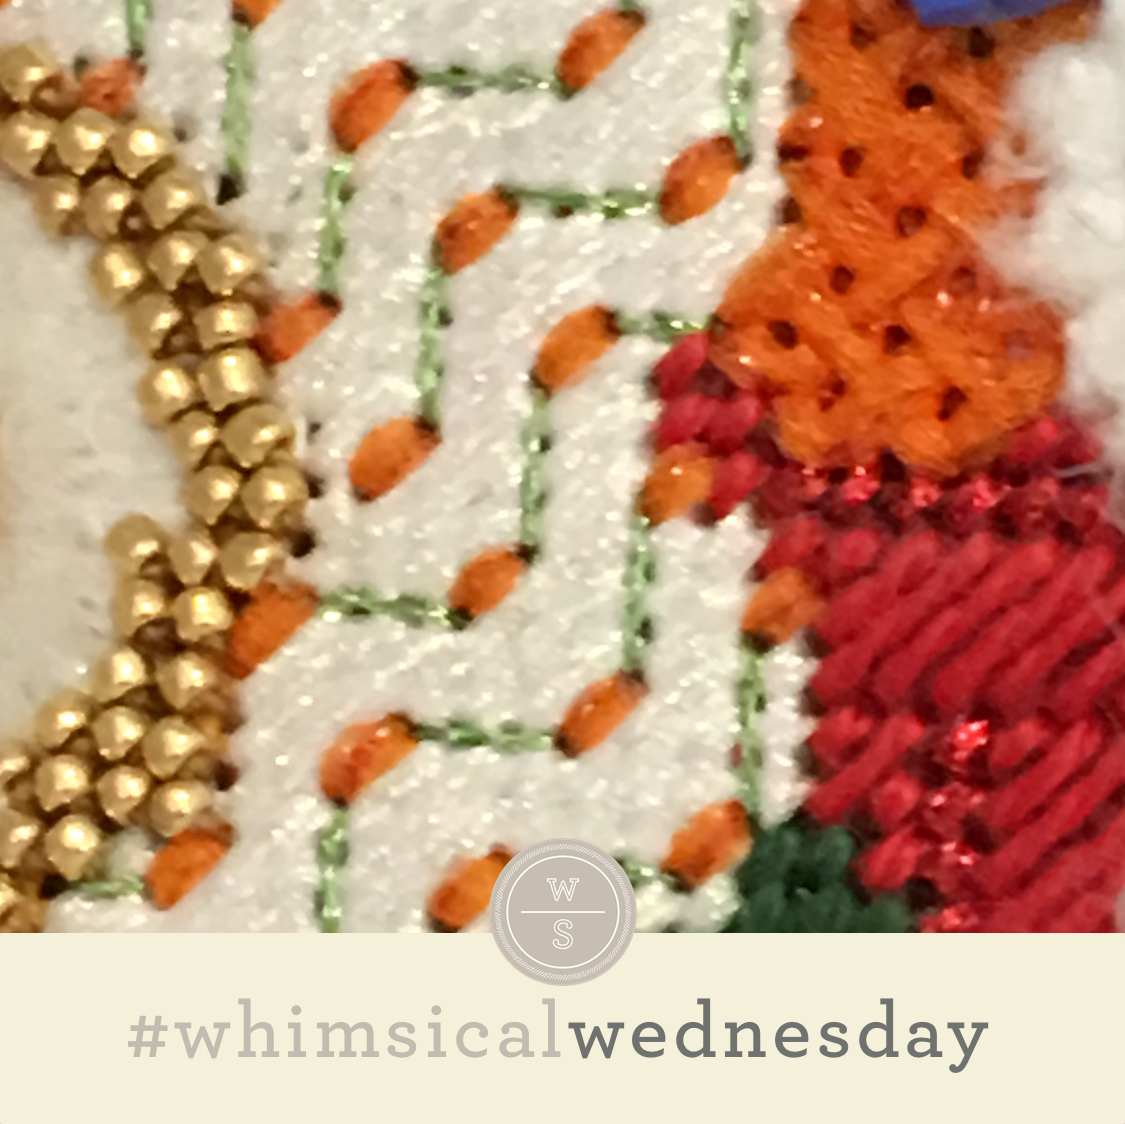
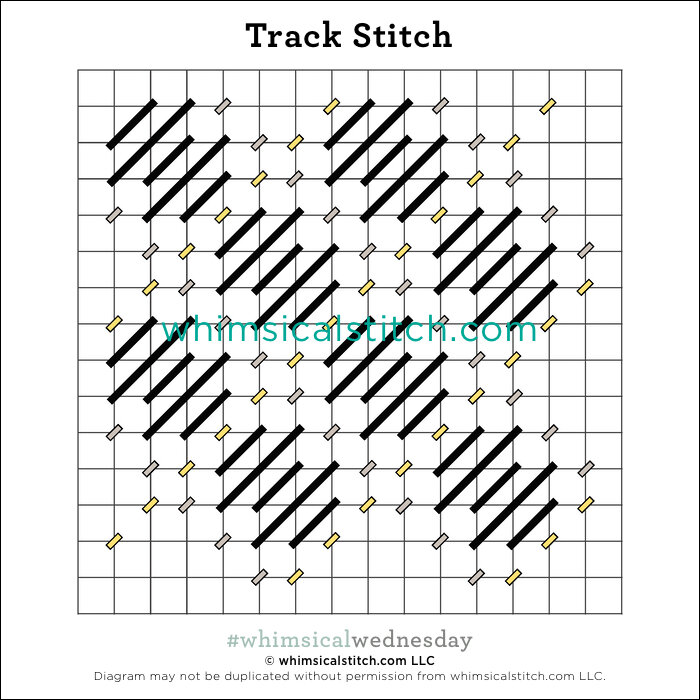
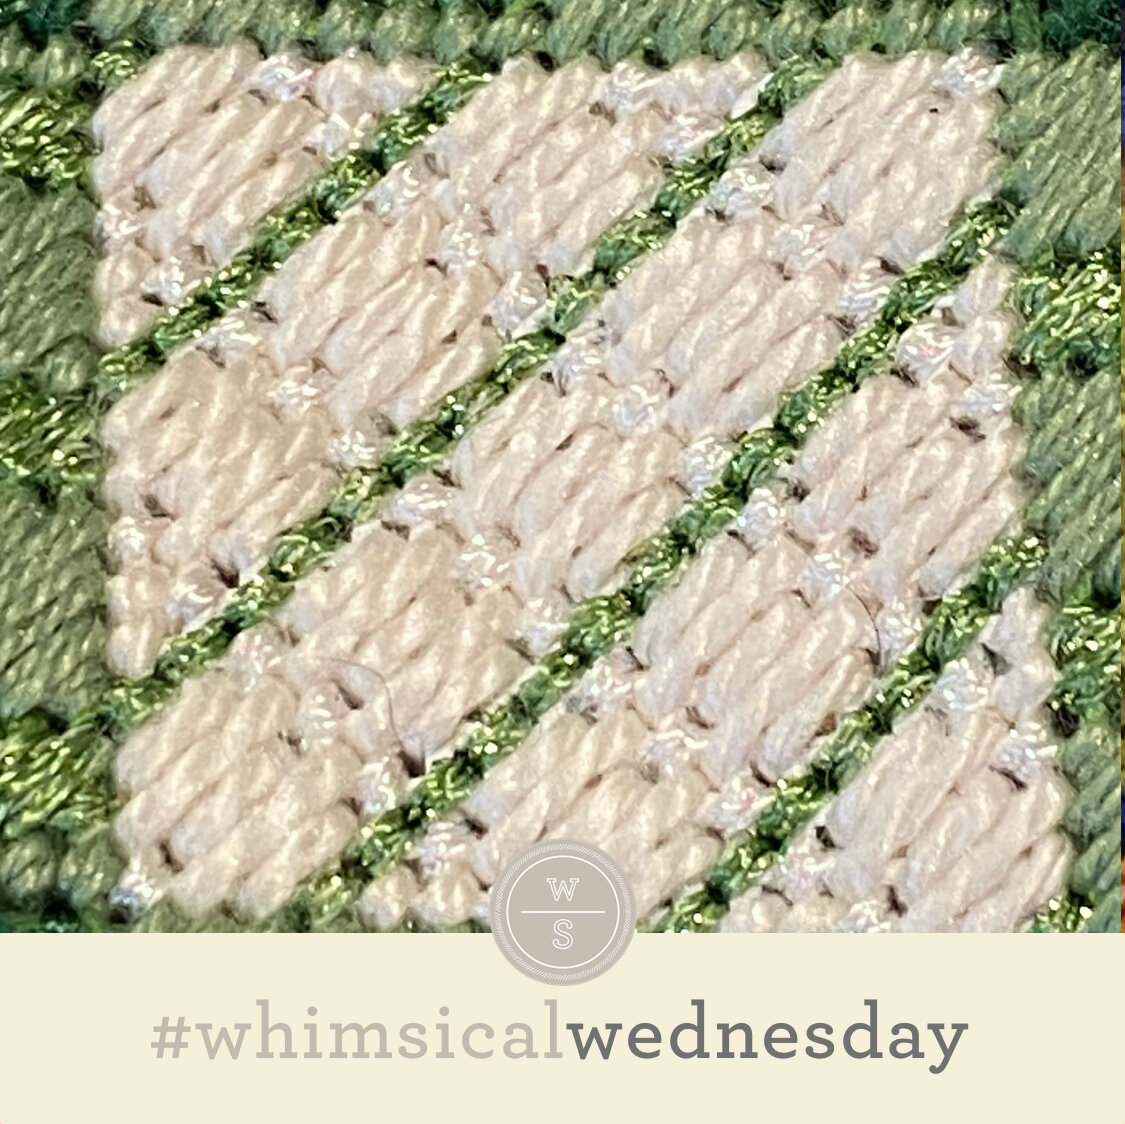
Since I stitched this almost ten years ago, I don’t have a clear recollection of where I stumbled across this stitch. What I do remember is I loved it the moment I saw it. Diagonal stitches are not my forte but the contrasting diagonal stripe made all the difference for me. That simple and uncommon accent makes this stitch sing for me. The stitched sample is Pepper Pot Silk (black lines), white Shimmer (gray lines), and green Shimmer (yellow lines). It’s one of three patterns in a checked pattern at the bottom of a Melissa Shirley stocking.

It’s a great all-purpose diagonal stitch. I’m looking forward to including it in a stitch plan for a wooly coat with Burmilana (black lines), a mild metallic such as Glisten (yellow lines), and a darker Burmilana (gray lines). There are many household objects that this will work for, such as a blanket or a pillow. I would love to see it as a blanket with Alpaca (black lines), Silk Lame (yellow lines), and a contrasting Silk Lame (gray lines).

These stitch diagrams, along with all other #whimsicalwednesday and #smallspacesunday stitch diagrams, can also be found on a Pinterest board here.

Be sure to follow whimsicalstitch.com on FacebookPinterestInstagram, and Twitter.

IIf you like what you see on this blog, there's more: Mary’s Whimsical Stitches Volume 1 is a contemporary how-to collection of more than 250 stitches for stitchers regardless of skill level. The book includes updated and sequenced diagrams from this blog, all-new stitches, and a chapter on the basics of needlepoint; Mary’s Whimsical Stitches Volume 2 features chapters on Balanced, Beading, Diagonal, Layered, Oblique, Small, and Straight stitches.

Also, you can download The Essentials, a free guide covering basic needlepoint stitches and stitch compensation techniques along with new top-line information on needlepoint materials and tools, how to handle threads, and other helpful needlepoint resources.

whimsicalstitch.com also sells Stitch Guides and Stitch Concepts for Melissa Shirley Designs, Zecca DesignsSandra Gilmore, Purple Palm, Maggie, and Penny MacLeod, and many more. Click here to see the newest guides and click here to see the entire collection.

I hope you have the perfect spot for this stitch! Please enjoy! Have a wonderful #whimsicalwednesday!

A Note about Diagrams
I use color in diagrams to make them as clear as possible.  The primary function of different colored lines is to illustrate a stitch sequence.  For example, layering of colors demonstrates you add them in that order.  They can also provide ideas on how to integrate additional threads (one line for each color).  Or, you can use the same thread for all color lines.  That's where I encourage you to use your imagination for the space you are stitching!

Christmas is Around the Corner

So it’s all about red today. A lot of red, I might add.

Click on image to see on whimsicalstitch.com's Pinterest account. Visit pinterest.com/whimsicalstitch/whimsicalwednesday for a library of all #whimsicalwednesday and #smallspacesunday stitch diagrams.

Click on image to see on whimsicalstitch.com's Pinterest account. Visit pinterest.com/whimsicalstitch/whimsicalwednesday for a library of all #whimsicalwednesday and #smallspacesunday stitch diagrams.

Click on image to see on whimsicalstitch.com's Instagram account. Visit instagram.com/whimsicalstitch to see a library of stitched samples for select #whimsicalwednesday and #smallspacesunday stitch diagrams.

Click on image to see on whimsicalstitch.com's Instagram account. Visit instagram.com/whimsicalstitch to see a library of stitched samples for select #whimsicalwednesday and #smallspacesunday stitch diagrams.

The stitched sample is two strands of Impressions (black lines) and Shimmer Ribbon (turquoise lines) on 13M. It’s part of the same sampler I shared with you last week.

Your eyes are not deceiving you…it is a full coverage and diagonal stitch. Oddly enough, what draws me to this stitch are the single tent stitches in between the 3X3 squares (turquoise lines with the Shimmer Ribbon). It adds a tiny element of surprise AND opens up a different pattern for the Impressions (black lines). I look forward to using this stitch for a jacket with Vineyard Silk and a Kreinik Metallic. It will also work well for a roof with two shades of Rainbow Linen or Vineyard Silk.

If you want to glam it up a tiny bit, consider replacing those single tent stitches I mentioned earlier with a seed bead or a Cross Stitch with a different metallic.

This stitch diagram, along with all other #whimsicalwednesday and #smallspacesunday stitch diagrams, can also be found on a Pinterest board here.

Be sure to follow whimsicalstitch.com on FacebookPinterestInstagram, and Twitter.

If you like what you see on this blog, want to learn some very creative decorative stitches, and how to put them all together, whimsicalstitch.com has a book for you! Mary’s Whimsical Stitches is a contemporary how-to collection of more than 250 stitches for stitchers regardless of skill level. The book includes updated and sequenced diagrams from this blog, all-new stitches, and a chapter on the basics of needlepoint. For more information, visit here.

whimsicalstitch.com also sells Stitch Guides and Stitch Concepts for Melissa Shirley Designs, Zecca DesignsSandra Gilmore, Purple Palm, Maggie, and Penny MacLeod, and many more. Click here to see the newest guides and click here to see the entire collection.

I hope you have the perfect spot for this stitch! Please enjoy! Have a wonderful #whimsicalwednesday!

A Note about Diagrams
I use color in diagrams to make them as clear as possible.  The primary function of different colored lines is to illustrate a stitch sequence.  For example, layering of colors demonstrates you add them in that order.  They can also provide ideas on how to integrate additional threads (one line for each color).  Or, you can use the same thread for all color lines.  That's where I encourage you to use your imagination for the space you are stitching!

Whole Lotta Pink

Today’s stitch is from the wayback stitching machine, aka early aughts, and a whole lotta pink.

Click on image to see on whimsicalstitch.com's Pinterest account. Visit pinterest.com/whimsicalstitch/whimsicalwednesday for a library of all #whimsicalwednesday and #smallspacesunday stitch diagrams.

Click on image to see on whimsicalstitch.com's Pinterest account. Visit pinterest.com/whimsicalstitch/whimsicalwednesday for a library of all #whimsicalwednesday and #smallspacesunday stitch diagrams.

Click on image to see on whimsicalstitch.com's Instagram account. Visit instagram.com/whimsicalstitch to see a library of stitched samples for select #whimsicalwednesday and #smallspacesunday stitch diagrams.

Click on image to see on whimsicalstitch.com's Instagram account. Visit instagram.com/whimsicalstitch to see a library of stitched samples for select #whimsicalwednesday and #smallspacesunday stitch diagrams.

The stitched sample is Impressions (aqua lines), Petite Frosty Rays (gray lines), and Neon Rays (yellow lines). It’s from a class taught by one of my favorite former shop girls (who is now a full-time+ mom of three adorable boys).

This stitch is from a heart sampler and is full of red, pink, and white. (So it’s highly likely you’ll be seeing more red and pink soon.) I love how the oblique angle of the stitches, combined with the use of contrasting finishes in the main repeated stitch elements, adds an element of surprise. I’ve used this stitch for a skirt with black Petite Very Velvet (for the aqua and gray lines) and multiple Kreinik Metallics for the yellow lines. A blouse or dress would be really pretty with more lightweight threads, such as Soie Cristale (aqua lines), Petite Silk Lame (gray lines) and Flair (yellow lines).

If you want to lighten it up a bit, consider a single bead or bugle bead (on the horizontal) in lieu of the yellow lines. Taking that one step further, consider a string of three beads in two colors across the open space (on the horizontal).

This stitch diagram, along with all other #whimsicalwednesday and #smallspacesunday stitch diagrams, can also be found on a Pinterest board here.

Be sure to follow whimsicalstitch.com on FacebookPinterestInstagram, and Twitter.

If you like what you see on this blog, want to learn some very creative decorative stitches, and how to put them all together, whimsicalstitch.com has a book for you! Mary’s Whimsical Stitches is a contemporary how-to collection of more than 250 stitches for stitchers regardless of skill level. The book includes updated and sequenced diagrams from this blog, all-new stitches, and a chapter on the basics of needlepoint. For more information, visit here.

whimsicalstitch.com also sells Stitch Guides and Stitch Concepts for Melissa Shirley Designs, Zecca DesignsSandra Gilmore, Purple Palm, Maggie, and Penny MacLeod, and many more. Click here to see the newest guides and click here to see the entire collection.

I hope you have the perfect spot for this stitch! Please enjoy! Have a wonderful #whimsicalwednesday!

A Note about Diagrams
I use color in diagrams to make them as clear as possible.  The primary function of different colored lines is to illustrate a stitch sequence.  For example, layering of colors demonstrates you add them in that order.  They can also provide ideas on how to integrate additional threads (one line for each color).  Or, you can use the same thread for all color lines.  That's where I encourage you to use your imagination for the space you are stitching!
Or What?

Or Nue is an exquisite goldwork embroidery technique that translates perfectly to needlepoint. Today’s post focuses on very simple Or Nue with standard needlepoint threads. Two examples are provided, illustrating a solid color and a pattern.

Very simply put, Or Nue combines pairs of threads on canvas with one thread covering the second thread. It’s similar to couching. However, I consider couching as a method to tack down a piece of thread on top of the canvas at strategic points to keep a shape, say attaching a piece of cording as a tendril. My version* of Or Nue covers the entirety of one of the threads in the pair with the second, creating beautiful ridges. * I use the expression “my version” because Or Nue is a elaborate technique in embroidery using silver-gilt (gold) threads, e.g. Japan Gold. A very simplified version of it is being shared here.

Click on image to see on whimsicalstitch.com's Pinterest account. Visit pinterest.com/whimsicalstitch/whimsicalwednesday for a library of all #whimsicalwednesday and #smallspacesunday stitch diagrams.

Click on image to see on whimsicalstitch.com's Pinterest account. Visit pinterest.com/whimsicalstitch/whimsicalwednesday for a library of all #whimsicalwednesday and #smallspacesunday stitch diagrams.

Click on image to see on whimsicalstitch.com's Instagram account. Visit instagram.com/whimsicalstitch to see a library of stitched samples for select #whimsicalwednesday and #smallspacesunday stitch diagrams.

Click on image to see on whimsicalstitch.com's Instagram account. Visit instagram.com/whimsicalstitch to see a library of stitched samples for select #whimsicalwednesday and #smallspacesunday stitch diagrams.

The first example above illustrates a solid color Or Nue. I numbered two separate threads in a single sequence to illustrate how to navigate the multiple threads. It’s important to complete an entire row with both threads before you proceed to the next row.

To begin, add your base thread from edge to edge on a single row (black line, step 1-2). The base thread rests in the ditch between two canvas threads. Park the first thread on the side and bring your second needle up from the hole under the first thread and return the needle in the hole immediately above, gently pulling the base thread on top of the canvas thread above. Repeat this step across the row. When you get to the end with the second thread, park it to the side and return to your first thread. Add your next base thread from edge to edge and cover with the second thread. (The numbering may appear odd but remember you are picking up your work from where you last left the thread.)

The stitched sample uses size 16 Kreinik for the base threads (black lines) and Flair for every other row of the covering stitches (gray lines) and the same size 16 Kreinik for the remaining rows of the covering stitches (gray lines).

The next example illustrates how to create a pattern. The diagram below is virtually identical, except for the numbering for the threads on top of the base threads.

Click on image to see on whimsicalstitch.com's Pinterest account. Visit pinterest.com/whimsicalstitch/whimsicalwednesday for a library of all #whimsicalwednesday and #smallspacesunday stitch diagrams.

Click on image to see on whimsicalstitch.com's Pinterest account. Visit pinterest.com/whimsicalstitch/whimsicalwednesday for a library of all #whimsicalwednesday and #smallspacesunday stitch diagrams.

Click on image to see on whimsicalstitch.com's Instagram account. Visit instagram.com/whimsicalstitch to see a library of stitched samples for select #whimsicalwednesday and #smallspacesunday stitch diagrams.

Click on image to see on whimsicalstitch.com's Instagram account. Visit instagram.com/whimsicalstitch to see a library of stitched samples for select #whimsicalwednesday and #smallspacesunday stitch diagrams.

The diagram certainly does not portray the stitched sample on the right BUT represents the numbering strategy. Simply put, when using more than one color for the top threads in a row, add each color one at a time. I like to add the color with the smallest representation first and end with the color with the most real estate. For example, in the stitched sample, I added the silver first in any row that needed it and then filled in the cream threads.

Let’s talk about threads because one thread choice really matters. Earlier, I mentioned how Or Nue creates small ridges. The base thread is what makes that work. The base thread needs to be a roundish shaped thread that holds its shape. An ideal matte thread is Very Velvet, Petite Very Velvet, a large size Perle Cotton (#3 or #5), or single strand silk. Good metallic threads include Kreinik Metallics (size 12 or 16) or Silk Lame (18 or 13). You can cover those with virtually any other thread, including silk or cotton floss. I’ve used matte threads covered with matte, metallics covered with metallics, metallics covered with matte, and matte covered with metallics. Personally, I prefer it when a tiny bit of the base thread shows through so, as an example, when I’m using silk floss over a metallic thread, I keep the floss ply count low. It’s the best of both worlds and I love the tiniest bit of sparkle that emerges.

Or Nue looks so much more difficult than it is. It’s a beautiful technique for rugs, bags, hats, purses, baskets…anything requiring a subtle texture and/or an elegant touch.

These stitch diagrams, along with all other #whimsicalwednesday and #smallspacesunday stitch diagrams, can also be found on a Pinterest board here.

Be sure to follow whimsicalstitch.com on FacebookPinterestInstagram, and Twitter.

If you like what you see on this blog, want to learn some very creative decorative stitches, and how to put them all together, whimsicalstitch.com has a book for you! Mary’s Whimsical Stitches is a contemporary how-to collection of more than 250 stitches for stitchers regardless of skill level. The book includes updated and sequenced diagrams from this blog, all-new stitches, and a chapter on the basics of needlepoint. For more information, visit here.

whimsicalstitch.com also sells Stitch Guides and Stitch Concepts for Melissa Shirley Designs, Zecca DesignsSandra Gilmore, Purple Palm, Maggie, and Penny MacLeod, and many more. Click here to see the newest guides and click here to see the entire collection.

I hope you have the perfect spot for this stitch! Please enjoy! Have a wonderful #whimsicalwednesday!

A Note about Diagrams
I use color in diagrams to make them as clear as possible.  The primary function of different colored lines is to illustrate a stitch sequence.  For example, layering of colors demonstrates you add them in that order.  They can also provide ideas on how to integrate additional threads (one line for each color).  Or, you can use the same thread for all color lines.  That's where I encourage you to use your imagination for the space you are stitching!
Take That, Gray Skies

So. California is drenched and Spring seems so close, yet so far away. I am savoring the bright colors in today’s stitched sample as an anecdote.

Click on image to see on whimsicalstitch.com's Pinterest account. Visit pinterest.com/whimsicalstitch/whimsicalwednesday for a library of all #whimsicalwednesday and #smallspacesunday stitch diagrams.

Click on image to see on whimsicalstitch.com's Pinterest account. Visit pinterest.com/whimsicalstitch/whimsicalwednesday for a library of all #whimsicalwednesday and #smallspacesunday stitch diagrams.

Click on image to see on whimsicalstitch.com's Instagram account. Visit instagram.com/whimsicalstitch to see a library of stitched samples for select #whimsicalwednesday and #smallspacesunday stitch diagrams.

Click on image to see on whimsicalstitch.com's Instagram account. Visit instagram.com/whimsicalstitch to see a library of stitched samples for select #whimsicalwednesday and #smallspacesunday stitch diagrams.

The stitched sample is a pillow from Whimsy Stork and uses three plies of Soie D'Alger (black lines) and Petite Silk Lame (yellow lines). As with all eyelet stitches, to avoid I recommend to stitch from the outer edges to the shared center hole.

This is a great all-purpose and scalable stitch. To illustrate its versatility, a student recently used it on a small dog’s body with Vineyard Silk (black lines) and Silk Lame (yellow lines). (Clearly, it will make a great human coat as well. See what I did there?) Consider leaving out the Cross Stitches for a water stitch with a lightweight Kreinik Metallic.

This stitch diagram, along with all other #whimsicalwednesday and #smallspacesunday stitch diagrams, can also be found on a Pinterest board here.

Be sure to follow whimsicalstitch.com on FacebookPinterestInstagram, and Twitter.

If you like what you see on this blog, want to learn some very creative decorative stitches, and how to put them all together, whimsicalstitch.com has a book for you! Mary’s Whimsical Stitches is a contemporary how-to collection of more than 250 stitches for stitchers regardless of skill level. The book includes updated and sequenced diagrams from this blog, all-new stitches, and a chapter on the basics of needlepoint. For more information, visit here.

whimsicalstitch.com also sells Stitch Guides and Stitch Concepts for Melissa Shirley Designs, Zecca DesignsSandra Gilmore, Purple Palm, Maggie, and Penny MacLeod, and many more. Click here to see the newest guides and click here to see the entire collection.

I hope you have the perfect spot for this stitch! Please enjoy! Have a wonderful #whimsicalwednesday!

A Note about Diagrams
I use color in diagrams to make them as clear as possible.  The primary function of different colored lines is to illustrate a stitch sequence.  For example, layering of colors demonstrates you add them in that order.  They can also provide ideas on how to integrate additional threads (one line for each color).  Or, you can use the same thread for all color lines.  That's where I encourage you to use your imagination for the space you are stitching!

Cold Weather Requires Full Coverage

It’s a bleak 30-45 seconds between waking up and getting the heat turned on these days, even here in So. Cal. So I think I need to extend my streak of full coverage stitches so I can get warm over here.

Click on image to see on whimsicalstitch.com's Pinterest account. Visit pinterest.com/whimsicalstitch/whimsicalwednesday for a library of all #whimsicalwednesday and #smallspacesunday stitch diagrams.

Click on image to see on whimsicalstitch.com's Pinterest account. Visit pinterest.com/whimsicalstitch/whimsicalwednesday for a library of all #whimsicalwednesday and #smallspacesunday stitch diagrams.

Click on image to see on whimsicalstitch.com's Instagram account. Visit instagram.com/whimsicalstitch to see a library of stitched samples for select #whimsicalwednesday and #smallspacesunday stitch diagrams.

Click on image to see on whimsicalstitch.com's Instagram account. Visit instagram.com/whimsicalstitch to see a library of stitched samples for select #whimsicalwednesday and #smallspacesunday stitch diagrams.

This is an oldie but goodie and from long before #whimsicalwednesday was a twinkle in my eye. This is so from so long ago, hashtags were still pound signs. And for those of you with a keen eye, Santa is NOT flying. He is part of a tree skirt from our friend Melissa Shirley. Since I stitched the background in same stitch in every panel, some of the Santas look wonky if you don’t look at them as part of the whole skirt. (And I would do it that way all over again.)

The stitched sample uses Very Velvet (black lines), Frosty Rays (yellow lines), size 8 Kreinik Metallic (gray lines), and size 16 Kreinik Metallic (turquoise lines) on 13-mesh. Clearly, it’s a great stitch for clothing. You can lighten it up with silk floss (black lines), Flair (yellow lines), Petite Silk Lame (gray lines), and a Kreinik Metallic (turquoise lines) for trees or a roof. I love the diagonal stitch across the top of the smaller Scotch squares. I think that is a really elegant touch. The stitch sequence is black lines followed by yellow lines. Cover the yellow lines with the gray line and cover the gray lines with the turquoise lines. Someday I would like to see a bead for the turquoise lines. I think that would be a darling doll dress.

This stitch diagram, along with all other #whimsicalwednesday and #smallspacesunday stitch diagrams, can also be found on a Pinterest board here.

Be sure to follow whimsicalstitch.com on FacebookPinterestInstagram, and Twitter.

If you like what you see on this blog, want to learn some very creative decorative stitches, and how to put them all together, whimsicalstitch.com sells Stitch Guides and Stitch Concepts for Melissa Shirley Designs, Zecca DesignsSandra Gilmore, Purple Palm, Maggie, and Penny MacLeod, and many more. Click here to see the newest guides and click here to see the entire collection.

I hope you have the perfect spot for this stitch! Please enjoy! Have a wonderful #whimsicalwednesday!

A Note about Diagrams
I use color in diagrams to make them as clear as possible.  The primary function of different colored lines is to illustrate a stitch sequence.  For example, layering of colors demonstrates you add them in that order.  They can also provide ideas on how to integrate additional threads (one line for each color).  Or, you can use the same thread for all color lines.  That's where I encourage you to use your imagination for the space you are stitching!

More Full Coverage Proof

Today’s stitch was a fun challenge for me. It’s so easy to say fun in hindsight! (And, yes! I do have full coverage stitches in my repertoire…two weeks in a row!)

Click on image to see on whimsicalstitch.com's Pinterest account. Visit pinterest.com/whimsicalstitch/whimsicalwednesday for a library of all #whimsicalwednesday and #smallspacesunday stitch diagrams.

Click on image to see on whimsicalstitch.com's Pinterest account. Visit pinterest.com/whimsicalstitch/whimsicalwednesday for a library of all #whimsicalwednesday and #smallspacesunday stitch diagrams.

Click on image to see on whimsicalstitch.com's Instagram account. Visit instagram.com/whimsicalstitch to see a library of stitched samples for select #whimsicalwednesday and #smallspacesunday stitch diagrams.

Click on image to see on whimsicalstitch.com's Instagram account. Visit instagram.com/whimsicalstitch to see a library of stitched samples for select #whimsicalwednesday and #smallspacesunday stitch diagrams.

Truth be told, I was a little panicked. I was creating a guide for the first Emma Williams canvas, such a pretty piece with beautiful colors and shading. The pink and brown roof was beautifully painted but my go-to of an open stitch was out of the cards (for lots of reasons). So, I knew two things. I wanted a full coverage stitch that included soft shapes (no squares or rectangles) and the respective amount of pink and brown (as painted). I started playing with beetle shapes (examples are here and here) but wanted something a tiny bit smaller and a tiny bit different. Enter the addition of the Upright Cross between the brown “crowns.” Voila!

The stitched sample uses ThreadWorx overdyed cotton floss (black lines), Splendor (turquoise lines), and Flair (gray lines) on 13-mesh. It’s a great stitch for clothing with Soie D’Alger (black lines), Flair (turquoise lines), and a Kreinik Metallic (gray lines). I would love to see it as a tree with the threads from the sample in a slightly different pattern. Use the solid floss for the black lines, the overdyed floss for the turquoise lines, and keep the Flair. A fun variation would be to replace the Upright Cross with a single bead over two rows.

This stitch diagram, along with all other #whimsicalwednesday and #smallspacesunday stitch diagrams, can also be found on a Pinterest board here.

Be sure to follow whimsicalstitch.com on FacebookPinterestInstagram, and Twitter.

IIf you like what you see on this blog, want to learn some very creative decorative stitches, and how to put them all together, whimsicalstitch.com sells Stitch Guides and Stitch Concepts for Melissa Shirley Designs, Zecca DesignsSandra Gilmore, Purple Palm, Maggie, and Penny MacLeod, and many more. Click here to see the newest guides and click here to see the entire collection.

I hope you have the perfect spot for this stitch! Please enjoy! Have a wonderful #whimsicalwednesday!

A Note about Diagrams
I use color in diagrams to make them as clear as possible.  The primary function of different colored lines is to illustrate a stitch sequence.  For example, layering of colors demonstrates you add them in that order.  They can also provide ideas on how to integrate additional threads (one line for each color).  Or, you can use the same thread for all color lines.  That's where I encourage you to use your imagination for the space you are stitching!
Stitching Friends are the Best Friends...

…largely because they know what will make you squeal with joy. Case in point is today’s stitch, shared with me by a stitching friend (naturally).

Click on image to see on whimsicalstitch.com's Pinterest account. Visit pinterest.com/whimsicalstitch/whimsicalwednesday for a library of all #whimsicalwednesday and #smallspacesunday stitch diagrams.

Click on image to see on whimsicalstitch.com's Pinterest account. Visit pinterest.com/whimsicalstitch/whimsicalwednesday for a library of all #whimsicalwednesday and #smallspacesunday stitch diagrams.

Click on image to see on whimsicalstitch.com's Instagram account. Visit instagram.com/whimsicalstitch to see a library of stitched samples for select #whimsicalwednesday and #smallspacesunday stitch diagrams.

Click on image to see on whimsicalstitch.com's Instagram account. Visit instagram.com/whimsicalstitch to see a library of stitched samples for select #whimsicalwednesday and #smallspacesunday stitch diagrams.

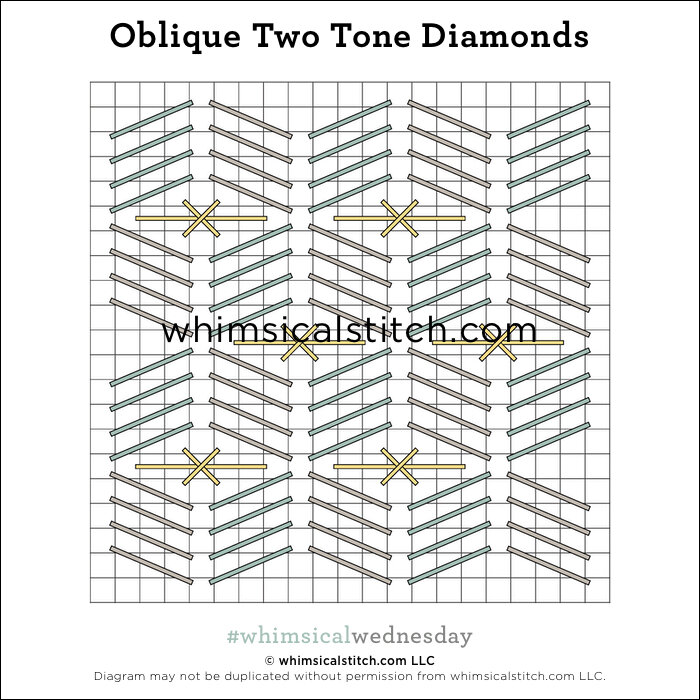
The stitched sample uses two shades of blue perle cotton for an elegant and subtle background. Truth be told, I would have used a matte and a metallic for this stitch in this background, but was pleasantly surprised at how charming it is without a metallic. So, said stitching friend also provided me (and us) good food for thought. I love how the two shades of blue mesh so well together and provide an intriguing background.

I colored the diagram lines to match the stitched sample but feel free to consider using 2-3 colors with this stitch. This would make a glamorous coat or toy bag on a large Santa stand-up. Consider a deep red matte for the larger black lines, a medium weight silver or gold metallic for the turquoise lines, and a wide green metallic for the center diamond. This would make a fantastic and funky pumpkin with orange metallic for the larger black lines, black matte for the turquoise lines, and your favorite Halloween accent color (think lime green or purple) or white for the center diamond. You could also fill the center diamond with Brick Beading for a truly over the top accent.

This stitch diagram, along with all other #whimsicalwednesday and #smallspacesunday stitch diagrams, can also be found on a Pinterest board here.

Be sure to follow whimsicalstitch.com on FacebookPinterestInstagram, and Twitter.

IIf you like what you see on this blog, want to learn some very creative decorative stitches, and how to put them all together, whimsicalstitch.com sells Stitch Guides and Stitch Concepts for Melissa Shirley Designs, Zecca DesignsSandra Gilmore, Purple Palm, Maggie, and Penny MacLeod, and many more. Click here to see the newest guides and click here to see the entire collection.

I hope you have the perfect spot for this stitch! Please enjoy! Have a wonderful #whimsicalwednesday!

A Note about Diagrams
I use color in diagrams to make them as clear as possible.  The primary function of different colored lines is to illustrate a stitch sequence.  For example, layering of colors demonstrates you add them in that order.  They can also provide ideas on how to integrate additional threads (one line for each color).  Or, you can use the same thread for all color lines.  That's where I encourage you to use your imagination for the space you are stitching!

Hello Again

The Milanese stitch was one of the first decorative stitches I learned and I thought it was magical. I used it a lot (okay, too much) and burned out on it. Seeing it again with cute accents makes me feel like we are meeting for the first time again.

Click on image to see on whimsicalstitch.com's Pinterest account. Visit pinterest.com/whimsicalstitch/whimsicalwednesday for a library of all #whimsicalwednesday and #smallspacesunday stitch diagrams.

Click on image to see on whimsicalstitch.com's Pinterest account. Visit pinterest.com/whimsicalstitch/whimsicalwednesday for a library of all #whimsicalwednesday and #smallspacesunday stitch diagrams.

Click on image to see on whimsicalstitch.com's Instagram account. Visit instagram.com/whimsicalstitch to see a library of stitched samples for select #whimsicalwednesday and #smallspacesunday stitch diagrams.

Click on image to see on whimsicalstitch.com's Instagram account. Visit instagram.com/whimsicalstitch to see a library of stitched samples for select #whimsicalwednesday and #smallspacesunday stitch diagrams.

The stitched sample uses all kinds of metallics, including Fyre Werks (black lines), Flair (turquoise lines), and Kreinik Metallics (size 8) on 13-mesh. It was stitched by my first needlepoint muse, the late Wendy Harwood of Aristeia. It’s a wacky flower on a Melissa Shirley purse.

This would be great for clothing with Vineyard Silk (black lines), Silk Lame (turquoise lines), and a Kreinik Metallic (yellow lines). It could make a very interesting tree as the overt diagonal stitches are offset by the straight lines. I recommend an overdyed Silk for the black lines, a lightweight metallic for the yellow lines, and maybe a French Knot in a solid silk floss for the turquoise lines. I would love to see the turquoise lines be a seed bead! That would be very fun.

This stitch diagram, along with all other #whimsicalwednesday and #smallspacesunday stitch diagrams, can also be found on a Pinterest board here.

Be sure to follow whimsicalstitch.com on FacebookPinterestInstagram, and Twitter.

If you like what you see on this blog, want to learn some very creative decorative stitches, and how to put them all together, whimsicalstitch.com sells Stitch Guides and Stitch Concepts for Melissa Shirley Designs, Zecca DesignsSandra Gilmore, Purple Palm, Maggie, and Penny MacLeod, and many more. Click here to see the newest guides and click here to see the entire collection.

I hope you have the perfect spot for this stitch!  Please enjoy!  

A Note about Diagrams
I use color in diagrams to make them as clear as possible.  The primary function of different colored lines is to illustrate a stitch sequence.  For example, layering of colors demonstrates you add them in that order.  They can also provide ideas on how to integrate additional threads (one line for each color).  Or, you can use the same thread for all color lines.  That's where I encourage you to use your imagination for the space you are stitching!

Excuse Me

I made the mistake of thinking pulling together today’s stitched sample was going to be easy. Au contraire. I kept getting distracted by variations that kept popping up in my head as I stitched it for you.

Click on image to see on whimsicalstitch.com's Pinterest account. Visit pinterest.com/whimsicalstitch/whimsicalwednesday for a library of all #whimsicalwednesday and #smallspacesunday stitch diagrams.

Click on image to see on whimsicalstitch.com's Pinterest account. Visit pinterest.com/whimsicalstitch/whimsicalwednesday for a library of all #whimsicalwednesday and #smallspacesunday stitch diagrams.

Click on image to see on whimsicalstitch.com's Instagram account. Visit instagram.com/whimsicalstitch to see a library of stitched samples for select #whimsicalwednesday and #smallspacesunday stitch diagrams.

Click on image to see on whimsicalstitch.com's Instagram account. Visit instagram.com/whimsicalstitch to see a library of stitched samples for select #whimsicalwednesday and #smallspacesunday stitch diagrams.

Click on image to see on whimsicalstitch.com's Instagram account. Visit instagram.com/whimsicalstitch to see a library of stitched samples for select #whimsicalwednesday and #smallspacesunday stitch diagrams.

Click on image to see on whimsicalstitch.com's Instagram account. Visit instagram.com/whimsicalstitch to see a library of stitched samples for select #whimsicalwednesday and #smallspacesunday stitch diagrams.

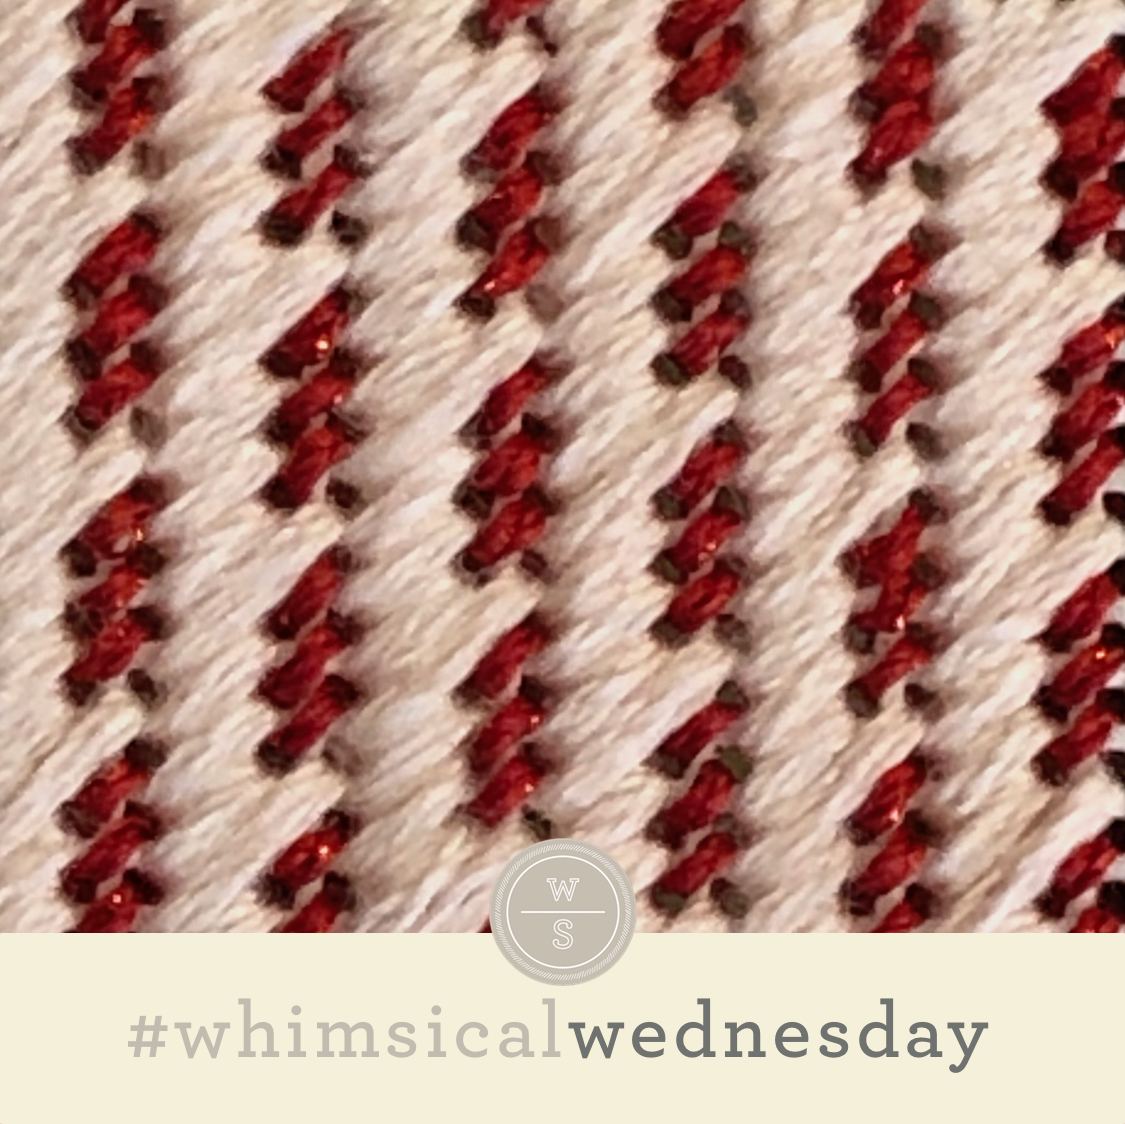
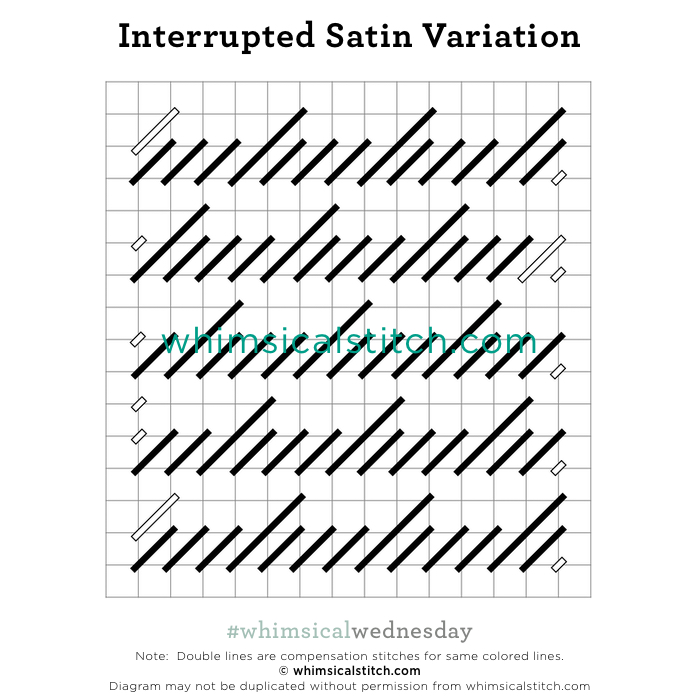
I named it Interrupted Satin Stitch because every fourth stitch is an interruption of sorts. You think you know where it’s going (over two rows) and…bam!…nope (over three rows). The stitched sample is me playing with Splendor (black lines) and Petite Silk Lame (turquoise lines) on 18-mesh.

This full coverage diagonal stitch (above center) is perfect for areas you want to add some direction, such as a roof or walkway. I love the idea of flipping it 90° and using it for pants or wall covering (above right).

I love uneven matte threads for roofs, such as Rainbow Linen or Rainbow Tweed. Glisten is a good alternative because the metallic filament adds a subtle unevenness. Partner any of those with a lightweight soft metallic, such as Trebizond Silk, for the tent stitches. I would use a single strand silk with a favorite metallic for pants and Soie D’Alger with Petite Silk Lame for a wall covering. Consider swapping the tent stitches for seed beads if you want to make it even more glamorous.

Click on image to see on whimsicalstitch.com's Pinterest account. Visit pinterest.com/whimsicalstitch/whimsicalwednesday for a library of all #whimsicalwednesday and #smallspacesunday stitch diagrams.

Click on image to see on whimsicalstitch.com's Pinterest account. Visit pinterest.com/whimsicalstitch/whimsicalwednesday for a library of all #whimsicalwednesday and #smallspacesunday stitch diagrams.

Another use popped into my head while stitching it. Leave out the tent stitches, use a lightweight metallic, and use it for a water stitch. The stitch over three adds an interesting choppy wave affect. While stitching, I also realized how scalable this stitch is. Consider changing the over 2 and over 3 rows to over 3 and 4, respectively for a slightly larger stitch.

These stitch diagrams, along with all other #whimsicalwednesday and #smallspacesunday stitch diagrams, can also be found on a Pinterest board here.

Be sure to follow whimsicalstitch.com on FacebookPinterestInstagram, and Twitter.

If you like what you see on this blog, want to learn some very creative decorative stitches, and how to put them all together, whimsicalstitch.com sells Stitch Guides and Stitch Concepts for Melissa Shirley Designs, Zecca DesignsSandra Gilmore, Purple Palm, Maggie, and Patience Brewster, and many more. Click here to see the newest guides and click here to see the entire collection.

I hope you have the perfect spot for this stitch!  Please enjoy! 

A Note about Diagrams
I use color in diagrams to make them as clear as possible.  The primary function of different colored lines is to illustrate a stitch sequence.  For example, layering of colors demonstrates you add them in that order.  They can also provide ideas on how to integrate additional threads (one line for each color).  Or, you can use the same thread for all color lines.  That's where I encourage you to use your imagination for the space you are stitching!