It’s a bleak 30-45 seconds between waking up and getting the heat turned on these days, even here in So. Cal. So I think I need to extend my streak of full coverage stitches so I can get warm over here.
Click on image to see on whimsicalstitch.com's Pinterest account. Visit pinterest.com/whimsicalstitch/whimsicalwednesday for a library of all #whimsicalwednesday and #smallspacesunday stitch diagrams.

Click on image to see on whimsicalstitch.com's Instagram account. Visit instagram.com/whimsicalstitch to see a library of stitched samples for select #whimsicalwednesday and #smallspacesunday stitch diagrams.
This is an oldie but goodie and from long before #whimsicalwednesday was a twinkle in my eye. This is so from so long ago, hashtags were still pound signs. And for those of you with a keen eye, Santa is NOT flying. He is part of a tree skirt from our friend Melissa Shirley. Since I stitched the background in same stitch in every panel, some of the Santas look wonky if you don’t look at them as part of the whole skirt. (And I would do it that way all over again.)
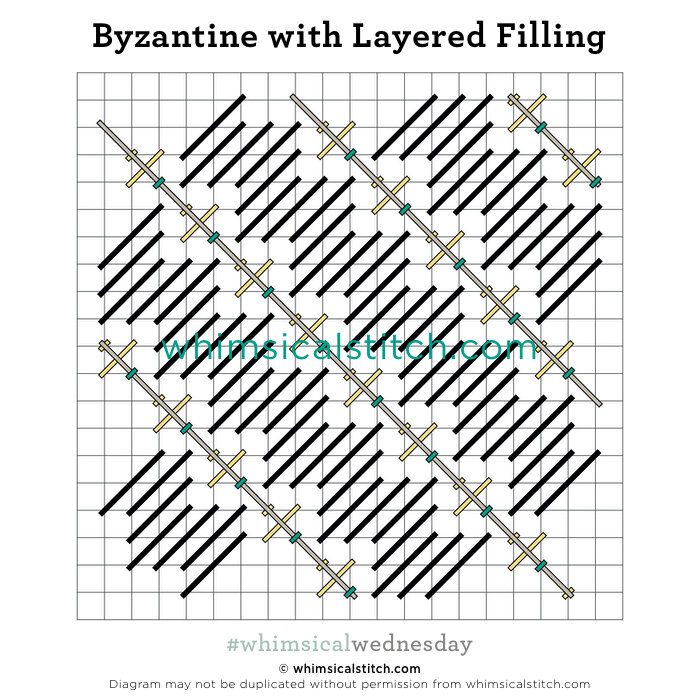
The stitched sample uses Very Velvet (black lines), Frosty Rays (yellow lines), size 8 Kreinik Metallic (gray lines), and size 16 Kreinik Metallic (turquoise lines) on 13-mesh. Clearly, it’s a great stitch for clothing. You can lighten it up with silk floss (black lines), Flair (yellow lines), Petite Silk Lame (gray lines), and a Kreinik Metallic (turquoise lines) for trees or a roof. I love the diagonal stitch across the top of the smaller Scotch squares. I think that is a really elegant touch. The stitch sequence is black lines followed by yellow lines. Cover the yellow lines with the gray line and cover the gray lines with the turquoise lines. Someday I would like to see a bead for the turquoise lines. I think that would be a darling doll dress.
This stitch diagram, along with all other #whimsicalwednesday and #smallspacesunday stitch diagrams, can also be found on a Pinterest board here.
Be sure to follow whimsicalstitch.com on Facebook, Pinterest, Instagram, and Twitter.
If you like what you see on this blog, want to learn some very creative decorative stitches, and how to put them all together, whimsicalstitch.com sells Stitch Guides and Stitch Concepts for Melissa Shirley Designs, Zecca Designs, Sandra Gilmore, Purple Palm, Maggie, and Penny MacLeod, and many more. Click here to see the newest guides and click here to see the entire collection.
I hope you have the perfect spot for this stitch! Please enjoy! Have a wonderful #whimsicalwednesday!
A Note about Diagrams
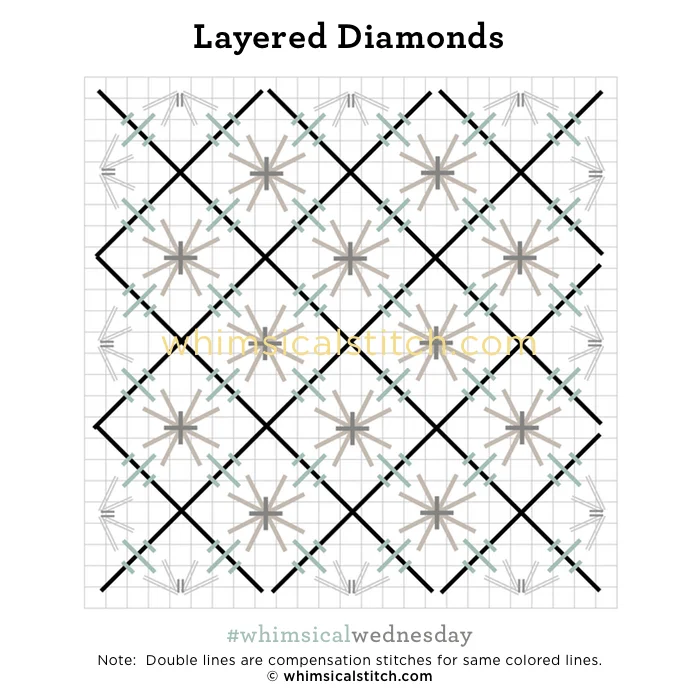
I use color in diagrams to make them as clear as possible. The primary function of different colored lines is to illustrate a stitch sequence. For example, layering of colors demonstrates you add them in that order. They can also provide ideas on how to integrate additional threads (one line for each color). Or, you can use the same thread for all color lines. That's where I encourage you to use your imagination for the space you are stitching!