Which Came First?

I’m often asked what comes first for a blog post…the stitch or the stitched sample? In all honesty, it’s both. Some weeks I am inspired by new stitches I’ve used for class projects and get to share student’s wonderful stitching. Other weeks I am walking around my house on Tuesday afternoon desperately looking for something I haven’t shared with you. Today and last week were definitely Tuesday afternoon scenarios.

Click on image to see on whimsicalstitch.com's Pinterest account. Visit pinterest.com/whimsicalstitch/whimsicalwednesday for a library of all #whimsicalwednesday and #smallspacesunday stitch diagrams.

Click on image to see on whimsicalstitch.com's Pinterest account. Visit pinterest.com/whimsicalstitch/whimsicalwednesday for a library of all #whimsicalwednesday and #smallspacesunday stitch diagrams.

Click on image to see on whimsicalstitch.com's Instagram account. Visit instagram.com/whimsicalstitch to see a library of stitched samples for select #whimsicalwednesday and #smallspacesunday stitch diagrams.

Click on image to see on whimsicalstitch.com's Instagram account. Visit instagram.com/whimsicalstitch to see a library of stitched samples for select #whimsicalwednesday and #smallspacesunday stitch diagrams.

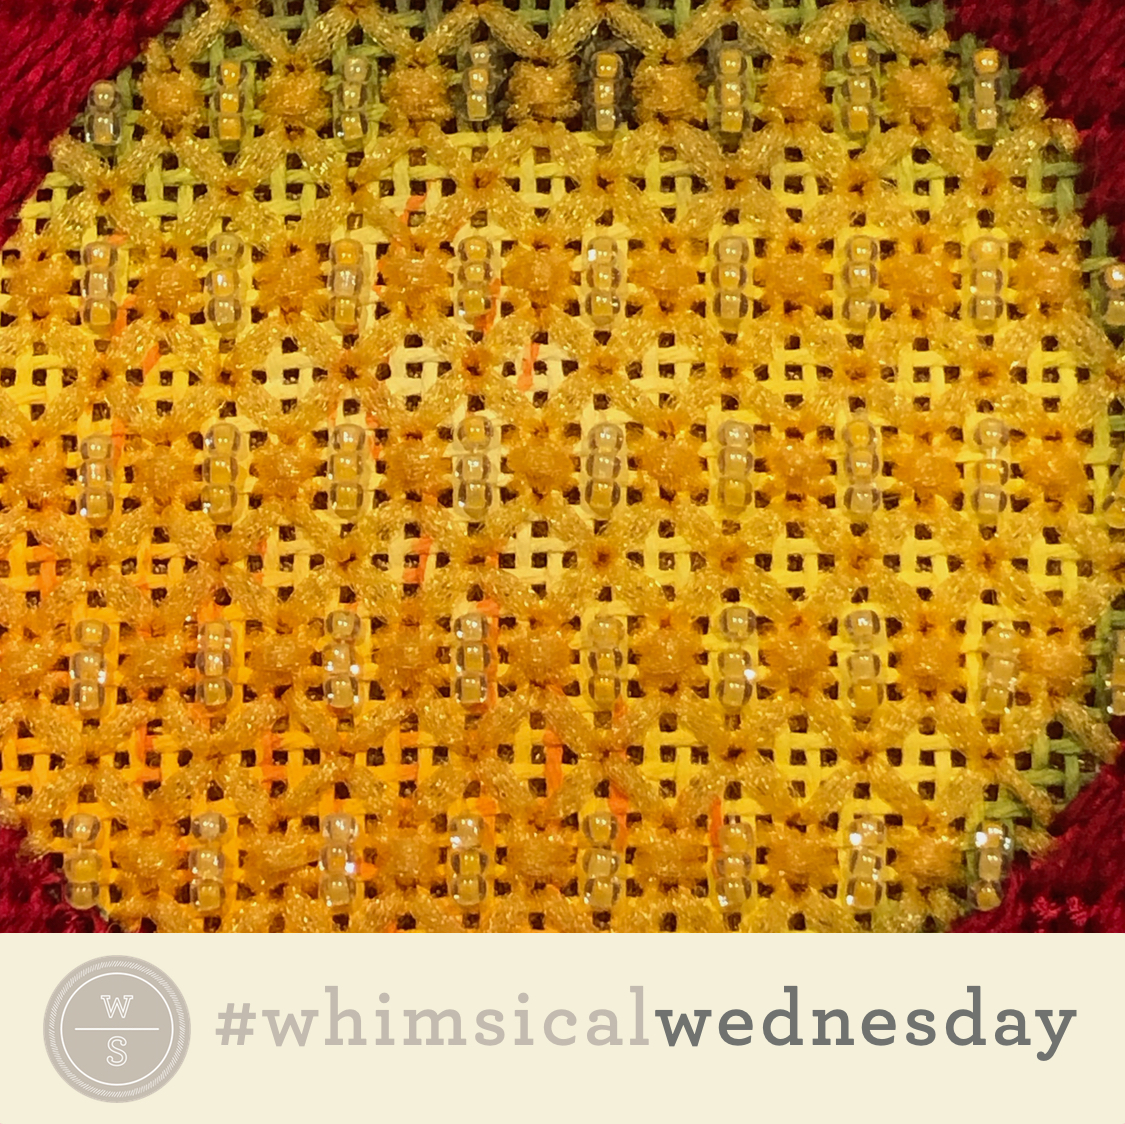
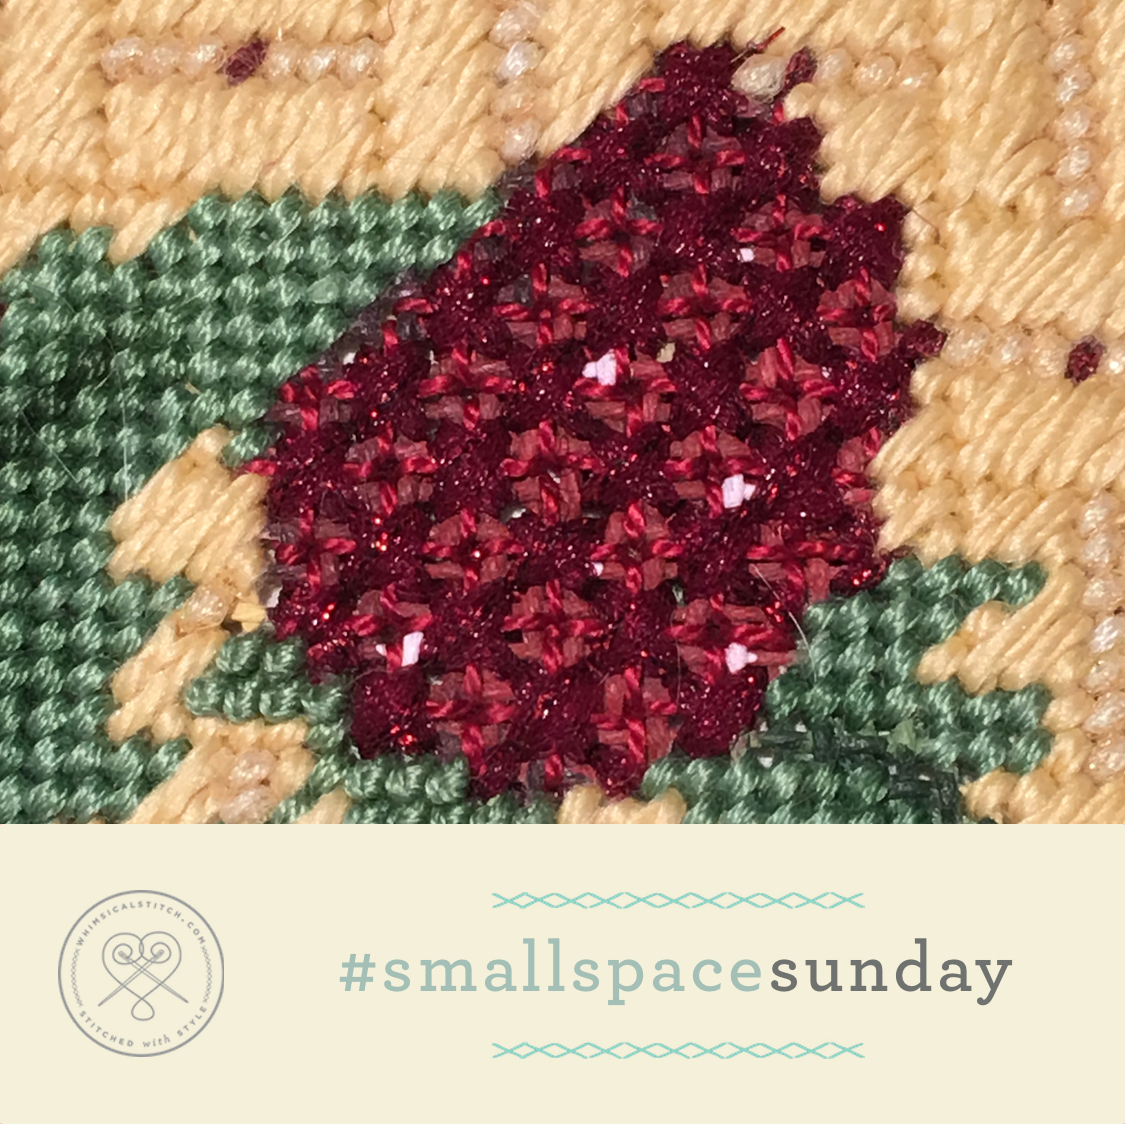
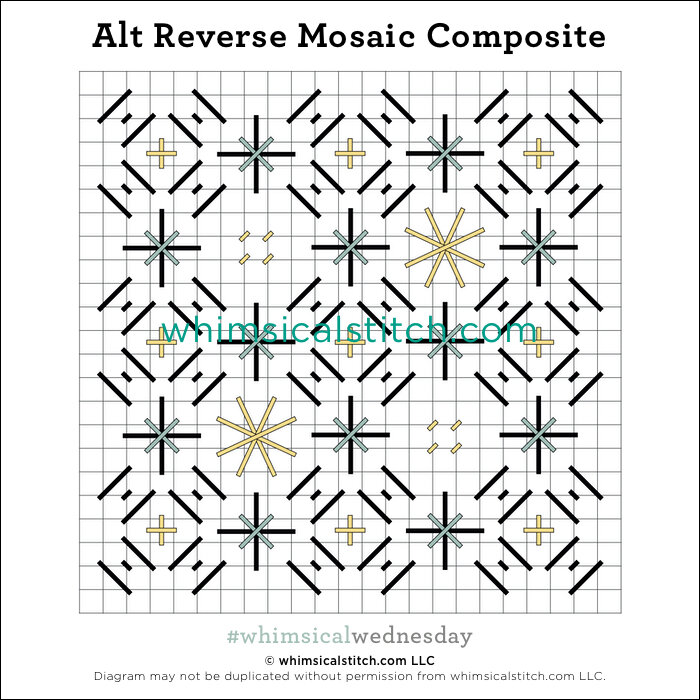
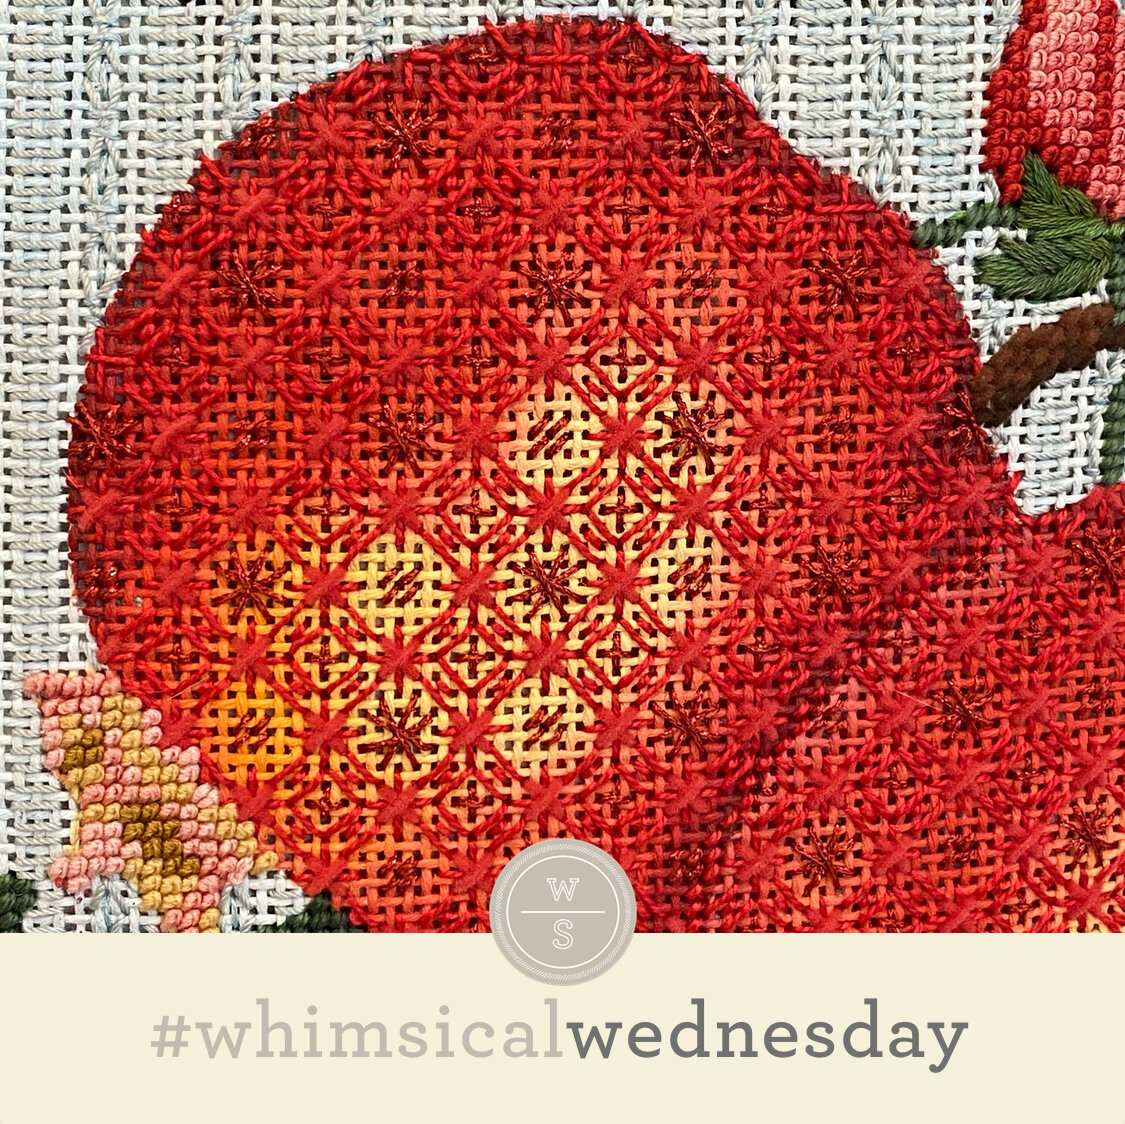
There is a LOT to unpack in today’s stitch. I stitched these pillows in the early 2000’s and I was all about dramatic composite stitches. In fact, the more dramatic, the better. In my opinion, it works here because there is so much real estate to cover. The pillow, which you can see in its entirety on today’s Instagram post, includes basketweave leaves and a low key background to balance the dramatic stitches and threads on each of the fruit. Just like your diet, needlepoint needs to have balance. And, just like your diet, I’m all about fruit in needlepoint.

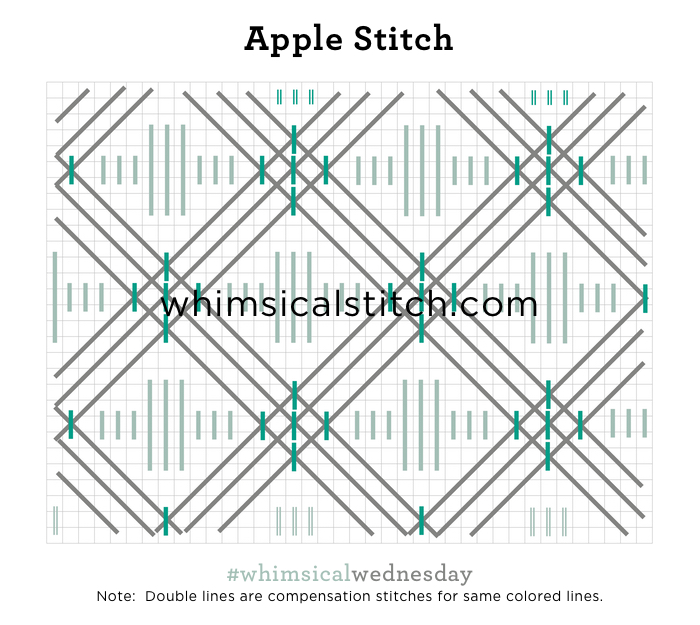
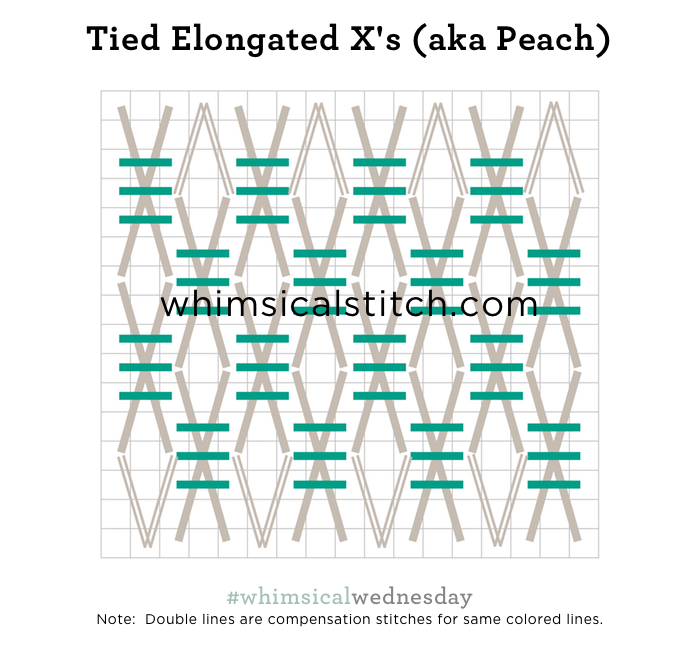
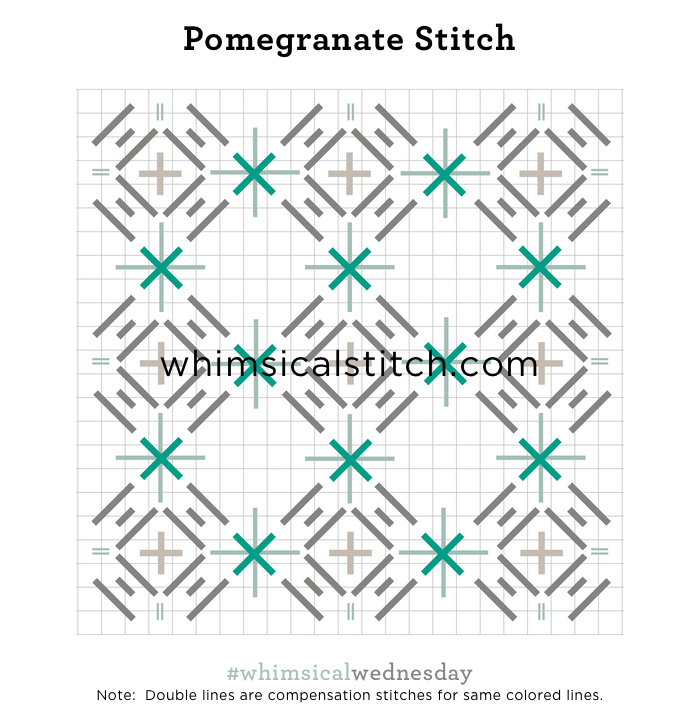
The stitched sample is a retired fruit pillow from Melissa Shirley Designs and uses DMC Perle Cotton (black lines), Very Velvet (aqua lines), Very Velvet (aqua lines), and a whole lotta red size 12 Kreinik (yellow lines). I recommend stitching the black liems first, folllowed by the yellow, and wrapping up with the aqua lines.

This stitch would make a beautiful fabric of any kind, say a dress with silk floss (black lines), a lightweight metallic such as Kreinik Metallics Fine Braid (#8) or Petite Silk Lame (yellow lines), and Flair (aqua lines). Extending the fabric theme, how about a pillow with Vineyard Silk (black lines), Silk Lame (yellow lines), and size 12 Kreinik (aqua lines). I may go so far as to replace the black lines under the aqua lines with the thread used for the aqua lines.

This stitch diagram, along with all other #whimsicalwednesday and #smallspacesunday stitch diagrams, can also be found on a Pinterest board here.

Be sure to follow whimsicalstitch.com on FacebookPinterestInstagram, and Twitter.

If you like what you see on this blog, want to learn some very creative decorative stitches, and how to put them all together, whimsicalstitch.com has a book for you! Mary’s Whimsical Stitches is a contemporary how-to collection of more than 250 stitches for stitchers regardless of skill level. The book includes updated and sequenced diagrams from this blog, all-new stitches, and a chapter on the basics of needlepoint. For more information, visit here.

whimsicalstitch.com also sells Stitch Guides and Stitch Concepts for Melissa Shirley Designs, Zecca DesignsSandra Gilmore, Purple Palm, Maggie, and Penny MacLeod, and many more. Click here to see the newest guides and click here to see the entire collection.

I hope you have the perfect spot for this stitch! Please enjoy! Have a wonderful #whimsicalwednesday!

A Note about Diagrams
I use color in diagrams to make them as clear as possible.  The primary function of different colored lines is to illustrate a stitch sequence.  For example, layering of colors demonstrates you add them in that order.  They can also provide ideas on how to integrate additional threads (one line for each color).  Or, you can use the same thread for all color lines.  That's where I encourage you to use your imagination for the space you are stitching!

Best Laid Plans

I thought this morning’s blog would literally write itself. The diagram was complete…the photo of the stitched sample existed…so, it’s done, right? Do I need to tell you that this was not the stitch diagram and photo I was anticipating I would be sharing with you? Even so, it’s still kinda cute!

Click on image to see on whimsicalstitch.com's Pinterest account. Visit pinterest.com/whimsicalstitch/whimsicalwednesday for a library of all #whimsicalwednesday and #smallspacesunday stitch diagrams.

Click on image to see on whimsicalstitch.com's Pinterest account. Visit pinterest.com/whimsicalstitch/whimsicalwednesday for a library of all #whimsicalwednesday and #smallspacesunday stitch diagrams.

Click on image to see on whimsicalstitch.com's Instagram account. Visit instagram.com/whimsicalstitch to see a library of stitched samples for select #whimsicalwednesday and #smallspacesunday stitch diagrams.

Click on image to see on whimsicalstitch.com's Instagram account. Visit instagram.com/whimsicalstitch to see a library of stitched samples for select #whimsicalwednesday and #smallspacesunday stitch diagrams.

The stitched sample is a pear from a vintage Melissa Shirley fruit piece (as part of the pinnacle of my fruit pillow years). It uses DMC Perle Cotton (black lines), and two Kreinik Metallics (gray lines and yellow lines).

Eyelet stitches are beautiful but do require a smidgen of pre-planning. As you can see in the stitched sample above, the stitches creating an eyelet share a single and larger center hole. The larger hole was created before the stitching began by inserting a tapered laying tool inside this hole and gently pushing it to create a slightly larger hole. Truth be told, this terrified me and I always found someone to do it for me…or wouldn’t do eyelet stitches at all. I got over it when I realized, to create similarly sized holes, you could put a small tick or tiny rubber band (ask your kid’s orthodontist for some) on the laying tool to indicate what point to not pass.

The second point to keep in mind is, with any hole that multiple (more than 2-3) stitches share, always stitch from the outer edge to the inside shared hole. This minimizes friction on the thread inside the shared hole. (Also, fun fact for you. Eyelet holes don’t have to be in the center!)

This is a great all-purpose stitch for an area that you want to draw attention to and highlight the canvas painting. It’s great for clothing, water, Santa’s bags…even a floor. More substantial threads will draw even more attention to this stitch. For example, consider the combination of a single strand silk (Vineyard Silk, Pepper Pot Silk) for the black lines, Fyre Werks for the gray lines, and Silk Lame for the yellow lines for a clothing or bag stitch. Another idea is to replace the Smyrna Cross (yellow lines) with a single larger bead (size 8 or even a 3mm pearl) over two holes on the vertical axis.

This stitch diagram, along with all other #whimsicalwednesday and #smallspacesunday stitch diagrams, can also be found on a Pinterest board here.

Be sure to follow whimsicalstitch.com on FacebookPinterestInstagram, and Twitter.

If you like what you see on this blog, want to learn some very creative decorative stitches, and how to put them all together, whimsicalstitch.com sells Stitch Guides and Stitch Concepts for Melissa Shirley Designs, Zecca DesignsSandra Gilmore, Purple Palm, Maggie, and Penny MacLeod, and many more. Click here to see the newest guides and click here to see the entire collection.

I hope you have the perfect spot for this stitch! Please enjoy! Have a wonderful #whimsicalwednesday!

A Note about Diagrams
I use color in diagrams to make them as clear as possible.  The primary function of different colored lines is to illustrate a stitch sequence.  For example, layering of colors demonstrates you add them in that order.  They can also provide ideas on how to integrate additional threads (one line for each color).  Or, you can use the same thread for all color lines.  That's where I encourage you to use your imagination for the space you are stitching!

Spark Joy

I’m fascinated with the Marie Kondo tidying routine. Things in my home that spark joy for me are my cookbooks, the four poster bed (from my great grandparents home), and my Melissa Shirley fruit needlepoint projects. Case in point is today’s stitch and stitch sample.

Click on image to see on whimsicalstitch.com's Pinterest account. Visit pinterest.com/whimsicalstitch/whimsicalwednesday for a library of all #whimsicalwednesday and #smallspacesunday stitch diagrams.

Click on image to see on whimsicalstitch.com's Pinterest account. Visit pinterest.com/whimsicalstitch/whimsicalwednesday for a library of all #whimsicalwednesday and #smallspacesunday stitch diagrams.

Click on image to see on whimsicalstitch.com's Instagram account. Visit instagram.com/whimsicalstitch to see a library of stitched samples for select #whimsicalwednesday and #smallspacesunday stitch diagrams.

Click on image to see on whimsicalstitch.com's Instagram account. Visit instagram.com/whimsicalstitch to see a library of stitched samples for select #whimsicalwednesday and #smallspacesunday stitch diagrams.

Today's stitch comes from a Melissa Shirley fruit purse I did eons ago. (Note: the stitched purse in the link is not mine.) Yes, I love the diamonds but I love the multiple bead accents more. The stitched sample uses yellow Flair (black and aqua lines) and Sundance Beads for, well, the beads. :)

It would be a great stitch for a body of water that you want to draw attention to. I would use a lightweight Kreinik metallic (size 8 for 13-mesh and size 4 for 18-mesh) for the black and gray lines and seed beads. It would be beautiful for a glamorous dress, especially a tall narrow one. I recommend a rich Silk Floss (Soie D’Alger or Soie Cristale come to mind) for the black lines, combined with Silk Lame for the aqua lines, and seed beads. Consider a bugle bead in lieu of the seed beads for an even more dramatic look.

This stitch diagram, along with all other #whimsicalwednesday and #smallspacesunday stitch diagrams, can also be found on a Pinterest board here.

Be sure to follow whimsicalstitch.com on FacebookPinterestInstagram, and Twitter.

If you like what you see on this blog, want to learn some very creative decorative stitches, and how to put them all together, whimsicalstitch.com sells Stitch Guides and Stitch Concepts for Melissa Shirley Designs, Zecca DesignsSandra Gilmore, and Patience Brewster, and many more. Click here to see the newest guides and click here to see the entire collection.

I disagree with Marie on one topic. The books stay. And, the fruit needlepoint pillows stay.

I hope you have the perfect spot for this stitch!  Please enjoy!  

A Note about Diagrams
I use color in diagrams to make them as clear as possible.  The primary function of different colored lines is to illustrate a stitch sequence.  For example, layering of colors demonstrates you add them in that order.  They can also provide ideas on how to integrate additional threads (one line for each color).  Or, you can use the same thread for all color lines.  That's where I encourage you to use your imagination for the space you are stitching!

Nothing Wrong with More Diamonds

Welcome to more diamonds.  While I love the stitch, this post is really a story of threads.  

Click on image to see on whimsicalstitch.com's Pinterest account. Visit pinterest.com/whimsicalstitch/whimsicalwednesday for a library of all #whimsicalwednesday and #smallspacesunday stitch diagrams.

Click on image to see on whimsicalstitch.com's Pinterest account. Visit pinterest.com/whimsicalstitch/whimsicalwednesday for a library of all #whimsicalwednesday and #smallspacesunday stitch diagrams.

Click on image to see on whimsicalstitch.com's Instagram account. Visit instagram.com/whimsicalstitch to see a library of stitched samples for select #whimsicalwednesday and #smallspacesunday stitch diagrams.

Click on image to see on whimsicalstitch.com's Instagram account. Visit instagram.com/whimsicalstitch to see a library of stitched samples for select #whimsicalwednesday and #smallspacesunday stitch diagrams.

Take a close look at the stitched sample.  It is an interesting exercise in thread weights and distinct finishes. 

The parallelograms surrounding the 6X6 diamonds are two different grays on the diagram and two different matte threads on the stitched sample.  The dark gray lines represent DMC Perle Cotton and the light gray line represents Vineyard Silk.  The diamond is filled with two different metallic threads.  The aqua lines are Shimmer Ribbon and the teal lines are Kreinik Metallics Tapestry Braid (#12). 

This is not the only way to stitch this stitch. Feel free to stitch the parallelograms in a single thread.  Depending on which part of the stitch (the parallelograms or the diamonds) you want to pop, adjust the thread weights accordingly.  Consider metallic parallelograms with velvet diamonds.  Try two different colors of a matte thread for the parallelograms with one color (but two threads) for the diamonds.  There are so many things you can do with this stitch.  It's great for any number of large areas...large fruit (as illustrated in the stitched sample), clothing, baskets, roofs, or floors, just as thought-starters.

This stitch diagram, along with all other #whimsicalwednesday and #smallspacesunday stitch diagrams, can also be found on a Pinterest board here.

Be sure to follow whimsicalstitch.com on FacebookPinterestInstagram, and Twitter.

If you like what you see on this blog, want to learn some very creative decorative stitches, and how to put them all together, whimsicalstitch.com sells stitch guides and stitch concepts for Melissa Shirley Designs, Zecca Designs, and Patience Brewster. 48 guides are currently available and more are in the works!

I hope you have the perfect spot for this stitch! Enjoy!

Surprisingly Small

Truth be told, I don't consider today's stitch a true small space stitch*.  However, as I was examining my needlepoint pieces for #smallspacesunday inspiration, I found this stitch in a small space on one of my (ahem, many) fruit pillows.  And, much to my surprise, I haven't covered this exact stitch yet (variations of, yes...this stitch, no).  So, win win!

I give you Upright Tied Crosses in its purest form.

Click on image to see on whimsicalstitch.com's Pinterest account.  Visit pinterest.com/whimsicalstitch/whimsicalwednesday for a library of all #whimsicalwednesday and #smallspacesunday stitch diagrams.

Click on image to see on whimsicalstitch.com's Pinterest account.  Visit pinterest.com/whimsicalstitch/whimsicalwednesday for a library of all #whimsicalwednesday and #smallspacesunday stitch diagrams.

Click on image to see on whimsicalstitch.com's Instagram account.  Visit instagram.com/whimsicalstitch to see a library of stitched samples for select #whimsicalwednesday and #smallspacesunday stitch diagrams.

Click on image to see on whimsicalstitch.com's Instagram account.  Visit instagram.com/whimsicalstitch to see a library of stitched samples for select #whimsicalwednesday and #smallspacesunday stitch diagrams.

The stitched sample is a raspberry from a retired Melissa Shirley fruit pillow.  It used DMC Perle Cotton with Frosty Rays as the X on top.  The use of two threads was a perfect way to make this stitch pop in a small space.

This stitch diagram, along with all other #whimsicalwednesday and #smallspacesunday stitch diagrams, can also be found on a Pinterest board here.

Be sure to follow whimsicalstitch.com on FacebookPinterestInstagram, and Twitter.

If you like what you see on this blog, want to learn some very creative decorative stitches, and how to put them all together, whimsicalstitch.com sells stitch guides and stitch concepts for Melissa Shirley Designs, Zecca Designs, and Patience Brewster. 41 guides are currently available and more are in the pipeline.

I hope you have the perfect spot for this stitch! Enjoy!

* I acknowledge this is not what I consider a pattern stitch.  I consider #smallspacesunday a theme unto itself.  :)

How Do You Like Them Apples?

Our last open stitch for the month is from a single subject canvas.  I mention this because the space this stitch covered was huge.  It is so huge, in fact, today's diagram is a smaller scale than the actual stitch.

The piece is a retired Melissa Shirley canvas with a single apple.  (As a side note, this is the canvas that started me down my path of fruit canvas obsession.)  Truth in advertising dictates I share Wendy Harwood of Aristeia helped me craft this stitch for the apple.

It was the perfect stitch to show off the shading.

Honestly, I recommend adding the dark gray lines first.  Tie them down (dark aqua lines) at the intersection.  Add the light aqua lines last.  

You will see the stitched sample is on an even larger scale.  The diagram illustrates the center element (light aqua lines) as over 2-2-2-6-6-6-2-2-2 rows.  The center element on the stitched sample is over 4-4-4-8-8-8-4-4-4 rows with the diamond grid moved accordingly.  It still grazes the far right and far left stitches at the same points, regardless of the size of the center element.  

The gray lines are DMC Pearl #5.  Both aqua lines (light and dark) are Kreinik Metallics Tapestry Braid (#12).  

This stitch diagram, along with all other #whimsicalwednesday and #smallspacesunday stitch diagrams, can also be found on a Pinterest board here.

Be sure to follow whimsicalstitch.com on FacebookPinterestInstagram, and Twitter.

If you like what you see on this blog, want to learn some very creative decorative stitches, and how to put them all together, whimsicalstitch.com sells stitch guides for Melissa Shirley Designs, Zecca Designs, and Patience Brewster.  31 guides are currently available and more are in the pipeline.

I hope you have the perfect spot for this stitch!  Enjoy!

Pretty as a Peach

Today's stitch is a denser variation of the Elongated X's I shared with you last September.   

Just as the original post, this stitch is up six rows and over two.  Tying down the X's with three horizontal stitches over two rows is a way to brighten it up for the peach that inspired this post.

As you can see, thread weights play a huge role in the openness of this denser stitch.  I used size 8 DMC Pearl Cotton and size 8 Kreinik Metallics, resulting in an almost full coverage stitch looking barely there.  And, for certain artists, this is the way to stitch.  There is some beautiful shading out there.  There are times I feel guilty covering it up.  

This stitch diagram, along with all other #whimsicalwednesday and #smallspacesunday stitch diagrams, can also be found on a Pinterest board here.

Be sure to follow whimsicalstitch.com on FacebookPinterestInstagram, and Twitter.

If you like what you see on this blog, want to learn some very creative decorative stitches, and how to put them all together, whimsicalstitch.com sells stitch guides for Melissa Shirley Designs, Zecca Designs, and Patience Brewster.  31 guides are currently available and more are in the pipeline.

I hope you enjoy this stitch and have the perfect spot for it!  Enjoy!

My Favorite Technique

#teamopenstitches

February focuses on open stitches from pillows on display in my front window for 15+ years as well as a stitch I accidentally created by not transferring a diagram correctly.  (Seriously.)

A little background.  When I returned to the world of needlepoint, I was #teamfullcoverage for several years. I could not get my head around what I called "naked canvas."  Oh, how wrong I was.  Without a doubt, it took some coaxing and hand-holding.  Here I am, twenty-some years later, I can't imagine a single piece of needlepoint I've stitched, or am stitching, without the dreaded...I mean gorgeous...naked canvas.  It's about balance, focus areas, and symmetry.  

I begin with the Pomegranate Stitch.  I have no other name for it.  This is because the stitch is comprised of several small stitches that create a gorgeous pattern and I used it on a pomegranate.  Makes sense, right?

The first diagram is the first group of stitches that would be fine just as they are, especially with a piece with gorgeous shading.

But, no.  I needed more stitches, so I added an Upright Cross (the light gray lines) inside the small diamonds.

Was that the end?  Of course not.  More oblique layered crosses were added.  And some tiny Mosaic stitches.

The stitched sample on Instagram reflects the final diagram.  I included all three steps because I wanted to make a point.  Any of these three combinations work as a group of stitches.  Truth be told, if I re-stitched this piece today, I would stitch it with the middle diagram so I could have more naked canvas.

It's all a matter of taste and your desired coverage level.  What is universal, regardless of which diagram you prefer, is the threads.  When doing open work, it's important to integrate thread weight into the equation.  Generally speaking, I choose lighter weight threads as a secondary way to let the shading show through.  Case in point, I used size 5 pearl cotton and size 12 Kreinik Metallics Tapestry Braid on 13-mesh for the pomegranate.  I would even use size 8 pearl cotton and size 8 Kreinik Metallics on 13-mesh to make a point.  It works, I promise.  And, as with all things needlepoint, it is all a matter of taste.  So, experiment to find what works for you.

These stitch diagrams, along with all other #whimsicalwednesday and #smallspacesunday stitch diagrams, can also be found on a Pinterest board here.

Be sure to follow whimsicalstitch.com on FacebookPinterestInstagram, and Twitter.

If you like what you see on this blog, want to learn some very creative decorative stitches, and how to put them all together, whimsicalstitch.com sells stitch guides for Melissa Shirley Designs, Zecca Designs, and Patience Brewster.  30 guides are currently available and more are in the pipeline.

I hope you have the perfect spot for this stitch!  Enjoy!

A Theme is Emerging

I am well aware I have a lot of Tramme and Beetle stitches in my work over time, but this month drives that point home in a borderline embarrassing way.  (Unless, of course, you really like Tramme and Beetles, then it is part of my plan!)

Meaning, yes, today's stitch combines Beetles and Tramme.  We knew it had to happen sometime. 

The stitched sample on Instagram is a retired Melissa Shirley fruit canvas.  I love me some fruit needlepoint.  You'll be seeing more of my fruit stitches in February, as they are great examples of open work (February's theme).

The stitched sample uses Elegance (gray lines), Flair (aqua lines), and Kreinik Metallics Fine Braid #8 (turquoise lines) on 13-mesh.  As you may know by now, I like a lighter touch, especially on background stitches.  Flair was a strategic choice.  I love the way that Flair lays flat.  It is a great base thread for Tramme.

This stitch diagram, along with all other #whimsicalwednesday and #smallspacesunday stitch diagrams, can also be found on a Pinterest board here.

Be sure to follow whimsicalstitch.com on FacebookPinterestInstagram, and Twitter.

If you like what you see on this blog, want to learn some very creative decorative stitches, and how to put them all together, whimsicalstitch.com sells stitch guides for Melissa Shirley Designs and Zecca Designs.  28 guides are currently available, including the newest Tea by the Sea, and more are in the pipeline.

I hope you have the perfect spot for this stitch!  Enjoy!