I've Said It Before...

And I am saying it again. It takes a village. I spent the past weekend with the needlepoint village at the Spring show and saw wonderful new canvases, dear friends, and a particularly cute stitch.

Click the image to see the whimsicalstitch.com Stitch Library on pinterest.com. Includes all #whimsicalwednesday and #smallspacesunday stitch diagrams.

Click the image to see #whimsicalwednesday and #smallspacesunday Stitched Sample Gallery on Instagram.

The stitched sample is one of Kristine Kingston’s new spring sweaters. Kristine used Soy Luster for the black lines, Silk Lame for the aqua lines, and Sundance Beads for the yellow circles on 18M.

Clearly, I will be using it for clothing in the future. It will work for clothing from any season. For a winter sweater, I might use Vineyard Silk for the black lines, Glisten for the aqua lines, and a bead for the yellow circle. I think it would make a very pretty vase with a lightweight metallic for the black lines, a slightly heavier metallic (such as Flair) for the yellow lines, and a bead.

I am looking forward to playing with its potential scalability, which will result in either a vertical row of multiple beads to connect the black lines or the addition of another stitch. Stay tuned!

I hope you have the perfect spot for it. Enjoy it!

Click on image to see the whimsicalstitch.com Stitch Library on pinterest.com. Includes all #whimsicalwednesday and #smallspacesunday stitch diagrams.

As you are auditioning stitches (from any stitch source), count the number of canvas threads on the diagram that match your mesh size. And there you have what an inch of the stitch will look like. Evaluate that against the area where you plan to use the stitch and make your final decision. If you start integrating this step into your stitch selection process, you may be surprised at how many stitches you think are large are much smaller than you realize.

By (sometimes) including this step in my own process, I find I am now integrating much longer stitches than I ever thought I would. I used to think a stitch six rows long was super big. I have very much changed my tune, which has helped me expand my creativity, especially for large-space stitches.

Today’s stitch diagram, along with all other #whimsicalwednesday and #smallspacesunday stitch diagrams, can also be found on a Pinterest board here. Be sure to follow whimsicalstitch.com on FacebookPinterestInstagram, and Twitter.

If you like what you see on this blog, there's more. Mary’s Whimsical Stitches is a series of four books offering contemporary how-to collections of more than 200 stitches (in each volume) for all stitchers, regardless of skill level. All books include updated and sequenced diagrams from this blog, plus a collection of all-new stitches from private lessons and other class projects. Visit here to find a needlepoint retailer that carries my books.

New to needlepoint or looking for a refresher? Please download a handy how-to guide covering basic needlepoint stitches and stitch compensation techniques along with new top-line information on needlepoint materials and tools, how to handle threads, and other helpful needlepoint resources.

whimsicalstitch.com also sells Stitch Guides and Stitch Concepts for Melissa Shirley Designs, Zecca DesignsSandra Gilmore, Purple Palm, Maggie, and Penny MacLeod, and many more. Click here to see the newest guides and click here to see the entire collection.

I hope you have the perfect spot for this stitch! Please enjoy! Have a wonderful #whimsicalwednesday!

A Note about Diagrams
I use color in diagrams to make them as clear as possible.  The primary function of different colored lines is to illustrate a stitch sequence.  For example, the layering of colors demonstrates you add them in that order.  They can also provide ideas on integrating additional threads (one line for each color).  Or, you can use the same thread for all color lines.  That's where I encourage you to use your imagination for the space you are stitching!

My Cheat Day

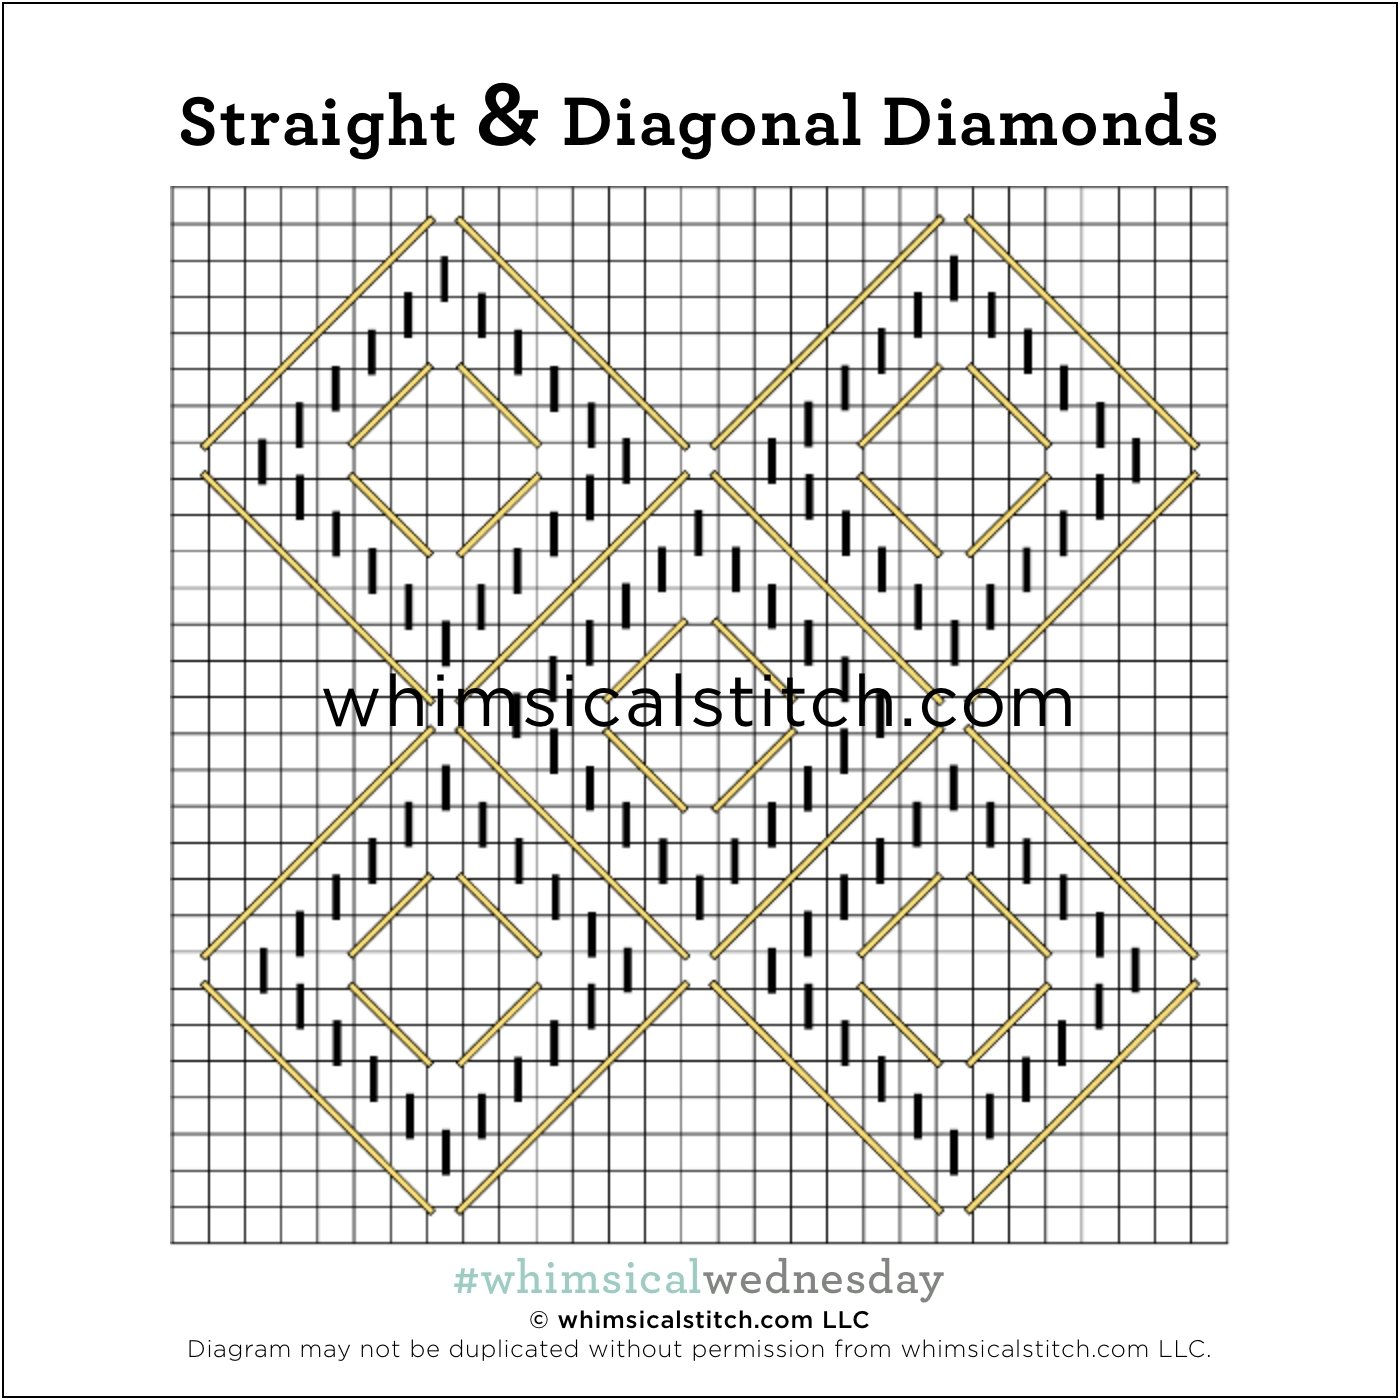
I was today years old when I realized that I needed a cheat day on the blog. That doesn’t make today’s stitch any less cute. It’s a more open stitch variation from a couple of weeks ago.

Click the image to see the whimsicalstitch.com Stitch Library on pinterest.com. Includes all #whimsicalwednesday and #smallspacesunday stitch diagrams.

Click the image to see #whimsicalwednesday and #smallspacesunday Stitched Sample Gallery on Instagram.

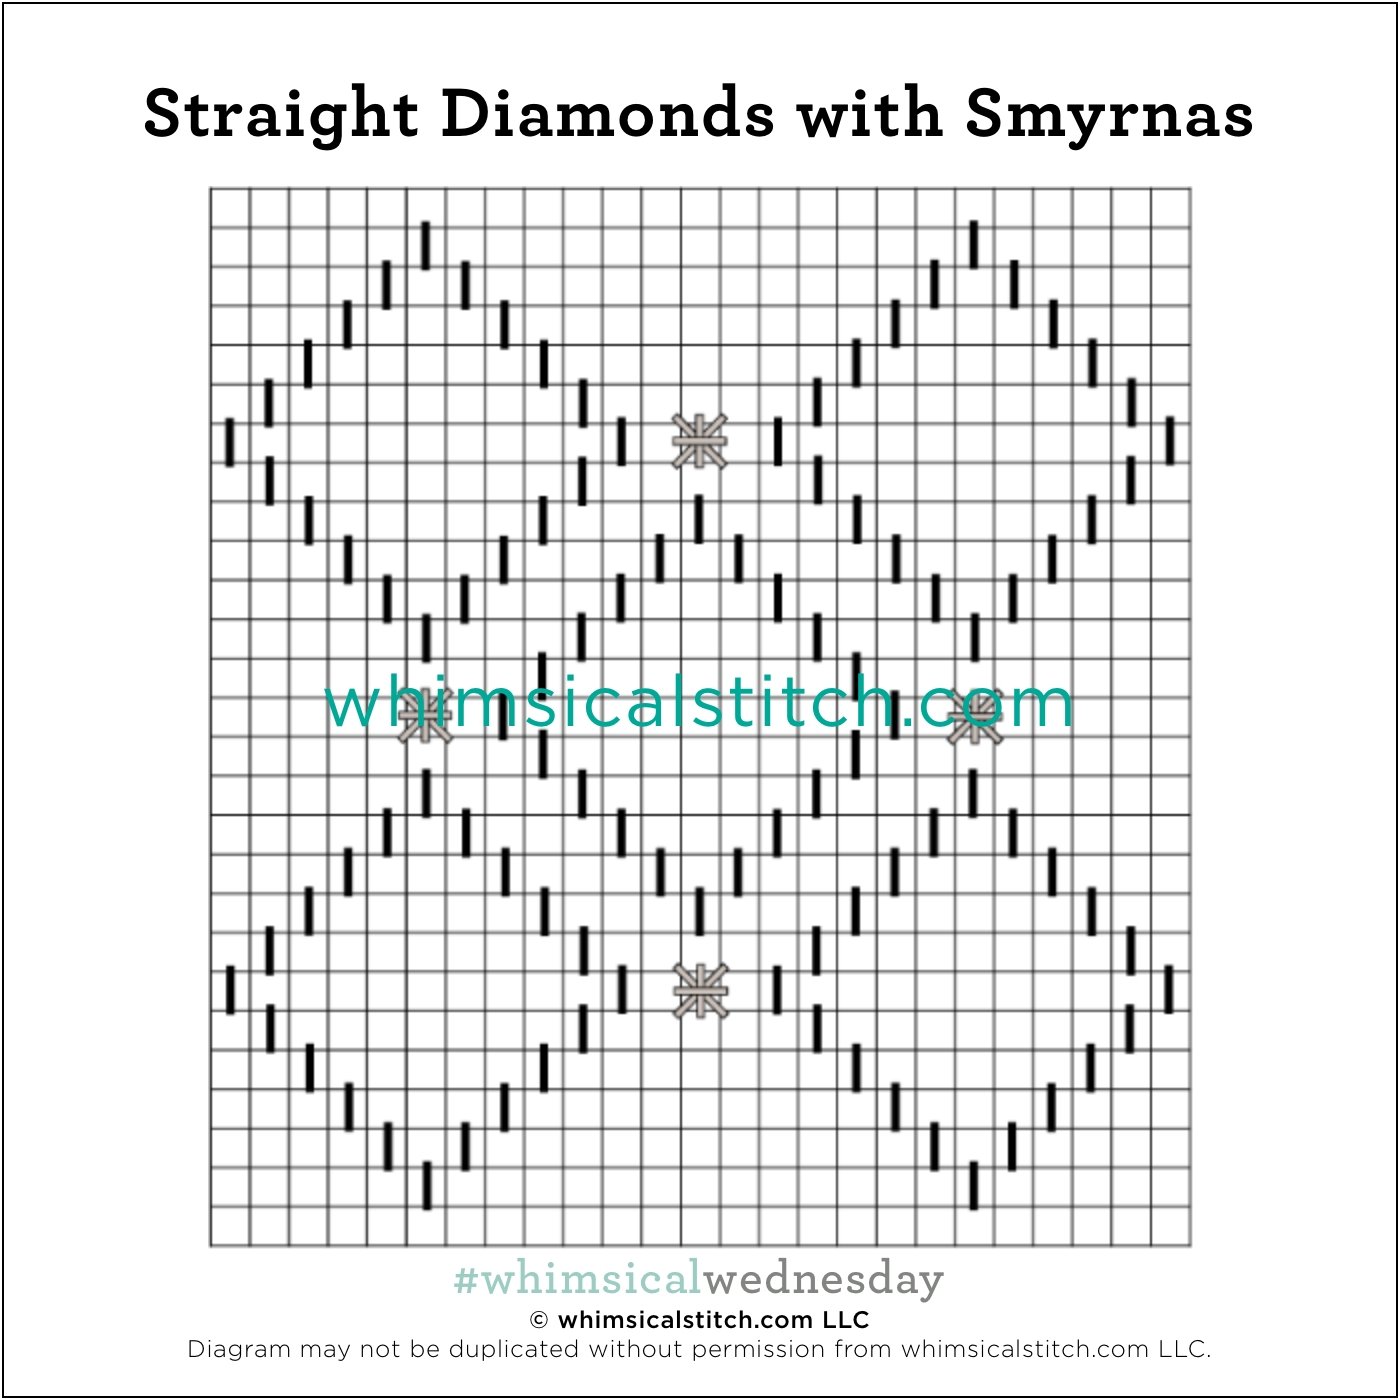
Full disclosure. This variation was a complete accident. I used the threads and canvas from my current WIP for the original stitched sample. I stumbled across the idea for today’s stitch as I removed the diagonal threads surrounding the diamonds. What is more fun is that 2X2 space can be filled with a Smyrna Cross (as illustrated), a faux pearl, four seed beads (in a 2X2 square), or an X. So it can be super glam or super chill!

Two students are already using it for a wall behind a Christmas tree with DMC Floss for the black lines and a Petite Silk Lame for the gray lines. A second is using it for a sky with silk floss and a Kreinik. I look forward to using it for a large vase with a lightweight Kreinik for the black lines and a single bead over two rows, replacing the Smyrna Crosses. I’m sitting here thinking about other ways to play with it.

Click on image to see the whimsicalstitch.com Stitch Library on pinterest.com. Includes all #whimsicalwednesday and #smallspacesunday stitch diagrams.

As you are auditioning stitches (from any stitch source), count the number of canvas threads on the diagram that match your mesh size. And there you have what an inch of the stitch will look like. Evaluate that against the area where you plan to use the stitch and make your final decision. If you start integrating this step into your stitch selection process, you may be surprised at how many stitches you think are large are much smaller than you realize.

By (sometimes) including this step in my own process, I find I am now integrating much longer stitches than I ever thought I would. I used to think a stitch six rows long was super big. I have very much changed my tune, which has helped me expand my creativity, especially for large-space stitches.

Today’s stitch diagram, along with all other #whimsicalwednesday and #smallspacesunday stitch diagrams, can also be found on a Pinterest board here. Be sure to follow whimsicalstitch.com on FacebookPinterestInstagram, and Twitter.

If you like what you see on this blog, there's more. Mary’s Whimsical Stitches is a series of four books offering contemporary how-to collections of more than 200 stitches (in each volume) for all stitchers, regardless of skill level. All books include updated and sequenced diagrams from this blog, plus a collection of all-new stitches from private lessons and other class projects. Visit here to find a needlepoint retailer that carries my books.

New to needlepoint or looking for a refresher? Please download a handy how-to guide covering basic needlepoint stitches and stitch compensation techniques along with new top-line information on needlepoint materials and tools, how to handle threads, and other helpful needlepoint resources.

whimsicalstitch.com also sells Stitch Guides and Stitch Concepts for Melissa Shirley Designs, Zecca DesignsSandra Gilmore, Purple Palm, Maggie, and Penny MacLeod, and many more. Click here to see the newest guides and click here to see the entire collection.

I hope you have the perfect spot for this stitch! Please enjoy! Have a wonderful #whimsicalwednesday!

A Note about Diagrams
I use color in diagrams to make them as clear as possible.  The primary function of different colored lines is to illustrate a stitch sequence.  For example, the layering of colors demonstrates you add them in that order.  They can also provide ideas on integrating additional threads (one line for each color).  Or, you can use the same thread for all color lines.  That's where I encourage you to use your imagination for the space you are stitching!

What?

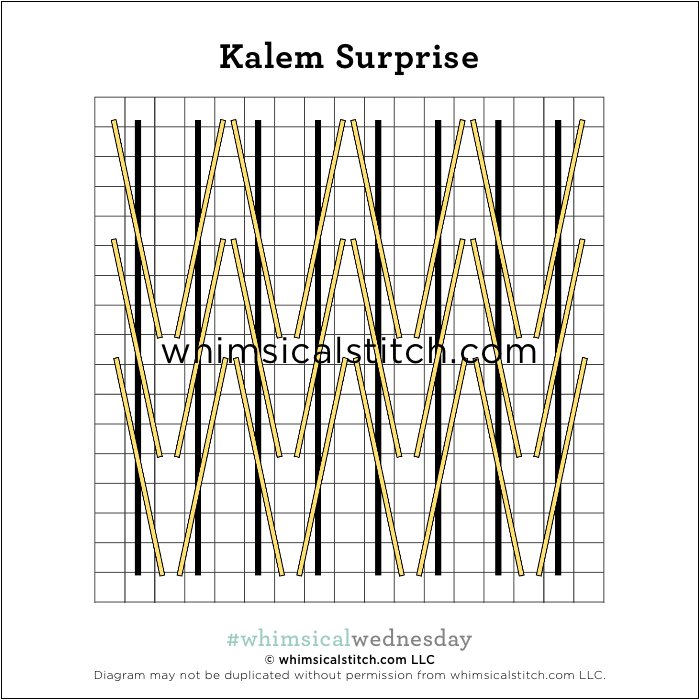
When you look at today’s stitched sample, it appears to be nothing more than an elongated Kalem. I texted Ruth Schmuff (the source of the stitch) to confirm the thread was blue Petite Silk Lame. I was only half right. What??

Click the image to see the whimsicalstitch.com Stitch Library on pinterest.com. Includes all #whimsicalwednesday and #smallspacesunday stitch diagrams.

Click the image to see #whimsicalwednesday and #smallspacesunday Stitched Sample Gallery on Instagram.

Today’s stitch is one of the more deceptive stitches I’ve shared in a while. It turns out it is a layered stitch. The black lines are Color Dream Twisted Silk Perle (available through Bedecked and Beadazzled), and the yellow lines are, in fact, Petite Silk Lame. (Whew. I can keep my job.)

It’s a really cool stitch that will work well for wings, as demonstrated on Ruth’s version of Zecca’s Long Bat. (If you’re interested in the project, click here for more info.) I’m also intrigued to use it for tree trunks. The triangular peaks remind me a little of palm tree trunks. I would use Burmilana or Bella Lusso for the black lines and Rainbow Linen for the yellow lines. It will also work well for clothing, such as a coat. I would use Silk Lame for the black lines and a Vineyard Silk or Pepper Pot Silk for the yellow lines.

Click on image to see the whimsicalstitch.com Stitch Library on pinterest.com. Includes all #whimsicalwednesday and #smallspacesunday stitch diagrams.

As you are auditioning stitches (from any stitch source), count the number of canvas threads on the diagram that match your mesh size. And there you have what an inch of the stitch will look like. Evaluate that against the area where you plan to use the stitch and make your final decision. If you start integrating this step into your stitch selection process, you may be surprised at how many stitches you think are large are much smaller than you realize.

By (sometimes) including this step in my own process, I find I am now integrating much longer stitches than I ever thought I would. I used to think a stitch six rows long was super big. I have very much changed my tune, which has helped me expand my creativity, especially for large-space stitches.

Today’s stitch diagram, along with all other #whimsicalwednesday and #smallspacesunday stitch diagrams, can also be found on a Pinterest board here. Be sure to follow whimsicalstitch.com on FacebookPinterestInstagram, and Twitter.

If you like what you see on this blog, there's more. Mary’s Whimsical Stitches is a series of four books offering contemporary how-to collections of more than 200 stitches (in each volume) for all stitchers, regardless of skill level. All books include updated and sequenced diagrams from this blog, plus a collection of all-new stitches from private lessons and other class projects. Visit here to find a needlepoint retailer that carries my books.

New to needlepoint or looking for a refresher? Please download a handy how-to guide covering basic needlepoint stitches and stitch compensation techniques along with new top-line information on needlepoint materials and tools, how to handle threads, and other helpful needlepoint resources.

whimsicalstitch.com also sells Stitch Guides and Stitch Concepts for Melissa Shirley Designs, Zecca DesignsSandra Gilmore, Purple Palm, Maggie, and Penny MacLeod, and many more. Click here to see the newest guides and click here to see the entire collection.

I hope you have the perfect spot for this stitch! Please enjoy! Have a wonderful #whimsicalwednesday!

A Note about Diagrams
I use color in diagrams to make them as clear as possible.  The primary function of different colored lines is to illustrate a stitch sequence.  For example, the layering of colors demonstrates you add them in that order.  They can also provide ideas on integrating additional threads (one line for each color).  Or, you can use the same thread for all color lines.  That's where I encourage you to use your imagination for the space you are stitching!

New Year, New Diamonds

I love diamond stitches. I stumbled across an interpretation of one of my favorite background stitches and decided to play with it some more.

Click the image to see the whimsicalstitch.com Stitch Library on pinterest.com. Includes all #whimsicalwednesday and #smallspacesunday stitch diagrams.

Click the image to see #whimsicalwednesday and #smallspacesunday Stitched Sample Gallery on Instagram.

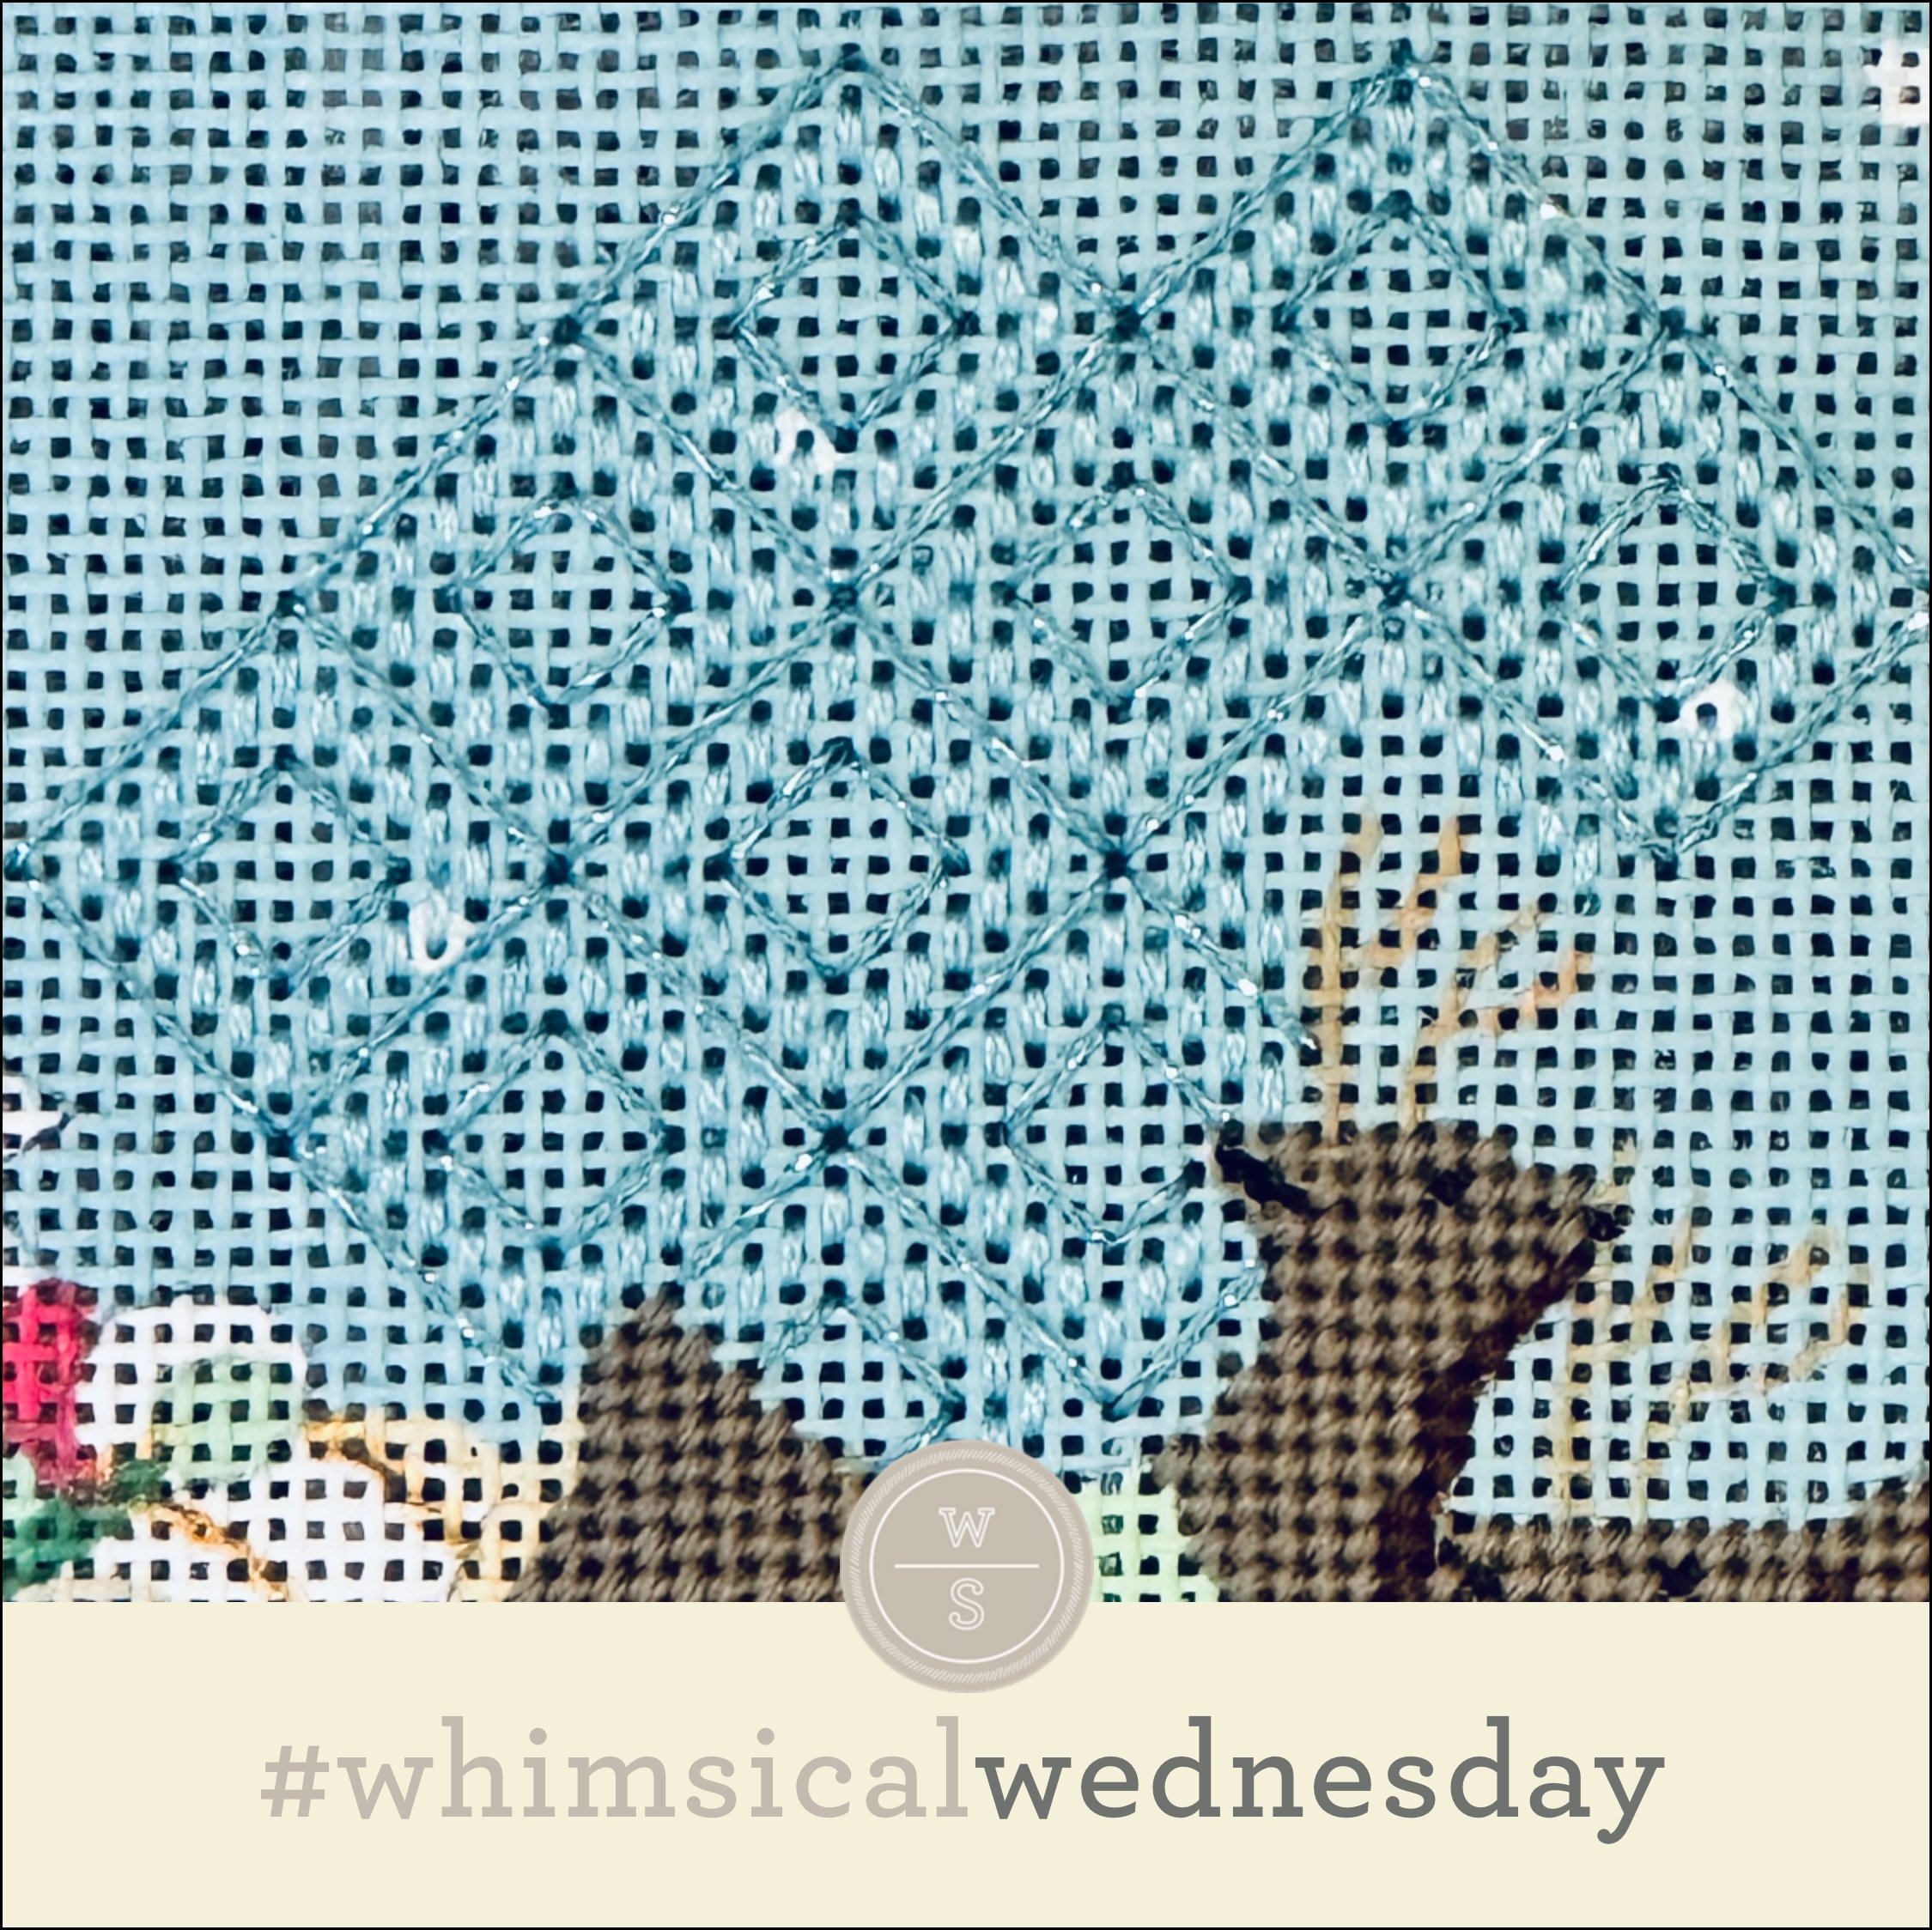
A stitcher took the pattern from my favorite background stitch and separated the diamonds. I had one of those, “Darn. I wish I had thought of that.” (I may or may not have used the word darn.) I played with the idea by enlarging the diamond from five stitches on each side to six stitches on each side (black lines) and adding diamond borders (yellow lines) on both sides of the original diamond. I used two plies of Soie D'Alger for the black lines and Petite Silk Lame for the yellow lines. I absolutely love the end result.

Frankly, I loved every step of this stitch. Feel free to use one step (black lines), two steps (black lines with yellow lines creating the large surrounding diamond, or all three steps (all of the above plus the small diamond in the center of each diamond group).

I love this stitch for some elegant clothing, such as a coat with Vineyard Silk for the black lines and a size 8 Kreinik for the yellow lines. If I wanted to send it over the top, I would add a small bit of brick beading in the center diamond's center or a single Upright Tied Cross. It will make a fantastic background with Elegance for the black lines and a lightweight metallic (Treasure Braid, Petite Silk Lame, or size 8 or 4 Kreinik) for the yellow lines.

Click on image to see the whimsicalstitch.com Stitch Library on pinterest.com. Includes all #whimsicalwednesday and #smallspacesunday stitch diagrams.

As you are auditioning stitches (from any stitch source), count the number of canvas threads on the diagram that match your mesh size. And there you have what an inch of the stitch will look like. Evaluate that against the area where you plan to use the stitch and make your final decision. If you start integrating this step into your stitch selection process, you may be surprised at how many stitches you think are large are much smaller than you realize.

By (sometimes) including this step in my own process, I find I am now integrating much longer stitches than I ever thought I would. I used to think a stitch six rows long was super big. I have very much changed my tune, which has helped me expand my creativity, especially for large-space stitches.

Today’s stitch diagram, along with all other #whimsicalwednesday and #smallspacesunday stitch diagrams, can also be found on a Pinterest board here. Be sure to follow whimsicalstitch.com on FacebookPinterestInstagram, and Twitter.

If you like what you see on this blog, there's more. Mary’s Whimsical Stitches is a series of four books offering contemporary how-to collections of more than 200 stitches (in each volume) for all stitchers, regardless of skill level. All books include updated and sequenced diagrams from this blog, plus a collection of all-new stitches from private lessons and other class projects. Visit here to find a needlepoint retailer that carries my books.

New to needlepoint or looking for a refresher? Please download a handy how-to guide covering basic needlepoint stitches and stitch compensation techniques along with new top-line information on needlepoint materials and tools, how to handle threads, and other helpful needlepoint resources.

whimsicalstitch.com also sells Stitch Guides and Stitch Concepts for Melissa Shirley Designs, Zecca DesignsSandra Gilmore, Purple Palm, Maggie, and Penny MacLeod, and many more. Click here to see the newest guides and click here to see the entire collection.

I hope you have the perfect spot for this stitch! Please enjoy! Have a wonderful #whimsicalwednesday!

A Note about Diagrams
I use color in diagrams to make them as clear as possible.  The primary function of different colored lines is to illustrate a stitch sequence.  For example, the layering of colors demonstrates you add them in that order.  They can also provide ideas on integrating additional threads (one line for each color).  Or, you can use the same thread for all color lines.  That's where I encourage you to use your imagination for the space you are stitching!

Still Hip to be Square

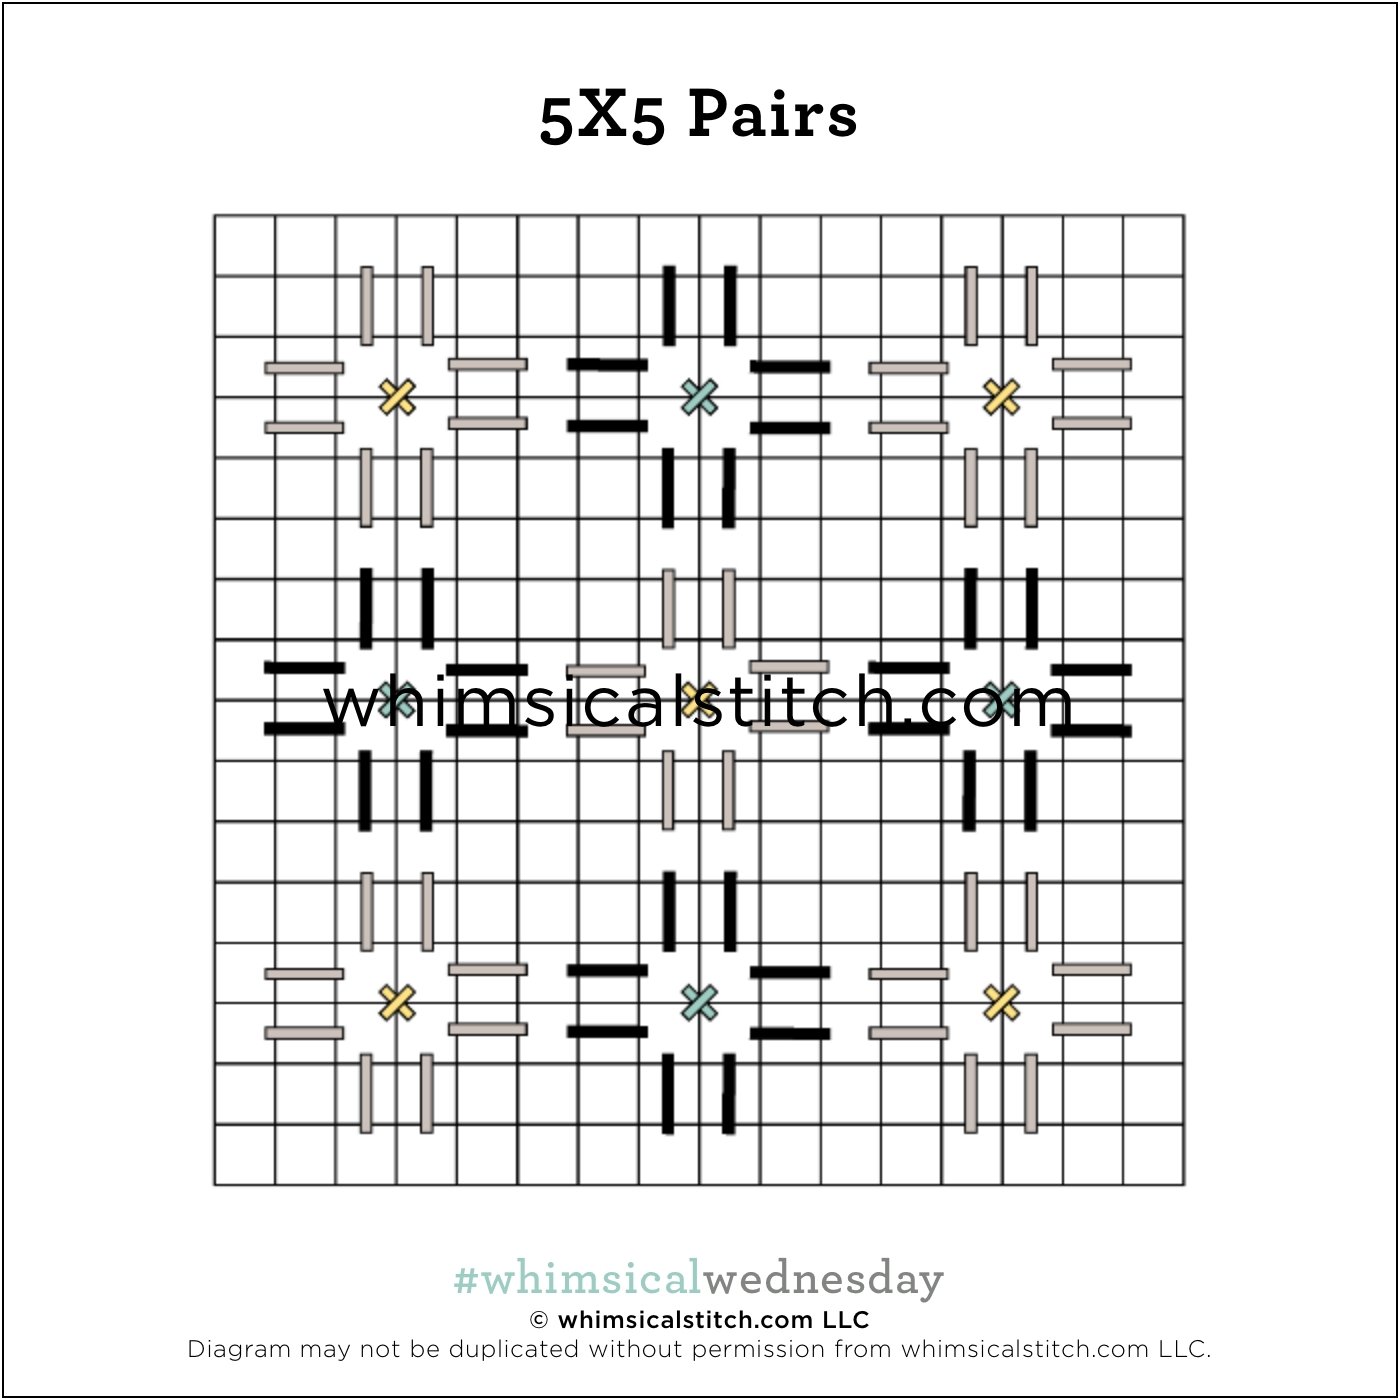
I am always shocked at the weird things I recall in a nanosecond, yet my memory for names is almost shot. As I started to ponder what to do for the 5X5 squares on the roof in today’s stitched sample, I instantly recalled that the stitch I landed on was NOT included in the post I did on 5X5 squares almost seven years ago.

Click the image to see the whimsicalstitch.com Stitch Library on pinterest.com. Includes all #whimsicalwednesday and #smallspacesunday stitch diagrams.

Click the image to see #whimsicalwednesday and #smallspacesunday Stitched Sample Gallery on Instagram.

Click the image to see #whimsicalwednesday and #smallspacesunday Stitched Sample Gallery on Instagram.

Fun fact. Blog posts in January 2016 were dedicated to all things square. 3X3, 6X6, 4X4, 2X2, and 9X9. (All of those stitches are now in the first volume of my book.) It was a great challenge, especially the 3X3 squares.

Today’s stitched sample is the roof of a house in a winter village by Melissa Shirley. I used Soie d’Alger for the black lines, a matching Kreinik for the turquoise lines, a DMC cotton floss for the gray lines, and a second matching Kreinik for the yellow lines. Some of you may question why I used Soie and cotton floss in the same area. The answer is simple. The cotton floss was a better match. Regarding thread matching, it almost always boils down to color. The lighter green Soie was already being used in a different area, so I knew I had to find a floss of some kind for the second green color.

Squares are always great all-purpose stitches, especially for architectural elements including roofs, walls, or floors. If you are looking for a heavier effect, say for a floor, consider two shades of Vineyard Silk with a Silk Lame 18 for the cross stitch accent. I think it will also make a beautiful vase with a lightweight metallic, such as Petite Silk Lame, for the gray and black lines and a seed bead or a faux pearl for the accent in the center.

Have fun with it!

Click on image to see the whimsicalstitch.com Stitch Library on pinterest.com. Includes all #whimsicalwednesday and #smallspacesunday stitch diagrams.

As you are auditioning stitches (from any stitch source), count the number of canvas threads on the diagram that match your mesh size. And there you have what an inch of the stitch will look like. Evaluate that against the area where you plan to use the stitch and make your final decision. If you start integrating this step into your stitch selection process, you may be surprised at how many stitches you think are large are much smaller than you realize.

By (sometimes) including this step in my own process, I find I am now integrating much longer stitches than I ever thought I would. I used to think a stitch six rows long was super big. I have very much changed my tune, which has helped me expand my creativity, especially for large-space stitches.

Today’s stitch diagram, along with all other #whimsicalwednesday and #smallspacesunday stitch diagrams, can also be found on a Pinterest board here. Be sure to follow whimsicalstitch.com on FacebookPinterestInstagram, and Twitter.

If you like what you see on this blog, there's more. Mary’s Whimsical Stitches is a series of four books offering contemporary how-to collections of more than 200 stitches (in each volume) for all stitchers, regardless of skill level. All books include updated and sequenced diagrams from this blog, plus a collection of all-new stitches from private lessons and other class projects. Visit here to find a needlepoint retailer that carries my books.

New to needlepoint or looking for a refresher? Please download a handy how-to guide covering basic needlepoint stitches and stitch compensation techniques along with new top-line information on needlepoint materials and tools, how to handle threads, and other helpful needlepoint resources.

whimsicalstitch.com also sells Stitch Guides and Stitch Concepts for Melissa Shirley Designs, Zecca DesignsSandra Gilmore, Purple Palm, Maggie, and Penny MacLeod, and many more. Click here to see the newest guides and click here to see the entire collection.

I hope you have the perfect spot for this stitch! Please enjoy! Have a wonderful #whimsicalwednesday!

A Note about Diagrams
I use color in diagrams to make them as clear as possible.  The primary function of different colored lines is to illustrate a stitch sequence.  For example, the layering of colors demonstrates you add them in that order.  They can also provide ideas on integrating additional threads (one line for each color).  Or, you can use the same thread for all color lines.  That's where I encourage you to use your imagination for the space you are stitching!
Two Extremes

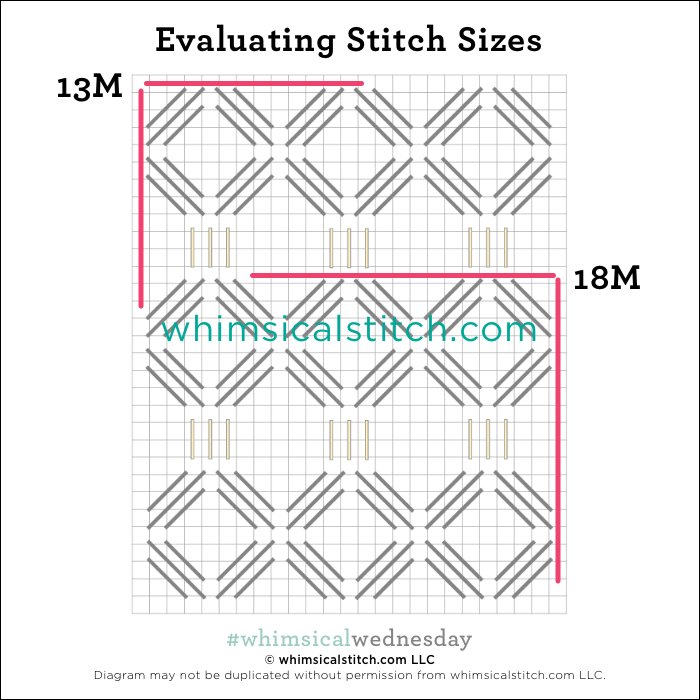
Today’s stitch is kinda fun. The first step was fun all by itself so you now have two new stitches!

Click image to see the whimsicalstitch.com Stitch Library on pinterest.com. Includes all #whimsicalwednesday and #smallspacesunday stitch diagrams.

Click image to see #whimsicalwednesday and #smallspacesunday Stitched Sample Gallery on Instagram.

The stitch is nothing more than a Chevron stitch three rows tall with a tiny vertical accent covering the intersection where the diagonal stitches meet. I went a little crazy with the stitched sample. I used red and white Vineyard Silk (black and gray lines, respectively). I covered each intersection with Neon Rays in the opposite color. It was a lot of fun though I may not want to stitch with Neon Rays again for a while. (That said, I love the look.)

This full-coverage stitch will make a fantastic roof, using one color for both the gray and black lines. I think Rainbow Linen, perle cotton, or Vineyard Silk would work for those stitches for a brown roof. I would use a darker brown and cream Silk Lames for the accent stitches to add subtle interest to the roof. This stitch will create a beautiful blanket with a version of the two-color concept illustrated in the stitched sample. Imagine how pretty a blue and yellow blanket in silk floss with contrasting accents in Flair will be.

As I was working on the sample, I loved the first step as much as the end result. Just the red Vineyard Silk and white Neon Rays created such a sassy open stitch. (Note. The threads are way too visible on the back because this was the first step for the stitch above. If the plan had been to skip a row, I would have added the diagonal stitches following the horizontal path across.)

Click image to see the whimsicalstitch.com Stitch Library on pinterest.com. Includes all #whimsicalwednesday and #smallspacesunday stitch diagrams.

Click image to see #whimsicalwednesday and #smallspacesunday Stitched Sample Gallery on Instagram. (Be sure to swipe to see this version.)

I am looking forward to using this version as a purse with two contrasting colors of Straw Silk for both lines. It will also be a beautiful vase with two shades of Kreinik Metallic with a twist. Use size 8 for the black lines and size 12 for the yellow lines.

Click on image to see the whimsicalstitch.com Stitch Library on pinterest.com. Includes all #whimsicalwednesday and #smallspacesunday stitch diagrams.

Just a reminder about how to evaluate stitches for size on your project.

As you are auditioning stitches (from any stitch source), count the number of canvas threads on the diagram that match your mesh size. And there you have what an inch of the stitch will look like. Evaluate that against the area where you plan to use the stitch and make your final decision. If you start integrating this step into your stitch selection process, you may be surprised at how many stitches you think are large are much smaller than you realize. (Or, in today’s case, the stitch is much larger than it looks.)

By (sometimes) including this step in my own process, I find I am now integrating much longer stitches than I ever thought I would. I used to think a stitch six rows long was super big. I have very much changed my tune, which has helped me expand my creativity, especially for large-space stitches.

Today’s stitch diagram, along with all other #whimsicalwednesday and #smallspacesunday stitch diagrams, can also be found on a Pinterest board here. Be sure to follow whimsicalstitch.com on FacebookPinterestInstagram, and Twitter.

If you like what you see on this blog, there's more. Mary’s Whimsical Stitches is a series of three books offering contemporary how-to collections of more than 250 stitches (in each volume) for all stitchers, regardless of skill level. All books include updated and sequenced diagrams from this blog plus a collection of all-new stitches from private lessons and other class projects. Visit here to find a needlepoint retailer that carries my books.

New to needlepoint or looking for a refresher? Please download a handy how-to guide covering basic needlepoint stitches and stitch compensation techniques along with new top-line information on needlepoint materials and tools, how to handle threads, and other helpful needlepoint resources.

whimsicalstitch.com also sells Stitch Guides and Stitch Concepts for Melissa Shirley Designs, Zecca DesignsSandra Gilmore, Purple Palm, Maggie, and Penny MacLeod, and many more. Click here to see the newest guides and click here to see the entire collection.

I hope you have the perfect spot for this stitch! Please enjoy! Have a wonderful #whimsicalwednesday!

A Note about Diagrams
I use color in diagrams to make them as clear as possible.  The primary function of different colored lines is to illustrate a stitch sequence.  For example, the layering of colors demonstrates you add them in that order.  They can also provide ideas on integrating additional threads (one line for each color).  Or, you can use the same thread for all color lines.  That's where I encourage you to use your imagination for the space you are stitching!
Silver Lining

I went through my canvas stash yesterday. It was, um, sobering. The silver lining is I have a bunch of canvases for us to play with in the weeks/months/years ahead. #iykyk

Click image to see the whimsicalstitch.com Stitch Library on pinterest.com. Includes all #whimsicalwednesday and #smallspacesunday stitch diagrams.

Click image to see #whimsicalwednesday and #smallspacesunday Stitched Sample Gallery on Instagram.

Today’s stitch was a test drive for a sky. It uses two plies of Soie D'Alger (black lines) and a Bead Dazzle size 14/15 bead (yellow circle with black lines) on 18M. And I absolutely love the stitch's lightness and the beads' subtle twinkle.

This practice run illustrated that I need to skip a couple more rows between the columns when I use it for a sky (or general background). The stitch, as it is, will be perfect for a vase, dress, or fence. I would use silk floss and beads for the dress (as illustrated in the example). A Kreinik metallic and a S&J Designs 2mm faux pearl would be an exquisite choice for a vase. A lightweight metallic such as Access Commodities Bijoux and a tiny silver bead will make a very elegant fence.

Click on image to see the whimsicalstitch.com Stitch Library on pinterest.com. Includes all #whimsicalwednesday and #smallspacesunday stitch diagrams.

Just a reminder about how to evaluate stitches for size on your project.

As you are auditioning stitches (from my blog, books, or any other stitch source), count out the number of canvas threads on the diagram that match your mesh size. And there you have what an inch of the stitch will look like. Evaluate that against the area where you are planning the stitch and make your final decision. If you start integrating this step into your stitch selection process, you may be surprised at how many stitches you think are large are much smaller than you realize.

By (sometimes) including this step in my own process, I find I am now integrating much longer stitches than I ever thought I would. I used to think a stitch six rows long was super big. I have very much changed my tune and this has helped me expand my creativity, especially for large space stitches.

Today’s stitch diagram, along with all other #whimsicalwednesday and #smallspacesunday stitch diagrams, can also be found on a Pinterest board here. Be sure to follow whimsicalstitch.com on FacebookPinterestInstagram, and Twitter.

If you like what you see on this blog, there's more. Mary’s Whimsical Stitches is a series of three books offering contemporary how-to collections of more than 250 stitches (in each volume) for all stitchers, regardless of skill level. All books include updated and sequenced diagrams from this blog plus a collection of all-new stitches from private lessons and other class projects. All three books include chapters on Balanced, Diagonal, Layered, Oblique, Small, and Straight stitches. Volume 1 also includes a chapter on Borders. Volume 2 includes a chapter on Beading, and Volume 3 includes a chapter on Tent Pattern Stitches. Any or all are a great enhancement to your stitch library. Visit here to find a needlepoint retailer that carries my books.

Also, you can download for free the first chapter from my first book which covers basic needlepoint stitches and stitch compensation techniques along with new top-line information on needlepoint materials and tools, how to handle threads, and other helpful needlepoint resources.

whimsicalstitch.com also sells Stitch Guides and Stitch Concepts for Melissa Shirley Designs, Zecca DesignsSandra Gilmore, Purple Palm, Maggie, and Penny MacLeod, and many more. Click here to see the newest guides and click here to see the entire collection.

I hope you have the perfect spot for this stitch! Please enjoy! Have a wonderful #whimsicalwednesday!

A Note about Diagrams
I use color in diagrams to make them as clear as possible.  The primary function of different colored lines is to illustrate a stitch sequence.  For example, layering of colors demonstrates you add them in that order.  They can also provide ideas on how to integrate additional threads (one line for each color).  Or, you can use the same thread for all color lines.  That's where I encourage you to use your imagination for the space you are stitching!