

3X3 squares can be frustrating because they are just on the cusp of being something significant. If you could just do one or two more rows, there are lots of fun options.
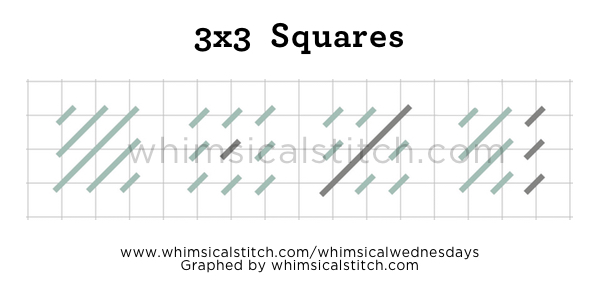
Alas, you are so wrong! (Okay, I'm wrong, but work with me on this.) Since it is still a small space (and this is #smallspacesunday) don't forget that combining threads (whether color or finish) is always a great start. Here are four straightforward 3X3 stitches. The first is the classic Scotch square. The remaining three all have a little extra something due to the addition of a second thread.
As I was playing with 3X3 stitches for this post, I wanted to add a tied stitch, but realized I covered that in the 4X4 post with the Tied 4X4 Square. (You could also "tie" 3X3 Alternating Scotch Squares.) I started to play with this idea and ended up with what I call Whimsy Squares.

This is a version of a Rice Stitch with the top stitches going over two rows instead of one. (If there is a formal name for this stitch, I would love to hear it! I could not find a name anywhere.) The gray lines are added first, followed by the yellow or aqua lines. Play with thread choices and have fun!
The sequence of the yellow and aqua lines can be tricky.

The sequence is numbers followed by letters. The only step to be mindful of is the last step of the diamond on the top. Take a look at the "g-h" step. You slide the final thread ("g-h") under the pre-existing thread ("a-b") to complete the stitch.
I consider the next stitch the classic 3X3 square, the Rhodes stitch.
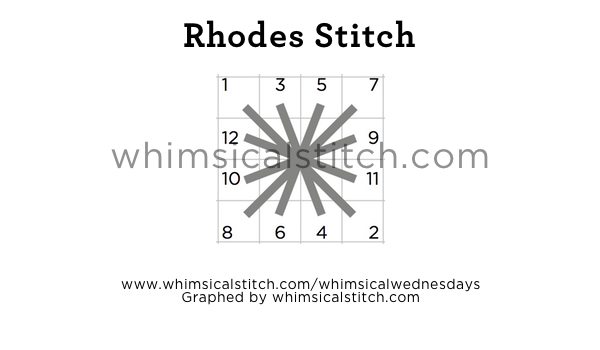
The Rhodes Stitch is an elegant, clean stitch. It's great for borders or corners as its height gives it some stature. It also makes a fantastic Christmas ornament or button, as it is a scalable stitch. It is also adjustable to the space, whether it be a larger square or even a rectangle, as illustrated by the stitched sample on Instagram. It is the same concept. Starting in a corner, go to opposite corner, and continue to rotate around shape until it is full.
The last stitch for today is a stitch I call a Layered Diamond. This is a beautiful accent, whether in a larger space, a border, or even as individual accent.

I call it a Layered Diamond because the sequence of the four stitches creating the central diamond are all layered above and beneath each other. The sequence for the diamond is the same as the sequence for the diamond in the Whimsy Square. You insert it under the previously stitched thread, as illustrated in the "Whimsy Square Sequence" diagram above.
These stitch diagrams, along with other #whimsicalwednesday and #smallspacesunday stitch diagrams, can also be found on www.pinterest.com/whimsicalstitch/whimsicalwednesday.
Be sure to follow whimsicalstitch.com on Facebook, Pinterest, Instagram, and Twitter.
If you like what you see on this blog, want to learn some very creative decorative stitches, and how to put them all together, whimsicalstitch.com sells stitch guides for seasonal Melissa Shirley designs. 20 guides are currently available and more are in the pipeline.
Enjoy!