On the Road

Summer stitching travels took me to Michigan, Maryland, Northern California, and Alabama. September's stitches are postcards from those travels and include stitches from several projects I worked on with students during those visits.

Click on image to see on whimsicalstitch.com's Pinterest account. Visit pinterest.com/whimsicalstitch/whimsicalwednesday for a library of all #whimsicalwednesday and #smallspacesunday stitch diagrams.

Click on image to see on whimsicalstitch.com's Pinterest account. Visit pinterest.com/whimsicalstitch/whimsicalwednesday for a library of all #whimsicalwednesday and #smallspacesunday stitch diagrams.

Click on image to see on whimsicalstitch.com's Instagram account. Visit instagram.com/whimsicalstitch to see a library of stitched samples for select #whimsicalwednesday and #smallspacesunday stitch diagrams.

Click on image to see on whimsicalstitch.com's Instagram account. Visit instagram.com/whimsicalstitch to see a library of stitched samples for select #whimsicalwednesday and #smallspacesunday stitch diagrams.

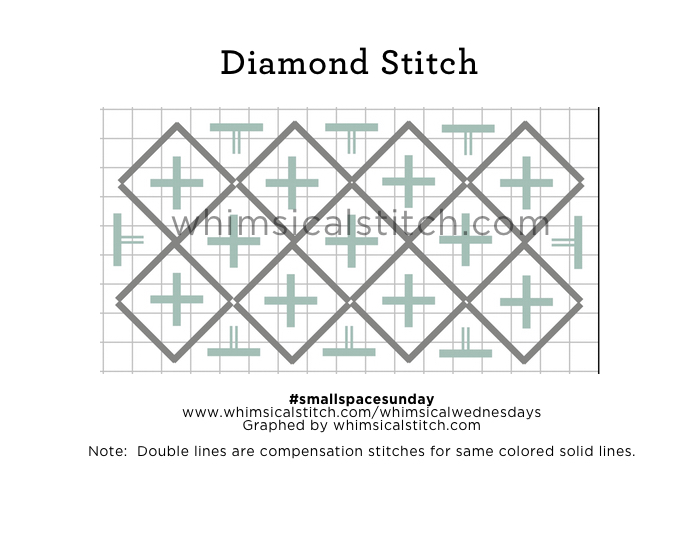
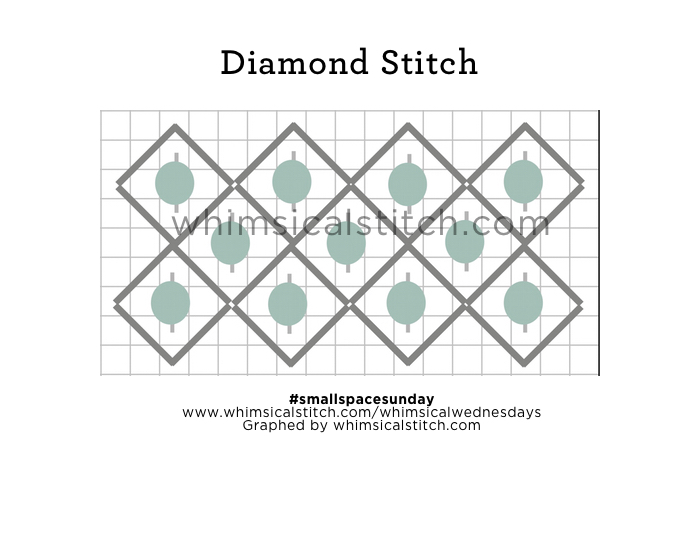
Today's stitch comes from my event at the Needle Bug in Alabama. It is a fun variation of diamonds from my new First Thanksgiving Stitch Concept. The bead between the diamonds (in the vertical columns) is an elegant and easy accent. 

The stitch was used for clothing in First Thanksgiving with Pepper Pot Silk, Flair, and Sundance Beads. I also used variations of this for skies with Splendor, sequins, and beads. It would make a great roof with Rainbow Linen, matte beads, and an overdyed wool. I would love to see it as water, as the bead adds a wave-like texture.

There are other variations available. Consider leaving the diamond empty for a more open stitch. Consider swapping the bead and Upright Cross locations. Consider adding a straight stitch over two rows on the vertical instead of the bead. Have fun with it and let us know what you did with it. It could be a future #stitchingsunday.

This stitch diagram, along with all other #whimsicalwednesday and #smallspacesunday stitch diagrams, can also be found on a Pinterest board here.

Be sure to follow whimsicalstitch.com on FacebookPinterestInstagram, and Twitter.

If you like what you see on this blog, want to learn some very creative decorative stitches, and how to put them all together, whimsicalstitch.com sells Stitch Guides and Stitch Concepts for Melissa Shirley Designs, Zecca DesignsPatience Brewster, and many more. Click here to see the newest guides and click here to see the entire collection.

I hope you have the perfect spot for this stitch!  Please enjoy!  

A Note about Diagrams
I use color in diagrams to make them as clear as possible.  The primary function of different colored lines is to illustrate a stitch sequence.  For example, layering of colors demonstrates you add them in that order.  They can also provide ideas on how to integrate additional threads (one line for each color).  Or, you can use the same thread for all color lines.  That's where I encourage you to use your imagination for the space you are stitching!

3X3

3X3 squares can be frustrating because they are just on the cusp of being something significant.  If you could just do one or two more rows, there are lots of fun options.

Alas, you are so wrong!  (Okay, I'm wrong, but work with me on this.)  Since it is still a small space (and this is #smallspacesunday) don't forget that combining threads (whether color or finish) is always a great start.  Here are four straightforward 3X3 stitches.  The first is the classic Scotch square.  The remaining three all have a little extra something due to the addition of a second thread.

As I was playing with 3X3 stitches for this post, I wanted to add a tied stitch, but realized I covered that in the 4X4 post with the Tied 4X4 Square.  (You could also "tie" 3X3 Alternating Scotch Squares.)  I started to play with this idea and ended up with what I call Whimsy Squares. 

This is a version of a Rice Stitch with the top stitches going over two rows instead of one.  (If there is a formal name for this stitch, I would love to hear it!  I could not find a name anywhere.)  The gray lines are added first, followed by the yellow or aqua lines.  Play with thread choices and have fun!  

The sequence of the yellow and aqua lines can be tricky.

The sequence is numbers followed by letters.  The only step to be mindful of is the last step of the diamond on the top.  Take a look at the "g-h" step.  You slide the final thread ("g-h") under the pre-existing thread ("a-b") to complete the stitch.

I consider the next stitch the classic 3X3 square, the Rhodes stitch.  

The Rhodes Stitch is an elegant, clean stitch.  It's great for borders or corners as its height gives it some stature.  It also makes a fantastic Christmas ornament or button, as it is a scalable stitch.  It is also adjustable to the space, whether it be a larger square or even a rectangle, as illustrated by the stitched sample on Instagram.  It is the same concept.  Starting in a corner, go to opposite corner, and continue to rotate around shape until it is full.

The last stitch for today is a stitch I call a Layered Diamond.  This is a beautiful accent, whether in a larger space, a border, or even as individual accent.   

I call it a Layered Diamond because the sequence of the four stitches creating the central diamond are all layered above and beneath each other.  The sequence for the diamond is the same as the sequence for the diamond in the Whimsy Square.  You insert it under the previously stitched thread, as illustrated in the "Whimsy Square Sequence" diagram above.

These stitch diagrams, along with other #whimsicalwednesday and #smallspacesunday stitch diagrams, can also be found on www.pinterest.com/whimsicalstitch/whimsicalwednesday.  

Be sure to follow whimsicalstitch.com on FacebookPinterestInstagram, and Twitter.

If you like what you see on this blog, want to learn some very creative decorative stitches, and how to put them all together, whimsicalstitch.com sells stitch guides for seasonal Melissa Shirley designs.  20 guides are currently available and more are in the pipeline.

Enjoy! 

A Girl's Best Friend

The Diamond Stitch may not be the first stitch you think of for a small space, but it's a fun and versatile solution.

More often than not, the simplest of Diamond Stitches is the best for a small space.

Diamond Stitch.jpg

Don't freak out at the openness of the diagram.  Imagine the gray lines as a Frosty Rays, Fyre Werks, or Vineyard Silk.  The coverage is far better than the diagram illustrates.  With a lighter thread, such as Soy Lustre, Elegance, or Kreinik Metallics Very Fine Braid (#4), it works as a fantastic open stitch that highlights shading.

If you are using the Diamond Stitch as a small space stitch, filling the center of the diamond requires discretion.  You don't want to make it too busy and overpower the area.  Two quick ideas are an Upright Cross or a single bead.

As a small space stitch, I like to mix matte and metallic threads (my favorite combo) with similar color values.  I've also used two different colors...one as the diamond and one as the Upright Cross...to add color to an area or to relate the area to another section of the canvas. 

If you choose to add a single bead, remember the size of the bead will define the stitch.  A larger bead will draw attention to the area.  

These stitch diagrams, along with other #whimsicalwednesday and #smallspacesunday stitch diagrams, can also be found on www.pinterest.com/whimsicalstitch/whimsicalwednesday.  

Be sure to follow whimsicalstitch.com on FacebookPinterestInstagram, and Twitter.

If you like what you see on this blog, want to learn some very creative decorative stitches, and how to put them all together, whimsicalstitch.com sells stitch guides for seasonal Melissa Shirley designs.  17 guides are currently available and more are in the pipeline.

Enjoy!