My Cheat Day

I was today years old when I realized that I needed a cheat day on the blog. That doesn’t make today’s stitch any less cute. It’s a more open stitch variation from a couple of weeks ago.

Click the image to see the whimsicalstitch.com Stitch Library on pinterest.com. Includes all #whimsicalwednesday and #smallspacesunday stitch diagrams.

Click the image to see #whimsicalwednesday and #smallspacesunday Stitched Sample Gallery on Instagram.

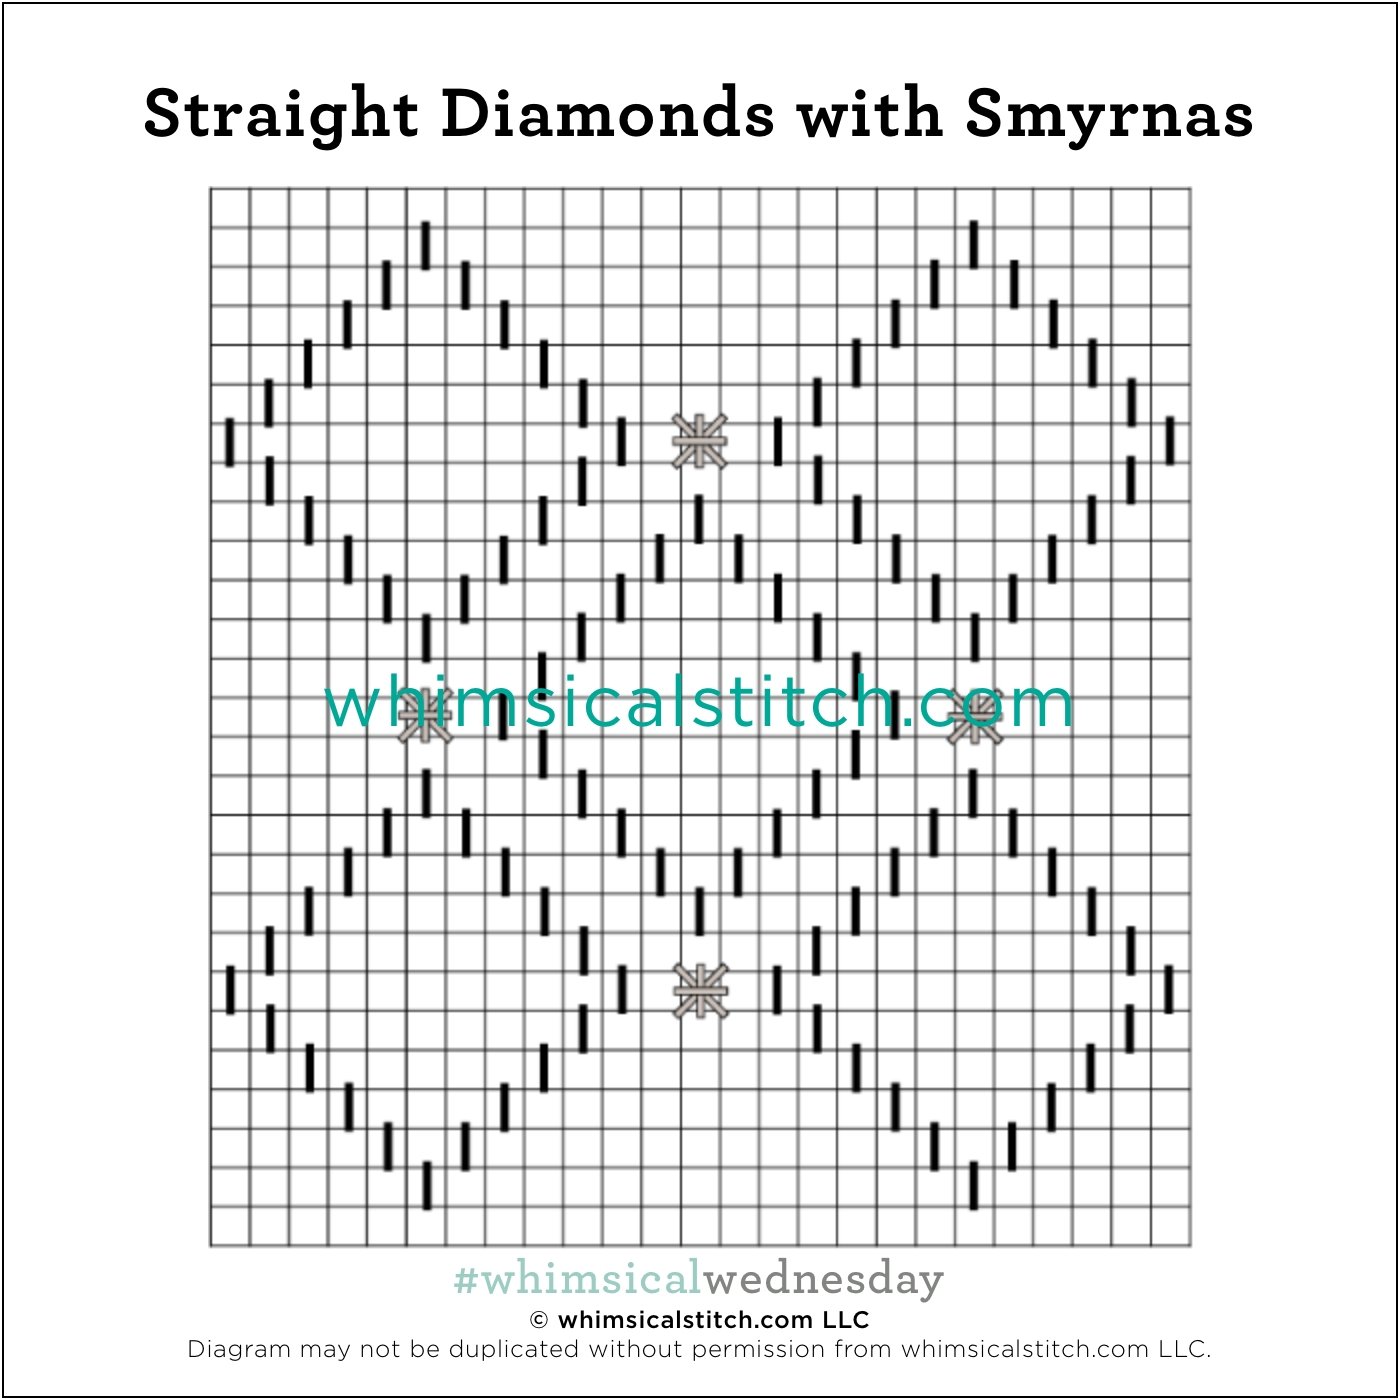
Full disclosure. This variation was a complete accident. I used the threads and canvas from my current WIP for the original stitched sample. I stumbled across the idea for today’s stitch as I removed the diagonal threads surrounding the diamonds. What is more fun is that 2X2 space can be filled with a Smyrna Cross (as illustrated), a faux pearl, four seed beads (in a 2X2 square), or an X. So it can be super glam or super chill!

Two students are already using it for a wall behind a Christmas tree with DMC Floss for the black lines and a Petite Silk Lame for the gray lines. A second is using it for a sky with silk floss and a Kreinik. I look forward to using it for a large vase with a lightweight Kreinik for the black lines and a single bead over two rows, replacing the Smyrna Crosses. I’m sitting here thinking about other ways to play with it.

Click on image to see the whimsicalstitch.com Stitch Library on pinterest.com. Includes all #whimsicalwednesday and #smallspacesunday stitch diagrams.

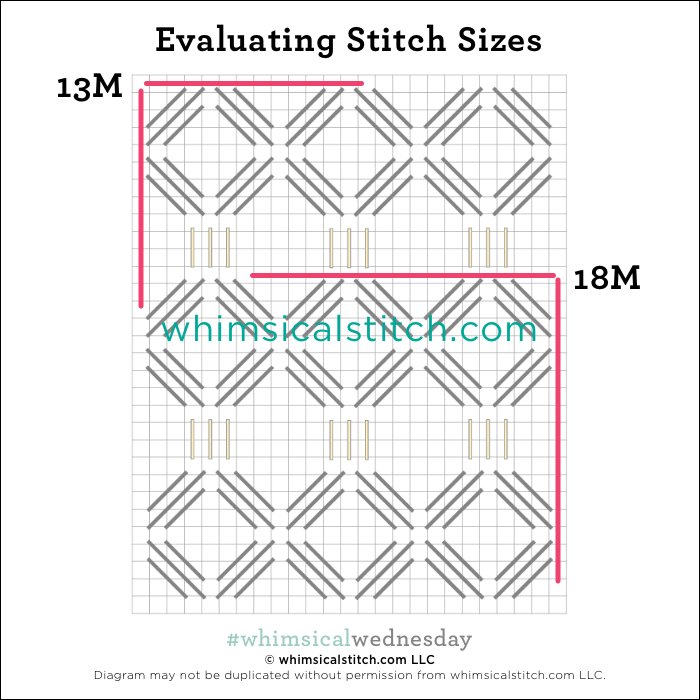
As you are auditioning stitches (from any stitch source), count the number of canvas threads on the diagram that match your mesh size. And there you have what an inch of the stitch will look like. Evaluate that against the area where you plan to use the stitch and make your final decision. If you start integrating this step into your stitch selection process, you may be surprised at how many stitches you think are large are much smaller than you realize.

By (sometimes) including this step in my own process, I find I am now integrating much longer stitches than I ever thought I would. I used to think a stitch six rows long was super big. I have very much changed my tune, which has helped me expand my creativity, especially for large-space stitches.

Today’s stitch diagram, along with all other #whimsicalwednesday and #smallspacesunday stitch diagrams, can also be found on a Pinterest board here. Be sure to follow whimsicalstitch.com on FacebookPinterestInstagram, and Twitter.

If you like what you see on this blog, there's more. Mary’s Whimsical Stitches is a series of four books offering contemporary how-to collections of more than 200 stitches (in each volume) for all stitchers, regardless of skill level. All books include updated and sequenced diagrams from this blog, plus a collection of all-new stitches from private lessons and other class projects. Visit here to find a needlepoint retailer that carries my books.

New to needlepoint or looking for a refresher? Please download a handy how-to guide covering basic needlepoint stitches and stitch compensation techniques along with new top-line information on needlepoint materials and tools, how to handle threads, and other helpful needlepoint resources.

whimsicalstitch.com also sells Stitch Guides and Stitch Concepts for Melissa Shirley Designs, Zecca DesignsSandra Gilmore, Purple Palm, Maggie, and Penny MacLeod, and many more. Click here to see the newest guides and click here to see the entire collection.

I hope you have the perfect spot for this stitch! Please enjoy! Have a wonderful #whimsicalwednesday!

A Note about Diagrams
I use color in diagrams to make them as clear as possible.  The primary function of different colored lines is to illustrate a stitch sequence.  For example, the layering of colors demonstrates you add them in that order.  They can also provide ideas on integrating additional threads (one line for each color).  Or, you can use the same thread for all color lines.  That's where I encourage you to use your imagination for the space you are stitching!

What?

When you look at today’s stitched sample, it appears to be nothing more than an elongated Kalem. I texted Ruth Schmuff (the source of the stitch) to confirm the thread was blue Petite Silk Lame. I was only half right. What??

Click the image to see the whimsicalstitch.com Stitch Library on pinterest.com. Includes all #whimsicalwednesday and #smallspacesunday stitch diagrams.

Click the image to see #whimsicalwednesday and #smallspacesunday Stitched Sample Gallery on Instagram.

Today’s stitch is one of the more deceptive stitches I’ve shared in a while. It turns out it is a layered stitch. The black lines are Color Dream Twisted Silk Perle (available through Bedecked and Beadazzled), and the yellow lines are, in fact, Petite Silk Lame. (Whew. I can keep my job.)

It’s a really cool stitch that will work well for wings, as demonstrated on Ruth’s version of Zecca’s Long Bat. (If you’re interested in the project, click here for more info.) I’m also intrigued to use it for tree trunks. The triangular peaks remind me a little of palm tree trunks. I would use Burmilana or Bella Lusso for the black lines and Rainbow Linen for the yellow lines. It will also work well for clothing, such as a coat. I would use Silk Lame for the black lines and a Vineyard Silk or Pepper Pot Silk for the yellow lines.

Click on image to see the whimsicalstitch.com Stitch Library on pinterest.com. Includes all #whimsicalwednesday and #smallspacesunday stitch diagrams.

As you are auditioning stitches (from any stitch source), count the number of canvas threads on the diagram that match your mesh size. And there you have what an inch of the stitch will look like. Evaluate that against the area where you plan to use the stitch and make your final decision. If you start integrating this step into your stitch selection process, you may be surprised at how many stitches you think are large are much smaller than you realize.

By (sometimes) including this step in my own process, I find I am now integrating much longer stitches than I ever thought I would. I used to think a stitch six rows long was super big. I have very much changed my tune, which has helped me expand my creativity, especially for large-space stitches.

Today’s stitch diagram, along with all other #whimsicalwednesday and #smallspacesunday stitch diagrams, can also be found on a Pinterest board here. Be sure to follow whimsicalstitch.com on FacebookPinterestInstagram, and Twitter.

If you like what you see on this blog, there's more. Mary’s Whimsical Stitches is a series of four books offering contemporary how-to collections of more than 200 stitches (in each volume) for all stitchers, regardless of skill level. All books include updated and sequenced diagrams from this blog, plus a collection of all-new stitches from private lessons and other class projects. Visit here to find a needlepoint retailer that carries my books.

New to needlepoint or looking for a refresher? Please download a handy how-to guide covering basic needlepoint stitches and stitch compensation techniques along with new top-line information on needlepoint materials and tools, how to handle threads, and other helpful needlepoint resources.

whimsicalstitch.com also sells Stitch Guides and Stitch Concepts for Melissa Shirley Designs, Zecca DesignsSandra Gilmore, Purple Palm, Maggie, and Penny MacLeod, and many more. Click here to see the newest guides and click here to see the entire collection.

I hope you have the perfect spot for this stitch! Please enjoy! Have a wonderful #whimsicalwednesday!

A Note about Diagrams
I use color in diagrams to make them as clear as possible.  The primary function of different colored lines is to illustrate a stitch sequence.  For example, the layering of colors demonstrates you add them in that order.  They can also provide ideas on integrating additional threads (one line for each color).  Or, you can use the same thread for all color lines.  That's where I encourage you to use your imagination for the space you are stitching!

New Year, New Diamonds

I love diamond stitches. I stumbled across an interpretation of one of my favorite background stitches and decided to play with it some more.

Click the image to see the whimsicalstitch.com Stitch Library on pinterest.com. Includes all #whimsicalwednesday and #smallspacesunday stitch diagrams.

Click the image to see #whimsicalwednesday and #smallspacesunday Stitched Sample Gallery on Instagram.

A stitcher took the pattern from my favorite background stitch and separated the diamonds. I had one of those, “Darn. I wish I had thought of that.” (I may or may not have used the word darn.) I played with the idea by enlarging the diamond from five stitches on each side to six stitches on each side (black lines) and adding diamond borders (yellow lines) on both sides of the original diamond. I used two plies of Soie D'Alger for the black lines and Petite Silk Lame for the yellow lines. I absolutely love the end result.

Frankly, I loved every step of this stitch. Feel free to use one step (black lines), two steps (black lines with yellow lines creating the large surrounding diamond, or all three steps (all of the above plus the small diamond in the center of each diamond group).

I love this stitch for some elegant clothing, such as a coat with Vineyard Silk for the black lines and a size 8 Kreinik for the yellow lines. If I wanted to send it over the top, I would add a small bit of brick beading in the center diamond's center or a single Upright Tied Cross. It will make a fantastic background with Elegance for the black lines and a lightweight metallic (Treasure Braid, Petite Silk Lame, or size 8 or 4 Kreinik) for the yellow lines.

Click on image to see the whimsicalstitch.com Stitch Library on pinterest.com. Includes all #whimsicalwednesday and #smallspacesunday stitch diagrams.

As you are auditioning stitches (from any stitch source), count the number of canvas threads on the diagram that match your mesh size. And there you have what an inch of the stitch will look like. Evaluate that against the area where you plan to use the stitch and make your final decision. If you start integrating this step into your stitch selection process, you may be surprised at how many stitches you think are large are much smaller than you realize.

By (sometimes) including this step in my own process, I find I am now integrating much longer stitches than I ever thought I would. I used to think a stitch six rows long was super big. I have very much changed my tune, which has helped me expand my creativity, especially for large-space stitches.

Today’s stitch diagram, along with all other #whimsicalwednesday and #smallspacesunday stitch diagrams, can also be found on a Pinterest board here. Be sure to follow whimsicalstitch.com on FacebookPinterestInstagram, and Twitter.

If you like what you see on this blog, there's more. Mary’s Whimsical Stitches is a series of four books offering contemporary how-to collections of more than 200 stitches (in each volume) for all stitchers, regardless of skill level. All books include updated and sequenced diagrams from this blog, plus a collection of all-new stitches from private lessons and other class projects. Visit here to find a needlepoint retailer that carries my books.

New to needlepoint or looking for a refresher? Please download a handy how-to guide covering basic needlepoint stitches and stitch compensation techniques along with new top-line information on needlepoint materials and tools, how to handle threads, and other helpful needlepoint resources.

whimsicalstitch.com also sells Stitch Guides and Stitch Concepts for Melissa Shirley Designs, Zecca DesignsSandra Gilmore, Purple Palm, Maggie, and Penny MacLeod, and many more. Click here to see the newest guides and click here to see the entire collection.

I hope you have the perfect spot for this stitch! Please enjoy! Have a wonderful #whimsicalwednesday!

A Note about Diagrams
I use color in diagrams to make them as clear as possible.  The primary function of different colored lines is to illustrate a stitch sequence.  For example, the layering of colors demonstrates you add them in that order.  They can also provide ideas on integrating additional threads (one line for each color).  Or, you can use the same thread for all color lines.  That's where I encourage you to use your imagination for the space you are stitching!
Still Hip to be Square

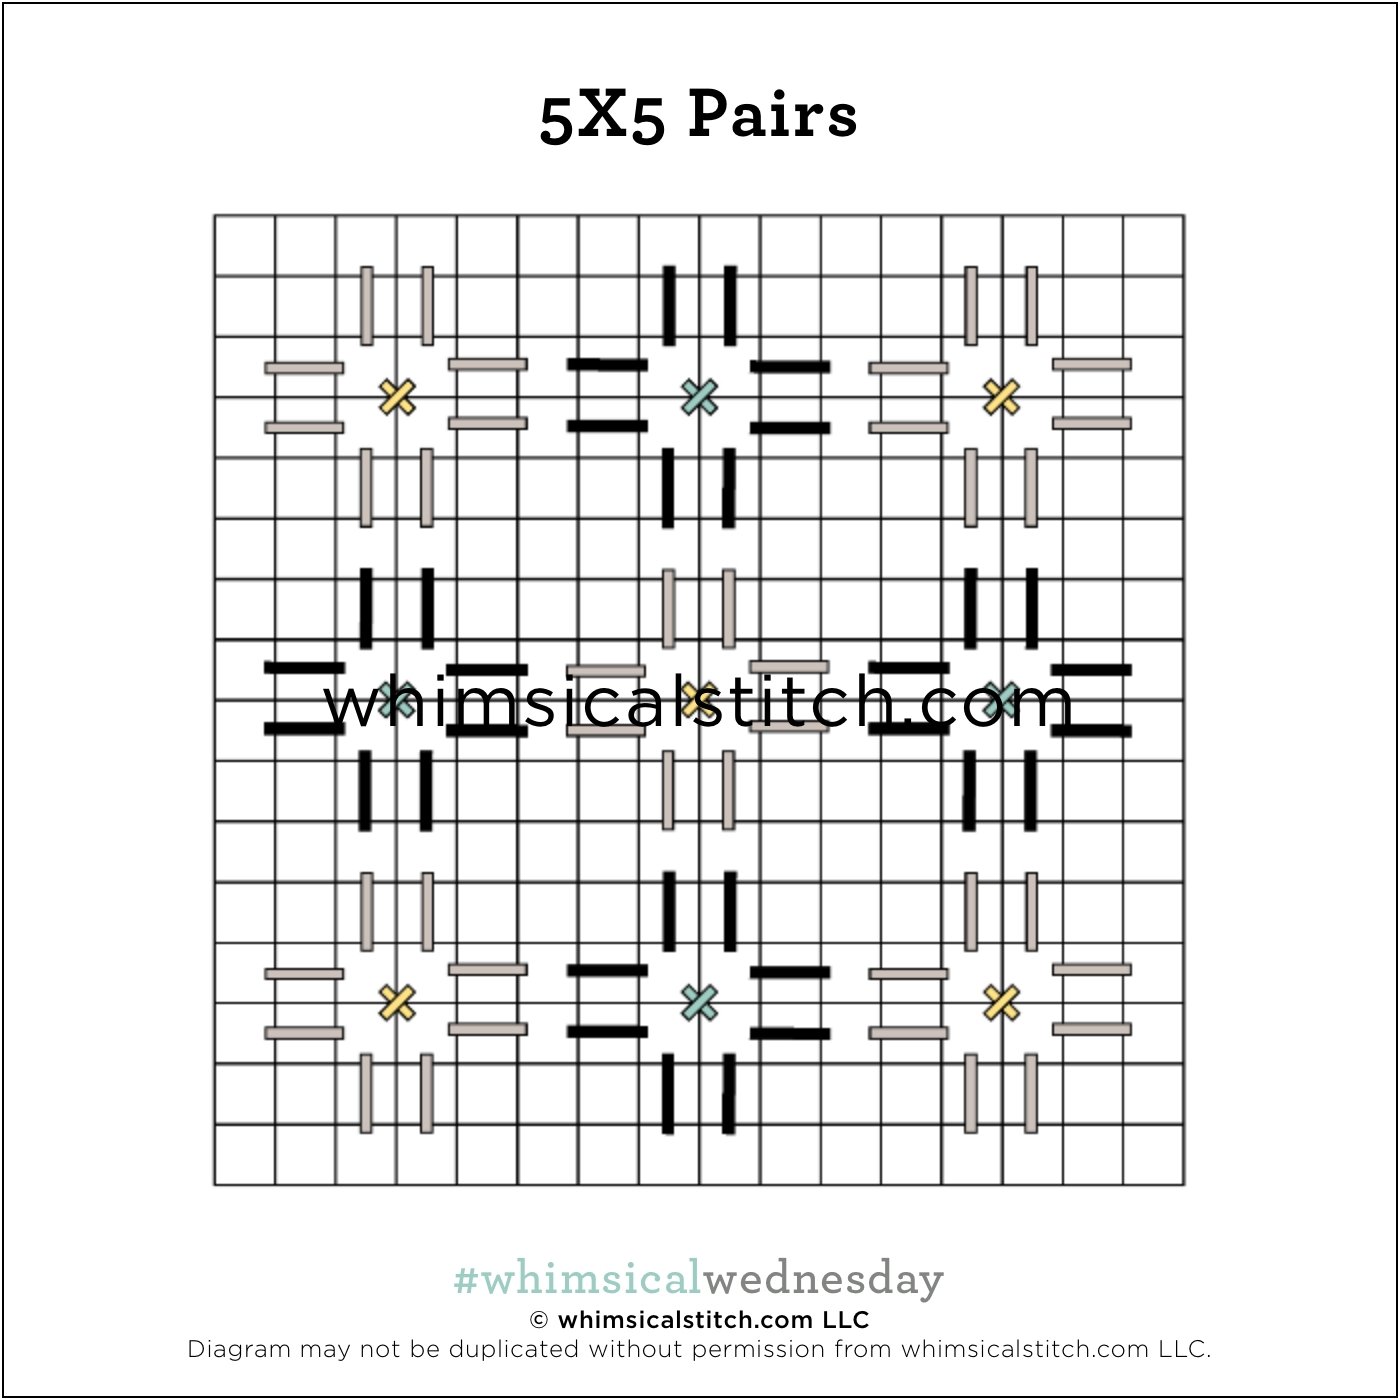
I am always shocked at the weird things I recall in a nanosecond, yet my memory for names is almost shot. As I started to ponder what to do for the 5X5 squares on the roof in today’s stitched sample, I instantly recalled that the stitch I landed on was NOT included in the post I did on 5X5 squares almost seven years ago.

Click the image to see the whimsicalstitch.com Stitch Library on pinterest.com. Includes all #whimsicalwednesday and #smallspacesunday stitch diagrams.

Click the image to see #whimsicalwednesday and #smallspacesunday Stitched Sample Gallery on Instagram.

Click the image to see #whimsicalwednesday and #smallspacesunday Stitched Sample Gallery on Instagram.

Fun fact. Blog posts in January 2016 were dedicated to all things square. 3X3, 6X6, 4X4, 2X2, and 9X9. (All of those stitches are now in the first volume of my book.) It was a great challenge, especially the 3X3 squares.

Today’s stitched sample is the roof of a house in a winter village by Melissa Shirley. I used Soie d’Alger for the black lines, a matching Kreinik for the turquoise lines, a DMC cotton floss for the gray lines, and a second matching Kreinik for the yellow lines. Some of you may question why I used Soie and cotton floss in the same area. The answer is simple. The cotton floss was a better match. Regarding thread matching, it almost always boils down to color. The lighter green Soie was already being used in a different area, so I knew I had to find a floss of some kind for the second green color.

Squares are always great all-purpose stitches, especially for architectural elements including roofs, walls, or floors. If you are looking for a heavier effect, say for a floor, consider two shades of Vineyard Silk with a Silk Lame 18 for the cross stitch accent. I think it will also make a beautiful vase with a lightweight metallic, such as Petite Silk Lame, for the gray and black lines and a seed bead or a faux pearl for the accent in the center.

Have fun with it!

Click on image to see the whimsicalstitch.com Stitch Library on pinterest.com. Includes all #whimsicalwednesday and #smallspacesunday stitch diagrams.

As you are auditioning stitches (from any stitch source), count the number of canvas threads on the diagram that match your mesh size. And there you have what an inch of the stitch will look like. Evaluate that against the area where you plan to use the stitch and make your final decision. If you start integrating this step into your stitch selection process, you may be surprised at how many stitches you think are large are much smaller than you realize.

By (sometimes) including this step in my own process, I find I am now integrating much longer stitches than I ever thought I would. I used to think a stitch six rows long was super big. I have very much changed my tune, which has helped me expand my creativity, especially for large-space stitches.

Today’s stitch diagram, along with all other #whimsicalwednesday and #smallspacesunday stitch diagrams, can also be found on a Pinterest board here. Be sure to follow whimsicalstitch.com on FacebookPinterestInstagram, and Twitter.

If you like what you see on this blog, there's more. Mary’s Whimsical Stitches is a series of four books offering contemporary how-to collections of more than 200 stitches (in each volume) for all stitchers, regardless of skill level. All books include updated and sequenced diagrams from this blog, plus a collection of all-new stitches from private lessons and other class projects. Visit here to find a needlepoint retailer that carries my books.

New to needlepoint or looking for a refresher? Please download a handy how-to guide covering basic needlepoint stitches and stitch compensation techniques along with new top-line information on needlepoint materials and tools, how to handle threads, and other helpful needlepoint resources.

whimsicalstitch.com also sells Stitch Guides and Stitch Concepts for Melissa Shirley Designs, Zecca DesignsSandra Gilmore, Purple Palm, Maggie, and Penny MacLeod, and many more. Click here to see the newest guides and click here to see the entire collection.

I hope you have the perfect spot for this stitch! Please enjoy! Have a wonderful #whimsicalwednesday!

A Note about Diagrams
I use color in diagrams to make them as clear as possible.  The primary function of different colored lines is to illustrate a stitch sequence.  For example, the layering of colors demonstrates you add them in that order.  They can also provide ideas on integrating additional threads (one line for each color).  Or, you can use the same thread for all color lines.  That's where I encourage you to use your imagination for the space you are stitching!

Ooh La La

Today’s stitch is yet another variation of diamonds with a lot of variations within itself.

Click the image to see the whimsicalstitch.com Stitch Library on pinterest.com. Includes all #whimsicalwednesday and #smallspacesunday stitch diagrams.

Click the image to see #whimsicalwednesday and #smallspacesunday Stitched Sample Gallery on Instagram.

The stitched sample is the chest on a vintage Melissa Shirley piece featuring a somewhat dramatic rooster. I used ThreadWorx cotton floss (black lines), Petite Very Velvet (yellow lines), and size 12 Kreinik (aqua lines) on 13M.

In all honesty, I don’t know if I would have considered using Petite Very Velvet for the center if I was stitching this today…and I would regret not using it. The metallic is now a subtle accent, and I love its surprising contrast in both finish and weight.

This stitch would make a beautiful coat for a snowman or Santa with red velvet (black lines, a solid silk floss in a slightly different hue of red for the yellow lines, and a gold Fyre Werks for the aqua lines. I would love to see this stitch on a tree with a beautiful overdyed silk floss for the black lines, a rich green single strand silk for the yellow lines, and a green Kreinik for the aqua lines.

To dress this stitch up even more, consider replacing the Upright Tied Cross with a small bit of Brick Beading in the center. I would love to use that on a dress or coat on an angel with silk floss and beads. I would not include the aqua lines BUT feel free to add that extra something something.

Click on image to see the whimsicalstitch.com Stitch Library on pinterest.com. Includes all #whimsicalwednesday and #smallspacesunday stitch diagrams.

As you are auditioning stitches (from any stitch source), count the number of canvas threads on the diagram that match your mesh size. And there you have what an inch of the stitch will look like. Evaluate that against the area where you plan to use the stitch and make your final decision. If you start integrating this step into your stitch selection process, you may be surprised at how many stitches you think are large are much smaller than you realize.

By (sometimes) including this step in my own process, I find I am now integrating much longer stitches than I ever thought I would. I used to think a stitch six rows long was super big. I have very much changed my tune, which has helped me expand my creativity, especially for large-space stitches.

Today’s stitch diagram, along with all other #whimsicalwednesday and #smallspacesunday stitch diagrams, can also be found on a Pinterest board here. Be sure to follow whimsicalstitch.com on FacebookPinterestInstagram, and Twitter.

If you like what you see on this blog, there's more. Mary’s Whimsical Stitches is a series of four books offering contemporary how-to collections of more than 200 stitches (in each volume) for all stitchers, regardless of skill level. All books include updated and sequenced diagrams from this blog, plus a collection of all-new stitches from private lessons and other class projects. Visit here to find a needlepoint retailer that carries my books.

New to needlepoint or looking for a refresher? Please download a handy how-to guide covering basic needlepoint stitches and stitch compensation techniques along with new top-line information on needlepoint materials and tools, how to handle threads, and other helpful needlepoint resources.

whimsicalstitch.com also sells Stitch Guides and Stitch Concepts for Melissa Shirley Designs, Zecca DesignsSandra Gilmore, Purple Palm, Maggie, and Penny MacLeod, and many more. Click here to see the newest guides and click here to see the entire collection.

I hope you have the perfect spot for this stitch! Please enjoy! Have a wonderful #whimsicalwednesday!

A Note about Diagrams
I use color in diagrams to make them as clear as possible.  The primary function of different colored lines is to illustrate a stitch sequence.  For example, the layering of colors demonstrates you add them in that order.  They can also provide ideas on integrating additional threads (one line for each color).  Or, you can use the same thread for all color lines.  That's where I encourage you to use your imagination for the space you are stitching!
Guilty as Charged

I have been wanting to expand my woven stitches beyond my typical simple patterns of alternating straight stitches to create weaves. I recently stumbled across some cute mish-mashes of woven stitches on social media that offered some great inspiration…only to find a stitched sample of what I was looking for in my basement. Someone is looking to make my job easier!

Click the image to see the whimsicalstitch.com Stitch Library on pinterest.com. Includes all #whimsicalwednesday and #smallspacesunday stitch diagrams.

Click the image to see #whimsicalwednesday and #smallspacesunday Stitched Sample Gallery on Instagram.

The stitched sample is a pathway on a vintage Melissa Shirley countryside scene. I used ThreadWorx Perle Cotton on 13M.

This stitch will work well for greenspaces with your favorite silk floss (overdyed or solid). It will make a great roof for a country house with Rainbow Linen. I’m also thinking baskets, hats, rugs or floors. It’s really a wonderful stitch that will fit nicely in small-ish spaces but also do well in larger spaces.

Consider adding a contrasting thread (color, finish, or both) for the groups of three horizontal stitches…or even all the horizontal stitches…for slightly more interest. I’m looking forward to going down this rabbit hole of woven stitches. So, more to come!

Click on image to see the whimsicalstitch.com Stitch Library on pinterest.com. Includes all #whimsicalwednesday and #smallspacesunday stitch diagrams.

As you are auditioning stitches (from any stitch source), count the number of canvas threads on the diagram that match your mesh size. And there you have what an inch of the stitch will look like. Evaluate that against the area where you plan to use the stitch and make your final decision. If you start integrating this step into your stitch selection process, you may be surprised at how many stitches you think are large are much smaller than you realize.

By (sometimes) including this step in my own process, I find I am now integrating much longer stitches than I ever thought I would. I used to think a stitch six rows long was super big. I have very much changed my tune, which has helped me expand my creativity, especially for large-space stitches.

Today’s stitch diagram, along with all other #whimsicalwednesday and #smallspacesunday stitch diagrams, can also be found on a Pinterest board here. Be sure to follow whimsicalstitch.com on FacebookPinterestInstagram, and Twitter.

If you like what you see on this blog, there's more. Mary’s Whimsical Stitches is a series of four books offering contemporary how-to collections of more than 200 stitches (in each volume) for all stitchers, regardless of skill level. All books include updated and sequenced diagrams from this blog, plus a collection of all-new stitches from private lessons and other class projects. Visit here to find a needlepoint retailer that carries my books.

New to needlepoint or looking for a refresher? Please download a handy how-to guide covering basic needlepoint stitches and stitch compensation techniques along with new top-line information on needlepoint materials and tools, how to handle threads, and other helpful needlepoint resources.

whimsicalstitch.com also sells Stitch Guides and Stitch Concepts for Melissa Shirley Designs, Zecca DesignsSandra Gilmore, Purple Palm, Maggie, and Penny MacLeod, and many more. Click here to see the newest guides and click here to see the entire collection.

I hope you have the perfect spot for this stitch! Please enjoy! Have a wonderful #whimsicalwednesday!

A Note about Diagrams
I use color in diagrams to make them as clear as possible.  The primary function of different colored lines is to illustrate a stitch sequence.  For example, the layering of colors demonstrates you add them in that order.  They can also provide ideas on integrating additional threads (one line for each color).  Or, you can use the same thread for all color lines.  That's where I encourage you to use your imagination for the space you are stitching!
Didn’t Expect to End Up Here

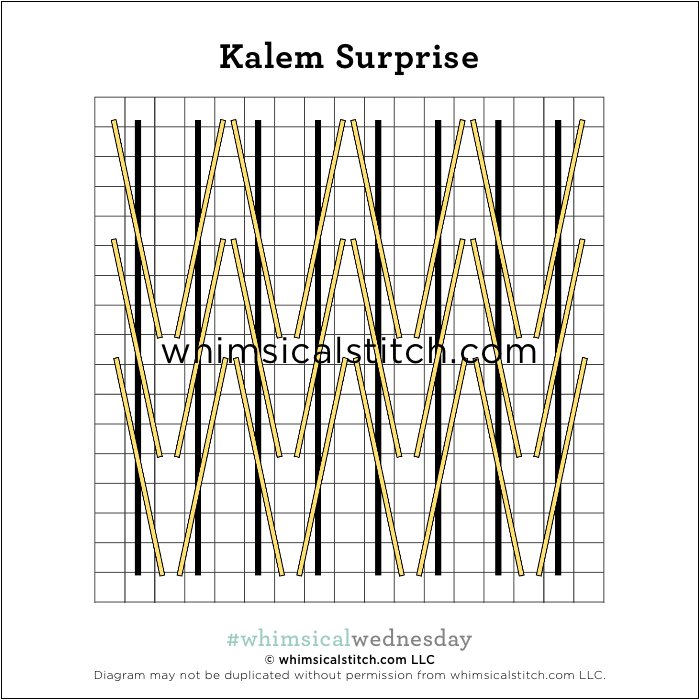
The moral of today’s post is to follow that tiny nagging feeling. Let’s just leave it at I was not anticipating sharing a stitch with three threads AND pearls today.

Click image to see the whimsicalstitch.com Stitch Library on pinterest.com. Includes all #whimsicalwednesday and #smallspacesunday stitch diagrams.

Click image to see #whimsicalwednesday and #smallspacesunday Stitched Sample Gallery on Instagram.

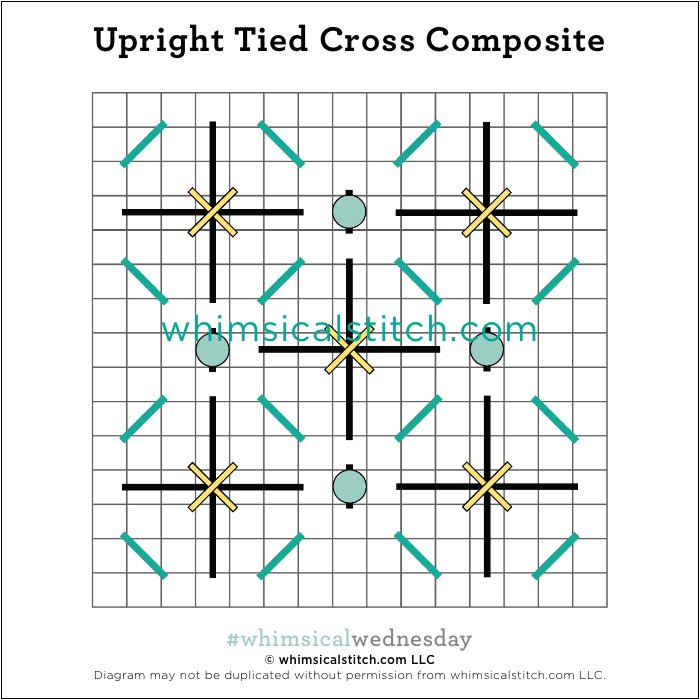
The Upright Tied Crosses in today’s stitch are slightly larger than what I typically think of as Upright Tied Crosses. The bottom stitches (black lines) are six rows long versus the four illustrated in the link. My original plan a stitch with the Upright Crosses (black and aqua lines) and the pearls (aqua circles) only. But I could tell something was missing, so I took some inspiration from Kelly Clark and added the diagonal stitches inside the emerging squares to create a stronger purpose and more definition to the pearls. And voila! The stitched sample uses three plies of Splendor (black lines) with Kreinik 1/16” ribbon on top (yellow lines). The diamonds are created with Shimmer Ribbon (turquoise lines) and SJ Designs 2mm pearls with white beading thread (aqua circles with black lines).

The stitched sample is a very feminine bedspread for an upcoming Stitch Concept. Along those lines, it will make a very pretty dress for a flapper with a simple addition of a contrasting color for the yellow lines and a bead or even a Swarovski crystal for the pearl. I also think it will make a fun toy box with red and silver metallics for the black and yellow lines, red silk floss for the turquoise lines, and bright blue beads for the aqua circles.

Click on image to see the whimsicalstitch.com Stitch Library on pinterest.com. Includes all #whimsicalwednesday and #smallspacesunday stitch diagrams.

Just a reminder about how to evaluate stitches for size on your project.

As you are auditioning stitches (from any stitch source), count the number of canvas threads on the diagram that match your mesh size. And there you have what an inch of the stitch will look like. Evaluate that against the area where you plan to use the stitch and make your final decision. If you start integrating this step into your stitch selection process, you may be surprised at how many stitches you think are large are much smaller than you realize. (Or, in today’s case, the stitch is much larger than it looks.)

By (sometimes) including this step in my own process, I find I am now integrating much longer stitches than I ever thought I would. I used to think a stitch six rows long was super big. I have very much changed my tune, which has helped me expand my creativity, especially for large-space stitches.

Today’s stitch diagram, along with all other #whimsicalwednesday and #smallspacesunday stitch diagrams, can also be found on a Pinterest board here. Be sure to follow whimsicalstitch.com on FacebookPinterestInstagram, and Twitter.

If you like what you see on this blog, there's more. Mary’s Whimsical Stitches is a series of three books offering contemporary how-to collections of more than 250 stitches (in each volume) for all stitchers, regardless of skill level. All books include updated and sequenced diagrams from this blog plus a collection of all-new stitches from private lessons and other class projects. Visit here to find a needlepoint retailer that carries my books.

New to needlepoint or looking for a refresher? Please download a handy how-to guide covering basic needlepoint stitches and stitch compensation techniques along with new top-line information on needlepoint materials and tools, how to handle threads, and other helpful needlepoint resources.

whimsicalstitch.com also sells Stitch Guides and Stitch Concepts for Melissa Shirley Designs, Zecca DesignsSandra Gilmore, Purple Palm, Maggie, and Penny MacLeod, and many more. Click here to see the newest guides and click here to see the entire collection.

I hope you have the perfect spot for this stitch! Please enjoy! Have a wonderful #whimsicalwednesday!

A Note about Diagrams
I use color in diagrams to make them as clear as possible.  The primary function of different colored lines is to illustrate a stitch sequence.  For example, the layering of colors demonstrates you add them in that order.  They can also provide ideas on integrating additional threads (one line for each color).  Or, you can use the same thread for all color lines.  That's where I encourage you to use your imagination for the space you are stitching!

Wait, What?

I never imagined I would be bragging about, let alone sharing with pride, an oversized beetle. Yet here we are.

Click image to see the whimsicalstitch.com Stitch Library on pinterest.com. Includes all #whimsicalwednesday and #smallspacesunday stitch diagrams.

Click image to see #whimsicalwednesday and #smallspacesunday Stitched Sample Gallery on Instagram.

The stitched sample is a beard stitched with Appleton Wool on 13M, stitched by yours truly forever and a day ago. (Tangent. The hair is a decent example of Double French Knots, which I chat about in Book 1 and the Essentials guide.)

I love Beetle Stitches in their simplest forms (such as today) because it adds interest without overwhelming surrounding areas. The smoothness of the stitch adds a certain elegance. I also love the dressed-up versions, but this stitch is perfect for the beard.

Appleton added a little puff to the beard. It will be adorable to replicate that on a bedspread with Appleton (on 13M) or single-strand silk such as Pepper Pot Silk or Vineyard Silk (on 18M). It will make a fantastic roof with Rainbow Linen. Don’t forget to consider flipping the diagram 90° for a taller version of the stitch. That would be great for clothing with silk floss.

Click on image to see the whimsicalstitch.com Stitch Library on pinterest.com. Includes all #whimsicalwednesday and #smallspacesunday stitch diagrams.

Just a reminder about how to evaluate stitches for size on your project.

As you are auditioning stitches (from any stitch source), count the number of canvas threads on the diagram that match your mesh size. And there you have what an inch of the stitch will look like. Evaluate that against the area where you plan to use the stitch and make your final decision. If you start integrating this step into your stitch selection process, you may be surprised at how many stitches you think are large are much smaller than you realize. (Or, in today’s case, the stitch is much larger than it looks.)

By (sometimes) including this step in my own process, I find I am now integrating much longer stitches than I ever thought I would. I used to think a stitch six rows long was super big. I have very much changed my tune, which has helped me expand my creativity, especially for large-space stitches.

Today’s stitch diagram, along with all other #whimsicalwednesday and #smallspacesunday stitch diagrams, can also be found on a Pinterest board here. Be sure to follow whimsicalstitch.com on FacebookPinterestInstagram, and Twitter.

If you like what you see on this blog, there's more. Mary’s Whimsical Stitches is a series of three books offering contemporary how-to collections of more than 250 stitches (in each volume) for all stitchers, regardless of skill level. All books include updated and sequenced diagrams from this blog plus a collection of all-new stitches from private lessons and other class projects. Visit here to find a needlepoint retailer that carries my books.

New to needlepoint or looking for a refresher? Please download a handy how-to guide covering basic needlepoint stitches and stitch compensation techniques along with new top-line information on needlepoint materials and tools, how to handle threads, and other helpful needlepoint resources.

whimsicalstitch.com also sells Stitch Guides and Stitch Concepts for Melissa Shirley Designs, Zecca DesignsSandra Gilmore, Purple Palm, Maggie, and Penny MacLeod, and many more. Click here to see the newest guides and click here to see the entire collection.

I hope you have the perfect spot for this stitch! Please enjoy! Have a wonderful #whimsicalwednesday!

A Note about Diagrams
I use color in diagrams to make them as clear as possible.  The primary function of different colored lines is to illustrate a stitch sequence.  For example, the layering of colors demonstrates you add them in that order.  They can also provide ideas on integrating additional threads (one line for each color).  Or, you can use the same thread for all color lines.  That's where I encourage you to use your imagination for the space you are stitching!
Way to Go!

My favorite week of the year is between Christmas and New Year’s Day. It’s a week that is singularly mine to do with what I want. Vacation? Sure! Great timing. Putting away the holidays? Sure! Nothing like a clean start to the year. Start some new Halloween ornaments? What a lovely idea.

Start a new Christmas stocking? Not in my world. So, this is a shout-out to @millennial_needlepointer for braving a stocking so soon after the holidays. Was happy to help her with a stitch suggestion as I massively giggled (and finished one of the above-mentioned Halloween ornaments).

Click image to see the whimsicalstitch.com Stitch Library on pinterest.com. Includes all #whimsicalwednesday and #smallspacesunday stitch diagrams.

Click image to see #whimsicalwednesday and #smallspacesunday Stitched Sample Gallery on Instagram.

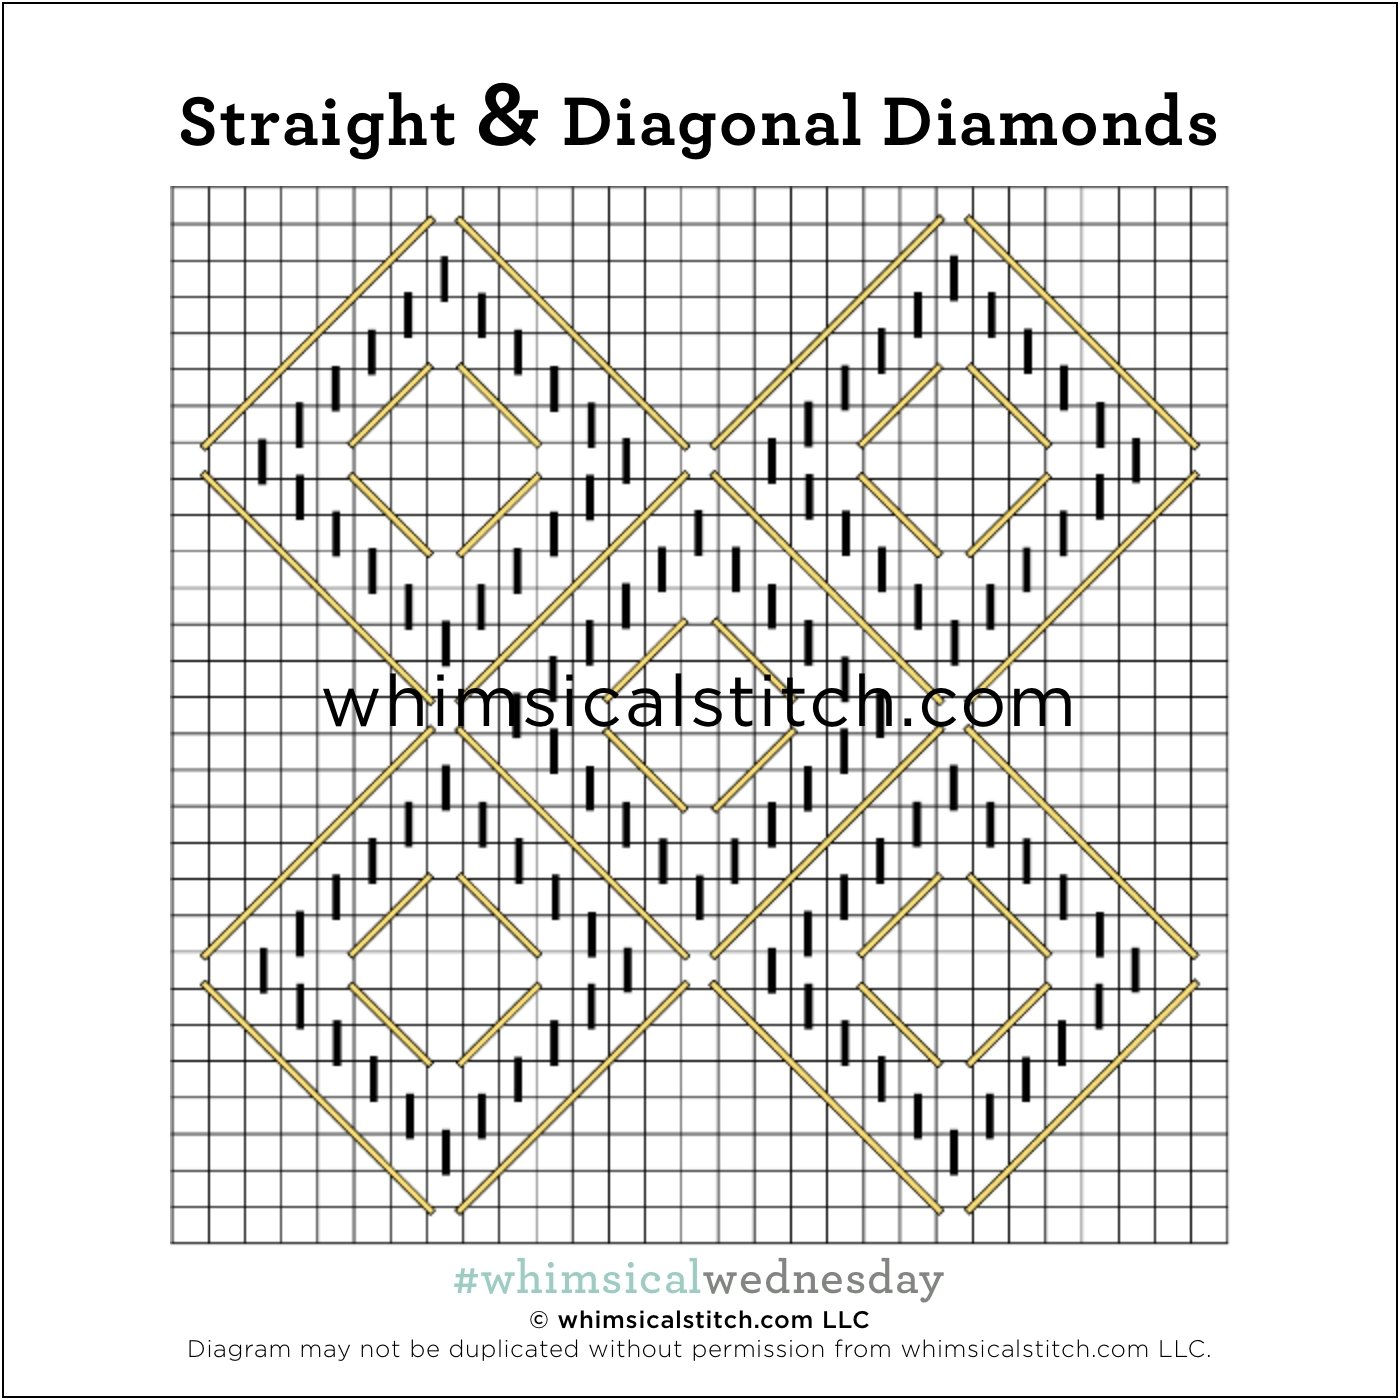
The stitched sample is a sky on a stocking. Alexandra used one ply of blue Watercolours (black lines) and Fyre Werks (yellow lines) on 18M. (She also gets a high five for stitching an 18M stocking. #team13mstockingsonly.)

This stitch is directly related to two stitches that have been shared here. Its direct relative is a Woven Hungarian variant I shared here many moons ago. This stitch is nothing more than removing the stitches that are five rows wide from that stitch. I named it as I did because it is so similar to the Dolly stitch I shared here as well.

As for the why I removed the stitches over five rows? The Woven Hungarian variation fit the sky as painted perfectly. That’s why I went straight to that stitch. However, I wanted it to be lighter because it was a sky and the adorable elephants were the stars here. So, boom, bye bye stitches over five rows for a lighter touch that fits the painted space perfectly.

I’m looking forward to using this stitch for more clothing with Vineyard Silk and Silk Lame 18 for a cozy sweater, also on 13M. It will also make a jazzy pumpkin with 2-3 plies of silk floss and Fyre Werks on 18M. I’m also toying with the idea of replacing the yellow lines with a larger sequin with a size 11 seed bead or bi-cone to attach it. A lot of fun can be had here!

Click on image to see the whimsicalstitch.com Stitch Library on pinterest.com. Includes all #whimsicalwednesday and #smallspacesunday stitch diagrams.

Just a reminder about how to evaluate stitches for size on your project.

As you are auditioning stitches (from any stitch source), count the number of canvas threads on the diagram that match your mesh size. And there you have what an inch of the stitch will look like. Evaluate that against the area where you plan to use the stitch and make your final decision. If you start integrating this step into your stitch selection process, you may be surprised at how many stitches you think are large are much smaller than you realize. (Or, in today’s case, the stitch is much larger than it looks.)

By (sometimes) including this step in my own process, I find I am now integrating much longer stitches than I ever thought I would. I used to think a stitch six rows long was super big. I have very much changed my tune, which has helped me expand my creativity, especially for large-space stitches.

Today’s stitch diagram, along with all other #whimsicalwednesday and #smallspacesunday stitch diagrams, can also be found on a Pinterest board here. Be sure to follow whimsicalstitch.com on FacebookPinterestInstagram, and Twitter.

If you like what you see on this blog, there's more. Mary’s Whimsical Stitches is a series of three books offering contemporary how-to collections of more than 250 stitches (in each volume) for all stitchers, regardless of skill level. All books include updated and sequenced diagrams from this blog plus a collection of all-new stitches from private lessons and other class projects. Visit here to find a needlepoint retailer that carries my books.

New to needlepoint or looking for a refresher? Please download a handy how-to guide covering basic needlepoint stitches and stitch compensation techniques along with new top-line information on needlepoint materials and tools, how to handle threads, and other helpful needlepoint resources.

whimsicalstitch.com also sells Stitch Guides and Stitch Concepts for Melissa Shirley Designs, Zecca DesignsSandra Gilmore, Purple Palm, Maggie, and Penny MacLeod, and many more. Click here to see the newest guides and click here to see the entire collection.

I hope you have the perfect spot for this stitch! Please enjoy! Have a wonderful #whimsicalwednesday!

A Note about Diagrams
I use color in diagrams to make them as clear as possible.  The primary function of different colored lines is to illustrate a stitch sequence.  For example, the layering of colors demonstrates you add them in that order.  They can also provide ideas on integrating additional threads (one line for each color).  Or, you can use the same thread for all color lines.  That's where I encourage you to use your imagination for the space you are stitching!
Santa’s Cute Pants

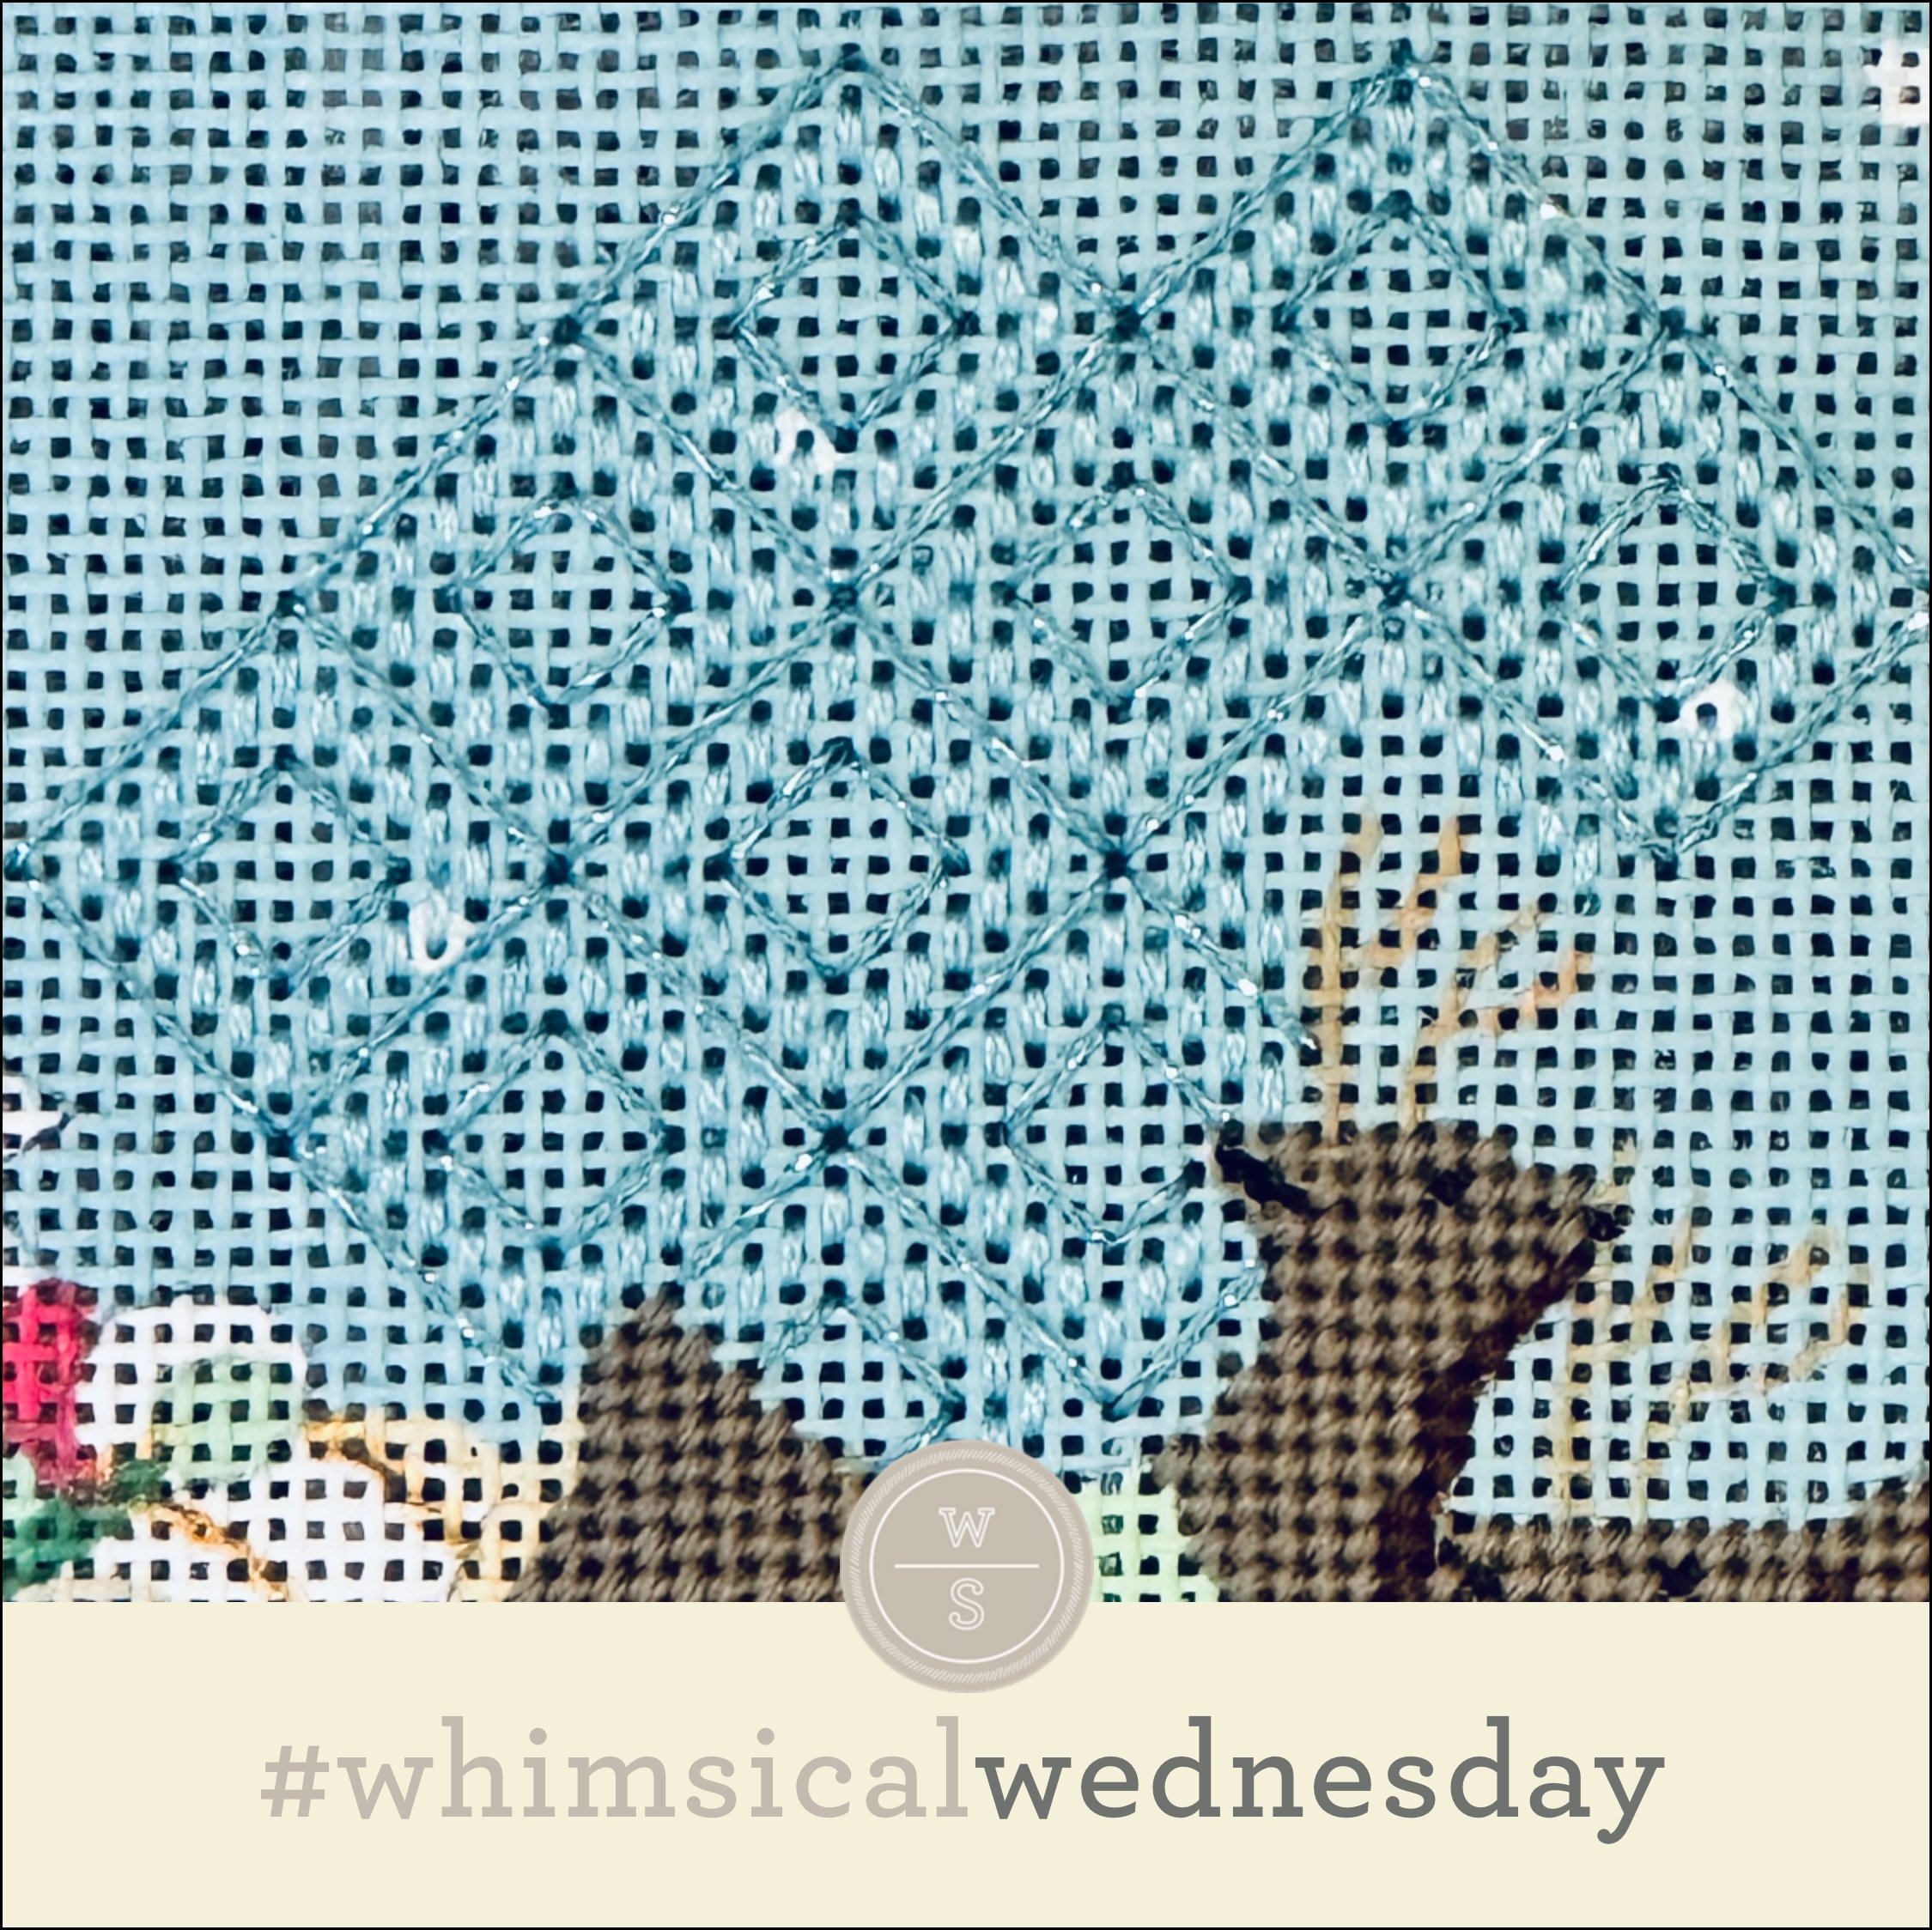
In unsurprising news, Santa is back to share another stitch with us. It’s a long forgotten stitch that I am so excited to have re-discovered as I see lots of future projects where it will look great!

Click image to see the whimsicalstitch.com Stitch Library on pinterest.com. Includes all #whimsicalwednesday and #smallspacesunday stitch diagrams.

Click image to see #whimsicalwednesday and #smallspacesunday Stitched Sample Gallery on Instagram.

Quick programming note: I will be taking off until after the first of the year. I look forward to starting another new year of stitching with you!

Back to today’s stitch. The stitched sample uses Very Velvet (black lines) and size 12 or 16 blue Kreinik (yellow lines) on 13M. (Remember…I stitched these in the late 90’s…so that’s why I can’t remember every detail.) I recommend adding the diamonds in columns, always starting the next diamond from its outermost edge. This will help with the center stitch, as it ends just under the outermost stitch from the preceding diamond. Take a look at the stitched sample, and you’ll see I flipped the direction of the yellow lines to face toward the pants’ center line.

I’m looking forward to using this stitch for more clothing with Vineyard Silk and Silk Lame 18 for a cozy sweater, also on 13M. It will also make a jazzy pumpkin with 2-3 plies of silk floss and Fyre Werks on 18M. I’m also toying with the idea of replacing the yellow lines with a larger sequin with a size 11 seed bead or bi-cone to attach it. A lot of fun can be had here!

Click on image to see the whimsicalstitch.com Stitch Library on pinterest.com. Includes all #whimsicalwednesday and #smallspacesunday stitch diagrams.

Just a reminder about how to evaluate stitches for size on your project.

As you are auditioning stitches (from any stitch source), count the number of canvas threads on the diagram that match your mesh size. And there you have what an inch of the stitch will look like. Evaluate that against the area where you plan to use the stitch and make your final decision. If you start integrating this step into your stitch selection process, you may be surprised at how many stitches you think are large are much smaller than you realize. (Or, in today’s case, the stitch is much larger than it looks.)

By (sometimes) including this step in my own process, I find I am now integrating much longer stitches than I ever thought I would. I used to think a stitch six rows long was super big. I have very much changed my tune, which has helped me expand my creativity, especially for large-space stitches.

Today’s stitch diagram, along with all other #whimsicalwednesday and #smallspacesunday stitch diagrams, can also be found on a Pinterest board here. Be sure to follow whimsicalstitch.com on FacebookPinterestInstagram, and Twitter.

If you like what you see on this blog, there's more. Mary’s Whimsical Stitches is a series of three books offering contemporary how-to collections of more than 250 stitches (in each volume) for all stitchers, regardless of skill level. All books include updated and sequenced diagrams from this blog plus a collection of all-new stitches from private lessons and other class projects. Visit here to find a needlepoint retailer that carries my books.

New to needlepoint or looking for a refresher? Please download a handy how-to guide covering basic needlepoint stitches and stitch compensation techniques along with new top-line information on needlepoint materials and tools, how to handle threads, and other helpful needlepoint resources.

whimsicalstitch.com also sells Stitch Guides and Stitch Concepts for Melissa Shirley Designs, Zecca DesignsSandra Gilmore, Purple Palm, Maggie, and Penny MacLeod, and many more. Click here to see the newest guides and click here to see the entire collection.

I hope you have the perfect spot for this stitch! Please enjoy! Have a wonderful #whimsicalwednesday!

A Note about Diagrams
I use color in diagrams to make them as clear as possible.  The primary function of different colored lines is to illustrate a stitch sequence.  For example, the layering of colors demonstrates you add them in that order.  They can also provide ideas on integrating additional threads (one line for each color).  Or, you can use the same thread for all color lines.  That's where I encourage you to use your imagination for the space you are stitching!