Squares or Diamonds?

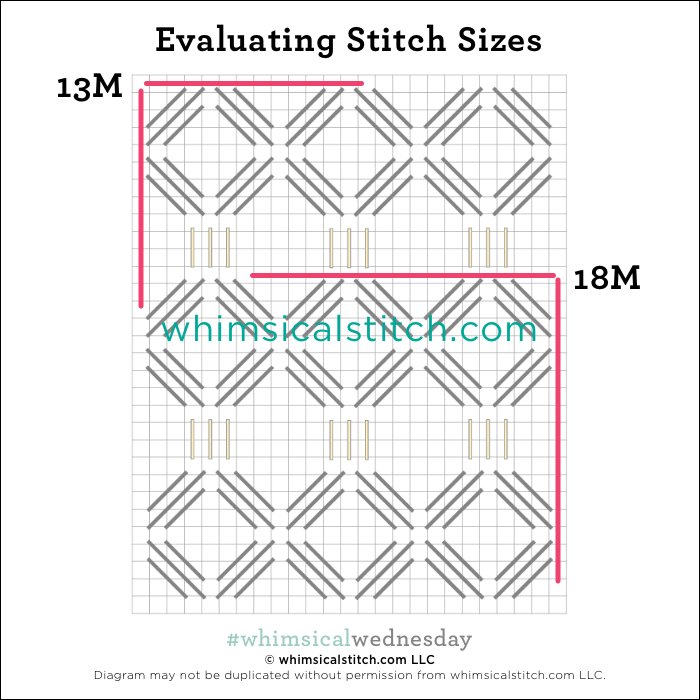
Today’s stitch comes from another adorable Rachel Donley needlepoint gingerbread house from our friends at the Nimble Needle in Atlanta. As we know, diagrams can be deceiving. I see squares on the diagram, but it’s clearly diamonds on the diagram. Whatever it is, it is darn cute!

Click the image to see the whimsicalstitch.com Stitch Library on pinterest.com. Includes all #whimsicalwednesday and #smallspacesunday stitch diagrams.

Click the image to see #whimsicalwednesday and #smallspacesunday Stitched Sample Gallery on Instagram.

The stitched sample is a sweet dreidel from the Nimble Needle’s new gingerbread house club. Marci used three plies of blue ThreadWorx Soie d’Alger on 18M. It’s a great scalable stitch.

This would be a great stitch for my favorite glass effect. I love “full” coverage stitches for windows with Petite Silk Lame or a small Kreinik (size 4 for 18M and size 8 for 13M). I also love the idea of it for other architectural elements, such as a roof or chimney, with Rainbow Linen or Vineyard Silk. Consider dressing it up a little by using a contrasting thread (color, finish, or both) for the horizontal lines.

Click on image to see the whimsicalstitch.com Stitch Library on pinterest.com. Includes all #whimsicalwednesday and #smallspacesunday stitch diagrams.

As you are auditioning stitches (from any stitch source), count the number of canvas threads on the diagram that match your mesh size. And there you have what an inch of the stitch will look like. Evaluate that against the area where you plan to use the stitch and make your final decision. If you start integrating this step into your stitch selection process, you may be surprised at how many stitches you think are large are much smaller than you realize.

By (sometimes) including this step in my own process, I find I am now integrating much longer stitches than I ever thought I would. I used to think a stitch six rows long was super big. I have very much changed my tune, which has helped me expand my creativity, especially for large-space stitches.

Today’s stitch diagram, along with all other #whimsicalwednesday and #smallspacesunday stitch diagrams, can also be found on a Pinterest board here. Be sure to follow whimsicalstitch.com on FacebookPinterestInstagram, and Twitter.

If you like what you see on this blog, there's more. Mary’s Whimsical Stitches is a series of four books offering contemporary how-to collections of more than 200 stitches (in each volume) for all stitchers, regardless of skill level. All books include updated and sequenced diagrams from this blog, plus a collection of all-new stitches from private lessons and other class projects. Visit here to find a needlepoint retailer that carries my books.

New to needlepoint or looking for a refresher? Please download a handy how-to guide covering basic needlepoint stitches and stitch compensation techniques along with new top-line information on needlepoint materials and tools, how to handle threads, and other helpful needlepoint resources.

whimsicalstitch.com also sells Stitch Guides and Stitch Concepts for Melissa Shirley Designs, Zecca DesignsSandra Gilmore, Purple Palm, Maggie, and Penny MacLeod, and many more. Click here to see the newest guides and click here to see the entire collection.

I hope you have the perfect spot for this stitch! Please enjoy! Have a wonderful #whimsicalwednesday!

A Note about Diagrams
I use color in diagrams to make them as clear as possible.  The primary function of different colored lines is to illustrate a stitch sequence.  For example, the layering of colors demonstrates you add them in that order.  They can also provide ideas on integrating additional threads (one line for each color).  Or, you can use the same thread for all color lines.  That's where I encourage you to use your imagination for the space you are stitching!

Lucy in the Sky with Diamonds

I resisted straight stitches over one row for a long time as they didn’t make sense. Today’s stitch is one of the reasons I got over it. I love its delicate size and that sweet skipped row in the center.

Click image to see the whimsicalstitch.com Stitch Library on pinterest.com. Includes all #whimsicalwednesday and #smallspacesunday stitch diagrams.

Click image to see #whimsicalwednesday and #smallspacesunday Stitched Sample Gallery on Instagram.

The stitched sample is a background in progress on a Kirk and Bradley hot air balloon. I used five plies of Splendor on 13M. It’s a fun and quick stitch, which certainly offsets the attention required for last week’s stitch.

This is one of those all-purpose stitches that will work so well in skies, water, wallpaper, curtains, a medium size window, or the center of a flower. I love lightweight Kreiniks or Petite Silk Lame for water or glass. For the wallpaper or curtains, you could alternate the columns between Flair and silk floss. Fun fact. There are three column directions for this stitch (horizontal, vertical, or diagonal). I think diagonal columns add the most surprise.

Click on image to see the whimsicalstitch.com Stitch Library on pinterest.com. Includes all #whimsicalwednesday and #smallspacesunday stitch diagrams.

As you are auditioning stitches (from any stitch source), count the number of canvas threads on the diagram that match your mesh size. And there you have what an inch of the stitch will look like. Evaluate that against the area where you plan to use the stitch and make your final decision. If you start integrating this step into your stitch selection process, you may be surprised at how many stitches you think are large are much smaller than you realize. (Or, in today’s case, the stitch is much larger than it looks.)

By (sometimes) including this step in my own process, I find I am now integrating much longer stitches than I ever thought I would. I used to think a stitch six rows long was super big. I have very much changed my tune, which has helped me expand my creativity, especially for large-space stitches.

Today’s stitch diagram, along with all other #whimsicalwednesday and #smallspacesunday stitch diagrams, can also be found on a Pinterest board here. Be sure to follow whimsicalstitch.com on FacebookPinterestInstagram, and Twitter.

If you like what you see on this blog, there's more. Mary’s Whimsical Stitches is a series of three books offering contemporary how-to collections of more than 250 stitches (in each volume) for all stitchers, regardless of skill level. All books include updated and sequenced diagrams from this blog plus a collection of all-new stitches from private lessons and other class projects. Visit here to find a needlepoint retailer that carries my books.

New to needlepoint or looking for a refresher? Please download a handy how-to guide covering basic needlepoint stitches and stitch compensation techniques along with new top-line information on needlepoint materials and tools, how to handle threads, and other helpful needlepoint resources.

whimsicalstitch.com also sells Stitch Guides and Stitch Concepts for Melissa Shirley Designs, Zecca DesignsSandra Gilmore, Purple Palm, Maggie, and Penny MacLeod, and many more. Click here to see the newest guides and click here to see the entire collection.

I hope you have the perfect spot for this stitch! Please enjoy! Have a wonderful #whimsicalwednesday!

A Note about Diagrams
I use color in diagrams to make them as clear as possible.  The primary function of different colored lines is to illustrate a stitch sequence.  For example, the layering of colors demonstrates you add them in that order.  They can also provide ideas on integrating additional threads (one line for each color).  Or, you can use the same thread for all color lines.  That's where I encourage you to use your imagination for the space you are stitching!

Didn’t Expect to End Up Here

The moral of today’s post is to follow that tiny nagging feeling. Let’s just leave it at I was not anticipating sharing a stitch with three threads AND pearls today.

Click image to see the whimsicalstitch.com Stitch Library on pinterest.com. Includes all #whimsicalwednesday and #smallspacesunday stitch diagrams.

Click image to see #whimsicalwednesday and #smallspacesunday Stitched Sample Gallery on Instagram.

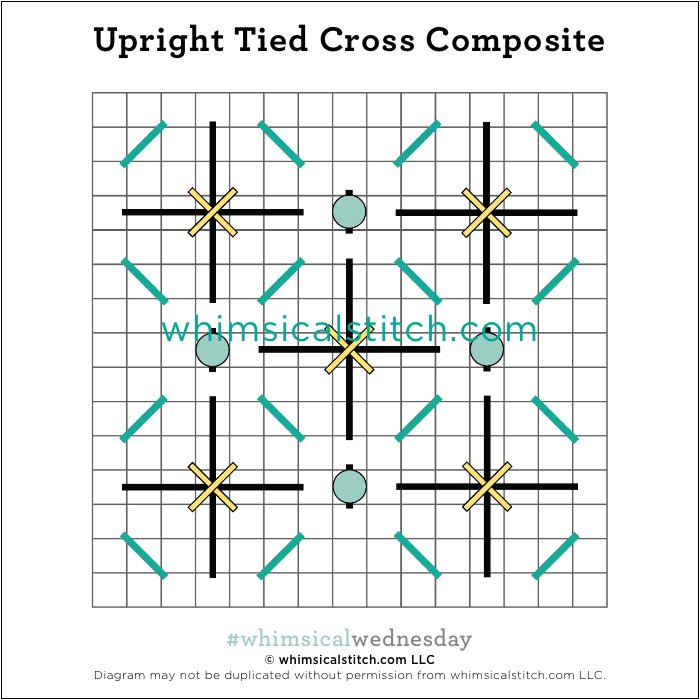
The Upright Tied Crosses in today’s stitch are slightly larger than what I typically think of as Upright Tied Crosses. The bottom stitches (black lines) are six rows long versus the four illustrated in the link. My original plan a stitch with the Upright Crosses (black and aqua lines) and the pearls (aqua circles) only. But I could tell something was missing, so I took some inspiration from Kelly Clark and added the diagonal stitches inside the emerging squares to create a stronger purpose and more definition to the pearls. And voila! The stitched sample uses three plies of Splendor (black lines) with Kreinik 1/16” ribbon on top (yellow lines). The diamonds are created with Shimmer Ribbon (turquoise lines) and SJ Designs 2mm pearls with white beading thread (aqua circles with black lines).

The stitched sample is a very feminine bedspread for an upcoming Stitch Concept. Along those lines, it will make a very pretty dress for a flapper with a simple addition of a contrasting color for the yellow lines and a bead or even a Swarovski crystal for the pearl. I also think it will make a fun toy box with red and silver metallics for the black and yellow lines, red silk floss for the turquoise lines, and bright blue beads for the aqua circles.

Click on image to see the whimsicalstitch.com Stitch Library on pinterest.com. Includes all #whimsicalwednesday and #smallspacesunday stitch diagrams.

Just a reminder about how to evaluate stitches for size on your project.

As you are auditioning stitches (from any stitch source), count the number of canvas threads on the diagram that match your mesh size. And there you have what an inch of the stitch will look like. Evaluate that against the area where you plan to use the stitch and make your final decision. If you start integrating this step into your stitch selection process, you may be surprised at how many stitches you think are large are much smaller than you realize. (Or, in today’s case, the stitch is much larger than it looks.)

By (sometimes) including this step in my own process, I find I am now integrating much longer stitches than I ever thought I would. I used to think a stitch six rows long was super big. I have very much changed my tune, which has helped me expand my creativity, especially for large-space stitches.

Today’s stitch diagram, along with all other #whimsicalwednesday and #smallspacesunday stitch diagrams, can also be found on a Pinterest board here. Be sure to follow whimsicalstitch.com on FacebookPinterestInstagram, and Twitter.

If you like what you see on this blog, there's more. Mary’s Whimsical Stitches is a series of three books offering contemporary how-to collections of more than 250 stitches (in each volume) for all stitchers, regardless of skill level. All books include updated and sequenced diagrams from this blog plus a collection of all-new stitches from private lessons and other class projects. Visit here to find a needlepoint retailer that carries my books.

New to needlepoint or looking for a refresher? Please download a handy how-to guide covering basic needlepoint stitches and stitch compensation techniques along with new top-line information on needlepoint materials and tools, how to handle threads, and other helpful needlepoint resources.

whimsicalstitch.com also sells Stitch Guides and Stitch Concepts for Melissa Shirley Designs, Zecca DesignsSandra Gilmore, Purple Palm, Maggie, and Penny MacLeod, and many more. Click here to see the newest guides and click here to see the entire collection.

I hope you have the perfect spot for this stitch! Please enjoy! Have a wonderful #whimsicalwednesday!

A Note about Diagrams
I use color in diagrams to make them as clear as possible.  The primary function of different colored lines is to illustrate a stitch sequence.  For example, the layering of colors demonstrates you add them in that order.  They can also provide ideas on integrating additional threads (one line for each color).  Or, you can use the same thread for all color lines.  That's where I encourage you to use your imagination for the space you are stitching!
Wait, What?

I never imagined I would be bragging about, let alone sharing with pride, an oversized beetle. Yet here we are.

Click image to see the whimsicalstitch.com Stitch Library on pinterest.com. Includes all #whimsicalwednesday and #smallspacesunday stitch diagrams.

Click image to see #whimsicalwednesday and #smallspacesunday Stitched Sample Gallery on Instagram.

The stitched sample is a beard stitched with Appleton Wool on 13M, stitched by yours truly forever and a day ago. (Tangent. The hair is a decent example of Double French Knots, which I chat about in Book 1 and the Essentials guide.)

I love Beetle Stitches in their simplest forms (such as today) because it adds interest without overwhelming surrounding areas. The smoothness of the stitch adds a certain elegance. I also love the dressed-up versions, but this stitch is perfect for the beard.

Appleton added a little puff to the beard. It will be adorable to replicate that on a bedspread with Appleton (on 13M) or single-strand silk such as Pepper Pot Silk or Vineyard Silk (on 18M). It will make a fantastic roof with Rainbow Linen. Don’t forget to consider flipping the diagram 90° for a taller version of the stitch. That would be great for clothing with silk floss.

Click on image to see the whimsicalstitch.com Stitch Library on pinterest.com. Includes all #whimsicalwednesday and #smallspacesunday stitch diagrams.

Just a reminder about how to evaluate stitches for size on your project.

As you are auditioning stitches (from any stitch source), count the number of canvas threads on the diagram that match your mesh size. And there you have what an inch of the stitch will look like. Evaluate that against the area where you plan to use the stitch and make your final decision. If you start integrating this step into your stitch selection process, you may be surprised at how many stitches you think are large are much smaller than you realize. (Or, in today’s case, the stitch is much larger than it looks.)

By (sometimes) including this step in my own process, I find I am now integrating much longer stitches than I ever thought I would. I used to think a stitch six rows long was super big. I have very much changed my tune, which has helped me expand my creativity, especially for large-space stitches.

Today’s stitch diagram, along with all other #whimsicalwednesday and #smallspacesunday stitch diagrams, can also be found on a Pinterest board here. Be sure to follow whimsicalstitch.com on FacebookPinterestInstagram, and Twitter.

If you like what you see on this blog, there's more. Mary’s Whimsical Stitches is a series of three books offering contemporary how-to collections of more than 250 stitches (in each volume) for all stitchers, regardless of skill level. All books include updated and sequenced diagrams from this blog plus a collection of all-new stitches from private lessons and other class projects. Visit here to find a needlepoint retailer that carries my books.

New to needlepoint or looking for a refresher? Please download a handy how-to guide covering basic needlepoint stitches and stitch compensation techniques along with new top-line information on needlepoint materials and tools, how to handle threads, and other helpful needlepoint resources.

whimsicalstitch.com also sells Stitch Guides and Stitch Concepts for Melissa Shirley Designs, Zecca DesignsSandra Gilmore, Purple Palm, Maggie, and Penny MacLeod, and many more. Click here to see the newest guides and click here to see the entire collection.

I hope you have the perfect spot for this stitch! Please enjoy! Have a wonderful #whimsicalwednesday!

A Note about Diagrams
I use color in diagrams to make them as clear as possible.  The primary function of different colored lines is to illustrate a stitch sequence.  For example, the layering of colors demonstrates you add them in that order.  They can also provide ideas on integrating additional threads (one line for each color).  Or, you can use the same thread for all color lines.  That's where I encourage you to use your imagination for the space you are stitching!
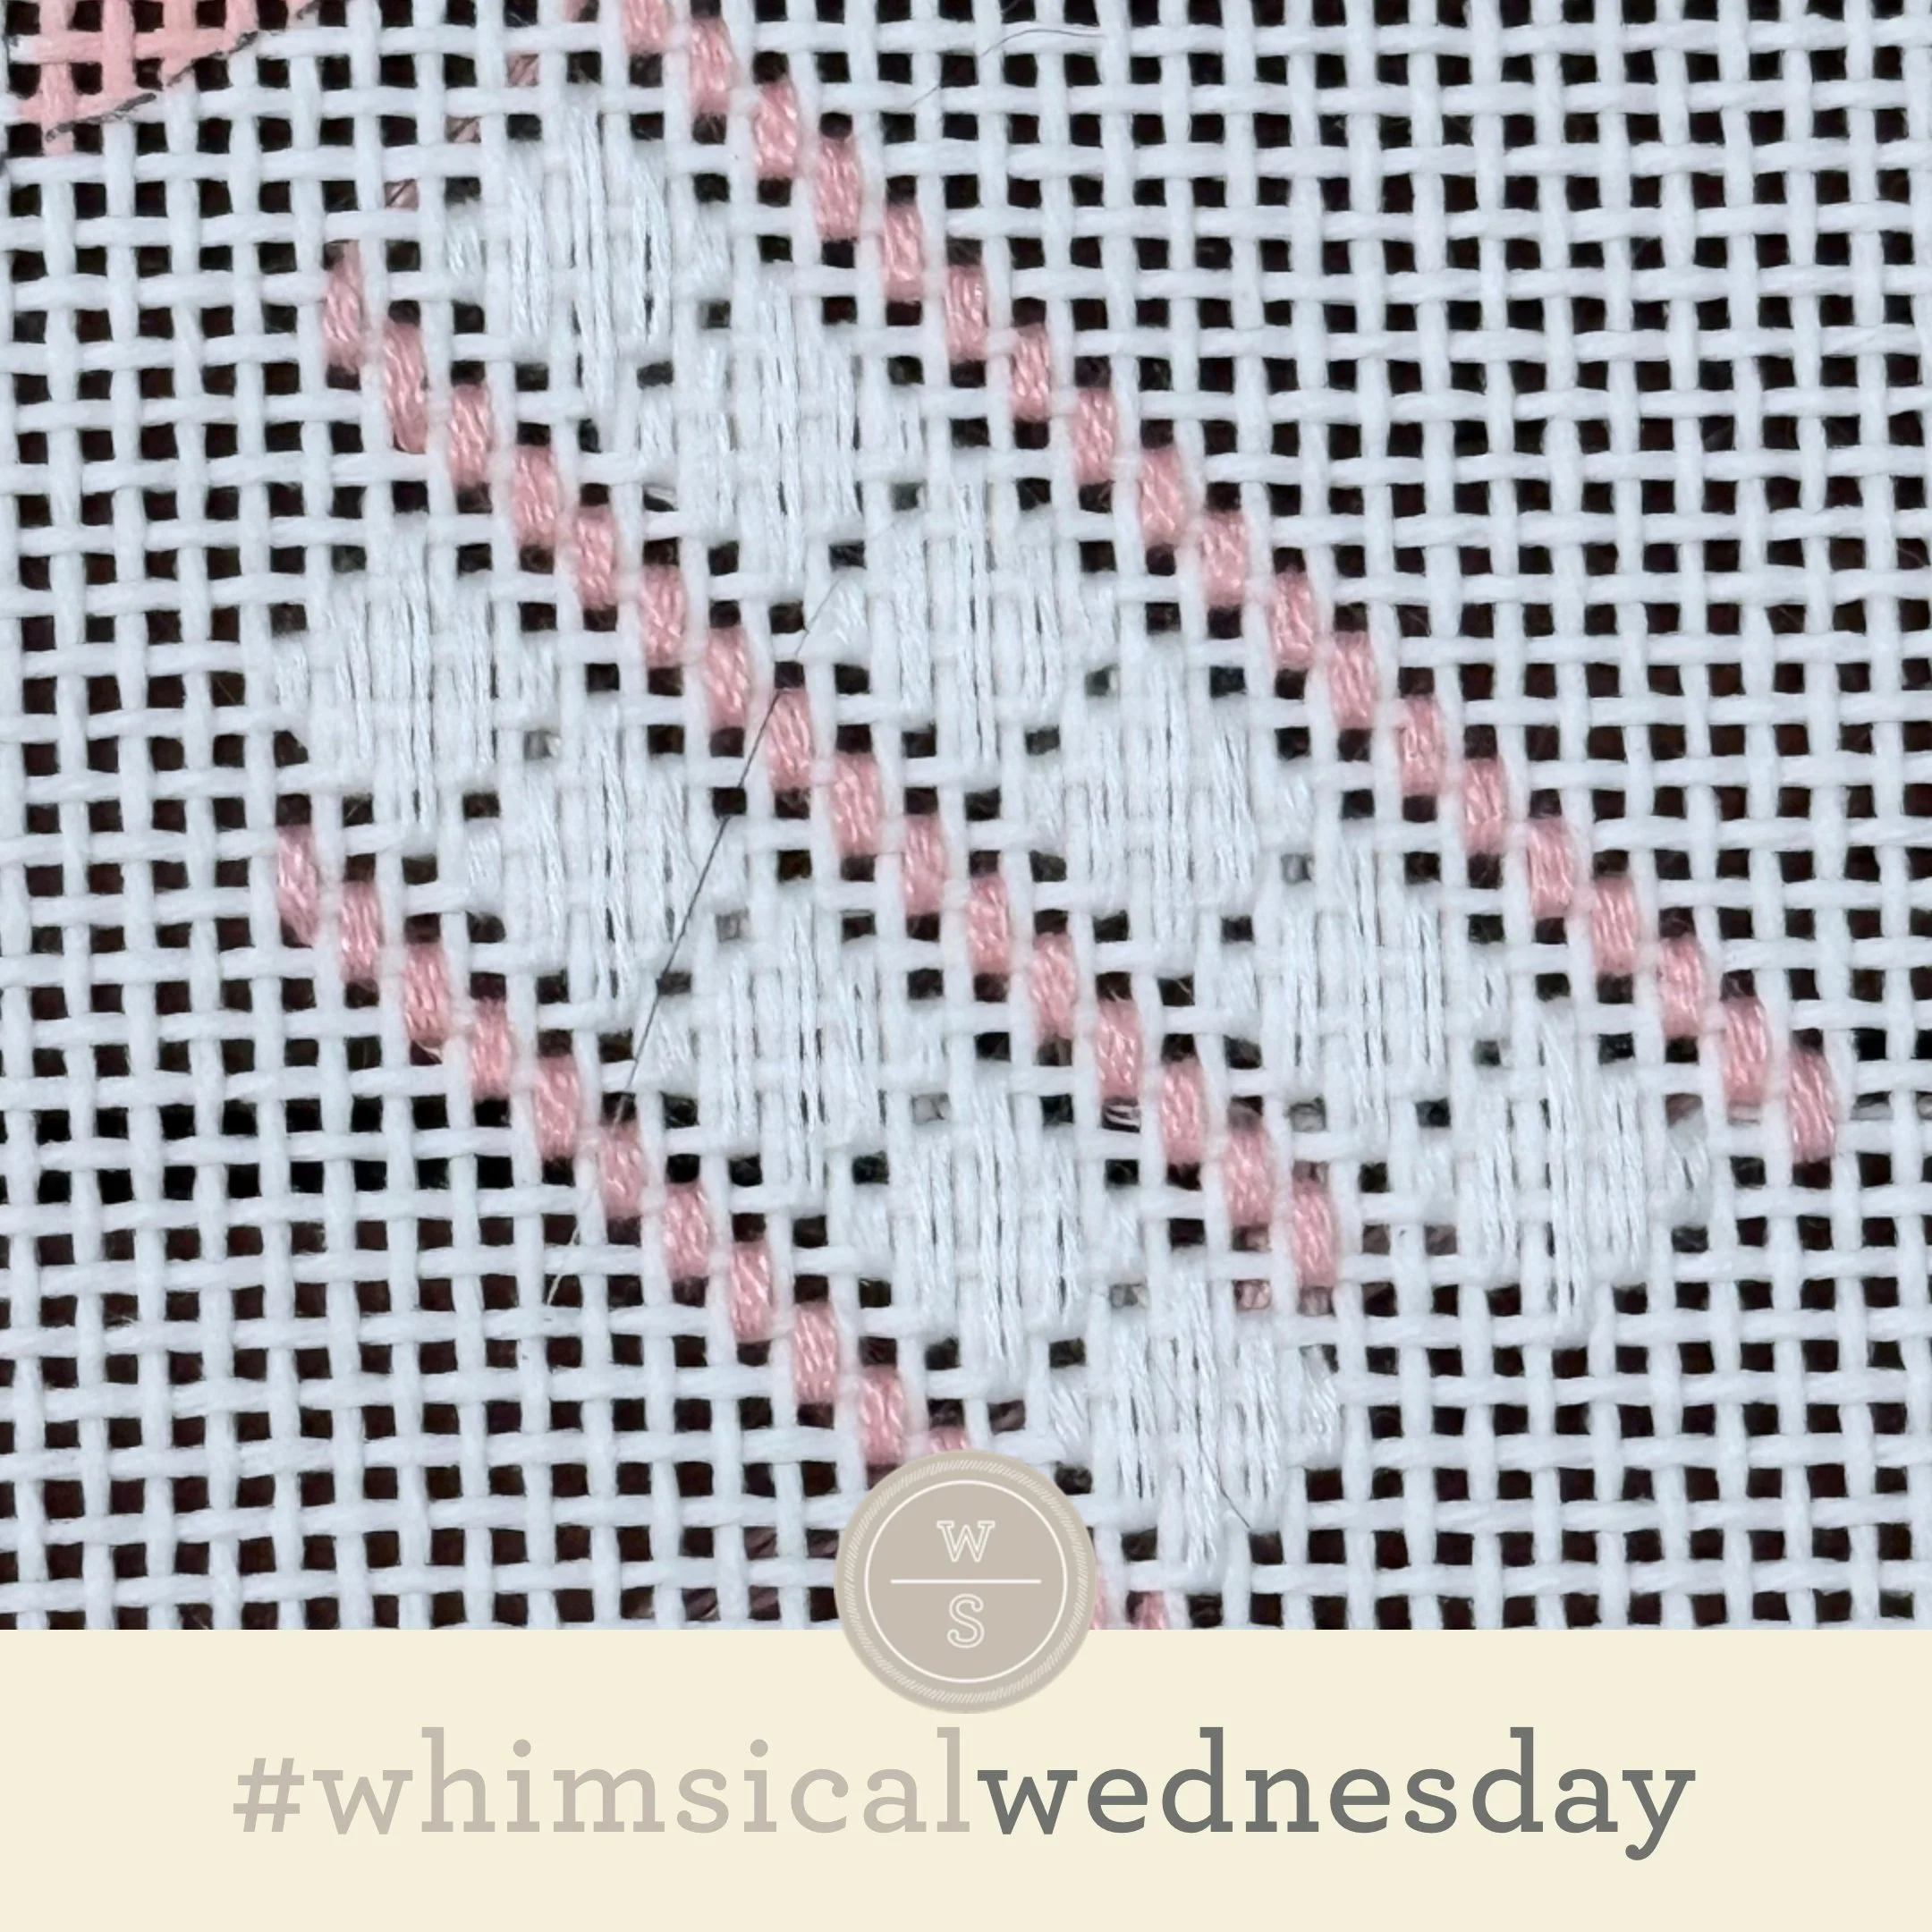
Stitching Friends are the Best Friends (Part 593)

I got to catch up with a dear stitching friend this weekend (virtually of course). We spent time regaling each other with family news and crazy current events. But, truth be told, we spent more time talking about stitches and current projects. She slipped me today’s adorable stitch and stitched sample. The stitch is as charming as my dear friend.

Click on image to see on whimsicalstitch.com's Pinterest account. Visit pinterest.com/whimsicalstitch/whimsicalwednesday for a library of all #whimsicalwednesday and #smallspacesunday stitch diagrams.

Click on image to see on whimsicalstitch.com's Pinterest account. Visit pinterest.com/whimsicalstitch/whimsicalwednesday for a library of all #whimsicalwednesday and #smallspacesunday stitch diagrams.

Click on image to see on whimsicalstitch.com's Instagram account. Visit instagram.com/whimsicalstitch to see a library of stitched samples for select #whimsicalwednesday and #smallspacesunday stitch diagrams.

Click on image to see on whimsicalstitch.com's Instagram account. Visit instagram.com/whimsicalstitch to see a library of stitched samples for select #whimsicalwednesday and #smallspacesunday stitch diagrams.

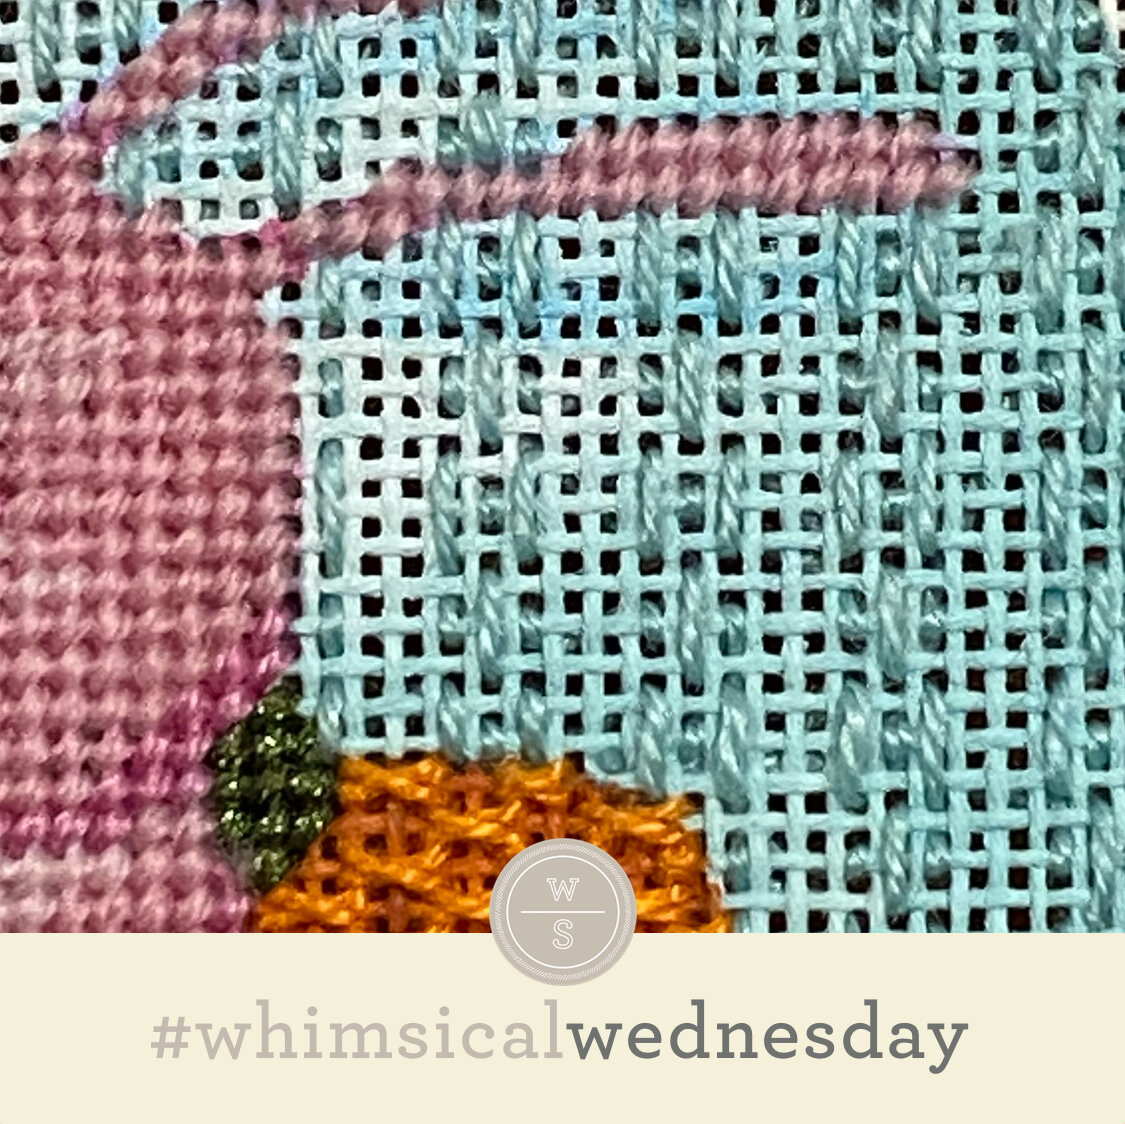
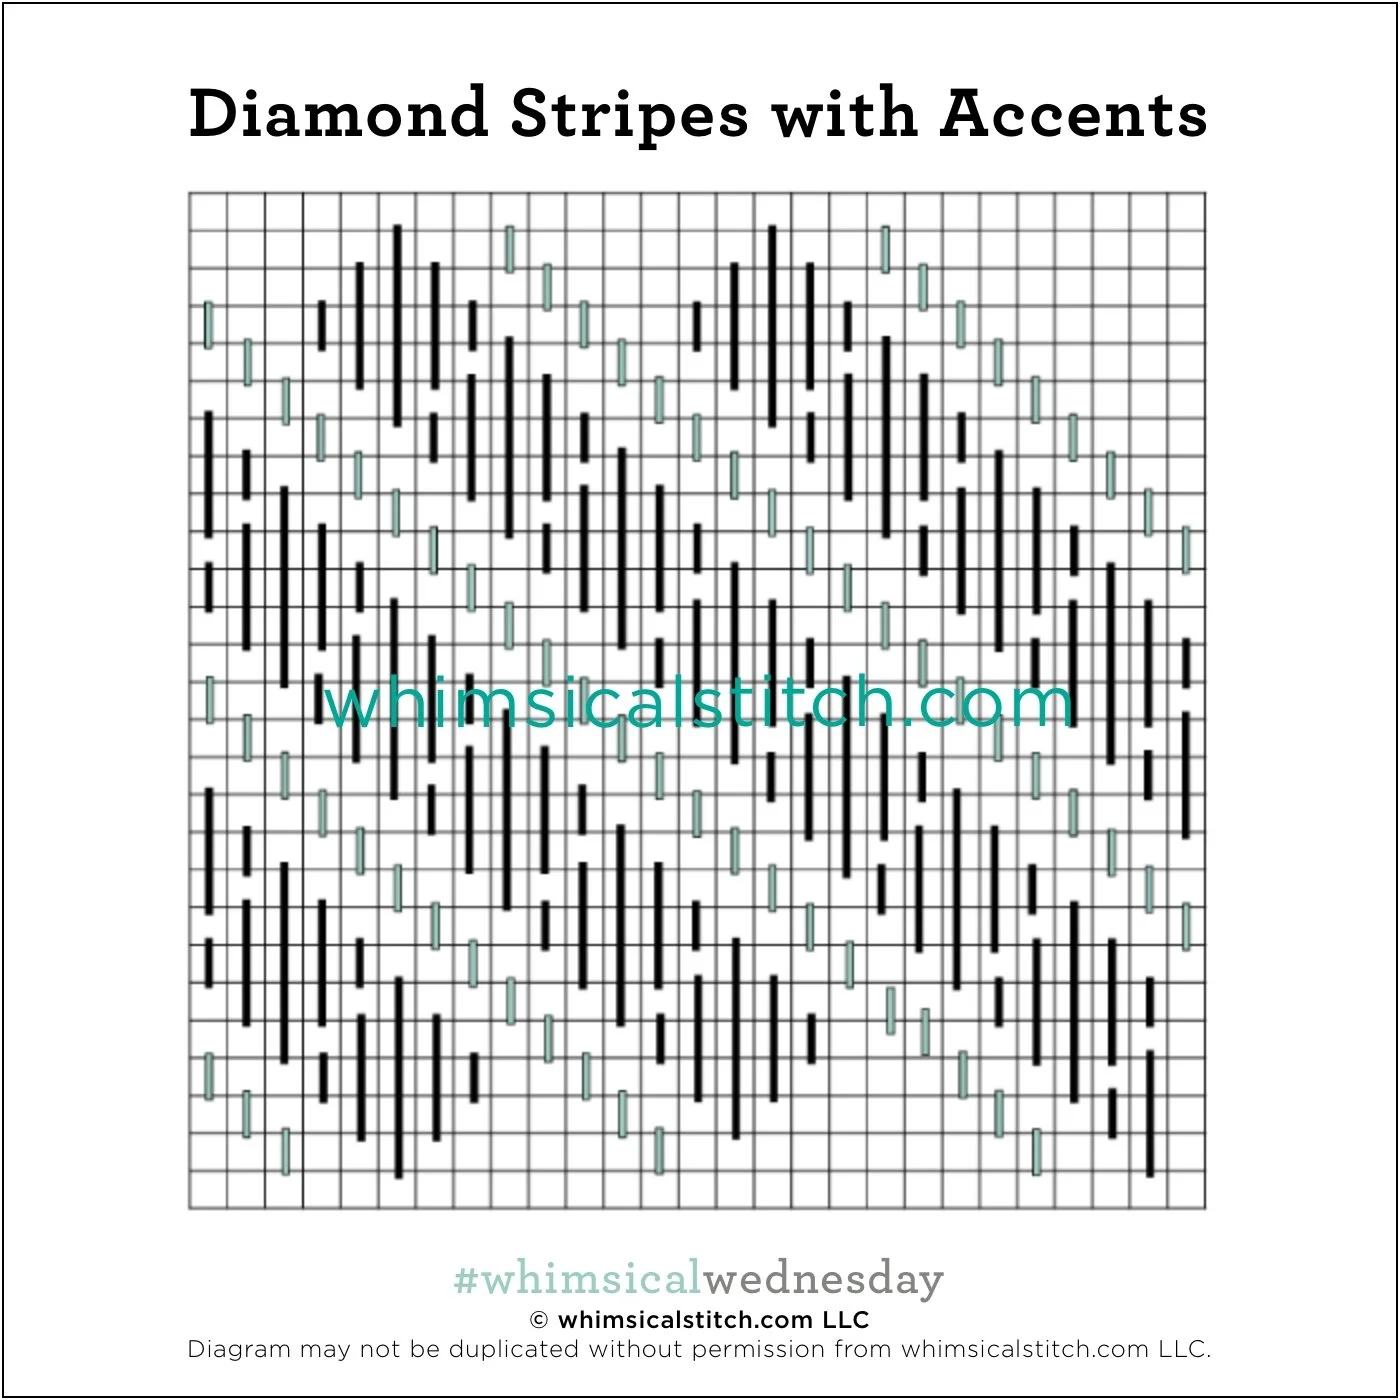
The stitched sample is a background on an adorable Rebecca Woods Easter bunny with Rainbow Gallery’s Elegance on 18-mesh. This pattern is very similar to darning stitches I’ve shared in the past. However, it is a traditional wrapped stitch. Start at the top of a column, add the three stitches on the horizontal axis (over 2-1-2 rows), drop down and switch the pattern to 1-2-1 rows. (See where I got the stitch name?)

Clearly, this makes a charming background. I’m looking forward to using it for tall and narrow clothing, like pants or jackets with a matte thread such as Vineyard Silk, silk floss, or an overdyed wool. Flip it 90° for water or a snow-covered path. My favorite threads for those kinds of areas are Flair and Kreinik Metallics.

Two things I want to play with when I use this stitch. The first is to alternate between matte and metallic in the columns. For example, the groups of stitches over 2-1-2 stitches would be a matte thread while the 1-2-1 stitches would use a metallic thread. Or alternate matte and metallic by entire columns. Also, consider adding more empty rows between the columns to give more space, especially if the canvas has beautiful shading.

This stitch diagram, along with all other #whimsicalwednesday and #smallspacesunday stitch diagrams, can also be found on a Pinterest board here. Be sure to follow whimsicalstitch.com on FacebookPinterestInstagram, and Twitter.

If you like what you see on this blog, there's more: Mary’s Whimsical Stitches Volume 1 is a contemporary how-to collection of more than 250 stitches for stitchers regardless of skill level. The book includes updated and sequenced diagrams from this blog, all-new stitches, and a chapter on the basics of needlepoint; Mary’s Whimsical Stitches Volume 2 features chapters on Balanced, Beading, Diagonal, Layered, Oblique, Small, and Straight stitches.

Also, you can download for free the first chapter from my first book which covers basic needlepoint stitches and stitch compensation techniques along with new top-line information on needlepoint materials and tools, how to handle threads, and other helpful needlepoint resources.

whimsicalstitch.com also sells Stitch Guides and Stitch Concepts for Melissa Shirley Designs, Zecca DesignsSandra Gilmore, Purple Palm, Maggie, and Penny MacLeod, and many more. Click here to see the newest guides and click here to see the entire collection.

I hope you have the perfect spot for this stitch! Please enjoy! Have a wonderful #whimsicalwednesday!

A Note about Diagrams
I use color in diagrams to make them as clear as possible.  The primary function of different colored lines is to illustrate a stitch sequence.  For example, layering of colors demonstrates you add them in that order.  They can also provide ideas on how to integrate additional threads (one line for each color).  Or, you can use the same thread for all color lines.  That's where I encourage you to use your imagination for the space you are stitching!