Brr…It's Cold

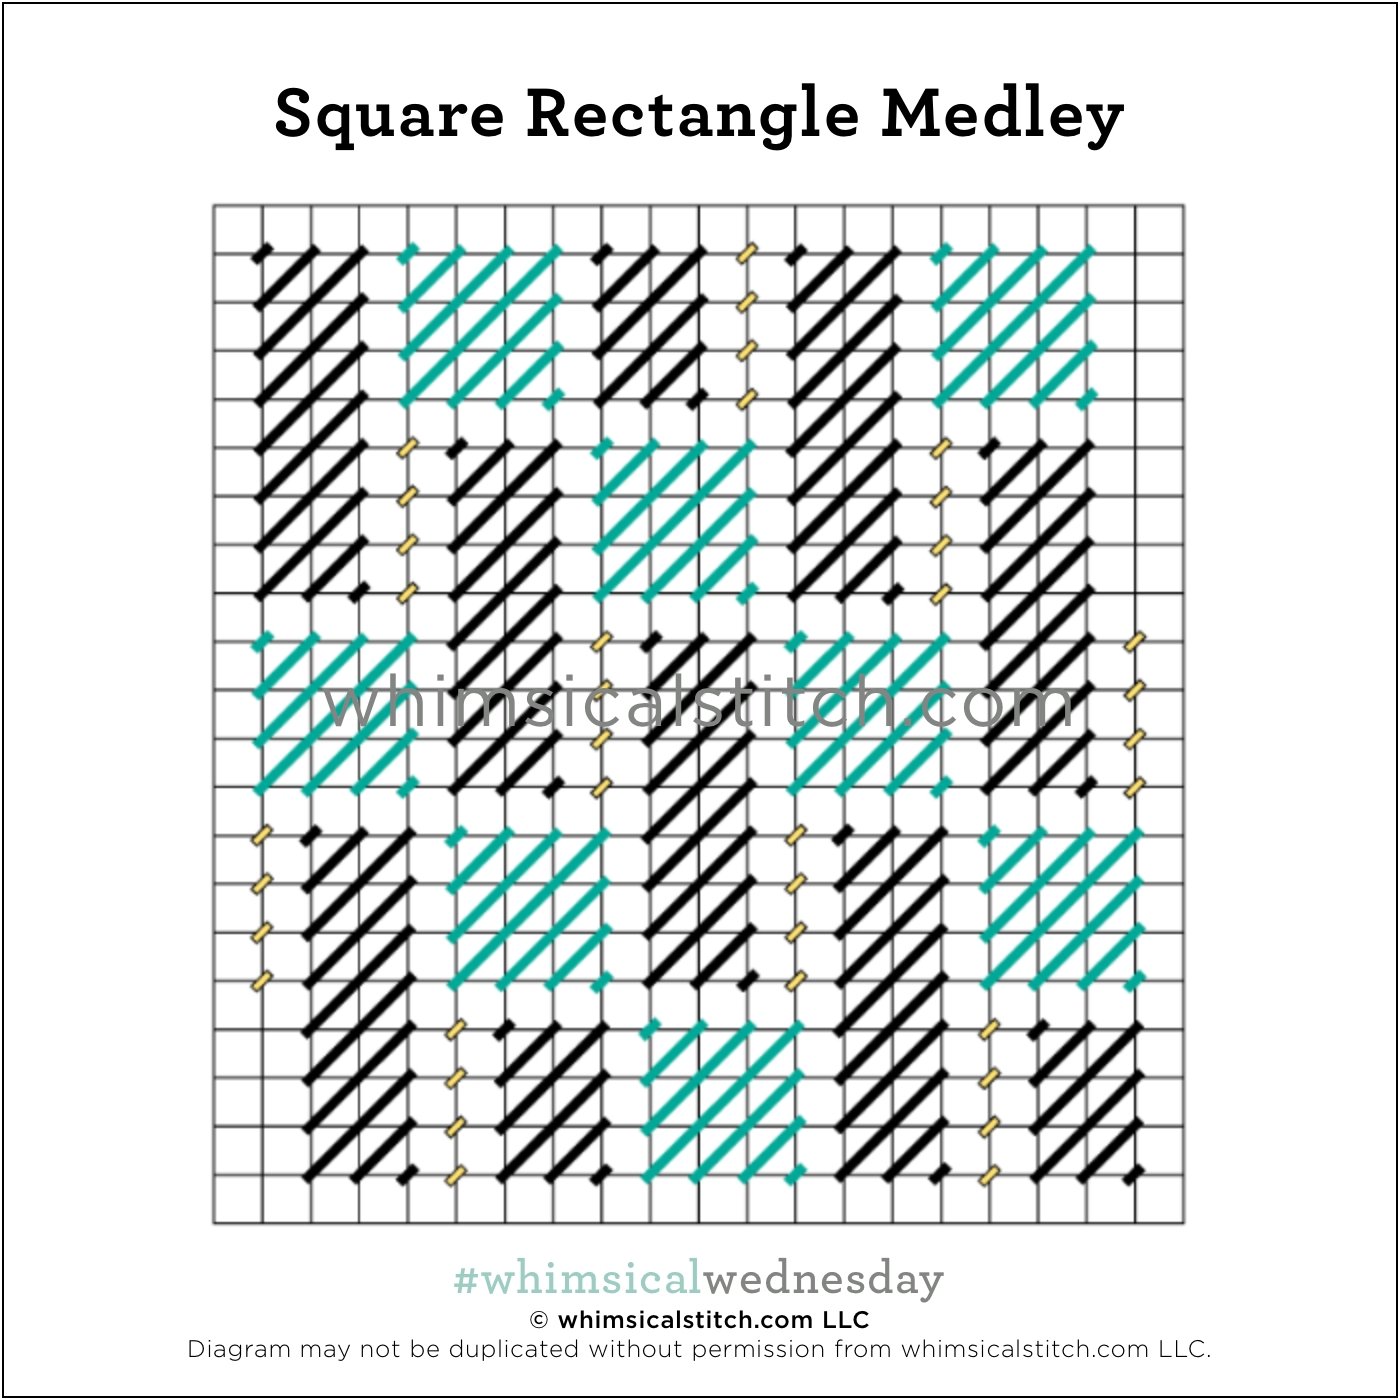
And my stitches need more coverage to get through the cold snap. Today’s full-coverage stitch is a fun medley of squares, rectangles, and a much-needed burst of color.

Click the image to see the whimsicalstitch.com Stitch Library on pinterest.com. Includes all #whimsicalwednesday and #smallspacesunday stitch diagrams.

Click the image to see #whimsicalwednesday and #smallspacesunday Stitched Sample Gallery on Instagram.

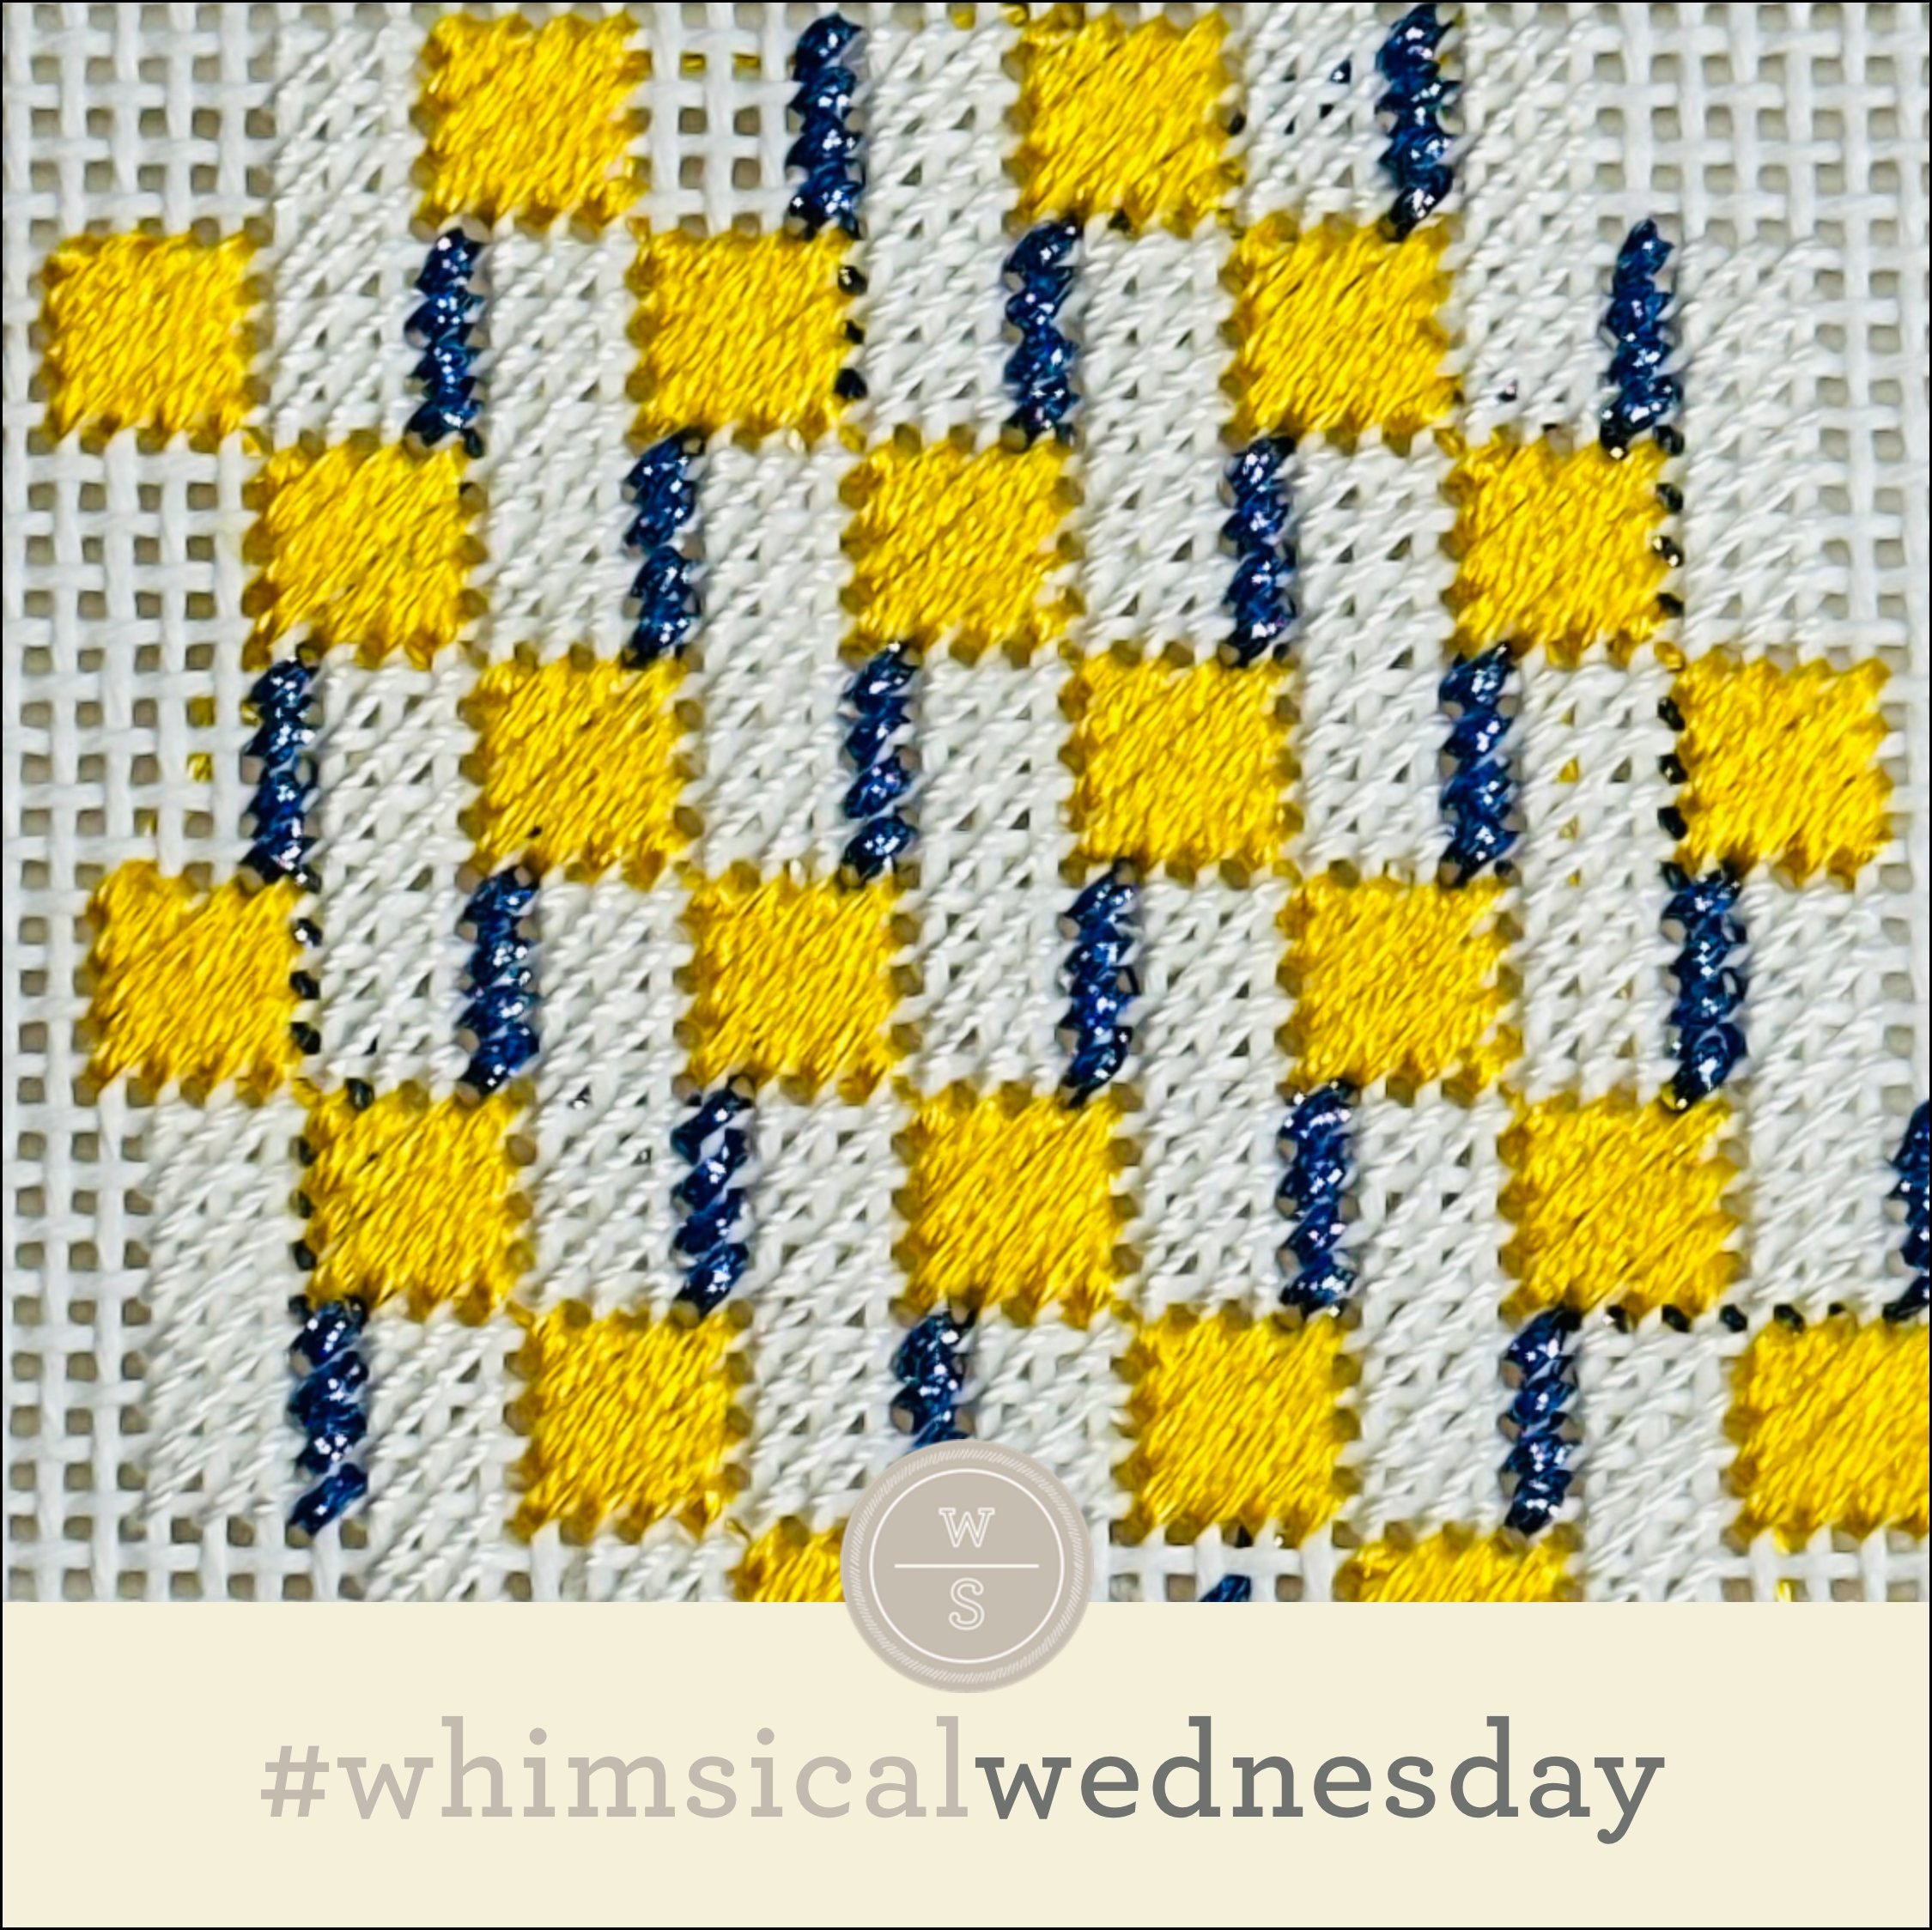
The stitched sample is me playing with yellow Splendor (turquoise lines), white Elegance (black lines), and blue Fyre Werks (yellow lines) on 13M.

I can’t wait to use this for a background on a simple ornament, say behind an initial. I am all about white backgrounds on ornaments. I would use a white silk floss for the black lines, a white silk perle for the turquoise lines, and an accent color for the yellow lines. Consider using it for a tile floor with contrasting colors, as illustrated above. You can also flip it 90 degrees for a floor or a roof. To dress it up a bit, consider replacing the yellow lines with beads.

This stitch is also scalable. If you want to downsize it a bit, consider a 3X3 square for the turquoise lines, which would make the rectangle two rows wide and six rows tall (to keep it at the current scale). You can also grow it to a 5X5 square or more. Have fun with it!

Click on image to see the whimsicalstitch.com Stitch Library on pinterest.com. Includes all #whimsicalwednesday and #smallspacesunday stitch diagrams.

As you are auditioning stitches (from any stitch source), count the number of canvas threads on the diagram that match your mesh size. And there you have what an inch of the stitch will look like. Evaluate that against the area where you plan to use the stitch and make your final decision. If you start integrating this step into your stitch selection process, you may be surprised at how many stitches you think are large are much smaller than you realize.

By (sometimes) including this step in my own process, I find I am now integrating much longer stitches than I ever thought I would. I used to think a stitch six rows long was super big. I have very much changed my tune, which has helped me expand my creativity, especially for large-space stitches.

Today’s stitch diagram, along with all other #whimsicalwednesday and #smallspacesunday stitch diagrams, can also be found on a Pinterest board here. Be sure to follow whimsicalstitch.com on FacebookPinterestInstagram, and Twitter.

If you like what you see on this blog, there's more. Mary’s Whimsical Stitches is a series of four books offering contemporary how-to collections of more than 200 stitches (in each volume) for all stitchers, regardless of skill level. All books include updated and sequenced diagrams from this blog, plus a collection of all-new stitches from private lessons and other class projects. Visit here to find a needlepoint retailer that carries my books.

New to needlepoint or looking for a refresher? Please download a handy how-to guide covering basic needlepoint stitches and stitch compensation techniques along with new top-line information on needlepoint materials and tools, how to handle threads, and other helpful needlepoint resources.

whimsicalstitch.com also sells Stitch Guides and Stitch Concepts for Melissa Shirley Designs, Zecca DesignsSandra Gilmore, Purple Palm, Maggie, and Penny MacLeod, and many more. Click here to see the newest guides and click here to see the entire collection.

I hope you have the perfect spot for this stitch! Please enjoy! Have a wonderful #whimsicalwednesday!

A Note about Diagrams
I use color in diagrams to make them as clear as possible.  The primary function of different colored lines is to illustrate a stitch sequence.  For example, the layering of colors demonstrates you add them in that order.  They can also provide ideas on integrating additional threads (one line for each color).  Or, you can use the same thread for all color lines.  That's where I encourage you to use your imagination for the space you are stitching!

Again?

Sharing stories of some of my favorite stitchers was not a planned theme for this and the past couple of weeks, but here we are again. I’m pretty sure this stitcher gave me a minute to get settled before she asked me for help on a background. I immediately knew what I wanted her to do, and she had most of it done by the next morning. (All kidding aside, she gave me more than a minute to settle and thanked me profusely, though I love teasing her that she didn’t.)

Click the image to see the whimsicalstitch.com Stitch Library on pinterest.com. Includes all #whimsicalwednesday and #smallspacesunday stitch diagrams.

Click the image to see #whimsicalwednesday and #smallspacesunday Stitched Sample Gallery on Instagram.

The stitched sample is the background on a sweet Sew Much Fun piece. The painting portrayed a beautiful watercolor-y effect that few threads could pull off in a basketweave or decorative stitch with multiple threads. The solution was a size 8 Kreinik in a simple open pattern that allows alllllll the colors to shine. It was absolute perfection and Suzy stitched it perfectly.

This stitch is also a great tabletop. The squares can be converted into diamonds by adding a second thread. It’s a deceptively fun variation, as illustrated on the right.


Click on image to see the whimsicalstitch.com Stitch Library on pinterest.com. Includes all #whimsicalwednesday and #smallspacesunday stitch diagrams.

As you are auditioning stitches (from any stitch source), count the number of canvas threads on the diagram that match your mesh size. And there you have what an inch of the stitch will look like. Evaluate that against the area where you plan to use the stitch and make your final decision. If you start integrating this step into your stitch selection process, you may be surprised at how many stitches you think are large are much smaller than you realize.

By (sometimes) including this step in my own process, I find I am now integrating much longer stitches than I ever thought I would. I used to think a stitch six rows long was super big. I have very much changed my tune, which has helped me expand my creativity, especially for large-space stitches.

Today’s stitch diagram, along with all other #whimsicalwednesday and #smallspacesunday stitch diagrams, can also be found on a Pinterest board here. Be sure to follow whimsicalstitch.com on FacebookPinterestInstagram, and Twitter.

If you like what you see on this blog, there's more. Mary’s Whimsical Stitches is a series of four books offering contemporary how-to collections of more than 200 stitches (in each volume) for all stitchers, regardless of skill level. All books include updated and sequenced diagrams from this blog, plus a collection of all-new stitches from private lessons and other class projects. Visit here to find a needlepoint retailer that carries my books.

New to needlepoint or looking for a refresher? Please download a handy how-to guide covering basic needlepoint stitches and stitch compensation techniques along with new top-line information on needlepoint materials and tools, how to handle threads, and other helpful needlepoint resources.

whimsicalstitch.com also sells Stitch Guides and Stitch Concepts for Melissa Shirley Designs, Zecca DesignsSandra Gilmore, Purple Palm, Maggie, and Penny MacLeod, and many more. Click here to see the newest guides and click here to see the entire collection.

I hope you have the perfect spot for this stitch! Please enjoy! Have a wonderful #whimsicalwednesday!

A Note about Diagrams
I use color in diagrams to make them as clear as possible.  The primary function of different colored lines is to illustrate a stitch sequence.  For example, the layering of colors demonstrates you add them in that order.  They can also provide ideas on integrating additional threads (one line for each color).  Or, you can use the same thread for all color lines.  That's where I encourage you to use your imagination for the space you are stitching!

What If We...?

One of my favorite stitchers wanted something a little different than what I suggested for a floor and that’s how we got this adorable little cashmere composite. She wanted something “tile-y but with a little something I can’t describe.” Um, sure?

Click the image to see the whimsicalstitch.com Stitch Library on pinterest.com. Includes all #whimsicalwednesday and #smallspacesunday stitch diagrams.

Click the image to see #whimsicalwednesday and #smallspacesunday Stitched Sample Gallery on Instagram.

The stitched sample is a floor stitched with two plies of white Splendor (black lines), light blue Petite Silk Lame (turquoise lines), and Elegance (yellow lines) on 18M. It’s absolutely full coverage but I like how the lighter threads help keep it chill. Well, as chill as three different threads can be in such a small space.

I love this idea for a jacket or coat with a hefty Vineyard Silk or Petite Very Velvet for the black lines, a Kreinik metallic for the turquoise lines, and Flair for the yellow lines to add a little peace and quiet. It will also make an adorable pathway with perle cotton for the black lines, a second perle in a slightly darker shade of its mate for the turquoise lines, and some silk floss for the yellow lines to mellow it out a little. I know people either love or loathe perle cotton. I absolutely love it in certain applications, especially size 8, largely because of its unique finish. I feel like you can see and identify it immediately because it is unique in our world of single-strand silks.

Have fun with it!

Click on image to see the whimsicalstitch.com Stitch Library on pinterest.com. Includes all #whimsicalwednesday and #smallspacesunday stitch diagrams.

As you are auditioning stitches (from any stitch source), count the number of canvas threads on the diagram that match your mesh size. And there you have what an inch of the stitch will look like. Evaluate that against the area where you plan to use the stitch and make your final decision. If you start integrating this step into your stitch selection process, you may be surprised at how many stitches you think are large are much smaller than you realize.

By (sometimes) including this step in my own process, I find I am now integrating much longer stitches than I ever thought I would. I used to think a stitch six rows long was super big. I have very much changed my tune, which has helped me expand my creativity, especially for large-space stitches.

Today’s stitch diagram, along with all other #whimsicalwednesday and #smallspacesunday stitch diagrams, can also be found on a Pinterest board here. Be sure to follow whimsicalstitch.com on FacebookPinterestInstagram, and Twitter.

If you like what you see on this blog, there's more. Mary’s Whimsical Stitches is a series of four books offering contemporary how-to collections of more than 200 stitches (in each volume) for all stitchers, regardless of skill level. All books include updated and sequenced diagrams from this blog, plus a collection of all-new stitches from private lessons and other class projects. Visit here to find a needlepoint retailer that carries my books.

New to needlepoint or looking for a refresher? Please download a handy how-to guide covering basic needlepoint stitches and stitch compensation techniques along with new top-line information on needlepoint materials and tools, how to handle threads, and other helpful needlepoint resources.

whimsicalstitch.com also sells Stitch Guides and Stitch Concepts for Melissa Shirley Designs, Zecca DesignsSandra Gilmore, Purple Palm, Maggie, and Penny MacLeod, and many more. Click here to see the newest guides and click here to see the entire collection.

I hope you have the perfect spot for this stitch! Please enjoy! Have a wonderful #whimsicalwednesday!

A Note about Diagrams
I use color in diagrams to make them as clear as possible.  The primary function of different colored lines is to illustrate a stitch sequence.  For example, the layering of colors demonstrates you add them in that order.  They can also provide ideas on integrating additional threads (one line for each color).  Or, you can use the same thread for all color lines.  That's where I encourage you to use your imagination for the space you are stitching!
Yum

Today’s stitch is a really fun variation of an octagon stitch, courtesy of our friends at Aristeia Needlepoint. Full disclosure: I’m confident I would not have thought of this on my own, which makes me love it all the more.

Click the image to see the whimsicalstitch.com Stitch Library on pinterest.com. Includes all #whimsicalwednesday and #smallspacesunday stitch diagrams.

Click the image to see #whimsicalwednesday and #smallspacesunday Stitched Sample Gallery on Instagram.

The stitched sample the tabletop for a Melissa Shirley basket. Amanda stitched all the lines in the diagram with white DMC perle cotton. I illustrated the diagram with two threads to distinguish the two steps of a complete pie as well as offer a little inspiration for thread ideas. Whether or not you use one or two threads, I strongly recommend stitching the black lines first, and ending with the aqua lines.

This stitch is also a great illustration of the second way you can stitch octagons. Most of my octagon stitches share diagonal edges. Today’s octagons share straight edges for a slightly different look.

Amanda’s use of this for a tabletop is always a good choice. I think it will also make a beautiful bedspread with silk floss (black lines) and a Kreinik metallic in a contrasting color (aqua lines). This also reminds me a great deal of kitchen tile, so why not use it for a backsplash or floor with two contrasting metallic threads, such as Petite Silk Lame or Twinkle.

Click on image to see the whimsicalstitch.com Stitch Library on pinterest.com. Includes all #whimsicalwednesday and #smallspacesunday stitch diagrams.

As you are auditioning stitches (from any stitch source), count the number of canvas threads on the diagram that match your mesh size. And there you have what an inch of the stitch will look like. Evaluate that against the area where you plan to use the stitch and make your final decision. If you start integrating this step into your stitch selection process, you may be surprised at how many stitches you think are large are much smaller than you realize.

By (sometimes) including this step in my own process, I find I am now integrating much longer stitches than I ever thought I would. I used to think a stitch six rows long was super big. I have very much changed my tune, which has helped me expand my creativity, especially for large-space stitches.

Today’s stitch diagram, along with all other #whimsicalwednesday and #smallspacesunday stitch diagrams, can also be found on a Pinterest board here. Be sure to follow whimsicalstitch.com on FacebookPinterestInstagram, and Twitter.

If you like what you see on this blog, there's more. Mary’s Whimsical Stitches is a series of four books offering contemporary how-to collections of more than 200 stitches (in each volume) for all stitchers, regardless of skill level. All books include updated and sequenced diagrams from this blog, plus a collection of all-new stitches from private lessons and other class projects. Visit here to find a needlepoint retailer that carries my books.

New to needlepoint or looking for a refresher? Please download a handy how-to guide covering basic needlepoint stitches and stitch compensation techniques along with new top-line information on needlepoint materials and tools, how to handle threads, and other helpful needlepoint resources.

whimsicalstitch.com also sells Stitch Guides and Stitch Concepts for Melissa Shirley Designs, Zecca DesignsSandra Gilmore, Purple Palm, Maggie, and Penny MacLeod, and many more. Click here to see the newest guides and click here to see the entire collection.

I hope you have the perfect spot for this stitch! Please enjoy! Have a wonderful #whimsicalwednesday!

A Note about Diagrams
I use color in diagrams to make them as clear as possible.  The primary function of different colored lines is to illustrate a stitch sequence.  For example, the layering of colors demonstrates you add them in that order.  They can also provide ideas on integrating additional threads (one line for each color).  Or, you can use the same thread for all color lines.  That's where I encourage you to use your imagination for the space you are stitching!
Creating Something Out of Nothing

I get a lot of pleasure out of stitching backgrounds. So much space to play! Yet, creating an environment for the background of single-subject canvases is equally fun.

Click the image to see the whimsicalstitch.com Stitch Library on pinterest.com. Includes all #whimsicalwednesday and #smallspacesunday stitch diagrams.

Click the image to see #whimsicalwednesday and #smallspacesunday Stitched Sample Gallery on Instagram.

The stitched sample is a glimpse of a background from a simple ornament with nothing more than a vase with flowers. (This ornament is a gift, so I can’t show everything.) The straight black lines are the tabletop underneath and behind the vase. The columns of diagonal rows of skipping tent stitch are the wall behind the vase. All black lines use Elegance; the yellow lines use Petite Silk Lame on 18M.

The diagram is simply a jumping-off point. In the stitched sample, I positioned the tabletop an appropriate bit above the bottom of the vase, started the stitch at the top edge of the imaginary tabletop, and continued it to the bottom edge. If the tent stitches don’t float your boat, I suggest finding a stitch that fits the width of a repeated element in the tabletop for the columns. My go-to suggestions include diamond stitches or more horizontal straight stitches. The wider your repeated element is, the more fun you can have with the columns.

This would be a darling floor and wall for a holiday ornament with a single Christmas tree. I typically use the same color as the canvas is painted for the floor (or tabletop). I would select a secondary color from the tree, say the ornaments, and add that to the contrasting column.

Click on image to see the whimsicalstitch.com Stitch Library on pinterest.com. Includes all #whimsicalwednesday and #smallspacesunday stitch diagrams.

As you are auditioning stitches (from any stitch source), count the number of canvas threads on the diagram that match your mesh size. And there you have what an inch of the stitch will look like. Evaluate that against the area where you plan to use the stitch and make your final decision. If you start integrating this step into your stitch selection process, you may be surprised at how many stitches you think are large are much smaller than you realize.

By (sometimes) including this step in my own process, I find I am now integrating much longer stitches than I ever thought I would. I used to think a stitch six rows long was super big. I have very much changed my tune, which has helped me expand my creativity, especially for large-space stitches.

Today’s stitch diagram, along with all other #whimsicalwednesday and #smallspacesunday stitch diagrams, can also be found on a Pinterest board here. Be sure to follow whimsicalstitch.com on FacebookPinterestInstagram, and Twitter.

If you like what you see on this blog, there's more. Mary’s Whimsical Stitches is a series of four books offering contemporary how-to collections of more than 200 stitches (in each volume) for all stitchers, regardless of skill level. All books include updated and sequenced diagrams from this blog, plus a collection of all-new stitches from private lessons and other class projects. Visit here to find a needlepoint retailer that carries my books.

New to needlepoint or looking for a refresher? Please download a handy how-to guide covering basic needlepoint stitches and stitch compensation techniques along with new top-line information on needlepoint materials and tools, how to handle threads, and other helpful needlepoint resources.

whimsicalstitch.com also sells Stitch Guides and Stitch Concepts for Melissa Shirley Designs, Zecca DesignsSandra Gilmore, Purple Palm, Maggie, and Penny MacLeod, and many more. Click here to see the newest guides and click here to see the entire collection.

I hope you have the perfect spot for this stitch! Please enjoy! Have a wonderful #whimsicalwednesday!

A Note about Diagrams
I use color in diagrams to make them as clear as possible.  The primary function of different colored lines is to illustrate a stitch sequence.  For example, the layering of colors demonstrates you add them in that order.  They can also provide ideas on integrating additional threads (one line for each color).  Or, you can use the same thread for all color lines.  That's where I encourage you to use your imagination for the space you are stitching!
Joy!

Everything about today’s stitched sample gives me joy. The colors, the threads, and the adorable red nose.

Click on image to see on whimsicalstitch.com's Pinterest account. Visit pinterest.com/whimsicalstitch/whimsicalwednesday for a library of all #whimsicalwednesday and #smallspacesunday stitch diagrams.

Click on image to see on whimsicalstitch.com's Pinterest account. Visit pinterest.com/whimsicalstitch/whimsicalwednesday for a library of all #whimsicalwednesday and #smallspacesunday stitch diagrams.

Click on image to see on whimsicalstitch.com's Instagram account. Visit instagram.com/whimsicalstitch to see a library of stitched samples for select #whimsicalwednesday and #smallspacesunday stitch diagrams.

Click on image to see on whimsicalstitch.com's Instagram account. Visit instagram.com/whimsicalstitch to see a library of stitched samples for select #whimsicalwednesday and #smallspacesunday stitch diagrams.

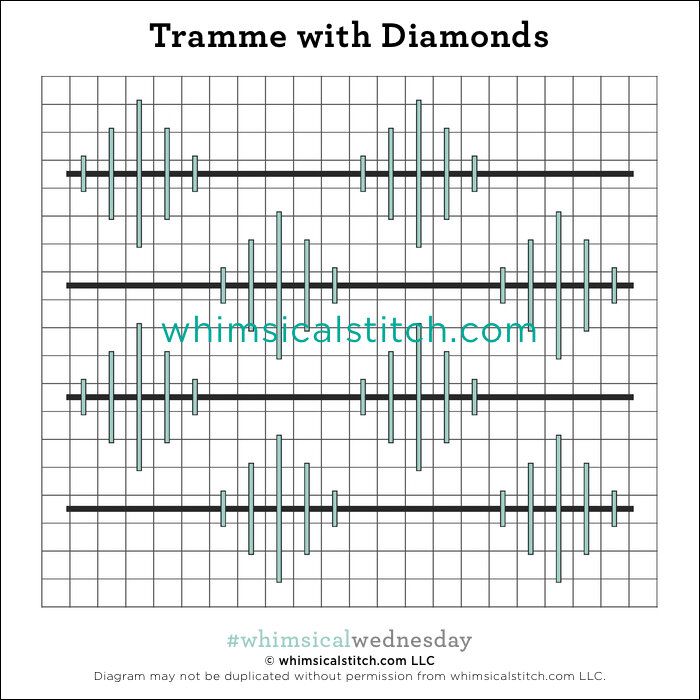
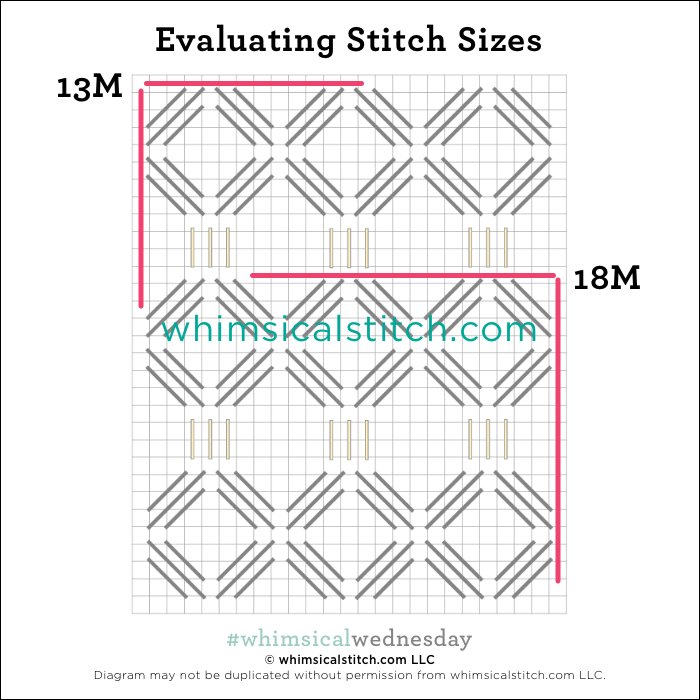
Today’s stitch is a(nother) Tramme stitch with Kreinik size 12 (black lines) and Elegance (aqua lines). I wrote at length about tramme stitches here (if you are interested). The canvas is from Pepperberry Designs.

This stitch has so much potential for clothing with Vineyard Silk (black lines) and Silk Lame (aqua lines). Or reverse the two if you want a more subtle combo. It will add a lot of interest to a roof or chimney with two related hues of Elegance. I’m also looking forward to using it with a solid single strand silk (black lines) and an overdyed silk floss or metallic on top (aqua lines) for a tree.

These stitch diagrams, along with all other #whimsicalwednesday and #smallspacesunday stitch diagrams, can also be found on a Pinterest board here. Be sure to follow whimsicalstitch.com on FacebookPinterestInstagram, and Twitter.

If you like what you see on this blog, there's more: Mary’s Whimsical Stitches Volume 1 is a contemporary how-to collection of more than 250 stitches for stitchers regardless of skill level. The book includes updated and sequenced diagrams from this blog, all-new stitches, and a chapter on the basics of needlepoint; Mary’s Whimsical Stitches Volume 2 features chapters on Balanced, Beading, Diagonal, Layered, Oblique, Small, and Straight stitches.

Also, you can download The Essentials, a free guide covering basic needlepoint stitches and stitch compensation techniques along with new top-line information on needlepoint materials and tools, how to handle threads, and other helpful needlepoint resources.

whimsicalstitch.com also sells Stitch Guides and Stitch Concepts for Melissa Shirley Designs, Zecca DesignsSandra Gilmore, Purple Palm, Maggie, and Penny MacLeod, and many more. Click here to see the newest guides and click here to see the entire collection.

I hope you have the perfect spot for this stitch! Please enjoy! Have a wonderful #whimsicalwednesday!

A Note about Diagrams
I use color in diagrams to make them as clear as possible.  The primary function of different colored lines is to illustrate a stitch sequence.  For example, layering of colors demonstrates you add them in that order.  They can also provide ideas on how to integrate additional threads (one line for each color).  Or, you can use the same thread for all color lines.  That's where I encourage you to use your imagination for the space you are stitching!
Stitching Friends are the Best Friends (Part 593)

I got to catch up with a dear stitching friend this weekend (virtually of course). We spent time regaling each other with family news and crazy current events. But, truth be told, we spent more time talking about stitches and current projects. She slipped me today’s adorable stitch and stitched sample. The stitch is as charming as my dear friend.

Click on image to see on whimsicalstitch.com's Pinterest account. Visit pinterest.com/whimsicalstitch/whimsicalwednesday for a library of all #whimsicalwednesday and #smallspacesunday stitch diagrams.

Click on image to see on whimsicalstitch.com's Pinterest account. Visit pinterest.com/whimsicalstitch/whimsicalwednesday for a library of all #whimsicalwednesday and #smallspacesunday stitch diagrams.

Click on image to see on whimsicalstitch.com's Instagram account. Visit instagram.com/whimsicalstitch to see a library of stitched samples for select #whimsicalwednesday and #smallspacesunday stitch diagrams.

Click on image to see on whimsicalstitch.com's Instagram account. Visit instagram.com/whimsicalstitch to see a library of stitched samples for select #whimsicalwednesday and #smallspacesunday stitch diagrams.

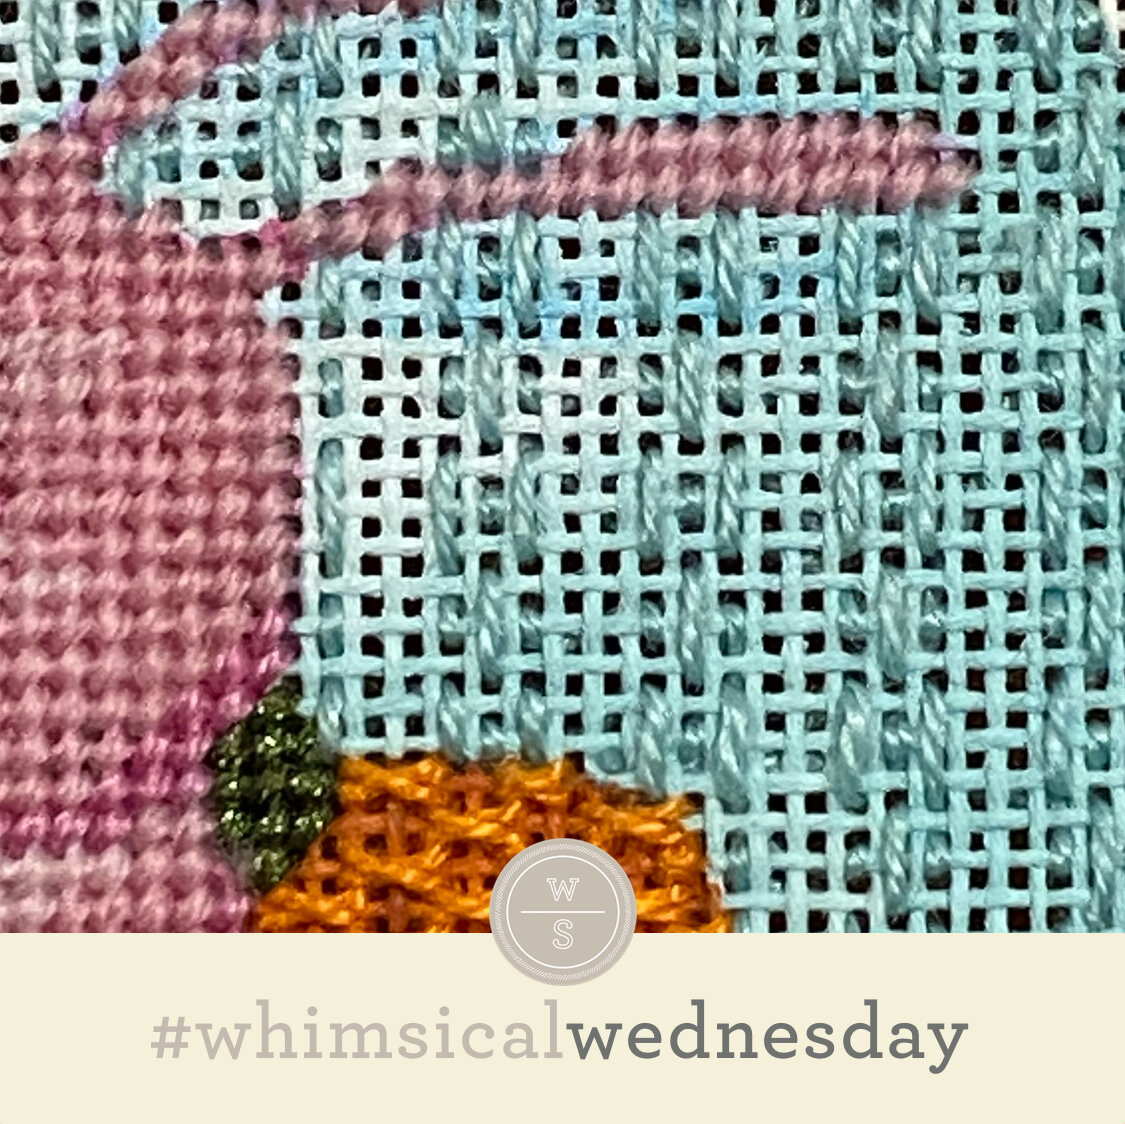
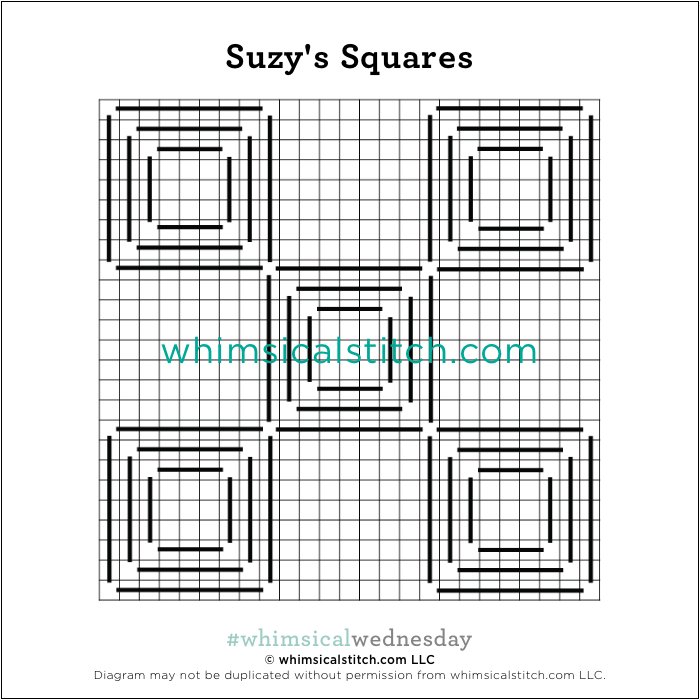
The stitched sample is a background on an adorable Rebecca Woods Easter bunny with Rainbow Gallery’s Elegance on 18-mesh. This pattern is very similar to darning stitches I’ve shared in the past. However, it is a traditional wrapped stitch. Start at the top of a column, add the three stitches on the horizontal axis (over 2-1-2 rows), drop down and switch the pattern to 1-2-1 rows. (See where I got the stitch name?)

Clearly, this makes a charming background. I’m looking forward to using it for tall and narrow clothing, like pants or jackets with a matte thread such as Vineyard Silk, silk floss, or an overdyed wool. Flip it 90° for water or a snow-covered path. My favorite threads for those kinds of areas are Flair and Kreinik Metallics.

Two things I want to play with when I use this stitch. The first is to alternate between matte and metallic in the columns. For example, the groups of stitches over 2-1-2 stitches would be a matte thread while the 1-2-1 stitches would use a metallic thread. Or alternate matte and metallic by entire columns. Also, consider adding more empty rows between the columns to give more space, especially if the canvas has beautiful shading.

This stitch diagram, along with all other #whimsicalwednesday and #smallspacesunday stitch diagrams, can also be found on a Pinterest board here. Be sure to follow whimsicalstitch.com on FacebookPinterestInstagram, and Twitter.

If you like what you see on this blog, there's more: Mary’s Whimsical Stitches Volume 1 is a contemporary how-to collection of more than 250 stitches for stitchers regardless of skill level. The book includes updated and sequenced diagrams from this blog, all-new stitches, and a chapter on the basics of needlepoint; Mary’s Whimsical Stitches Volume 2 features chapters on Balanced, Beading, Diagonal, Layered, Oblique, Small, and Straight stitches.

Also, you can download for free the first chapter from my first book which covers basic needlepoint stitches and stitch compensation techniques along with new top-line information on needlepoint materials and tools, how to handle threads, and other helpful needlepoint resources.

whimsicalstitch.com also sells Stitch Guides and Stitch Concepts for Melissa Shirley Designs, Zecca DesignsSandra Gilmore, Purple Palm, Maggie, and Penny MacLeod, and many more. Click here to see the newest guides and click here to see the entire collection.

I hope you have the perfect spot for this stitch! Please enjoy! Have a wonderful #whimsicalwednesday!

A Note about Diagrams
I use color in diagrams to make them as clear as possible.  The primary function of different colored lines is to illustrate a stitch sequence.  For example, layering of colors demonstrates you add them in that order.  They can also provide ideas on how to integrate additional threads (one line for each color).  Or, you can use the same thread for all color lines.  That's where I encourage you to use your imagination for the space you are stitching!