Let There Be White

On the off chance you didn’t know, I adore tramme stitches. Today’s variation is a great way to add more subtle direction.

Click on image to see on whimsicalstitch.com's Pinterest account. Visit pinterest.com/whimsicalstitch/whimsicalwednesday for a library of all #whimsicalwednesday and #smallspacesunday stitch diagrams.

Click on image to see on whimsicalstitch.com's Pinterest account. Visit pinterest.com/whimsicalstitch/whimsicalwednesday for a library of all #whimsicalwednesday and #smallspacesunday stitch diagrams.

Click on image to see on whimsicalstitch.com's Instagram account. Visit instagram.com/whimsicalstitch to see a library of stitched samples for select #whimsicalwednesday and #smallspacesunday stitch diagrams.

Click on image to see on whimsicalstitch.com's Instagram account. Visit instagram.com/whimsicalstitch to see a library of stitched samples for select #whimsicalwednesday and #smallspacesunday stitch diagrams.

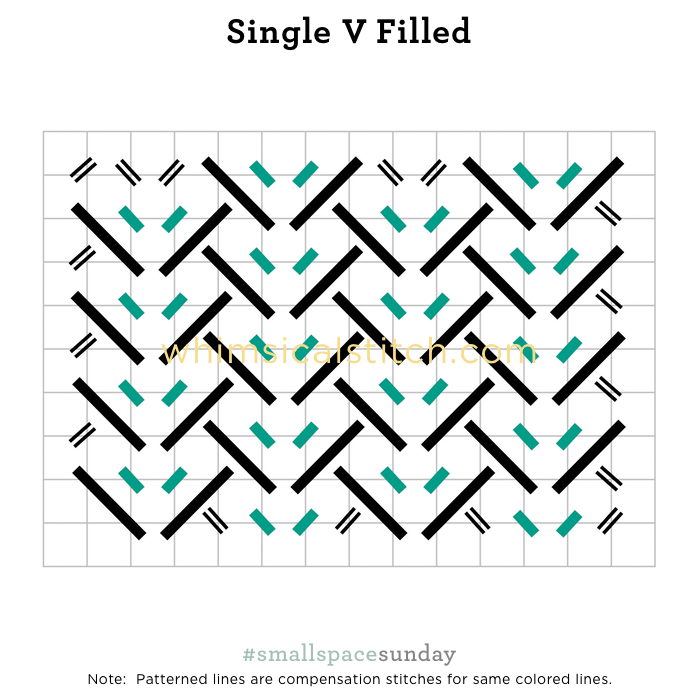
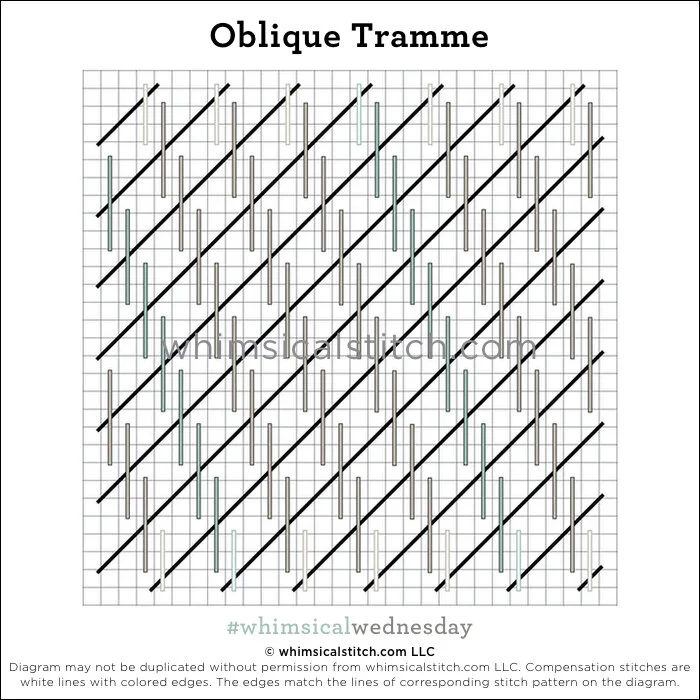
Most of the tramme stitches I’ve shared with you have been horizontal or vertical with cute accent stitches. Today’s tramme uses diagonal base threads with long accent stitches. The accent stitches provide the subtle angle of the stitch.

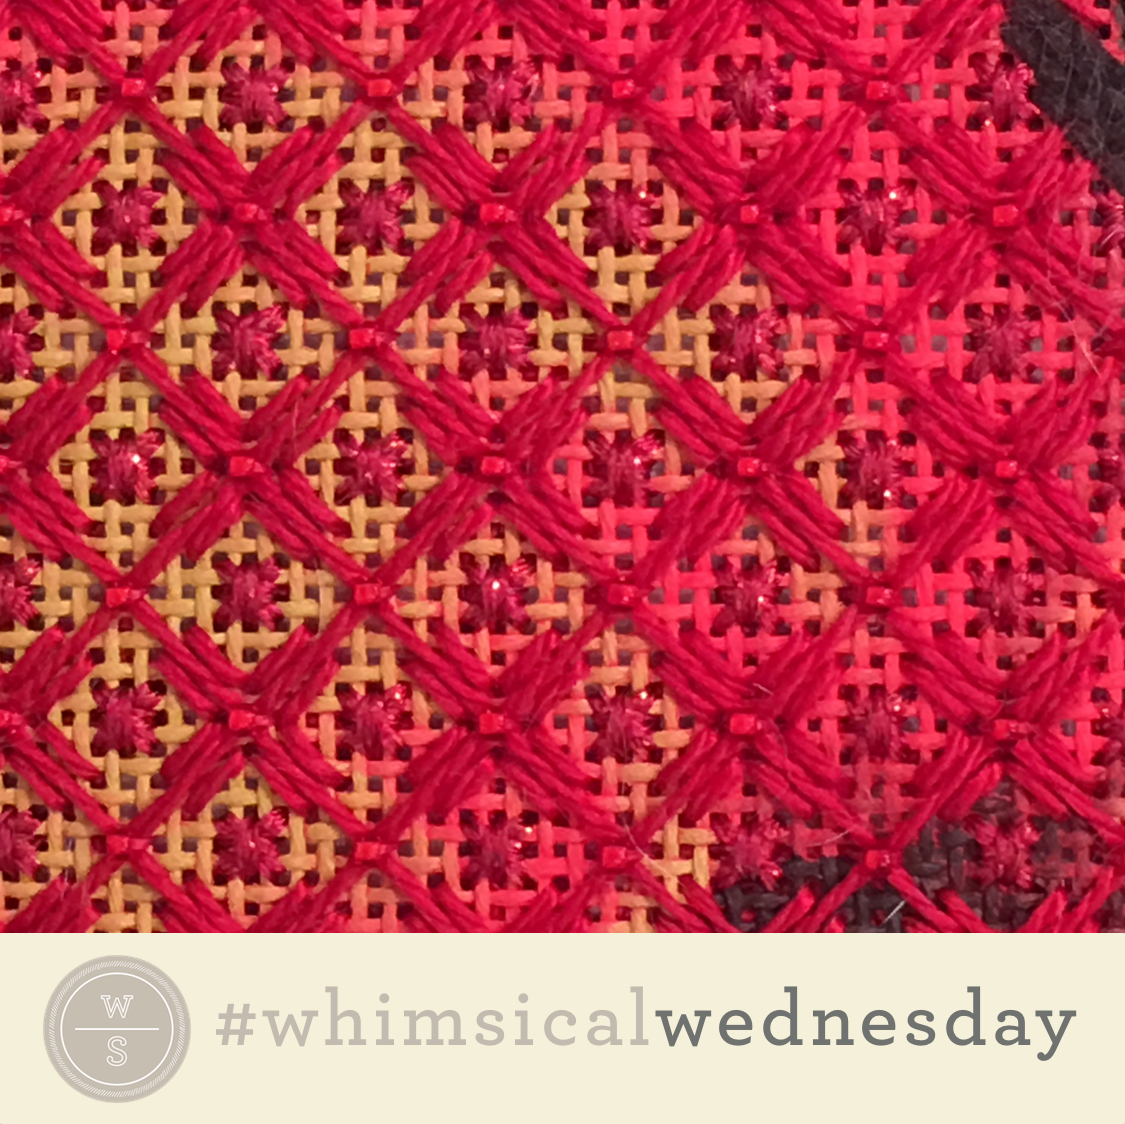
The stitched sample is the stomach of a flying puffin (naturally), hence the use of a whole lotta white threads. The base threads (black lines) are Kreinik 1/16” ribbon. The gray lines are Petite Silk Lame and the aqua lines are Soie D'Alger. I acknowledge you may not be able to distinguish between the Petite Silk Lame and the Soie on the stitched sample but I promise they are distinct on the actual canvas.

The most difficult part of this stitch is the first step (black lines). If one of these diagonal lines is off by even a single canvas thread, it will screw up the remainder of the stitch. My recommendation is to start small and work up to the longer diagonal stitches.

An easy way to accomplish this is to add your first short diagonal stitch in a corner. For this example, start in the upper left corner from the left edge to the top edge. Double and triple-check that your first diagonal stitch travels along a perfect 45° diagonal path. After it is complete, count across four rows to the right, bring your thread up from behind the canvas at that point and return it four rows below the left-hand side of the prior diagonal stitch. Count down four rows, bring the thread up from behind the canvas and return it four rows to the right of the prior stitch on the top edge.

Select members of the needlepoint police may offer a more complex way to ensure that your threads are wrapped around the edges versus an ever so slight resulting from my technique. I do the first step of most of my tramme stitches in this manner, especially for large areas, in order to minimize the use of the thread and make this go as quickly as possible. It is a matter of personal preference. I find this counting method effective and easy.

I stumbled across this stitch for a roof with a similar angle. The angle was reinforced with painted lines at that angle (in a different color). That is where the idea emerged to use two different color threads for the straight stitches.

This stitch diagram, along with all other #whimsicalwednesday and #smallspacesunday stitch diagrams, can also be found on a Pinterest board here.

Be sure to follow whimsicalstitch.com on FacebookPinterestInstagram, and Twitter.

If you like what you see on this blog, want to learn some very creative decorative stitches, and how to put them all together, whimsicalstitch.com has a book for you! Mary’s Whimsical Stitches is a contemporary how-to collection of more than 250 stitches for stitchers regardless of skill level. The book includes updated and sequenced diagrams from this blog, all-new stitches, and a chapter on the basics of needlepoint. For more information, visit here.

whimsicalstitch.com also sells Stitch Guides and Stitch Concepts for Melissa Shirley Designs, Zecca DesignsSandra Gilmore, Purple Palm, Maggie, and Penny MacLeod, and many more. Click here to see the newest guides and click here to see the entire collection.

I hope you have the perfect spot for this stitch! Please enjoy! Have a wonderful #whimsicalwednesday!

A Note about Diagrams
I use color in diagrams to make them as clear as possible.  The primary function of different colored lines is to illustrate a stitch sequence.  For example, the layering of colors demonstrates you add them in that order.  They can also provide ideas on how to integrate additional threads (one line for each color).  Or, you can use the same thread for all color lines.  That's where I encourage you to use your imagination for the space you are stitching!

Spring in Autumn!

Today’s stitch is the promised alternate to the Layered Oblique Stitch from a few weeks ago. Truth be told, today’s stitch is what I included in the Stitch Concept until the very charming student went off the reservation. And, for the record, I love this stitch and I love the student’s interpretation of it.

Click on image to see on whimsicalstitch.com's Pinterest account. Visit pinterest.com/whimsicalstitch/whimsicalwednesday for a library of all #whimsicalwednesday and #smallspacesunday stitch diagrams.

Click on image to see on whimsicalstitch.com's Pinterest account. Visit pinterest.com/whimsicalstitch/whimsicalwednesday for a library of all #whimsicalwednesday and #smallspacesunday stitch diagrams.

Click on image to see on whimsicalstitch.com's Instagram account. Visit instagram.com/whimsicalstitch to see a library of stitched samples for select #whimsicalwednesday and #smallspacesunday stitch diagrams.

Click on image to see on whimsicalstitch.com's Instagram account. Visit instagram.com/whimsicalstitch to see a library of stitched samples for select #whimsicalwednesday and #smallspacesunday stitch diagrams.

The stitched sample is me playing with threads on hand on 18-mesh canvas. I used Petite Very Velvet (light gray lines), yellow Trebizond Silk (aqua lines), pink Trebizond Silk (black lines), and purple…wait for it…purple Trebizond Silk (dark gray lines).

Consider this stitch for a dramatic coat, bag, or blanket with a Kreinik 1/16” ribbon for the gray lines, Vineyard Silk or silk floss for the black lines, and a contrasting metallic in a smaller size (like a Petite Silk Lame or size 8 Kreinik) for the aqua lines. Cover the Vineyard Silk or silk floss (black lines) with a Kreinik braid (#8 or #12) (dark gray lines) and you are good to go.

This stitch diagram, along with all other #whimsicalwednesday and #smallspacesunday stitch diagrams, can also be found on a Pinterest board here.

Be sure to follow whimsicalstitch.com on FacebookPinterestInstagram, and Twitter.

If you like what you see on this blog, want to learn creative decorative stitches, and how to put them all together, whimsicalstitch.com sells Stitch Guides and Stitch Concepts for Melissa Shirley Designs, Zecca DesignsSandra Gilmore, Purple Palm, Maggie, and Penny MacLeod, and many more. Click here to see the newest guides and click here to see the entire collection.

I hope you have the perfect spot for this stitch! Please enjoy!  

A Note about Diagrams
I use color in diagrams to make them as clear as possible.  The primary function of different colored lines is to illustrate a stitch sequence.  For example, layering of colors demonstrates you add them in that order.  They can also provide ideas on how to integrate additional threads (one line for each color).  Or, you can use the same thread for all color lines.  That's where I encourage you to use your imagination for the space you are stitching!

Travelling Girl

This week's stitch also comes from recent travels. It's bright, cheerful, and fun...something we always expect from our friend, Ruth Schmuff.

Click on image to see on whimsicalstitch.com's Pinterest account. Visit pinterest.com/whimsicalstitch/whimsicalwednesday for a library of all #whimsicalwednesday and #smallspacesunday stitch diagrams.

Click on image to see on whimsicalstitch.com's Pinterest account. Visit pinterest.com/whimsicalstitch/whimsicalwednesday for a library of all #whimsicalwednesday and #smallspacesunday stitch diagrams.

Click on image to see on whimsicalstitch.com's Instagram account. Visit instagram.com/whimsicalstitch to see a library of stitched samples for select #whimsicalwednesday and #smallspacesunday stitch diagrams.

Click on image to see on whimsicalstitch.com's Instagram account. Visit instagram.com/whimsicalstitch to see a library of stitched samples for select #whimsicalwednesday and #smallspacesunday stitch diagrams.

Today's stitched sample is a Triple Alternating Nobuko with a single strand of Floche (on 18-mesh). The stitch is one of many Nobuko variations. This larger version is a great all-purpose stitch. It includes an intriguing pattern, is scalable, and can be understated or much more. (Here's another Nobuko variation just for the heck of it.)

The sample is the background for a fun Zecca piece*. Leaving the stitch open adds subtlety, allowing it to recede a bit into the background. This simpler version would make a great background (obviously), sky, tabletop, roof, green field, or pathway. The stitches in this pattern go in two directions; consider using two threads, one for each direction. You could use a matte and a metallic, or two completely different colors.

If you want to dress this up a little, add your favorite metallic in the empty rows. If you want to dress it up a lot, add beads in the empty rows! Combinations like those two would make wonderful clothing or bags. I would love to see this as a Santa coat or a witch dress with a with a rich Very Velvet or Pepper Pot Silk along with a heavier metallic such as Kreinik 1/16" ribbon (for 13-mesh). Soie D'Alger and a size 15 crystal bead would be perfect for 18-mesh.

This stitch diagram, along with all other #whimsicalwednesday and #smallspacesunday stitch diagrams, can also be found on a Pinterest board here.

Be sure to follow whimsicalstitch.com on FacebookPinterestInstagram, and Twitter.

If you like what you see on this blog, want to learn some very creative decorative stitches, and how to put them all together, whimsicalstitch.com sells Stitch Guides and Stitch Concepts for Melissa Shirley Designs, Zecca DesignsPatience Brewster, and many more. Click here to see the newest guides and click here to see the entire collection.

I hope you have the perfect spot for this stitch!  Please enjoy!  

* "A fun Zecca piece." Let's acknowledge this is a redundant statement.

A Note about Diagrams
I use color in diagrams to make them as clear as possible.  The primary function of different colored lines is to illustrate a stitch sequence.  For example, layering of colors demonstrates you add them in that order.  They can also provide ideas on how to integrate additional threads (one line for each color).  Or, you can use the same thread for all color lines.  That's where I encourage you to use your imagination for the space you are stitching!

I. Love. This. Stitch.

Today's stitch is a variation on another favorite stitch. It's a great pop of colors and finishes that can help bring a small space to life. I. Love. This. Stitch.

Click on image to see on whimsicalstitch.com's Pinterest account. Visit pinterest.com/whimsicalstitch/whimsicalwednesday for a library of all #whimsicalwednesday and #smallspacesunday stitch diagrams.

Click on image to see on whimsicalstitch.com's Pinterest account. Visit pinterest.com/whimsicalstitch/whimsicalwednesday for a library of all #whimsicalwednesday and #smallspacesunday stitch diagrams.

Click on image to see on whimsicalstitch.com's Instagram account. Visit instagram.com/whimsicalstitch to see a library of stitched samples for select #whimsicalwednesday and #smallspacesunday stitch diagrams.

Click on image to see on whimsicalstitch.com's Instagram account. Visit instagram.com/whimsicalstitch to see a library of stitched samples for select #whimsicalwednesday and #smallspacesunday stitch diagrams.

The stitched sample is me playing with Vineyard Silk and Kreinik Metallics 1/16" Ribbon on 13-mesh. 

There are so many applications for this stitch. I integrated this stitch into a student's project with Lorikeet for a small bush, replacing the single tent stitches with French Knots. It would make a darling sweater or small Christmas stocking, especially with two colors and/or two different finishes. The stitched sample is a perfect example of that. Consider leaving the two tent stitches out for an open stitch for any sort of small greenery or even water.

This stitch diagram, along with all other #whimsicalwednesday and #smallspacesunday stitch diagrams, can also be found on a Pinterest board here.

Be sure to follow whimsicalstitch.com on FacebookPinterestInstagram, and Twitter.

If you like what you see on this blog, want to learn some very creative decorative stitches, and how to put them all together, whimsicalstitch.com sells stitch guides and stitch concepts for Melissa Shirley Designs, Zecca Designs, and Patience Brewster. 81 guides are currently available, with 20 new Stitch Concepts just added! Click here to see the newest guides and click here to see the entire collection.

I hope you have the perfect spot for this stitch! Enjoy! Happy #smallspacesunday!

A Note about Diagrams
I use color in diagrams to make them as clear as possible.  The primary function of different colored lines is to illustrate a stitch sequence.  For example, layering of colors demonstrates you add them in that order.  They can also provide ideas on how to integrate additional threads (one line for each color).  Or, you can use the same thread for all color lines.  That's where I encourage you to use your imagination for the space you are stitching!

Still Wishing I Was Tall

Today's stitch is something that has been flitting in and out of my Pinterest feed.  It's an easy way to add height to any area and looks good to boot.  Win win!

Click on image to see on whimsicalstitch.com's Pinterest account. Visit pinterest.com/whimsicalstitch/whimsicalwednesday for a library of all #whimsicalwednesday and #smallspacesunday stitch diagrams.

Click on image to see on whimsicalstitch.com's Pinterest account. Visit pinterest.com/whimsicalstitch/whimsicalwednesday for a library of all #whimsicalwednesday and #smallspacesunday stitch diagrams.

Click on image to see on whimsicalstitch.com's Instagram account. Visit instagram.com/whimsicalstitch to see a library of stitched samples for select #whimsicalwednesday and #smallspacesunday stitch diagrams.

Click on image to see on whimsicalstitch.com's Instagram account. Visit instagram.com/whimsicalstitch to see a library of stitched samples for select #whimsicalwednesday and #smallspacesunday stitch diagrams.

The stitched sample is me playing with Kreinik 1/16" Ribbon and Gloriana Florimel (silk floss) that I had laying around to be put away.  I'm happy I did it in an atypical color combo because it illustrates the tall drama of this otherwise unassuming stitch.

Frankly, the Cross Stitch accent is completely optional, so the stitch could also enhance any beautiful painting. This would be wonderful as a field of grass, on either the horizontal or vertical axis.   Keeping the Cross Stitch intact, this would make an intriguing tree trunk.  Any wool or cotton floss would work for the turquoise lines.  Have fun with the Cross Stitch here.  Use Rainbow LInen or Straw Silk, as thought-starters.

This tall symmetry of this stitch also lends itself for elegant architectural applications, such as the columns of a fireplace mantle, or a door.   It would make a fantastic roof, especially on the horizontal axis.

This stitch diagram, along with all other #whimsicalwednesday and #smallspacesunday stitch diagrams, can also be found on a Pinterest board here.

Be sure to follow whimsicalstitch.com on FacebookPinterestInstagram, and Twitter.

If you like what you see on this blog, want to learn some very creative decorative stitches, and how to put them all together, whimsicalstitch.com sells stitch guides and stitch concepts for Melissa Shirley Designs, Zecca Designs, and Patience Brewster.  61 guides are currently available, with 13 new Stitch Concepts just added! Click here to see the newest guides and click here to see the entire collection.

I hope you have the perfect spot for this stitch!  Please enjoy!

Confession Time

Today is a blog in two parts.  First, I'm offering up a fun Scallop Stitch with four(!) different and fun options for filling.  The second part spends a little extra time on one of the fillings.  

The stitch is a scallop stitch over three rows.  The topmost points of the scallops in subsequent rows are centered along the lowest point of the row above, creating small shell-shaped spaces in between the horizontal columns of scallops. 

Click on image to see on whimsicalstitch.com's Pinterest account. Visit pinterest.com/whimsicalstitch/whimsicalwednesday for a library of all #whimsicalwednesday and #smallspacesunday stitch diagrams.

Click on image to see on whimsicalstitch.com's Pinterest account. Visit pinterest.com/whimsicalstitch/whimsicalwednesday for a library of all #whimsicalwednesday and #smallspacesunday stitch diagrams.

Click on image to see on whimsicalstitch.com's Instagram account. Visit instagram.com/whimsicalstitch to see a library of stitched samples for select #whimsicalwednesday and #smallspacesunday stitch diagrams.

Click on image to see on whimsicalstitch.com's Instagram account. Visit instagram.com/whimsicalstitch to see a library of stitched samples for select #whimsicalwednesday and #smallspacesunday stitch diagrams.

There are four ideas to fill the empty space (from top to bottom):  Eyelet Stitch (turquoise lines on diagram, purple thread in diagram), Traditional Leaf Stitch (light gray lines on diagram, blue thread in diagram), Shell Stitch (yellow lines on diagram, white thread in diagram), Oblique Tied Stitch (aqua lines on diagram, purple thread in diagram).  Feel free to mix and match the scallops and filling stitch to your heart's desire.  The stitched sample uses Gloriana Florimell (yellow thread), Kreinik 1/16" ribbon, Kreinik Medium Braid (#16) (purple thread), and Gloriana Princess Perle (white thread). 

Personally, I like the idea of the Eyelet or Oblique Tied Stitch as a single filling.  Each offers a smidge of open work and lightness to the overall stitch.  Conversely, I like the combination of the Traditional Leaf and Shell Stitch on alternating horizontal rows.  They are very similar in shape (but not exactly the same!) and I like the alternating directions the two fillings offer.  This is all a matter of personal taste!  Mix and match to your delight.

Now it's time for my confession.  This is the first time I've included an eyelet stitch on my blog.  My confession is they make me nervous.  Today, this changes.

Eyelet stitches are adorable and I appreciate what they can add to a piece, as the added element of a larger hole draws the eye in a unique way.  And therein lies my fear...that the larger holes I create will not be identical sizes and chaos reigns.  (I have enough chaos with my new kitten.)

Here's how I navigated this for the eyelet stitch above.  A tapered laying tool is critical, as it provides more control over the size of the final hole.

Use a tapered laying tool as a guide for consistent eyelet hole sizes.  Final knotted ribbon on laying tool.  Just make sure it's tight!

Use a tapered laying tool as a guide for consistent eyelet hole sizes.  Final knotted ribbon on laying tool.  Just make sure it's tight!

Insert the laying tool in the hole from the front of the canvas and gently push it down until the hole is the desired size.  Don't remove the laying tool yet.  Tie a wide piece of a stash thread (e.g., silk ribbon) where the laying tool meets the canvas on the front, creating a guide for future holes.   

Tie the thread tight, pull the laying tool out of the hole, and complete the knot by tying it again, making sure is tight.  Move across the canvas, creating holes as needed.  Revisit any outlier holes and repeat the process if required to make the hole larger. (I recommend silk ribbon because it is not a slippery thread and will, if tied tightly, stay still on the laying tool.) 

Sometimes, you might make a hole a little too large (compared to other eyelet holes).  To make that hole smaller, use the eye end of a size 22 needle to push the canvas threads back into place.  Put the needle in the immediately adjacent hole, and gently push the needle against the canvas thread, helping nudge the thread back into place.  You may need to do this on all four sides of the hole.  It may take a couple pushes, so be patient.  You can push them back and start over again or just push in a bit to get it to the desired size.  Use your judgment.

This stitch diagram, along with all other #whimsicalwednesday and #smallspacesunday stitch diagrams, can also be found on a Pinterest board here.

Be sure to follow whimsicalstitch.com on FacebookPinterestInstagram, and Twitter.

If you like what you see on this blog, want to learn some very creative decorative stitches, and how to put them all together, whimsicalstitch.com sells stitch guides and stitch concepts for Melissa Shirley Designs, Zecca Designs, and Patience Brewster.  60 guides are currently available, with 12 new Stitch Concepts just added! Click here to see the newest guides and click here to see the entire collection.

I hope you have the perfect spot for this stitch!  Please enjoy!

Open Diamonds!

Today's open stitch comes from a Aristeia workshop from several years ago.  It's a great stitch that strikes the perfect balance of an interesting stitch and the beautiful shading on the canvas.

Click on image to see on whimsicalstitch.com's Pinterest account. Visit pinterest.com/whimsicalstitch/whimsicalwednesday for a library of all #whimsicalwednesday and #smallspacesunday stitch diagrams.

Click on image to see on whimsicalstitch.com's Pinterest account. Visit pinterest.com/whimsicalstitch/whimsicalwednesday for a library of all #whimsicalwednesday and #smallspacesunday stitch diagrams.

Click on image to see on whimsicalstitch.com's Instagram account. Visit instagram.com/whimsicalstitch to see a library of stitched samples for select #whimsicalwednesday and #smallspacesunday stitch diagrams.

Click on image to see on whimsicalstitch.com's Instagram account. Visit instagram.com/whimsicalstitch to see a library of stitched samples for select #whimsicalwednesday and #smallspacesunday stitch diagrams.

I recommend stitching the gray lines first, followed by the aqua lines, and ending with the bead.

The stitched sample includes Vineyard Silk, Shimmer Ribbon, and a Sundance Bead.  This stitch is great for many larger spaces, whether they are are a solid color or deeply shaded.   It could be gorgeous for a large tree with Vineyard Silk or Pepper Pot Silk (gray lines) and Painters Thread or a subtly overdyed Silk Floss (e.g., Gloriana Silk Floss or Dinky Dyes Silk Floss).   For a rich coat you want to stand out, try Very Velvet and Fyre Werks or Kreinik 1/16" metallic ribbon.

This stitch diagram, along with all other #whimsicalwednesday and #smallspacesunday stitch diagrams, can also be found on a Pinterest board here.

Be sure to follow whimsicalstitch.com on FacebookPinterestInstagram, and Twitter.

If you like what you see on this blog, want to learn some very creative decorative stitches, and how to put them all together, whimsicalstitch.com sells stitch guides and stitch concepts for Melissa Shirley Designs, Zecca Designs, and Patience Brewster. 48 guides are currently available and more are in the works!

I hope you have the perfect spot for this stitch! Enjoy!

Technical Difficulties

I really, really like this stitch.  I am confident of this because this has been one of those posts that had multiple "technical difficulties" during every step (diagraming, stitching, and writing).  Every.  Single.  Step.  (Please ignore the fact those difficulties were of my own doing.)  But, I was so excited by this stitch that I kept going.  I give you the Triple Diamond.

Click on image to see on whimsicalstitch.com's Pinterest account. Visit pinterest.com/whimsicalstitch/whimsicalwednesday for a library of all #whimsicalwednesday and #smallspacesunday stitch diagrams.

Click on image to see on whimsicalstitch.com's Pinterest account. Visit pinterest.com/whimsicalstitch/whimsicalwednesday for a library of all #whimsicalwednesday and #smallspacesunday stitch diagrams.

Click on image to see on whimsicalstitch.com's Instagram account. Visit instagram.com/whimsicalstitch to see a library of stitched samples for select #whimsicalwednesday and #smallspacesunday stitch diagrams.

Click on image to see on whimsicalstitch.com's Instagram account. Visit instagram.com/whimsicalstitch to see a library of stitched samples for select #whimsicalwednesday and #smallspacesunday stitch diagrams.

This stitch pops up in my Pinterest feed on a regular basis and I am always happy to see it.  I'm not sure the original teacher nor the original source, so all I have to offer is a broad "thank you!"  The diagram and stitch sample replicate the really clever color plan with three shades of a single hue plus a metallic. (The original post was blue and silver.)

As I was creating the stitched sample, I reached a point where I wasn't "done-done" but I still really liked it.  So, here's a variation with a slightly lighter touch.  

Click on image to see on whimsicalstitch.com's Pinterest account. Visit pinterest.com/whimsicalstitch/whimsicalwednesday for a library of all #whimsicalwednesday and #smallspacesunday stitch diagrams.

Click on image to see on whimsicalstitch.com's Pinterest account. Visit pinterest.com/whimsicalstitch/whimsicalwednesday for a library of all #whimsicalwednesday and #smallspacesunday stitch diagrams.

Click on image to see on whimsicalstitch.com's Instagram account. Visit instagram.com/whimsicalstitch to see a library of stitched samples for select #whimsicalwednesday and #smallspacesunday stitch diagrams.

Click on image to see on whimsicalstitch.com's Instagram account. Visit instagram.com/whimsicalstitch to see a library of stitched samples for select #whimsicalwednesday and #smallspacesunday stitch diagrams.

I can't wait to use this stitch for a larger (and/or wider) area where I want to draw the eye.  It would make a great Santa coat or bag, large trees, even ground covering, or a large flower.  The second diagram provides a version where some of the shading can show through.  

Have fun with the thread combinations.  A dramatic stitch calls for dramatic threads.  Ideas include two hues of Very Velvet (diamonds) with Kreinik 1/16" ribbon surrounding the diamonds, Painters threads (diamonds) with wool or single strand silk for the surround, Lorikeet (diamonds) with Rainbow Linen or Grandeur for the surround.  

These stitch diagrams, along with all other #whimsicalwednesday and #smallspacesunday stitch diagrams, can also be found on a Pinterest board here.

Be sure to follow whimsicalstitch.com on FacebookPinterestInstagram, and Twitter.

If you like what you see on this blog, want to learn some very creative decorative stitches, and how to put them all together, whimsicalstitch.com sells stitch guides and stitch concepts for Melissa Shirley Designs, Zecca Designs, and Patience Brewster. 48 guides are currently available and more are in the works!

I hope you have the perfect spot for this stitch! Enjoy!