

Today is a blog in two parts. First, I'm offering up a fun Scallop Stitch with four(!) different and fun options for filling. The second part spends a little extra time on one of the fillings.
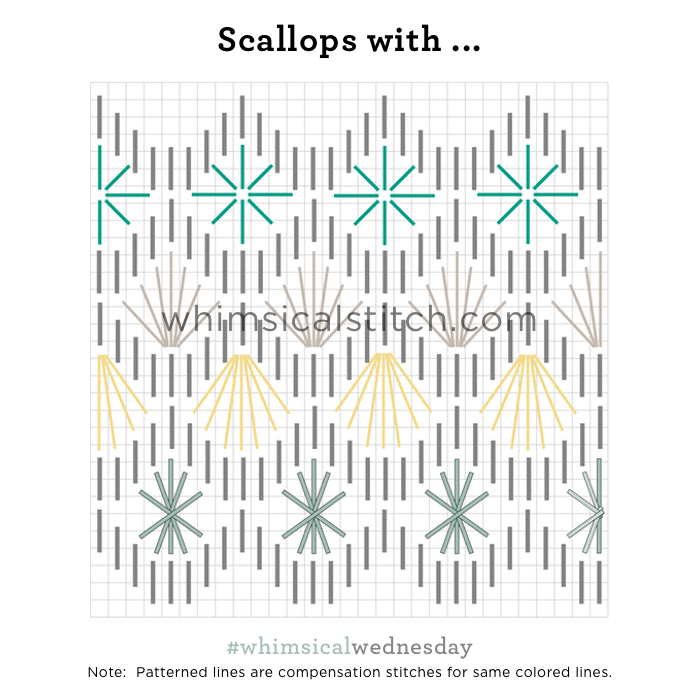
The stitch is a scallop stitch over three rows. The topmost points of the scallops in subsequent rows are centered along the lowest point of the row above, creating small shell-shaped spaces in between the horizontal columns of scallops.
Click on image to see on whimsicalstitch.com's Pinterest account. Visit pinterest.com/whimsicalstitch/whimsicalwednesday for a library of all #whimsicalwednesday and #smallspacesunday stitch diagrams.

Click on image to see on whimsicalstitch.com's Instagram account. Visit instagram.com/whimsicalstitch to see a library of stitched samples for select #whimsicalwednesday and #smallspacesunday stitch diagrams.
There are four ideas to fill the empty space (from top to bottom): Eyelet Stitch (turquoise lines on diagram, purple thread in diagram), Traditional Leaf Stitch (light gray lines on diagram, blue thread in diagram), Shell Stitch (yellow lines on diagram, white thread in diagram), Oblique Tied Stitch (aqua lines on diagram, purple thread in diagram). Feel free to mix and match the scallops and filling stitch to your heart's desire. The stitched sample uses Gloriana Florimell (yellow thread), Kreinik 1/16" ribbon, Kreinik Medium Braid (#16) (purple thread), and Gloriana Princess Perle (white thread).
Personally, I like the idea of the Eyelet or Oblique Tied Stitch as a single filling. Each offers a smidge of open work and lightness to the overall stitch. Conversely, I like the combination of the Traditional Leaf and Shell Stitch on alternating horizontal rows. They are very similar in shape (but not exactly the same!) and I like the alternating directions the two fillings offer. This is all a matter of personal taste! Mix and match to your delight.
Now it's time for my confession. This is the first time I've included an eyelet stitch on my blog. My confession is they make me nervous. Today, this changes.
Eyelet stitches are adorable and I appreciate what they can add to a piece, as the added element of a larger hole draws the eye in a unique way. And therein lies my fear...that the larger holes I create will not be identical sizes and chaos reigns. (I have enough chaos with my new kitten.)
Here's how I navigated this for the eyelet stitch above. A tapered laying tool is critical, as it provides more control over the size of the final hole.

Use a tapered laying tool as a guide for consistent eyelet hole sizes. Final knotted ribbon on laying tool. Just make sure it's tight!
Insert the laying tool in the hole from the front of the canvas and gently push it down until the hole is the desired size. Don't remove the laying tool yet. Tie a wide piece of a stash thread (e.g., silk ribbon) where the laying tool meets the canvas on the front, creating a guide for future holes.
Tie the thread tight, pull the laying tool out of the hole, and complete the knot by tying it again, making sure is tight. Move across the canvas, creating holes as needed. Revisit any outlier holes and repeat the process if required to make the hole larger. (I recommend silk ribbon because it is not a slippery thread and will, if tied tightly, stay still on the laying tool.)
Sometimes, you might make a hole a little too large (compared to other eyelet holes). To make that hole smaller, use the eye end of a size 22 needle to push the canvas threads back into place. Put the needle in the immediately adjacent hole, and gently push the needle against the canvas thread, helping nudge the thread back into place. You may need to do this on all four sides of the hole. It may take a couple pushes, so be patient. You can push them back and start over again or just push in a bit to get it to the desired size. Use your judgment.
This stitch diagram, along with all other #whimsicalwednesday and #smallspacesunday stitch diagrams, can also be found on a Pinterest board here.
Be sure to follow whimsicalstitch.com on Facebook, Pinterest, Instagram, and Twitter.
If you like what you see on this blog, want to learn some very creative decorative stitches, and how to put them all together, whimsicalstitch.com sells stitch guides and stitch concepts for Melissa Shirley Designs, Zecca Designs, and Patience Brewster. 60 guides are currently available, with 12 new Stitch Concepts just added! Click here to see the newest guides and click here to see the entire collection.
I hope you have the perfect spot for this stitch! Please enjoy!