Open Skies

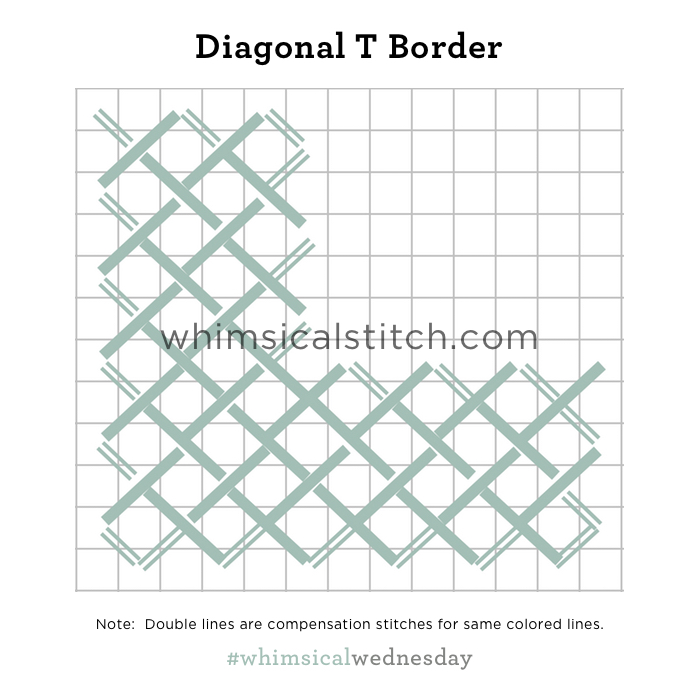
Honestly, I can't think of a time I wanted a sky stitch to stand out above other stitches on the canvas.  It's the nature of skies.  This explains why most of my favorite sky stitches tend to be open stitches with unassuming thread choices that are neutral in direction.  These elements project a perfect minimalism.

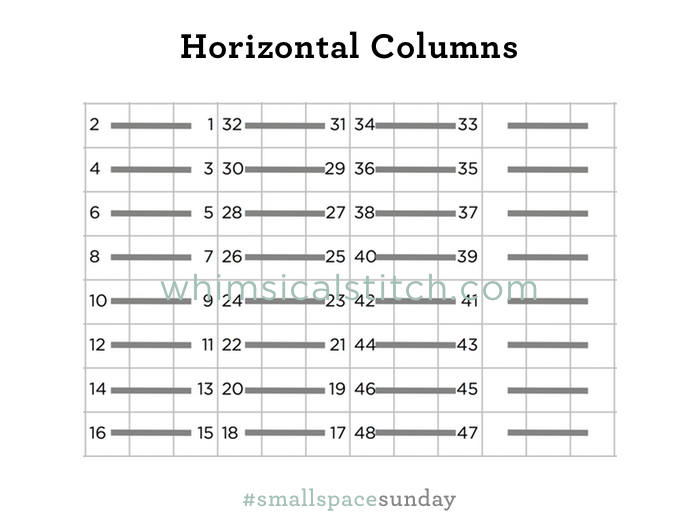
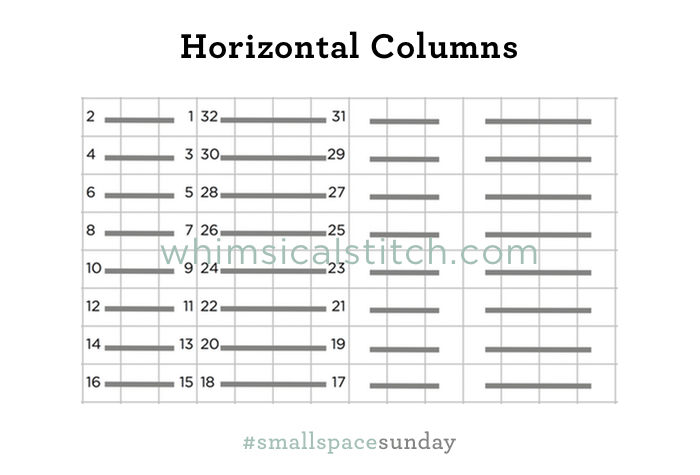
This week's sky stitch is a perfect example.

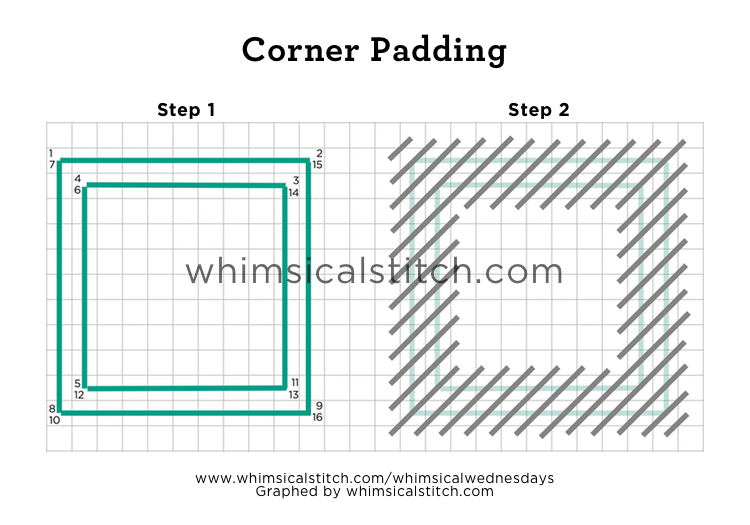
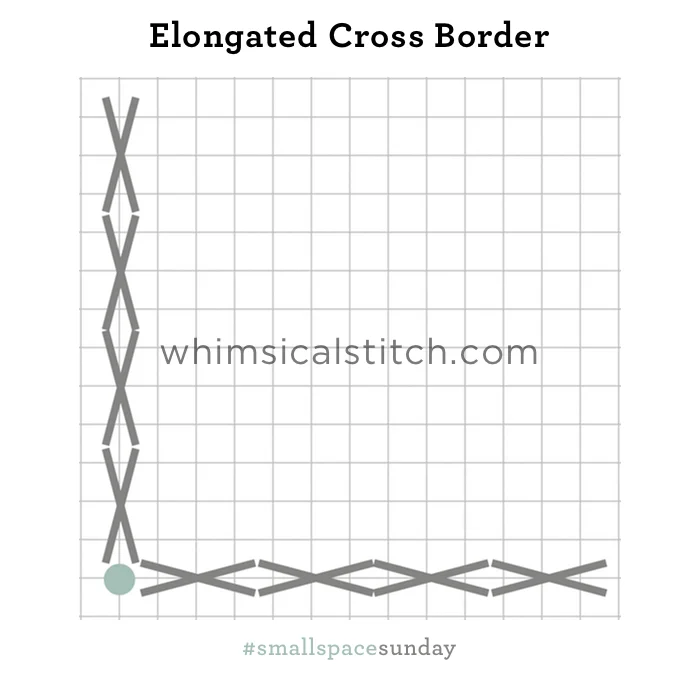
The stitch consists of stitch pairs over five rows on the horizontal and the vertical.  I purposefully leave the open areas blank, especially for a sky, to minimize the stitch and let the shading show through.  Two colors are used in the diagram for clarity.  Typically, I use only one color thread for sky stitches*.  

As for the thread choice, the lighter weight the better.  On the Instagram stitched sample, I used two plies of DMC Floss on 13-mesh canvas.  It was insane but it worked.  My favorite threads for skies are 2-4 strands of DMC (or Anchor) Floss, Splendor, or Planet Earth Silk.  The number of strands depends on the mesh size and the desired coverage.  My favorite single strand threads are Elegance, Pepper Pot Silk, DMC (or Anchor) Pearl Cotton, especially sizes #8 and #12.

When I'm using a metallic for a sky, my two go-to's are Petite Silk Lame and Kreinik Metallics Very Fine Braid (#4) for 18-mesh and Fine Braid (#8) for 13-mesh.  

The *.  My commentary on this stitch focuses on its use for a sky.  This stitch serves many other purposes that may call for the use of multiple threads, whether they combine thread finishes or colors. I reserve the right to repurpose this stitch diagram for another post where I may elaborate on that point.   (Otherwise, this post may never end.)

This stitch diagram, along with other #whimsicalwednesday and #smallspacesunday stitch diagrams, can also be found on www.pinterest.com/whimsicalstitch/whimsicalwednesday.  

Be sure to follow whimsicalstitch.com on FacebookPinterestInstagram, and Twitter.

If you like what you see on this blog, want to learn some very creative decorative stitches, and how to put them all together, whimsicalstitch.com sells stitch guides for seasonal Melissa Shirley designs.  22 guides are currently available and more are in the pipeline.

Enjoy!

Small Skies

There really is no such thing as a small sky except, well, maybe in needlepoint.

This stitch is beyond straightforward (pun intended) and is one of the most subtle sky stitches.  It would work for a large sky if you really want to minimize the sky.

Start the first column from the opposite side of the column closest to the edge.  In this case, I'm starting on the left edge of the canvas so my stitch starts on the right side of the column.  This ensure the columns are neat with crisp edges.  

As you can see, there is an empty row in between the columns.  You can leave it blank or fill the column with Plain Needlepoint.  Personally, I like the space blank as it keeps it subtle.

The columns can be the same width or you can vary the width depending on the width of the space to be stitched.  

This diagram alternates columns over three rows and over two rows.  It's up to you and the space requirements.  Find a sequence you like and have fun with it!  You could alternate columns over two row and four rows.  You could add a third column into the mix and make it over two, over three, over four, over three, over two.  The larger the space the more fun you can have with column width sequences.

For whatever reason I can't quite verbalize, I really like this stitch in a lightweight metallic.  My go to metallic for skies is Kreinik Metallics Very Fine Braid (#4) on 18-mesh and Fine Braid (#8) on 13-mesh.  Petite Silk Lame is a great alternative for both size canvases. 

These stitch diagrams, along with other #whimsicalwednesday and #smallspacesunday stitch diagrams, can also be found on www.pinterest.com/whimsicalstitch/whimsicalwednesday.  

Be sure to follow whimsicalstitch.com on FacebookPinterestInstagram, and Twitter.

If you like what you see on this blog, want to learn some very creative decorative stitches, and how to put them all together, whimsicalstitch.com sells stitch guides for seasonal Melissa Shirley designs.  22 guides are currently available and more are in the pipeline.

Enjoy!

Starry, Starry Night

This is a new favorite sky stitch (with the clever name of Sky #14) I uncovered in a book last Fall. I made a few adjustments and renamed it Starry Night Sky. Clearly, it is for a large space.  This is funny considering how technically small the canvas is on which I first used this stitch.  And, yes, the canvas was mostly sky.  You can get a glimpse of it on Instagram.

Unlike other whimsicalstitch.com stitch diagrams, I did not add compensation stitches because I didn't want to distract you from the large pattern of the stitch.  It's important to note the stitches comprising the star do not cross over each other.  They share the same center hole.  The stitch sequence helps clarify this point.  

Starting from the outer edge, take every stitch from out to the center hole (indicated by the gray square).  So, every even numbered step in the above diagram is the center hole.  Because all stitches end in the center hole, it's important to use a lighter weight thread so you do not stretch the hole too much.  The stitched sample on Instagram uses Elegance on 18-mesh canvas. 

These stitch diagrams, along with other #whimsicalwednesday and #smallspacesunday stitch diagrams, can also be found on www.pinterest.com/whimsicalstitch/whimsicalwednesday.  

Be sure to follow whimsicalstitch.com on FacebookPinterestInstagram, and Twitter.

If you like what you see on this blog, want to learn some very creative decorative stitches, and how to put them all together, whimsicalstitch.com sells stitch guides for seasonal Melissa Shirley designs.  22 guides are currently available and more are in the pipeline.

Enjoy!

Big Blue Skies

May blog posts focus on sky stitches.  There is not a single formula for sky stitches.  Some are small and need to blend quietly into the background, while others are dramatic and require attention.

The stitch diagrams shared over the next few weeks are just a few ideas for your next skies. There are so many stitches that can be adapted for a sky...I hope these give you lots of inspiration to look at stitches in your collection differently.

The first sky post focuses on a more discreet sky stitch.  

Woven Sky.jpg

For a sky, this stitch works best with a single thread or two threads with similar color values. Using a single thread, especially a twisted silk (such as Elegance), provides good coverage on 18-mesh.  On 13-mesh, the shading will show through in a subtle way.  

For a two thread version, one of my favorite thread combinations is Elegance and Flair, regardless of whether I'm working with 13- or 18-mesh. The subtle matte of the Elegance is a nice partner with the subtle metallic of the Flair.  A good alternative to Elegance is DMC or Anchor Pearl #8.  Let the colors determine the right threads.  I think it's best if you do the matte thread on the horizontal and the metallic thread on the vertical.  I can't explain it.  I've tried it both ways and find that combo to be the best.  

The stitched sample on Instagram illustrates the scalability of this stitch (over five rows in groups of four stitches) and a slightly different pattern of matte and metallic.

Don't let this post limit your thinking on this stitch as singularly a sky stitch.  It's a great stitch for many other areas, including ground cover, baskets, clothing, and even a large-ish window. The key to this stitch is it works best for an area you don't want to draw a lot of attention to, but you want to do something special.  The second stitched sample on Instagram illustrates its use for a rug with Sea Grass thread.

This stitch diagrams, along with other #whimsicalwednesday and #smallspacesunday stitch diagrams, can also be found on www.pinterest.com/whimsicalstitch/whimsicalwednesday.  

Be sure to follow whimsicalstitch.com on FacebookPinterestInstagram, and Twitter.

If you like what you see on this blog, want to learn some very creative decorative stitches, and how to put them all together, whimsicalstitch.com sells stitch guides for seasonal Melissa Shirley designs.  21 guides are currently available and more are in the pipeline.

Enjoy!


Sweet Sky

Welcome to the month of skies!  We kick off the month with a #smallspacesunday.

Today's stitch is the Step Stitch.  The openness allows the beautiful shading of most skies to show through the thread.  What I like most about it is its scalability.  You can do the stitches as small as two, or larger depending on your space.   

The diagram is over three, as is the stitched sample on Instagram.  The stitched sample also illustrates that it doesn't matter which direction you go on the diagonal.  The diagram is up to the left and the sample is up to the right.

As with most open stitches, I like to use a slightly lighter weight thread than a canvas typically calls for.  As an example, a dark night sky on a Christmas stocking (on 18 mesh) looks fantastic with a single strand of Petite Silk Lame.  Petite Silk Lame is the perfect combination of matte and metallic in one thread.  If you want your night sky to shimmer, consider Kreinik Metallics Very Fine Braid (#4) on 18 mesh.  For a daytime sky, my go to thread is Elegance, regardless of mesh size.   DMC and Anchor Pearl #8 and #12 are two more to consider, and they have a wider color selection.

This stitch diagram, along with other #whimsicalwednesday and #smallspacesunday stitch diagrams, can also be found on www.pinterest.com/whimsicalstitch/whimsicalwednesday.  

Be sure to follow whimsicalstitch.com on FacebookPinterestInstagram, and Twitter.

If you like what you see on this blog, want to learn some very creative decorative stitches, and how to put them all together, whimsicalstitch.com sells stitch guides for seasonal Melissa Shirley designs.  20 guides are currently available and more are in the pipeline.

Enjoy!

Randomness

As I mentioned, I truly love borders and often have gone out of my way to include them in projects. However, borders don't always need to be pieces of art on their own.  There are so many everyday stitches that serve as great borders, as they can fill large and small spaces alike.  The first example is the tried and true Reverse Basketweave.

The beauty of a "simple" border stitch is there is no need to worry about the corners, as I've discussed in a few posts this month.  The pattern will carry through the border.  Another great example is the Diagonal T stitch.

Both of these stitches are subtle borders that are easy to stitch.  They are also scalable to almost any size border.

Also, just a friendly reminder that virtually any square or rectangular stitch is a great basis for a border.   The first example is the Smyrna Cross.

You could revisit any of the square stitches I shared with you in January.  They can be repurposed into borders, as already illustrated by the Split Square border earlier this month. Another example is the Tied Crosses.

Or the Whimsy Squares for a border over three rows.

And last, but certainly not the least, is the Diamond Border.  

I think you get the idea by now.  :)

These stitch diagrams, along with other #whimsicalwednesday and #smallspacesunday stitch diagrams, can also be found on www.pinterest.com/whimsicalstitch/whimsicalwednesday.  

Be sure to follow whimsicalstitch.com on FacebookPinterestInstagram, and Twitter.

If you like what you see on this blog, want to learn some very creative decorative stitches, and how to put them all together, whimsicalstitch.com sells stitch guides for seasonal Melissa Shirley designs.  21 guides are currently available and more are in the pipeline.

I hope you enjoyed the month of borders!  It was fun for me to do and there are some borders I now can't wait to add to some current projects!

Beetle Border

This week covers a border six rows wide (unintended pun).   It's the skinny version of the Beetle Stitch.

Just as I took a stitch designed for columns (or a border) and exploded it into a background, here I took what I traditionally use as a background stitch and repurposed it as a border.

Beetle Border.jpg

Since this is a straight stitch, the pattern is self contained in each column, meaning you stitch from upper corner to lower corner.  You create mitered corners to make a clean transition from vertical to horizontal columns.  The bright turquoise line in the diagram illustrates the mitered corner, the diagonal seam that joins the left border with the bottom border.  

In the example, the border is six rows wide (or tall, depending on direction).  This means the full pattern begins on the sixth row.  Rows 1-5 (in the corners) are used to create the diagonal seam illustrated above.   

I recommend that your horizontal columns match, meaning they have the exact same pattern on the same rows.  The same goes for your vertical columns.  Once you lay in the pattern for the first column of each direction, the pattern is set.  For this stitch, there's no rule of what stitch to start with...start with the sequence that makes you comfortable.  Just make a note (in the way that works best for you) illustrating what row and what length stitch you started with so you can match it in the other corresponding column.

The stitched sample on Instagram illustrates a Beetle border with brightly metallic contrasting threads, specifically Flair and Shimmer Ribbon.   

This stitch diagram, along with other #whimsicalwednesday and #smallspacesunday stitch diagrams, can also be found on www.pinterest.com/whimsicalstitch/whimsicalwednesday.  

Be sure to follow whimsicalstitch.com on FacebookPinterestInstagram, and Twitter.

If you like what you see on this blog, want to learn some very creative decorative stitches, and how to put them all together, whimsicalstitch.com sells stitch guides for seasonal Melissa Shirley designs.  21 guides are currently available and more are in the pipeline.

Enjoy!

Go Wide!

This week moves to a slightly wider border, specifically five rows wide.  

My go-to recommendation for borders this size is my 5X5 standard, the Split Square.  Here, you alternate directions to create a column.

The bright green and yellow corner is a safeguard for you.  By doing the four corners of the overall border separate from the overall border stitch, you avoid heartbreak if the row count (either horizontally or vertically or both) isn't divisible by five*.

This means each of the four columns (two horizontal and two vertical) of the border are separate items.  I recommend you start each vertical column at the top and compensate at the bottom just above the corner.  For each horizontal column, start at the left and compensate on the right hand side.

* It's lovely to think that any of us will take the time to count out the rows, both on the horizontal and the vertical.  Typically (and honestly), I do not have the patience because I am so excited to be starting a new stitch or I am so over the piece that I just want to be done with it.  

Case in point (and confession time):  The perfectly matched border on my Red Cottage pillow was a freak of nature.  I didn't count.  I just started doing it without even thinking.  I was very, very lucky.  Remember, handpainted canvases are just that...handpainted.  There will be variations between individual canvases of the same design.  Sometimes that is a single row.  And a single row in either direction would have changed that border completely.  Hence, my advice for doing corners differently than the primary border stitch.

The diagram above is colored for clarity.  You can mix colors, as illustrated, or use different threads with the same color value.  Regardless of color, I typically use a matte thread for the two rectangles, such as Vineyard Silk or Silk & Ivory, along with a metallic thread for the center row.   The center stitch of the center row is a way to add an accent, whether it is a bead or a different color thread.  Doing the center row in one color and type thread provides a far less dramatic look.   

These stitch diagrams, along with other #whimsicalwednesday and #smallspacesunday stitch diagrams, can also be found on www.pinterest.com/whimsicalstitch/whimsicalwednesday.  

Be sure to follow whimsicalstitch.com on FacebookPinterestInstagram, and Twitter.

If you like what you see on this blog, want to learn some very creative decorative stitches, and how to put them all together, whimsicalstitch.com sells stitch guides for seasonal Melissa Shirley designs.  20 guides are currently available and more are in the pipeline.

Enjoy!

Turning a Corner

Today's border concept is Padding.  This post elaborates on the earlier #whimsicalwednesday post on padding and takes it one step further by illustrating how to get around corners.

With all padding, the base rows (turquoise lines) can be added with efficiency.  It is not critical to have crisp edges or coverage for the border rows on the back.  They will be covered and no one will be able to tell that you took varying short cuts in between rows.  However, it is important the path(s) you follow are contained within the border area so there are no base threads dragged across the non-border area of the canvas.   Step 1 illustrates a potential path.  This ensures the base threads will be covered by the top threads (gray lines) on both sides of the canvas, enclosing the entire border.

In Step 2, navigating the wide corners (upper left and lower right) requires focus.  To get a crisp and clean inside corner, split the stitch where the inside corners meet for the first time.  In this example, the border is over three rows.  Corners will meet when the border will be over six rows (double the width).  Don't do over six rows with one stitch!  Split it into two stitches, over three rows each, for a crisp corner.  The lime green and aqua stitched sample on Instagram illustrates a padded corner over three rows

There are a few things worth repeating from the first post about padding.  Most padding requires only one layer of base thread.  If you want to create more pronounced padding, add 1-2 additional layers of base thread.  One of the stitched samples on Instagram illustrates a very thick padding.  Kelly wasn't sure how many layers of padding he added to that border...but it might have been double digit.  It's a dramatic and beautiful example of padding.  

Very Velvet and Pearl Cotton #3 make excellent base rows.  I prefer wider threads for the top thread, such as Flair, Fyre Werks, Treasure Ribbon, Frosty Rays, or plied floss (with a laying tool to maximize its width and coverage).

This stitch diagram, along with other #whimsicalwednesday and #smallspacesunday stitch diagrams, can also be found on www.pinterest.com/whimsicalstitch/whimsicalwednesday.  

Be sure to follow whimsicalstitch.com on FacebookPinterestInstagram, and Twitter.

If you like what you see on this blog, want to learn some very creative decorative stitches, and how to put them all together, whimsicalstitch.com sells stitch guides for seasonal Melissa Shirley designs.  20 guides are currently available and more are in the pipeline.

Enjoy!

Don't Fence Me In

Rather, please do!

This month's post will focus on borders.  I went through a border obsession several years ago, when I added a border (or two) to almost every canvas I stitched.  An example is one of my favorite Halloween pillows from Melissa Shirley.  The only border painted on it was the black border surrounding the witch.  I added two borders on top of that.  By the time the finisher was done, it had five borders.  And I love all of them.

So, not the best planning in the world when it's time for a new theme month, that month begins with a #smallspacesunday, and the theme is borders.  

I prevailed.  :)

The first idea for your consideration is Elongated Crosses.  

This stitch provides full coverage and a bit of texture, which helps define it as a border.  It's almost deceiving that it is only over one row.  The circle in the corner represents a bead, cross stitch, or a French Knot.  

The next border is a version of the above stitch.  I increased its length so I could add a contrasting stitch.

Elongated Cross Border with accent.jpg

The contrast could be color or thread type.  The stitched sample on Instagram is an example of this border and uses contrasting colors originating from the canvas.  It's a great way to draw the viewer's eye to those areas of the stitched canvas.  

The next over one border is the Greek Stitch.  This one is interesting (to me) because I typically use Greek over a minimum of two rows, usually more.  I scaled this stitch down for this border and love it.  

Similar to the Open Step Diamond stitch (aka Herringbone stitch), this stitch must be started at the farthest end of a row.  Each stitch overlaps the previous, so it is easiest to do it in one straight shot.  

Your thread choice for any of the above borders is critical.  In order to achieve a distinct stitch look over only one row, use very lightweight threads.  My metallic thread suggestions for 18-mesh are Kreinik Metallics Very Fine Braid (#4), Petite Silk Lame, Neon Rays, Neon Rays+, or Shimmer Ribbon.  Matte thread suggestions include 2-3 plies of your favorite floss or silk.  (Add one additional ply for 13 mesh.)  I do not recommend the heavier silks, such as Pepper Pot or Vineyard Vines.  I love them, but think the coverage is too much for a one row border.

The last border for your consideration is beads.  A single row border of beads is a very elegant and dramatic statement for the right piece.  If you like the idea but not the execution, consider this.

I recommend adding the Plain Needlepoint first, followed by the beading.  As a gentle reminder, the bead is attached with beading thread in a stitch going in the opposite direction than the traditional tent stitch.  This ensures the bead will be laying in the same direction as the other stitches.

These stitch diagrams, along with other #whimsicalwednesday and #smallspacesunday stitch diagrams, can also be found on www.pinterest.com/whimsicalstitch/whimsicalwednesday.  

Be sure to follow whimsicalstitch.com on FacebookPinterestInstagram, and Twitter.

If you like what you see on this blog, want to learn some very creative decorative stitches, and how to put them all together, whimsicalstitch.com sells stitch guides for seasonal Melissa Shirley designs.  20 guides are currently available and more are in the pipeline.

Enjoy!