Old Glass

If you are looking for a more vintage window, look no further.  The pattern is a series of small bursts giving the area a slightly pinched look, similar to antique glass.

The pattern is a tiny 2X2 square with four single stitches.  The diagram provides two alternatives.  The first is square shaped and the second is diamond shaped.

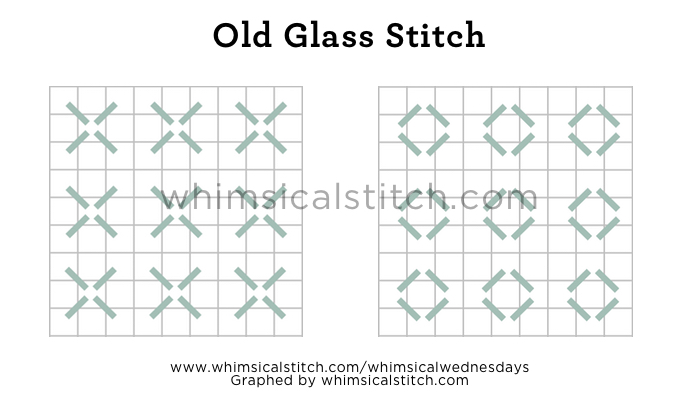
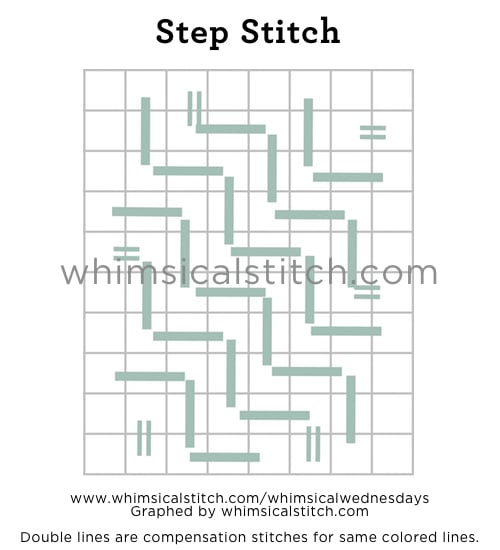
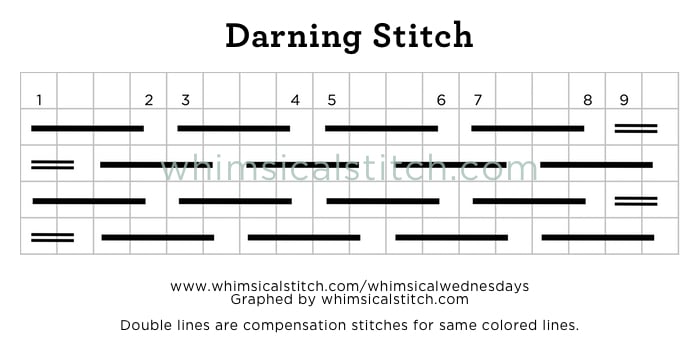
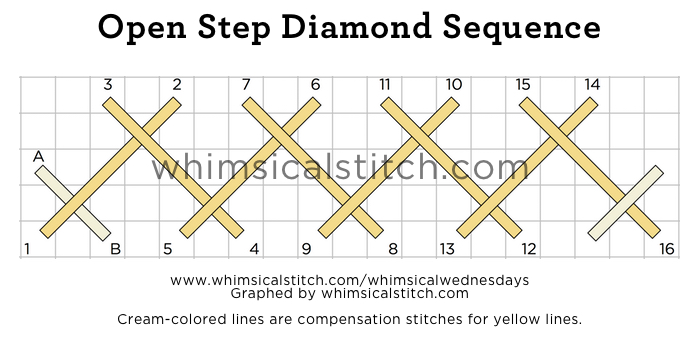
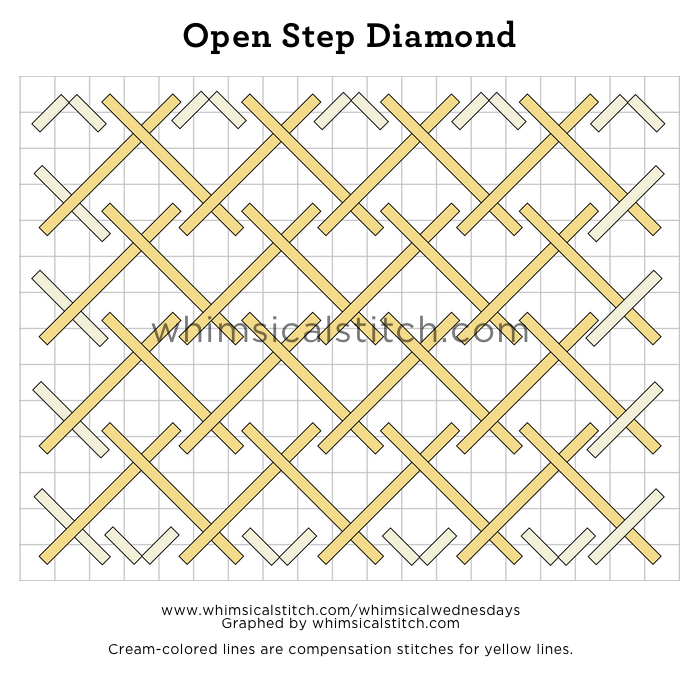
The heart of this stitch is very simple and straightforward.  Canvas is left exposed to highlight the content of the windows.  If this is too much open space for you, consider adding an accent.

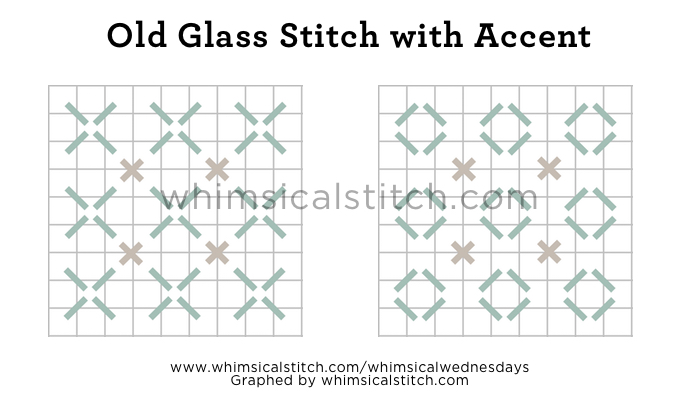
The accent is in a different color to make the diagram easier to understand.  

These stitch diagrams, along with other #whimsicalwednesday and #smallspacesunday stitch diagrams, can also be found on www.pinterest.com/whimsicalstitch/whimsicalwednesday.  

Be sure to follow whimsicalstitch.com on FacebookPinterestInstagram, and Twitter.

If you like what you see on this blog, want to learn some very creative decorative stitches, and how to put them all together, whimsicalstitch.com sells stitch guides for seasonal Melissa Shirley designs.  20 guides are currently available and more are in the pipeline.

Enjoy!

Guilt Works

The original plan for today's post was Reverse Basketweave, a great glass stitch.  After all, It is the month of glass.  However, I felt guilty I already shared Reverse Basketweave in a post last year. So, here's where guilt works...and you benefit.  Here's a link to the original post about Reverse Basketweave.  Summary:  it's great for glass.  Please use it.

And here is how I compensated for my original plan...a bonus glass stitch.  I named it the Square Stitch.  It should be obvious why I did so.

The coverage is more substantial than it appears.  It works best in a medium sized window.  The next two diagrams are variations of this stitch.  Each offers an increasingly open perspective.

This variation includes boxes that do not share any sides.  It's good for a medium to large glass areas, such as a jar full of candy.  

The last example skips a full row between squares.

These stitch diagrams, along with other #whimsicalwednesday and #smallspacesunday stitch diagrams, can also be found on www.pinterest.com/whimsicalstitch/whimsicalwednesday.  

Be sure to follow whimsicalstitch.com on FacebookPinterestInstagram, and Twitter.

If you like what you see on this blog, want to learn some very creative decorative stitches, and how to put them all together, whimsicalstitch.com sells stitch guides for seasonal Melissa Shirley designs.  20 guides are currently available and more are in the pipeline.

Enjoy!

Step Into It

This week's glass stitch is a very welcome find for me.  It's a variation of a more open stitch I found in a book last Fall while I was working on Melissa's new Emma Williams Rooftops piece.  

It's clean and simple, though the compensation gave me a tiny headache.  (I can't lie to you.)  Once I got through it, I was thrilled I hung in there.

An appropriate colored Kreinik Metallic is a great thread for any glass.  For some windows, especially on canvases with historical or vintage themes, consider one of their vintage metallics (connoted by a V in the thread color) for a slightly matte metallic.  It's a great look.

This stitch diagram, along with other #whimsicalwednesday and #smallspacesunday stitch diagrams, can also be found on www.pinterest.com/whimsicalstitch/whimsicalwednesday.  

Be sure to follow whimsicalstitch.com on FacebookPinterestInstagram, and Twitter.

If you like what you see on this blog, want to learn some very creative decorative stitches, and how to put them all together, whimsicalstitch.com sells stitch guides for seasonal Melissa Shirley designs.  20 guides are currently available and more are in the pipeline.

Enjoy!

PS Due to technical difficulties, the Instagram photo for this stitch can't be posted today. It will be posted no later than Friday morning. Thanks! 

Darn it!

The darning stitch is a fantastic glass stitch*.  I love how you can play with the width of the stitches based on the size of your window.  I'm sharing three variations today, offering ideas for different sized windows. 

Today's stitched sample on Instagram illustrates the first stitch.  It is a wider darning stitch I used for a very large window in a Sandra Gilmore piece.    

For a medium to small window, consider a darning stitch over two rows.  

I did this stitch in pairs as I like the way they look.  However, if you prefer your open space to be in smaller bits, feel free to use the over two pattern in single rows with the same offset pattern for every other row, instead of every two rows.

I suspect you have figured out where we will end for this stitch.  Yup...over one row. I was completely doubtful and uncertain the first time I did this stitch.  And I absolutely loved how it so delicately showed the shading, yet was still a stitch.  It's perfect for a tiny window.

I hope you have the perfect windows for these stitches!

*  Yes, I know I wrote about the darning stitch way back when.  I briefly mentioned I used it for glass but didn't elaborate.  Today, I elaborated.  :)

These stitch diagrams, along with other #whimsicalwednesday and #smallspacesunday stitch diagrams, can also be found on www.pinterest.com/whimsicalstitch/whimsicalwednesday.  

Be sure to follow whimsicalstitch.com on FacebookPinterestInstagram, and Twitter.

If you like what you see on this blog, want to learn some very creative decorative stitches, and how to put them all together, whimsicalstitch.com sells stitch guides for seasonal Melissa Shirley designs.  20 guides are currently available and more are in the pipeline.

Enjoy!

Glittery Glass

March posts focus on stitches for glass.  My glass stitches are variations of a single theme, specifically using lightweight metallic threads in an open stitch.  My go-to metallic is Kreinik Metallics Braids.  

The key to my glass stitches is a lighter weight thread than the canvas size typically calls for.  As an example, I use Kreinik Metallics Fine Braid (#8) on 13-mesh and Very Fine Braid (#4) on 18-mesh. 

For those of you who aren't comfortable with open stitches, a few of this month's stitches provide mostly full coverage, including today's example.  

We begin with Alicia's Lace.  It's a very straightforward stitch that alternates directions of simple tent stitches.  

I find it easiest to do this stitch going horizontally across a row, alternating directions for each stitch.  In addition, as you will see on the stitched sample on Instagram, this is a an especially great stitch for the smallest of windows.

Speaking of small stitches, we have whimsicalstitch.com/whimsicalwednesdays first PROGRAMMING ALERT:  Due to the small nature of these stitches, there will be no #smallspacesundays during the month of March.  #smallspacesundays will return to their regularly scheduled time on April 3.

This stitch diagram, along with other #whimsicalwednesday and #smallspacesunday stitch diagrams, can also be found on www.pinterest.com/whimsicalstitch/whimsicalwednesday.  

Be sure to follow whimsicalstitch.com on FacebookPinterestInstagram, and Twitter.

If you like what you see on this blog, want to learn some very creative decorative stitches, and how to put them all together, whimsicalstitch.com sells stitch guides for seasonal Melissa Shirley designs.  20 guides are currently available and more are in the pipeline.

Enjoy!

Connections Part 2

With no intent, this week continues last week's theme of connections.  We talked about connected diamonds last week and this week morphs into connected squares.

So, funny thing happened on way to this post.  I diagrammed it from memory yet the stitched sample on Instagram reminds me how flexible this stitch is.

The diagonal connections between the squares on the diagram are over two rows.  The connections on stitched sample are over three rows.  Both are correct!  Adjust according to the area you are filling.  Over four rows is great for a larger space, especially with shading, while over two is great for a smaller space.  

You may also notice the stitched sample has bling inside the squares.  Those are hotfix Swarovski crystals and are fantastic accents for needlepoint.  You may also attach a bead (over two rows on the vertical or horizontal).  I love bling and I especially love contrasting bling, so have fun with accents when you use this stitch.

This stitch diagram, along with other #whimsicalwednesday and #smallspacesunday stitch diagrams, can also be found on www.pinterest.com/whimsicalstitch/whimsicalwednesday.  

Be sure to follow whimsicalstitch.com on FacebookPinterestInstagram, and Twitter.

If you like what you see on this blog, want to learn very creative decorative stitches, and how to put them all together, whimsicalstitch.com sells stitch guides for seasonal Melissa Shirley designs.  20 guides are currently available and more are in the pipeline.

Enjoy!

Smaller than Small

Another often overlooked small space stitch is the Cross Stitch.  Because, really, what's more fun than plain needlepoint than plain needlepoint twice over the same intersection?

Click on image to see on whimsicalstitch.com's Pinterest account. Visit pinterest.com/whimsicalstitch/whimsicalwednesday for a library of all #whimsicalwednesday and #smallspacesunday stitch diagrams.

Click on image to see on whimsicalstitch.com's Pinterest account. Visit pinterest.com/whimsicalstitch/whimsicalwednesday for a library of all #whimsicalwednesday and #smallspacesunday stitch diagrams.

What sets the Cross Stitch apart is its unique ability to be a single stand-alone stitch.  Steps 1-4 illustrate the sequence for the individual stitch.  You can use it for an eye, a button, an earring, a flower center, or a star.  Use it for any single stitch that needs to stand apart, however delicately, from the area around it.  For use as a single stitch, it works best if the area surrounding it is a different color.  It also makes a great accent stitch in a larger pattern, illustrated by the stitched sample on Instagram.

The entire diagram shows a cluster of Cross Stitches. Consider covering an entire small area that needs texture yet needs to recede a little bit.  Consider it for groundcover in the distance on a landscape.  It also makes a great tree trunk, allowing the (more enjoyable to stitch*) leaves to stand out.

Be sure to follow whimsicalstitch.com on FacebookPinterestInstagram, and Twitter.

If you like what you see on this blog, want to learn some very creative decorative stitches, and how to put them all together, whimsicalstitch.com has a book for you! Mary’s Whimsical Stitches is a contemporary how-to collection of more than 250 stitches for stitchers regardless of skill level. The book includes updated and sequenced diagrams from this blog, all-new stitches, and a chapter on the basics of needlepoint. For more information, visit here.

whimsicalstitch.com also sells Stitch Guides and Stitch Concepts for Melissa Shirley Designs, Zecca DesignsSandra Gilmore, Purple Palm, Maggie, and Penny MacLeod, and many more. Click here to see the newest guides and click here to see the entire collection.

I hope you have the perfect spot for this stitch! Please enjoy! Have a wonderful #smallspacesunday!

A Note about Diagrams
I use color in diagrams to make them as clear as possible.  The primary function of different colored lines is to illustrate a stitch sequence.  For example, layering of colors demonstrates you add them in that order.  They can also provide ideas on how to integrate additional threads (one line for each color).  Or, you can use the same thread for all color lines.  That's where I encourage you to use your imagination for the space you are stitching!

Connections Part 1

I am a huge fan of open stitches, especially for backgrounds.  Open stitches are a way to integrate wonderful stitches without completely obscuring truly beautiful painting, especially skies, by our favorite needlepoint artists.  It also is a tactic to draw the eye to a desired area by downplaying the area the open stitch is covering.  The most understandable example for the second reason are backgrounds.  

Today's stitch is one of my favorite backgrounds.  It's an easy pattern to pick up, fills up an area quickly due to its deceivingly large size, and is evenly spaced.  It's also very easy to determine if you missed a stitch within the the pattern.  I call it Diamond Connections.  

It's also a very appealing combination of vertical and diagonal stitches, which adds a nice texture to the area.  Consider rotating the diagram 90 degrees and having horizontal connectors instead of vertical!  There are no rules here.  The stitched sample on Instagram is from one of Melissa Shirley's recent holiday baskets.

This stitch diagram, along with other #whimsicalwednesday and #smallspacesunday stitch diagrams, can also be found on www.pinterest.com/whimsicalstitch/whimsicalwednesday.  

Be sure to follow whimsicalstitch.com on FacebookPinterestInstagram, and Twitter.

If you like what you see on this blog, want to learn some very creative decorative stitches, and how to put them all together, whimsicalstitch.com sells stitch guides for seasonal Melissa Shirley designs.  20 guides are currently available and more are in the pipeline.

Enjoy!

What are Names?

As you may have noticed by now, I am not a strict follower of stitch names.  There are a handful I know stand for only one stitch.  The Mosaic Stitch, a Cashmere Stitch, and Woven Hungarian are three examples.

There are stitches I can find no names for as well as stitches with two or more names.  Some of my favorite stitches come from books with stitch names Rug 1, Rug 2, and Rug 3.  I threw up my hands a long time ago and let the diagrams do the talking.

Today's stitch is a perfect example.  It was one of the many rug stitches I mentioned earlier.  I used it for a ground covered in snow, as illustrated in the stitched sample on Instagram.  It would also make a great stitch for a table, or a large window.  I've seen it in several books but no name has been provided.

I named it Open Step Diamond, to reflect the stitches crossing and the emerging diamond halves.  It's a fun stitch though it requires compensation in the beginning and must always start from the same side.

Let's start with the sequence.

This stitch is best started at the far end of the area to be stitched.  In the diagram, it starts on the far left.  As you can see, each subsequent stitch lays over the previous stitch.  Knowing this, add the compensation stitch (the "A-B" step) in the beginning so the remainder of the stitch lays properly.

You repeat this sequence on subsequent rows.

I added examples of the compensation stitches at the top and bottom of the area (the single stitches in opposite directions).  Honestly, for this stitch, I consider those compensation stitches completely optional.  The first set of compensation stitches (the "A-B" steps) from first diagram are not optional.  That is my opinion  Do what you think is best for the stitched area.  Thread weight will play a role in the need for compensation stitches.

These stitch diagrams, along with other #whimsicalwednesday and #smallspacesunday stitch diagrams, can also be found on www.pinterest.com/whimsicalstitch/whimsicalwednesday.  

Be sure to follow whimsicalstitch.com on FacebookPinterestInstagram, and Twitter.

If you like what you see on this blog, want to learn some very creative decorative stitches, and how to put them all together, whimsicalstitch.com sells stitch guides for seasonal Melissa Shirley designs.  20 guides are currently available and more are in the pipeline.

Enjoy!

#swisssunday

Today's #smallspacesunday stitch is a quiet and easy stitch.  It utilizes the easiest and smallest stitch of all, Plain Needlepoint.  You can also use a Cross Stitch to add effect.  (I discussed the Cross Stitch a couple weeks ago.)

Dotted Swiss is really lovely and classy.  I've used versions of it for backgrounds, small spaces, and clothing.  It brings a tiny little pop to a traditional stitch. The diagram below includes a Cross Stitch variant.

Needless to say, the pop is defined by the color contrast between the two threads.  There are two stitched samples for this stitch on whimsicalstitch.com's Instagram account.  The first is a sail on a sailboat where I used a blue metallic as the base thread and a white floss as the accent.  The second example is a tone on tone background, using all Plain Needlepoint (and a slightly different Dotted Swiss pattern).  Another idea is to use a lightweight matte thread like Elegance or Pearl #8 with a Very Velvet as the cross stitch accent.  That would add a surprising pop of texture.

The fact that this stitch can be used for a background or the smallest of items on a canvas demonstrates its uniqueness.

This stitch diagram, along with other #whimsicalwednesday and #smallspacesunday stitch diagrams, can also be found on www.pinterest.com/whimsicalstitch/whimsicalwednesday.  

Be sure to follow whimsicalstitch.com on FacebookPinterestInstagram, and Twitter.

If you like what you see on this blog, want to learn some very creative decorative stitches, and how to put them all together, whimsicalstitch.com sells stitch guides for seasonal Melissa Shirley designs.  20 guides are currently available and more are in the pipeline.

Enjoy!