Supposedly Columns

I discovered today's stitch last summer while working on a paneled saying by &more.  I needed something with personality but subtle enough to not overpower the writing.

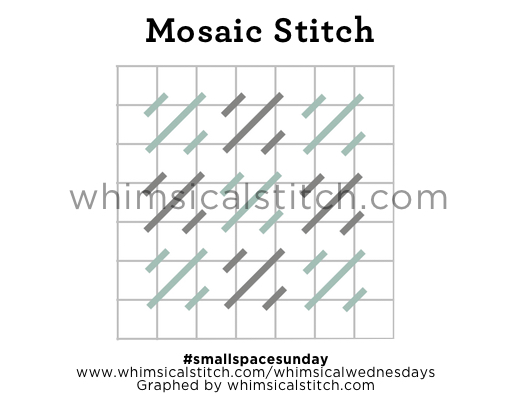
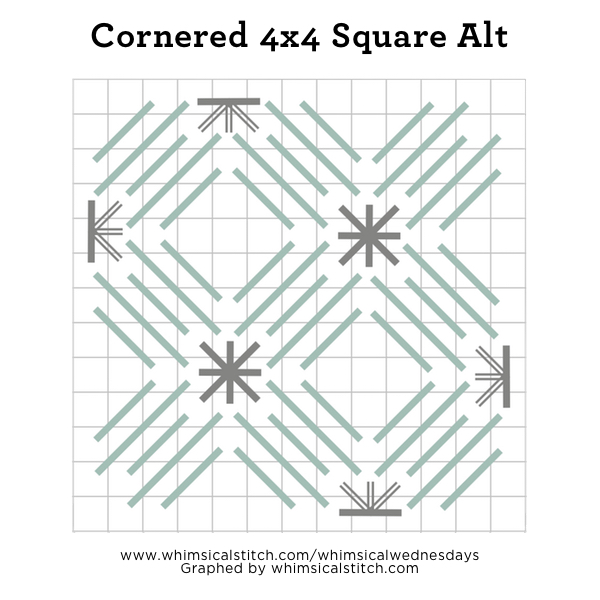
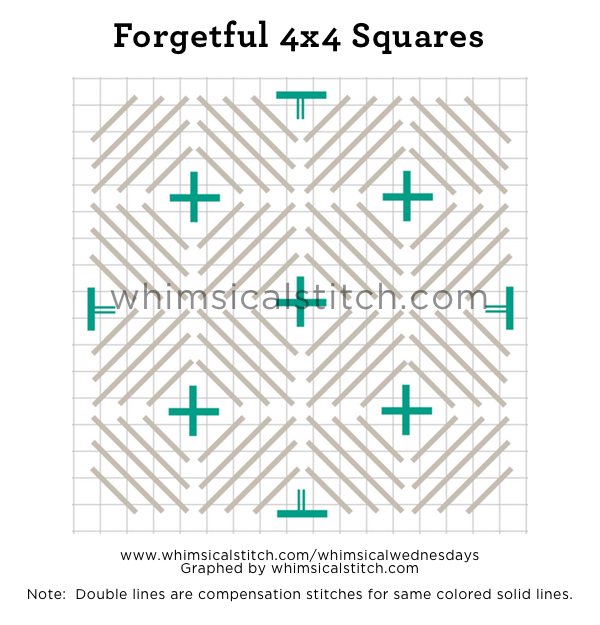
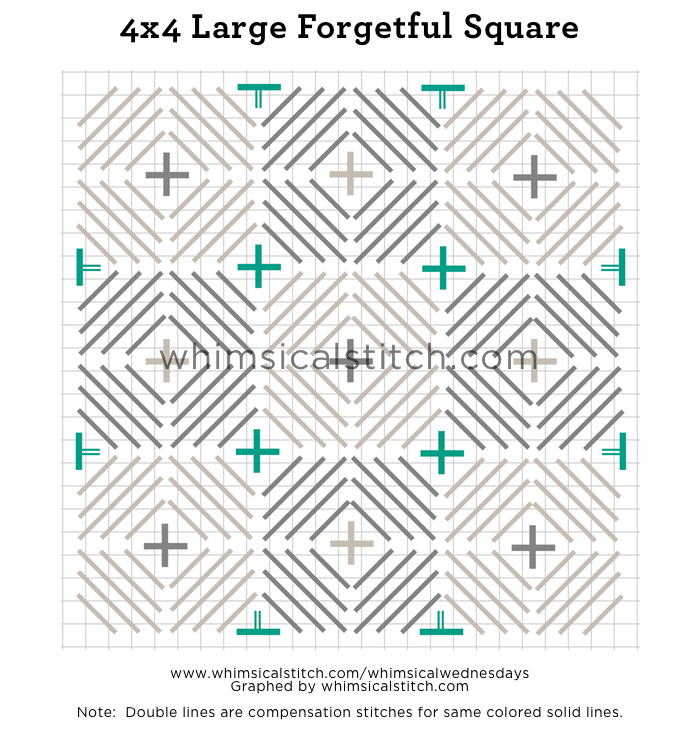
This stitch came from a book on layered stitches.  As I mentioned in an earlier post, layered stitches are among the most adaptable stitches because you do not have to do every layer or every stitch.

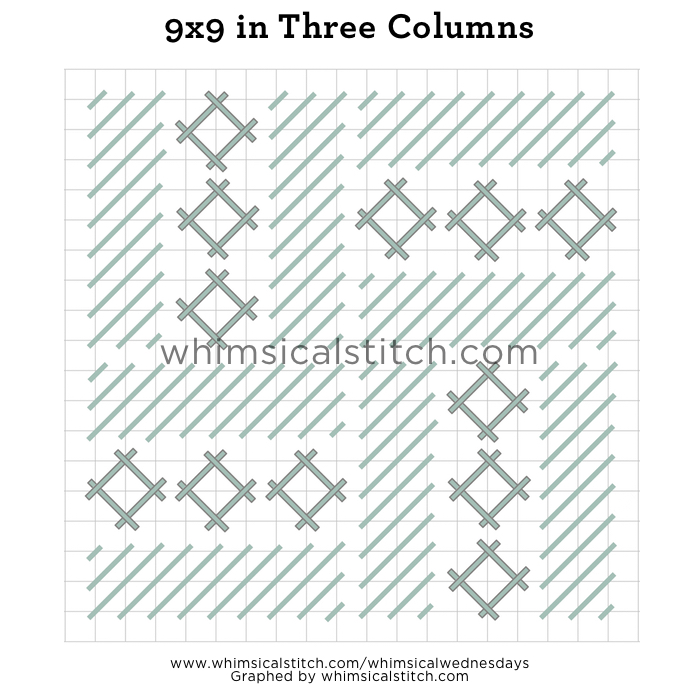
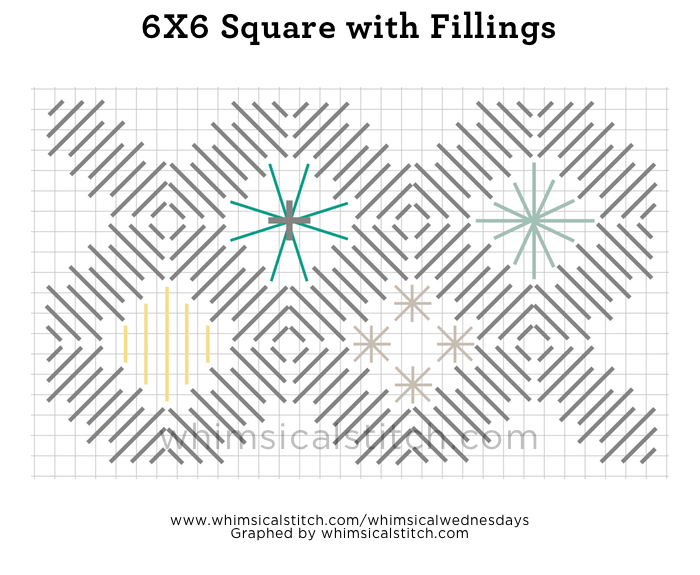
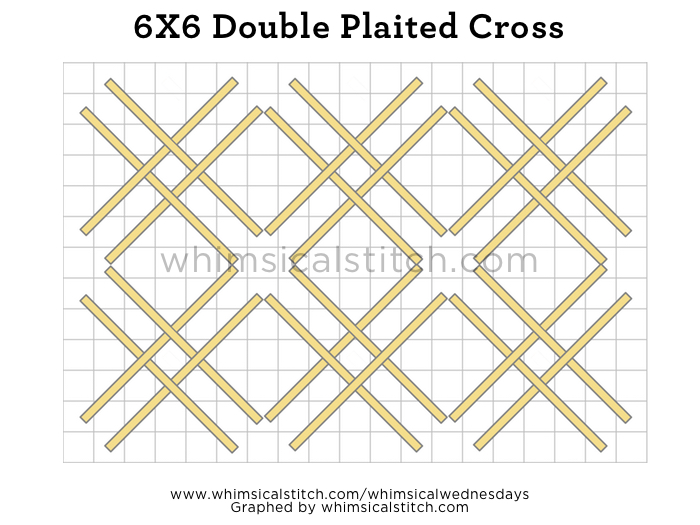
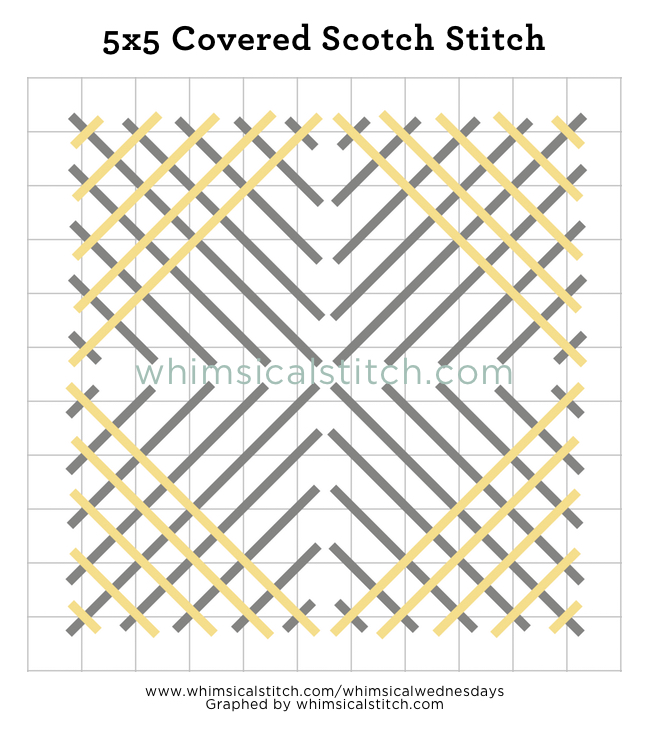
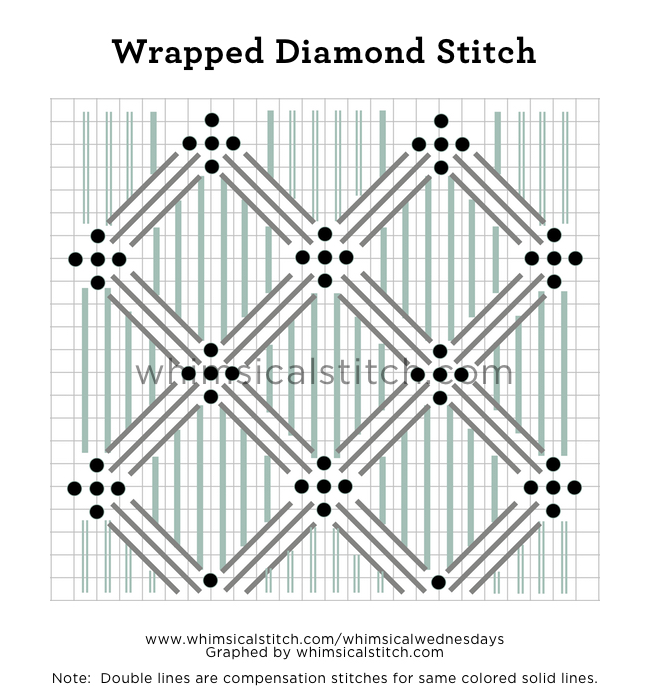
Originally designed as a border four rows wide, I simply filled the rectangular space with multiple columns, skipping a row in between to add definition to the rectangles.

Elongated Crosses.jpg

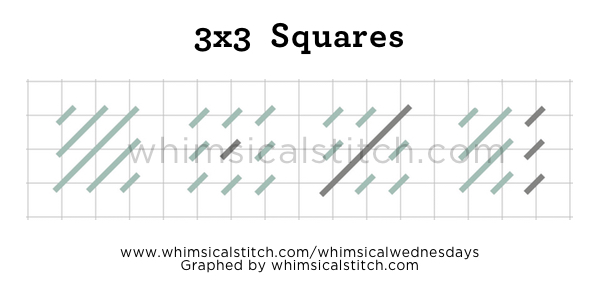
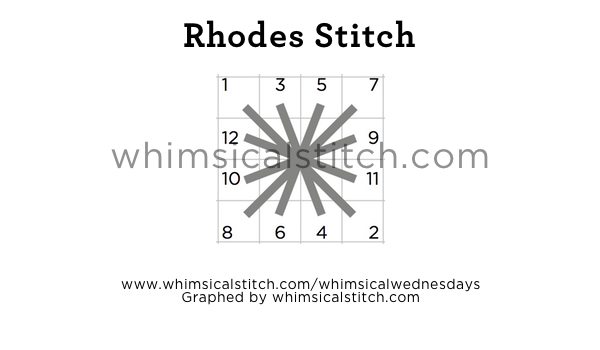
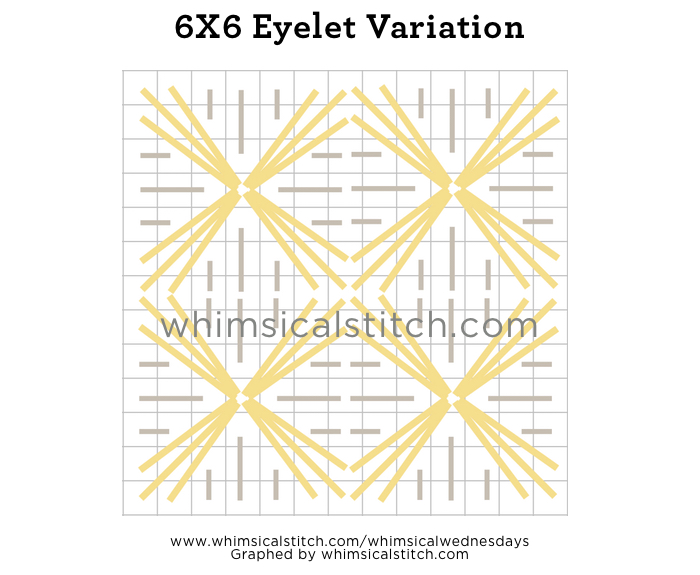
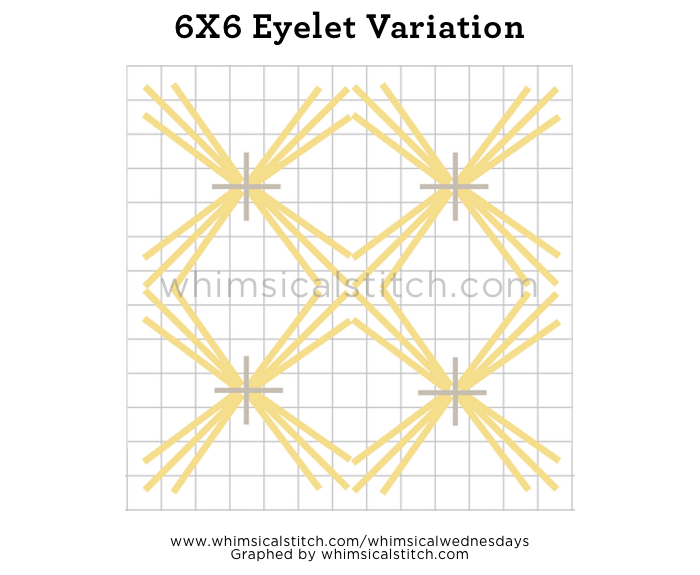
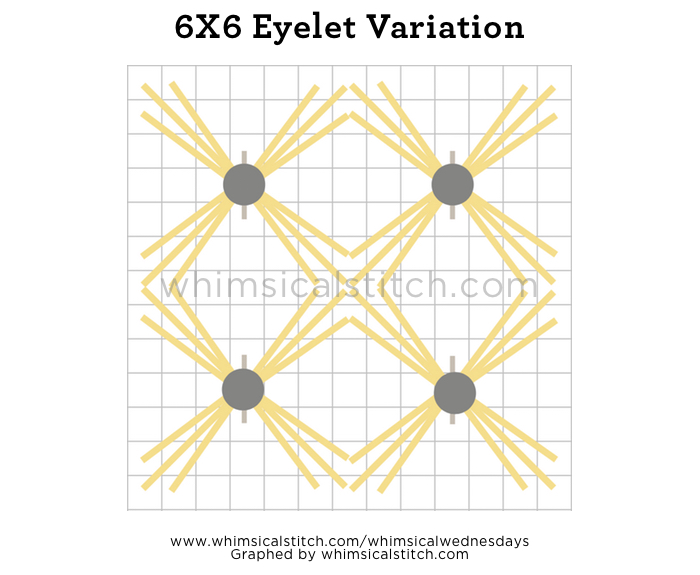
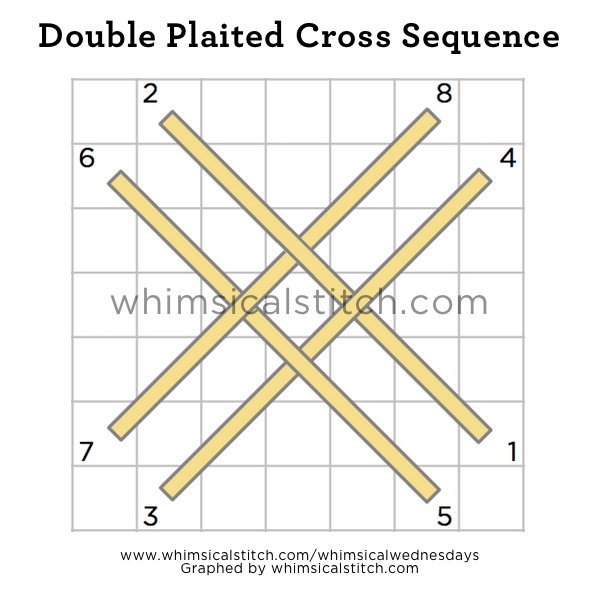
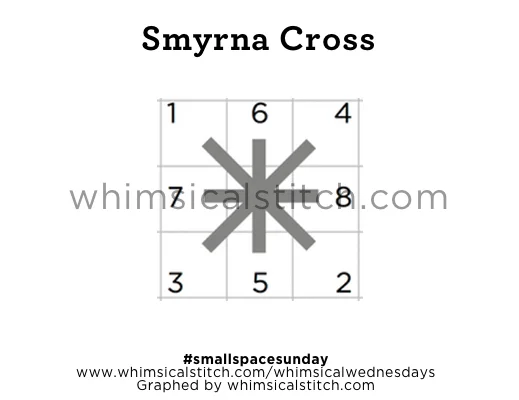
The sequence of the threads is important.  

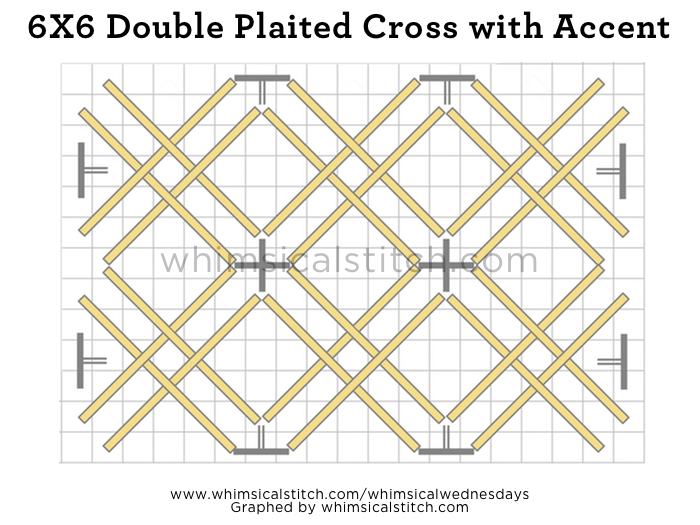
Begin with the vertical aqua lines (numbered steps), followed by the horizontal aqua lines (lettered steps).  Add the yellow lines on top of the aqua lines and conclude with the accent threads (gray lines).

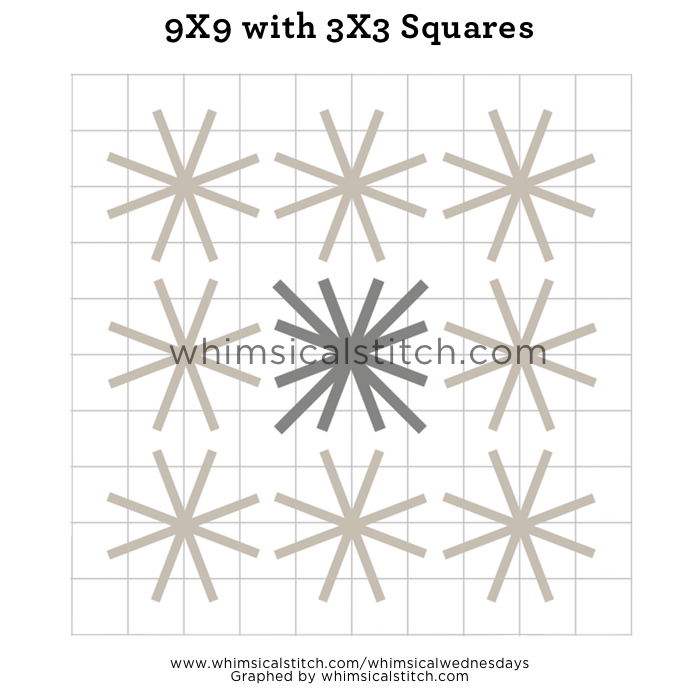
As with most whimsicalstitch.com diagrams, the colors are used for clarity.  The stitched sample on Instagram uses different fibers with similar color values.  In addition, the single stitches surrounding the center (the gray lines) alternate colors by columns. 

Whether you use multiple colors or similar color values, there is a great deal you can do with this stitch.  It can be a 4-row wide border, as originally designed, a background (today's example), a wallpaper, chair or couch, ground cover, or an elegant coat.  Have fun with it!

These stitch diagrams, along with other #whimsicalwednesday and #smallspacesunday stitch diagrams, can also be found on www.pinterest.com/whimsicalstitch/whimsicalwednesday.  

Be sure to follow whimsicalstitch.com on FacebookPinterestInstagram, and Twitter.

If you like what you see on this blog, want to learn some very creative decorative stitches, and how to put them all together, whimsicalstitch.com sells stitch guides for seasonal Melissa Shirley designs.  20 guides are currently available and more are in the pipeline.

Enjoy!

Nine Nirvana

January's month of squares concludes with 9X9 squares. 

The first 9X9 square is a classic for any square, as small as 7X7 and as large as you need.  It's a square in a square with a border two rows wide.  

It's scalable and works best for any square at least seven rows wide.  (While it technically works for 5X5 and 6X6 squares, the center square is diminished and the effect is lost.)

The next two diagrams focus on columns for the square.  The first diagram combines good old fashioned Cashmere columns AND one of my favorite 3X3 square stitches.  Honestly, utilize any of your favorite 3X3 stitches in the center column.

9X9 with three threes.jpg

Using the three columns as the base, I added bursts of color in the center column.

Yes, it's Plain Needlepoint but the addition of color is a great accent for the center column of the larger square. Depending on how much texture or bling you need the square to convey, consider doing a row of French Knots or beads for the yellow lines.

And, finally, it is fun to utilize smaller shapes to create a larger square.  The next series of diagrams integrate some of the 3X3 squares we discussed earlier this month.  First, let's begin with a starter library of 3X3's.  

9X9 with 3X3 library.jpg

I mixed and matched some of my favorite 3X3's to create a larger 9X9 square.  

The above square, along with the Enclosed Square (first diagram in this post), are the featured stitched samples on Instagram.  The next diagrams are two more variations of mixing 3X3 squares from the 3X3 library.

9X9 with 3X3 Squares 2.jpg

There is absolutely no right or wrong on what combos to use.  In addition, the diagrams are created with multiple colors for clarity.  The stitched sample on Instagram demonstrates you can use multiple threads with the same color value to create a textured and compelling square.  Feel free to mix finishes and/or colors to add increasing levels of effect to the space.

These stitch diagrams, along with other #whimsicalwednesday and #smallspacesunday stitch diagrams, can also be found on www.pinterest.com/whimsicalstitch/whimsicalwednesday.  

Be sure to follow whimsicalstitch.com on FacebookPinterestInstagram, and Twitter.

If you like what you see on this blog, want to learn some very creative decorative stitches, and how to put them all together, whimsicalstitch.com sells stitch guides for seasonal Melissa Shirley designs.  20 guides are currently available and more are in the pipeline.

Enjoy!

3X3

3X3 squares can be frustrating because they are just on the cusp of being something significant.  If you could just do one or two more rows, there are lots of fun options.

Alas, you are so wrong!  (Okay, I'm wrong, but work with me on this.)  Since it is still a small space (and this is #smallspacesunday) don't forget that combining threads (whether color or finish) is always a great start.  Here are four straightforward 3X3 stitches.  The first is the classic Scotch square.  The remaining three all have a little extra something due to the addition of a second thread.

As I was playing with 3X3 stitches for this post, I wanted to add a tied stitch, but realized I covered that in the 4X4 post with the Tied 4X4 Square.  (You could also "tie" 3X3 Alternating Scotch Squares.)  I started to play with this idea and ended up with what I call Whimsy Squares. 

This is a version of a Rice Stitch with the top stitches going over two rows instead of one.  (If there is a formal name for this stitch, I would love to hear it!  I could not find a name anywhere.)  The gray lines are added first, followed by the yellow or aqua lines.  Play with thread choices and have fun!  

The sequence of the yellow and aqua lines can be tricky.

The sequence is numbers followed by letters.  The only step to be mindful of is the last step of the diamond on the top.  Take a look at the "g-h" step.  You slide the final thread ("g-h") under the pre-existing thread ("a-b") to complete the stitch.

I consider the next stitch the classic 3X3 square, the Rhodes stitch.  

The Rhodes Stitch is an elegant, clean stitch.  It's great for borders or corners as its height gives it some stature.  It also makes a fantastic Christmas ornament or button, as it is a scalable stitch.  It is also adjustable to the space, whether it be a larger square or even a rectangle, as illustrated by the stitched sample on Instagram.  It is the same concept.  Starting in a corner, go to opposite corner, and continue to rotate around shape until it is full.

The last stitch for today is a stitch I call a Layered Diamond.  This is a beautiful accent, whether in a larger space, a border, or even as individual accent.   

I call it a Layered Diamond because the sequence of the four stitches creating the central diamond are all layered above and beneath each other.  The sequence for the diamond is the same as the sequence for the diamond in the Whimsy Square.  You insert it under the previously stitched thread, as illustrated in the "Whimsy Square Sequence" diagram above.

These stitch diagrams, along with other #whimsicalwednesday and #smallspacesunday stitch diagrams, can also be found on www.pinterest.com/whimsicalstitch/whimsicalwednesday.  

Be sure to follow whimsicalstitch.com on FacebookPinterestInstagram, and Twitter.

If you like what you see on this blog, want to learn some very creative decorative stitches, and how to put them all together, whimsicalstitch.com sells stitch guides for seasonal Melissa Shirley designs.  20 guides are currently available and more are in the pipeline.

Enjoy! 

Devilish Squares

6X6 squares are one of my favorites.  It's the just right square...not too big, not too small and you can do a lot with it.  

My first square for you is a square being hugged!  Here's what I mean.

I absolutely love this look.  It's clean and well proportioned.  However, in my opinion, it works best in columns or borders.  You can get a hint of what a border looks like with this stitch as it is this week's stitched sample on Instagram.  This stitch truly pops when you use contrasting colors.  Mixing fiber types (say my usual recommendation of matte and metallic) with similar color values is an elegant addition with this stitch.

If your space is larger, or you want to add a little surprise to your squares, stitch an "unsquare" pattern in your square.  

6X6 Alternate.jpg

Look carefully.  Those are 6X6 squares with defined borders and the pattern fits perfectly within a 6X6 space. Yet, they don't look like squares at all.  It's a great way to add pattern, symmetry, and a little deception to your space.

As I diagrammed the above stitch, my mind wandered.  The aqua area has so much more potential than a 45 degree edge.  So, I played a bit.  This play was also a chance to integrate my current obsession with layered stitches.

Each filling provides a different look.  Starting in the upper left hand corner and going clockwise, you can:

  1. Add a layered cross stitch to keep the stitched area light and open

  2. Add a layered diamond stitch to add a small amount of texture

  3. Add Smyrna Crosses to add a more pronounced texture

  4. Add a vertical diamond for a simple, elegant look

There's no right or wrong here.  You can also keep the centers open.  These four ideas are just thought starters!  

The next series of stitches finds their common theme in an eyelet stitch.  The first idea offers full coverage.

An eyelet stitch shares a common (typically) center hole.  It is very important to do eyelet stitches from the outside edges to the center to minimize the expansion of the center hole.  You can expand the center hole ever so slightly with a laying tool.  However, using a lighter weight thread (versus the canvas size) sometimes mitigates the need to expand the hole with a laying tool.  As an example, use Pearl #8 (on the ball) for the yellow lines on 13 mesh.  Use three plies of a pliable thread, such as floss or strandable silk, on 18 mesh.  

The next variation of this stitch is an open stitch but with an elegant accent.

While this stitch appears to eliminate the need for the eyelet hole, the advantage to maintaining it (and not doing long stitches from one corner to the other) is the height of the center will remain relatively flat versus the larger bump the long stitches would create.  

Keeping that thought, another dramatic accent is included on the next diagram.

Whether 13-mesh or 18-mesh canvas, a larger bead, such as a #6 or #8, would be a fantastic accent for this version. If you choose to accent the eyelet stitch with a bead, it's very important to maintain the eyelet stitch so the bead will have a relatively flat space in the center to rest.

The last 6X6 square is an open stitch with some beautiful and easy weaving.  

The last step in the sequence is exactly the same as the Modified Rice stitch in the 5X5 post.  The only tricky step is the last step.  Take a look at the "7-8" step.  You slide the final thread ("7-8") under the pre-existing thread ("1-2") to complete the stitch.

Expanding this pattern into multiple squares demonstrates what a beautiful, delicate pattern this is.  It would make an understated background, an elegant tabletop, a beautiful coat on a large Santa.  You get the idea.

It works as an open stitch or with a small accent in the emerging square areas as illustrated below.

I hope they inspire you!

These stitch diagrams, along with other #whimsicalwednesday and #smallspacesunday stitch diagrams, can also be found on www.pinterest.com/whimsicalstitch/whimsicalwednesday.  

Be sure to follow whimsicalstitch.com on FacebookPinterestInstagram, and Twitter.

If you like what you see on this blog, want to learn creative decorative stitches, and how to put them all together, whimsicalstitch.com sells stitch guides for seasonal Melissa Shirley designs. 20 guides are currently available and more are in the pipeline.

Enjoy!

The True Inspiration

The true inspiration for a month of squares is this stitch from Carol H. Lake's "Desert Island Stitches."  

I discovered this stitch last Fall while working on a club series and was absolutely charmed.  It was the perfect proportion for the space, I could add contrasting color, and it was such a unique interpretation of a square.

The stitched sample on Instagram uses contrasting colors.  I also used it on the body of a boat (with a solid color and a white accent for the cross stitch).  I love both as they play the stitch completely differently.

If you are interested in the book, you can find more information here.  More information about the club series, hosted by What's the Point! in Dublin, Ohio, can be found here.  (Scroll down a little bit for information on The Petite Bouquet Club.)

The next 5X5 square is a modified Rice Stitch.  The traditional Rice Stitch contains an X over the square space (gray lines below) with each leg tacked down by a single stitch, typically in the outer corners (yellow lines).  (There are versions where the legs are tacked down by a stitch over two rows, but I digress.)   

The stitch sequence is numbers, followed by small letters, followed by capital letters.  The only step to be mindful of is the last step of the diamond (small letters).  Take a look at the "g-h" step.  You slide the final thread ("g-h") under the pre-existing thread ("a-b") to complete the stitch.

Expanding this into a pattern illustrates what a pretty stitch it is.  It's perfect for a floor, tablecloth, or clothing. 

The single stitches in the corner are optional as you may want more of the underlying X to be exposed for whatever effect you seek.  Another idea for the intersection where the yellow stitches are is to add an upright cross over two rows in each direction. 

The combination of thread weights and finishes is important for this stitch.  You need a balance of lightweight and heavy threads, with an emphasis on lightweight.  An example for 13-mesh canvas is a heavier thread, such as Rainbow Galleries Very Velvet, for the X, and follow with a lighter weight metallic such as Kreinik Metallics Fine Braid (#8) for the aqua diamond and a stranded silk or floss in a contrasting color for the yellow corners.

The last 5X5 idea for you today is the Covered Scotch.  This is another scalable stitch and is a great way to add color and texture to a space.

This stitch works equally well with threads with similar color values or contrasting colors.  My favorite combination is a flat metallic thread (such as Neon Rays, Fyre Werks, or Shimmer Ribbon) for the bottom thread and Very Velvet for the corners, with both threads in similar color values.  The eye gravitates towards the corners, so put the finish or color you want the attention to go to in the corner.

These stitch diagrams, along with other #whimsicalwednesday and #smallspacesunday stitch diagrams, can also be found on www.pinterest.com/whimsicalstitch/whimsicalwednesday.  

Be sure to follow whimsicalstitch.com on FacebookPinterestInstagram, and Twitter.

If you like what you see on this blog, want to learn some very creative decorative stitches, and how to put them all together, whimsicalstitch.com sells stitch guides for seasonal Melissa Shirley designs.  20 guides are currently available and more are in the pipeline.

Enjoy!

It Takes Two

Today's #smallspacesunday focuses on the 2X2 square.  

The standard for a 2X2 square is the Mosaic Stitch, the smallest Satin Stitch there is.  

I diagrammed it in two colors to expand your thinking on small spaces.  The two colors represent two colors, thread types or both.  

The next is the Cross Stitch or, as I like to elegantly call it, an X.

You will notice the diagram is in same colors and in the same size.  But the color pattern is different.  Just another way to look at a space.

The next 2X2 is the Upright Cross.  

The Upright Cross is featured as the stitched sample on whimsicalstitch.com's Instagram page this week.

The Smyrna Cross is often overlooked because it adds a lovely pop of texture and most people think of it for only texture.  This begs the question...why not add the surprise of texture in a small space?  It's a lovely and unexpected touch.  And that's why I love it so.  

You will be surprised at how fun this stitch can be.  I've used it in "larger" small spaces such as a two-row high border, boots on a Santa, and as small bushes in the background in addition to the traditional small spaces such as a snowflake, a holiday ornament, or a button.  The Smyrna Cross adds a pop of contrasting color and texture in a larger stitch combo.

The possibilities are endless.  The only thing I obsess about is the application of a consistent stitch sequence.  My recommended sequence is above.  If you do a different sequence, I strongly encourage you to do the same sequence in all of the crosses.  

These stitch diagrams, along with other #whimsicalwednesday and #smallspacesunday stitch diagrams, can also be found on www.pinterest.com/whimsicalstitch/whimsicalwednesday.  

Be sure to follow whimsicalstitch.com on FacebookPinterestInstagram, and Twitter.

If you like what you see on this blog, want to learn some very creative decorative stitches, and how to put them all together, whimsicalstitch.com sells stitch guides for seasonal Melissa Shirley designs.  20 guides are currently available and more are in the pipeline.

Enjoy!

Silly Squares

A very happy New Year to you and yours!  

I'm trying something a little different for you this month. #whimsicalwednesdays and #smallspacesunday posts for January will focus on variations of a common stitch, specifically square stitches.

The collection of diagrams for this month were curated from my personal favorite stitches, stitched pieces that inspire me (from my circle of needlepoint friends), and my go-to books.  Each post focuses on a specific size square and includes a small sampling of the stitch possibilities for that size square. These are just thought starters and I hope they help you create something magical!

The month begins with 4X4 squares.  A simple and elegant way to dress up 4X4's is to alternate the directions of the squares AND add contrasting threads, in the opposite direction, on top of the square.

The stitched sample on Instagram illustrates a tone on tone with a bright accent with similarly weighted threads.  However, don't let that or the width of the gray line in the diagram restrict you.  This is a great stitch when you add a light thread across the top.  Think Vineyard Silk on 13-mesh with an overlay of Kreinik Metallics Fine Braid #8.  

By alternating the squares and setting the corner stitches apart with a contrasting thread (color or finish), you begin to see whole new patterns that don't even look like squares, but are squares.

4X4 Square Corners.jpg

I call it the Corner Stitch because the eye is drawn to the unique corners.  You can take this one step further and add open space and more pronounced accents.

This version removes the single stitch corners, creating two open spaces.  One is shaped like a square and one is shaped like a triangle.   You can fill one or both with the same or contrasting stitches.  Personally, I like to fill only one as it creates a smoother design pattern, but it is a matter of personal taste and what the space requires.  Alternate filling stitches include Plain Needlepoint, Smyrna Cross, Beads, or French Knots (select list).  Mix and match to your heart's delight.

The next diagram splits the widest stitch in half.  This is a personal favorite as I like the subtle texture it adds.  It is a technique that works better with lighter colored threads, so the split stitch is more clearly visible.

The next diagram provides an open alternative.  It is an exact square but looks much softer than other square alternatives.

The above diagram is scalable as well and works especially well with even numbered squares, allowing the gray Upright Cross to be in the exact center of the stitch.

The last two diagrams are related.  I call them "Forgetful" Squares.  By "forgetting" to add the single stitch in each corner, a world of possibilities opens up.

When you start expanding the color palette, as you do in the larger version of Forgetful Squares, it can be downright clever and beautiful.  

The color inspiration for the pattern in the larger diagram is drawn from the stitched photo in the lower right hand corner of this collage on flickr.  I absolutely love the colors in the sample.  

I hope these diagrams prompt a lot of creative ideas for your next square stitch!

These stitch diagrams, along with other #whimsicalwednesday and #smallspacesunday stitch diagrams, can also be found on www.pinterest.com/whimsicalstitch/whimsicalwednesday.  

Be sure to follow whimsicalstitch.com on FacebookPinterestInstagram, and Twitter.

If you like what you see on this blog, want to learn some very creative decorative stitches, and how to put them all together, whimsicalstitch.com sells stitch guides for seasonal Melissa Shirley designs.  20 guides are currently available and more are in the pipeline.

Enjoy!

The Wrapped Diamond

I'm wrapping up 2015 with a classic diamond stitch.  I call it the "Wrapped Diamond" because of the border surrounding it.  (No pun intended.  Really.) 

This diamond is slightly different from other diamonds on this site.  Specifically, the pattern is based on an odd number of rows.  

The diamond pattern is over 3 rows, 5 rows, 7 rows, 7 rows, 5 rows, and ends with over 3 rows. The two that are over seven rows establish a larger open space at the top and bottom of the diamond, allowing a more pronounced accent.

Click on image to see on whimsicalstitch.com's Pinterest account. Visit pinterest.com/whimsicalstitch/whimsicalwednesday for a library of all #whimsicalwednesday and #smallspacesunday stitch diagrams.

Click on image to see on whimsicalstitch.com's Pinterest account. Visit pinterest.com/whimsicalstitch/whimsicalwednesday for a library of all #whimsicalwednesday and #smallspacesunday stitch diagrams.

To make this stitch easier to manage, add the diamonds first (aqua lines), followed by the borders surrounding the diamonds (gray lines) and ending with the french knot accents (black circles).

This diagram is a smidge deceiving as this stitch provides rather full coverage.  The lines are thinner to illustrate the individual stitches.  So, don't be concerned about the small gap between the outer rows of the diamond and the adjacent French Knot.  That should not happen in your stitched version.

The stitched sample on Instagram is from a pumpkin sampler I did many moons ago.  The threads are the same color values and provide a great choice for an an area where you want to be elegant yet still have a little pizazz.  Combining colors and thread finishes and/or weights will make a great coat, rooftop, floor, or background.  Using lighter weight threads in similar color values would lend themselves very well to a sky or pasture.  Use your imagination!

These stitch diagrams, along with other #whimsicalwednesday and #smallspacesunday stitch diagrams, can also be found on www.pinterest.com/whimsicalstitch/whimsicalwednesday.  

Be sure to follow whimsicalstitch.com on FacebookPinterestInstagram, and Twitter.

If you like what you see on this blog, want to learn some very creative decorative stitches, and how to put them all together, whimsicalstitch.com sells stitch guides for seasonal Melissa Shirley designs.  20 guides are available and more are in the pipeline.

Enjoy!

Another Trifecta

This stitch is easy, clever, and wildly deceiving...another Trifecta.

Now that Santa has a warm coat, he needs a complementary bag.   This stitch is nothing more than vertical diamonds, yet the combo of similarly colored metallic threads make this stitch very elegant, understated, and stunning.

This diagram is best viewed alongside the stitched sample for this stitch.  The stitched sample is found on whimsicalstitch.com's Instagram page. 

There are four lines in the diagram, representing four different threads.  The two dark gray lines (thin and wider) represent two different metallics in similar color values.  The aqua line and the light gray line represent another two different metallics in similar color values (but different from the dark gray lines).  (Note:  I did not add the compensation stitches, as I do with most stitch diagrams, because I wanted the focus to be on the overall pattern.)

In the stitched sample, the dark gray lines are a very light gold/copper metallic (in Neon Rays and Kreinik Metallics Fine Braid #8).  The aqua line and the light gray line are two separate cream colored metallics (Neon Rays and Flair).

It's a really easy stitch with such an elegant twist.  It would also be great to mix colors and thread finishes to draw more attention to an area.  This stitch would make a terrific coat, bag, roof, or floor.  You could expand the diamonds (and the overall stitch) to create a really fantastic large space stitch.  You may also consider eliminating the center diamond (the wide dark gray line) and covering that area in an (over) 2-4-6-4-2 (row) solid diamond for an even more subtle stitch.

This stitch diagram, along with other #whimsicalwednesday and #smallspacesunday stitch diagrams, can also be found on www.pinterest.com/whimsicalstitch/whimsicalwednesday.  

Be sure to follow whimsicalstitch.com on FacebookPinterestInstagram, and Twitter.

If you like what you see on this blog, want to learn some very creative decorative stitches, and how to put them all together, whimsicalstitch.com sells stitch guides for seasonal Melissa Shirley designs.  17 guides are currently available and more are in the pipeline.

Enjoy!


Baby, It's Cold Outside

And Santa needs a coat.

Today's stitch is a pared down version of a layered stitch I came across in a book.  As you will see on the stitched sample on Instagram, there is nothing special about the canvas that shows through, but the open area is a great way to add lightness to a stitched area.

I named the stitch "Tied Squares."  It's a combo of Scotch Squares in alternating directions and Oblong Upright Crosses connecting the squares.

I suggest adding the squares first, followed by the Oblong Upright Crosses.  The diagram below is my personal preference for the stitch sequence for the crosses.

If you choose to do a different sequence on the crosses, I strongly recommend you do the exact same sequence on all crosses.  It will maintain the stitch symmetry and pattern.

So, a little insight on layered stitches.  They are a wonderful way to add color and pattern to a canvas and there are times layered stitches are perfect.  However, don't forget to look at the cumulative total of the steps.  Sometimes you only need to do a portion of them.  The original diagram for this stitch included another set of oblong crosses in the open area.  And that's a great idea, especially if you want to add another color, but I loved the simplicity of the first two steps.

This stitch diagram, along with other #whimsicalwednesday and #smallspacesunday stitch diagrams, can also be found on www.pinterest.com/whimsicalstitch/whimsicalwednesday.  

Be sure to follow whimsicalstitch.com on FacebookPinterestInstagram, and Twitter.

If you like what you see on this blog, want to learn some very creative decorative stitches, and how to put them all together, whimsicalstitch.com sells stitch guides for seasonal Melissa Shirley designs.  18 guides are currently available and more are in the pipeline.

Enjoy!