Magical Milanese

I've never chatted about Milanese before, so why not start with a large, dramatic Milanese stitch?

Milanese stitches are diagonal stitches, typically in groups of four with each stitch one row wider than the previous.  The resulting element looks like a triangle or an arrowhead.  Today's stitch idea blows this up into a group of six stitches for each triangle.

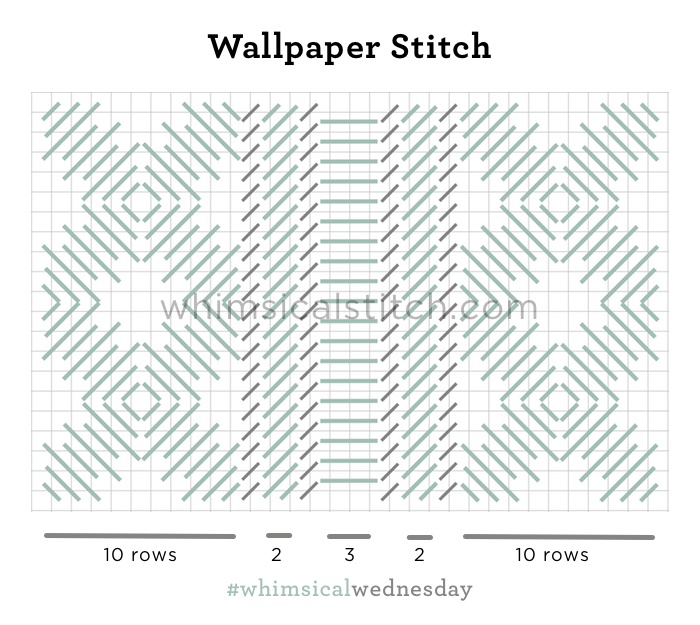
Let's start with the diagram.

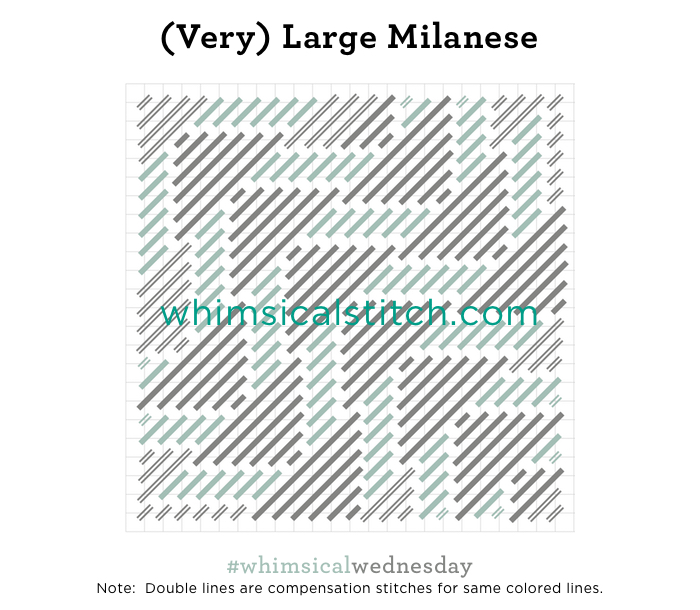
The triangles are in diagonal columns.  Every row of an individual triangle aligns with a specific row in the triangle on either side (going in the opposite direction).  I use the "total" to determine which stitch (of the triangle) is in the next diagonal column of triangles.  In the above example, the total is seven (7).  The sixes match to the ones; the fives match to the twos; the fours match to the threes.  The "total" counting method helps me easily add subsequent columns and is a real help when adding compensation stitches.  Honestly, it keeps me sane.  I recommend stitching the triangles first and return to add the accent stitches (the aqua lines).

The stitched sample on Instagram takes this concept one step further by alternating finishes for the diagonal columns of triangles.

The diagram below is the exact same as above, but I changed the color of alternating columns to align it with the stitched sample for clarity.


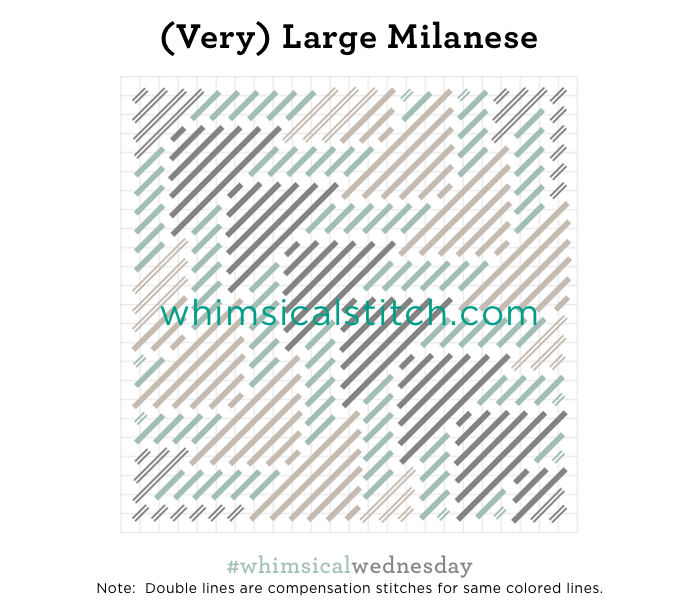
Since Milanese is a dramatic stitch that stands out, I think it calls for substantial, full coverage threads.  The stitched sample uses Very Velvet and Frosty Rays.  Both of those threads add a certain puff to the stitched sample.  Confetti or Rachelette would be a fun alternative for the Frosty Rays.  Right now, I am pondering how fun it could be to use Gloriana's Chenille for the triangles (on 13-mesh). 

Other substantial threads, albeit with less puff, are Silk & Ivory, Planet Earth Wool, Planet Earth Silk, or Kreinik Metallics (size 12 or 16).  Fyre Werks and Flair are great metallic threads to consider as well.  While they may appear lighter weight, they are great threads as they lie flat and wide.  They make great accent threads.

These stitch diagrams, along with all other #whimsicalwednesday and #smallspacesunday stitch diagrams, can also be found on a Pinterest board here.

Be sure to follow whimsicalstitch.com on FacebookPinterestInstagram, and Twitter.

If you like what you see on this blog, want to learn some very creative decorative stitches, and how to put them all together, whimsicalstitch.com sells stitch guides for Melissa Shirley Designs and Zecca Designs.  28 guides are currently available, including the newest Tea by the Sea, and more are in the pipeline.

I hope you enjoy this stitch and have the perfect spot for it!  Enjoy!

More Beads!

Snow stitches beg for beads.  Today's stitch finds its inspiration in earlier posts.  While I wholeheartedly recommend the Baby Bling stitch or Chopsticks (with beads) for snow, let's change the shape of the stitch in between the beads this week.

I present Beads with Diamonds.  

This is an open stitch that is perfect for the wonderful snow shading.  The light blue or gray shading will show through beautifully with this stitch.  Consider using a clear bead, such as Sundance Beads color 131, for the accent.  Frankly, I would use a light sheen Metallic, such as Flair, Frosty Rays, or Crystal Braid, for the diamond itself.

I'm including a couple of variations to (hopefully) inspire you.  The first adds an Upright Cross stitch to the center of the diamond.  I strongly recommend using two different metallics, one for the Upright Cross and one for the Diamond.  

The last variation leaves the center clear but fills in the diagonal stitch between the diamonds.

Beads with Diamonds Variation 2.jpg

It's all a matter of taste.  And your taste is perfect.  

These stitch diagrams, along with all other #whimsicalwednesday and #smallspacesunday stitch diagrams, can also be found on a Pinterest board here.

Be sure to follow whimsicalstitch.com on FacebookPinterestInstagram, and Twitter.

If you like what you see on this blog, want to learn some very creative decorative stitches, and how to put them all together, whimsicalstitch.com sells stitch guides for seasonal Melissa Shirley designs.  27 guides are currently available and more are in the pipeline.

Enjoy!

X's and O's

I love stitching snow.  The variety of stitches we can use are virtually limitless.  I can't think of a needlepoint artist who doesn't add some sort of secondary color, whether it is gray or blue, to add depth and nuance to the snow.

And those additional colors are exactly why I favor open stitches.  The shading is so beautiful and subtle I don't want to cover it up.  Today's stitch honors that objective and is for a snowman you want to stand out.

Add the base threads (gray lines) first, and follow up with the accent threads (green and yellow lines).  

With most tramme stitches I previously shared with you on this site, I used a matte thread for the base (typically Very Velvet or a heavy Pearl Cotton).  On the stitched sample on Instagram for this stitch, I used all shiny threads.  The base thread is Petite Sparkle Rays.  The green accent thread is Crystal Braid and the yellow accent thread is Shimmer Ribbon.  

When using threads with the same finish, take a moment to make sure they are distinguishable from each other.  As an example, Neon Ray would not work with either Neon Rays + or Shimmer Ribbon as the finishes are too similar.  If you are using contrasting colors, have fun with the colors!  Finish matters less in that scenario.

This stitch diagram, along with all other #whimsicalwednesday and #smallspacesunday stitch diagrams, can also be found on a Pinterest board here.

Be sure to follow whimsicalstitch.com on FacebookPinterestInstagram, and Twitter.

If you like what you see on this blog, want to learn some very creative decorative stitches, and how to put them all together, whimsicalstitch.com sells stitch guides for Melissa Shirley and Zecca Designs.  27 guides are currently available and more are in the pipeline.

Enjoy!

Fish Sticks

I'm not going to bore you with how long it took me to find this week's stitch.  The moral of the story is to not always associate certain stitches with specific themes.  Meaning, all of these stitches are great for animals but they are great for many other areas.  And vice versa.

Case in point.  I first used this stitch on a sailboat on Emma Williams Rooftops.  Not an animal in sight on that piece.  But...I saw a picture of the same stitch on a fish this morning and voila!  We have a #smallspacesunday.  And it's perfect...absolutely perfect.

And I have not a single clue as to its name.  And that's okay.  I present the Fish Stitch.

Fish Stitch.jpg

This diagram is slightly different from other #whimsicalwednesday diagrams to provide clarity on the steps (left side of diagram) and the compensation stitches (right side of diagram).  The core stitch is up four rows and over two rows.  Always start four rows down from the top!  After you create the first row of stitches, each subsequent horizontal row of stitches overlaps the previous row by a single row.  The compensation stitches are a tiny bit tricky because their angle will rarely match the angle of adjacent stitches.  

The thread combinations are endless.  The diagram is in two colors for clarity.  On the Emma Williams sailboat, I used Silk Lame and Fyre Werks (shown here on Instagram).  The soon to be famous fish (stitch sample can be found here) used a single thread, Silk Lame Braid.  It really depends on the area you are stitching. I hope you have the perfect space for this stitch, whether it is a fish or something else.  More importantly, I hope you enjoy it.

This stitch diagram, along with all other #whimsicalwednesday and #smallspacesunday stitch diagrams, can also be found on a Pinterest board here.

Be sure to follow whimsicalstitch.com on FacebookPinterestInstagram, and Twitter.

If you like what you see on this blog, want to learn some very creative decorative stitches, and how to put them all together, whimsicalstitch.com sells stitch guides for seasonal Melissa Shirley designs.  27 guides are currently available and more are in the pipeline.

Enjoy!

Horizontal Brick

Not the most clever of blog post titles, but it's early here.  :)

Today's stitch is one of those universal solutions.  Depending on the thread combination, it can be clothing, a background, a tabletop, a piece of fruit (as illustrated on Instagram), or foliage.

It's really simple.

As I mentioned earlier, the thread combination defines its use.  For an area you'd like to recede a little, I recommend a lightweight pearl silk or cotton, such as Elegance, Thread Gatherer Silken Pearl, DMC (or Anchor) Pearl #8 for the gray lines and a lightweight metallic for the yellow lines, such as Neon Rays, Shimmer, or Kreinik Metallics #4 or #8. 

For a more intense area, such as a coat, Very Velvet, Pepper Pot Silk, Vineyard Silk, or a multi-ply wool are great alternatives.  Flair, Frosty Rays, Kreinik Metallics #12 or #16 balance these threads well.  

On a separate but related subject, I would love to receive feedback on whimsicalstitch.com.  Please visit this link to fill out a short survey.  Thank you!

This stitch diagram, along with other #whimsicalwednesday and #smallspacesunday stitch diagrams, can also be found on www.pinterest.com/whimsicalstitch/whimsicalwednesday.  

Be sure to follow whimsicalstitch.com on FacebookPinterestInstagram, and Twitter.

If you like what you see on this blog, want to learn some very creative decorative stitches, and how to put them all together, whimsicalstitch.com sells stitch guides for seasonal Melissa Shirley designs.  22 guides are currently available and more are in the pipeline.

Enjoy!

Patterns

This week's post is less about a specific stitch and more about how to mix patterns to fit rigid space definitions.  The backstory is someone asked me for a wallpaper stitch.  My first thought was some sort of huge, open, and fun stitch (my favorite).  Turns out the wallpaper was really columns surrounded by single vertical rows painted in a different color.  This person needed three stripe stitches to fit an overarching wallpaper.  A completely different request, but a great opportunity to mix things up a little.

The trick was to define the dimensions of the individual spaces, find a pattern, and mix stitches to fit that pattern.  Turns out the column width pattern was 10, 2, 3, 2, 10, 2, 3, 2, 10 with a row of plain needlepoint on either side of every column.  So, I needed three stitches, one ten rows wide, two rows wide, and three rows wide.

Here's where I landed.

Clearly, the 10 row column has the most stitching potential.  Any pair of 5X5 squares would fill the width of the space.  A smaller pattern, such as the Star OctagonWoven Hungarian, or even a Tramme stitch would fit.  It's all a matter of personal taste.

The smaller columns are best handled in traditional stripe stitches.  But, don't be afraid to mix it up on the direction.  Mix diagonal and horizontal for a little change of pace.  You could do the over-2 columns in a single row of Tramme, or fill them with Smyrna Crosses from top to bottom.   

In terms of threads for backgrounds, I tend to understate the threads.  The stitched sample on Instagram illustrates the above diagram with a cream Subtlety.  I've seen versions of these columns with the all the columns in a matte thread and the gray lines are in a light sheen metallic.  The small splash of a muted metallic was a nice touch.  The final determination is the space you are stitching.  These are simply thought-starters.

These stitch diagrams, along with other #whimsicalwednesday and #smallspacesunday stitch diagrams, can also be found on www.pinterest.com/whimsicalstitch/whimsicalwednesday.  

Be sure to follow whimsicalstitch.com on FacebookPinterestInstagram, and Twitter.

If you like what you see on this blog, want to learn some very creative decorative stitches, and how to put them all together, whimsicalstitch.com sells stitch guides for seasonal Melissa Shirley designs.  22 guides are currently available and more are in the pipeline.

Enjoy!

It's a Cluster

But in the best possible way.

Today's stitch is another base pattern from Ann Strite Kurz's book, "The Potpourri of Pattern" by Ann Strite Kurz.  The base pattern begins with a Hungarian stitch, or over 2-3-2 rows.  You may recognize the sequence from the more well known Criss Cross or Woven Hungarian stitch.

As with the Explosion stitch of last week, the fun begins with what stitch to put in the intersection.  Five 2X2 alternatives are provided.  Yet, if you want to fill more space with dramatic effect, I suggest either of the larger crosses at the bottom of the image.  Both fit in the exact center.  For both over four alternatives, the yellow cross on top would be exactly where the yellow alternating tent stitches are in the main diagram.  That will help you visualize the position of the gray lines.

This would make a fantastic background for a seasonal piece, whether it is Halloween, Christmas, or Spring.  You can select colors from the main area of interest from the canvas to bring it all together.  It also works well in a sampler.

On a separate but related subject, I would love to receive feedback on whimsicalstitch.com.  Please visit this link to fill out a short survey.  Thank you!

My preferred thread combination is matte threads, such as Pepper Pot Silk or DMC Pearl for the clusters and a contrasting metallic for the yellow centers.  The stitched sample on Instagram is a tone on tone version of this stitch, using a Smyrna Cross in the intersections.

This stitch diagram, along with other #whimsicalwednesday and #smallspacesunday stitch diagrams, can also be found on www.pinterest.com/whimsicalstitch/whimsicalwednesday.  

Be sure to follow whimsicalstitch.com on FacebookPinterestInstagram, and Twitter.

If you like what you see on this blog, want to learn some very creative decorative stitches, and how to put them all together, whimsicalstitch.com sells stitch guides for seasonal Melissa Shirley designs.  22 guides are currently available and more are in the pipeline.

Enjoy!

It's an Explosion!

Welcome to June, the month of whatever stitch strikes my fancy.  We kick off June with what I call the Explosion Stitch.  Its origin is "The Potpourri of Pattern" by Ann Strite Kurz, one of my favorite pattern books.  Ann does a lovely job of combining patterns for a stunning effect.  Yet, I find the individual patterns just as intriguing.

This pattern creates a beautiful trellis.  I find the trellis pattern surprising, simply because no stitch in this pattern is more than over two rows.  Yet, it fills a large space quickly.  I prefer to leave the open diamonds just that...open.  

As always, the fun begins with what stitch to put in the intersection.  If you want to keep the diamond shape, I suggest the alternating tent stitches in the main diagram.  You can dress it up with beads or add some texture with a Smyrna Cross.  Be sure to have fun with the bead sizes.  A really large bead, such as #6 or #8, would be a wonderfully dramatic touch for the single bead center.

My preferred thread combination is a matte thread, such as Pepper Pot Silk or Silk Pearl for the gray lines, and a contrasting metallic for the yellow centers.  The stitched sample on Instagram uses Elegance and Kreinik Metallics Fine Braid #8 in a vintage metallic finish. 

On a separate but related subject, I would love to receive feedback on whimsicalstitch.com.  Please visit this link to fill out a short survey.  Thank you!

This stitch diagram, along with other #whimsicalwednesday and #smallspacesunday stitch diagrams, can also be found on www.pinterest.com/whimsicalstitch/whimsicalwednesday.  

Be sure to follow whimsicalstitch.com on Facebook, Pinterest, Instagram, and Twitter.

If you like what you see on this blog, want to learn some very creative decorative stitches, and how to put them all together, whimsicalstitch.com sells stitch guides for seasonal Melissa Shirley designs.  22 guides are currently available and more are in the pipeline.

Enjoy!

Small Skies

There really is no such thing as a small sky except, well, maybe in needlepoint.

This stitch is beyond straightforward (pun intended) and is one of the most subtle sky stitches.  It would work for a large sky if you really want to minimize the sky.

Start the first column from the opposite side of the column closest to the edge.  In this case, I'm starting on the left edge of the canvas so my stitch starts on the right side of the column.  This ensure the columns are neat with crisp edges.  

As you can see, there is an empty row in between the columns.  You can leave it blank or fill the column with Plain Needlepoint.  Personally, I like the space blank as it keeps it subtle.

The columns can be the same width or you can vary the width depending on the width of the space to be stitched.  

This diagram alternates columns over three rows and over two rows.  It's up to you and the space requirements.  Find a sequence you like and have fun with it!  You could alternate columns over two row and four rows.  You could add a third column into the mix and make it over two, over three, over four, over three, over two.  The larger the space the more fun you can have with column width sequences.

For whatever reason I can't quite verbalize, I really like this stitch in a lightweight metallic.  My go to metallic for skies is Kreinik Metallics Very Fine Braid (#4) on 18-mesh and Fine Braid (#8) on 13-mesh.  Petite Silk Lame is a great alternative for both size canvases. 

These stitch diagrams, along with other #whimsicalwednesday and #smallspacesunday stitch diagrams, can also be found on www.pinterest.com/whimsicalstitch/whimsicalwednesday.  

Be sure to follow whimsicalstitch.com on FacebookPinterestInstagram, and Twitter.

If you like what you see on this blog, want to learn some very creative decorative stitches, and how to put them all together, whimsicalstitch.com sells stitch guides for seasonal Melissa Shirley designs.  22 guides are currently available and more are in the pipeline.

Enjoy!

Starry, Starry Night

This is a new favorite sky stitch (with the clever name of Sky #14) I uncovered in a book last Fall. I made a few adjustments and renamed it Starry Night Sky. Clearly, it is for a large space.  This is funny considering how technically small the canvas is on which I first used this stitch.  And, yes, the canvas was mostly sky.  You can get a glimpse of it on Instagram.

Unlike other whimsicalstitch.com stitch diagrams, I did not add compensation stitches because I didn't want to distract you from the large pattern of the stitch.  It's important to note the stitches comprising the star do not cross over each other.  They share the same center hole.  The stitch sequence helps clarify this point.  

Starting from the outer edge, take every stitch from out to the center hole (indicated by the gray square).  So, every even numbered step in the above diagram is the center hole.  Because all stitches end in the center hole, it's important to use a lighter weight thread so you do not stretch the hole too much.  The stitched sample on Instagram uses Elegance on 18-mesh canvas. 

These stitch diagrams, along with other #whimsicalwednesday and #smallspacesunday stitch diagrams, can also be found on www.pinterest.com/whimsicalstitch/whimsicalwednesday.  

Be sure to follow whimsicalstitch.com on FacebookPinterestInstagram, and Twitter.

If you like what you see on this blog, want to learn some very creative decorative stitches, and how to put them all together, whimsicalstitch.com sells stitch guides for seasonal Melissa Shirley designs.  22 guides are currently available and more are in the pipeline.

Enjoy!