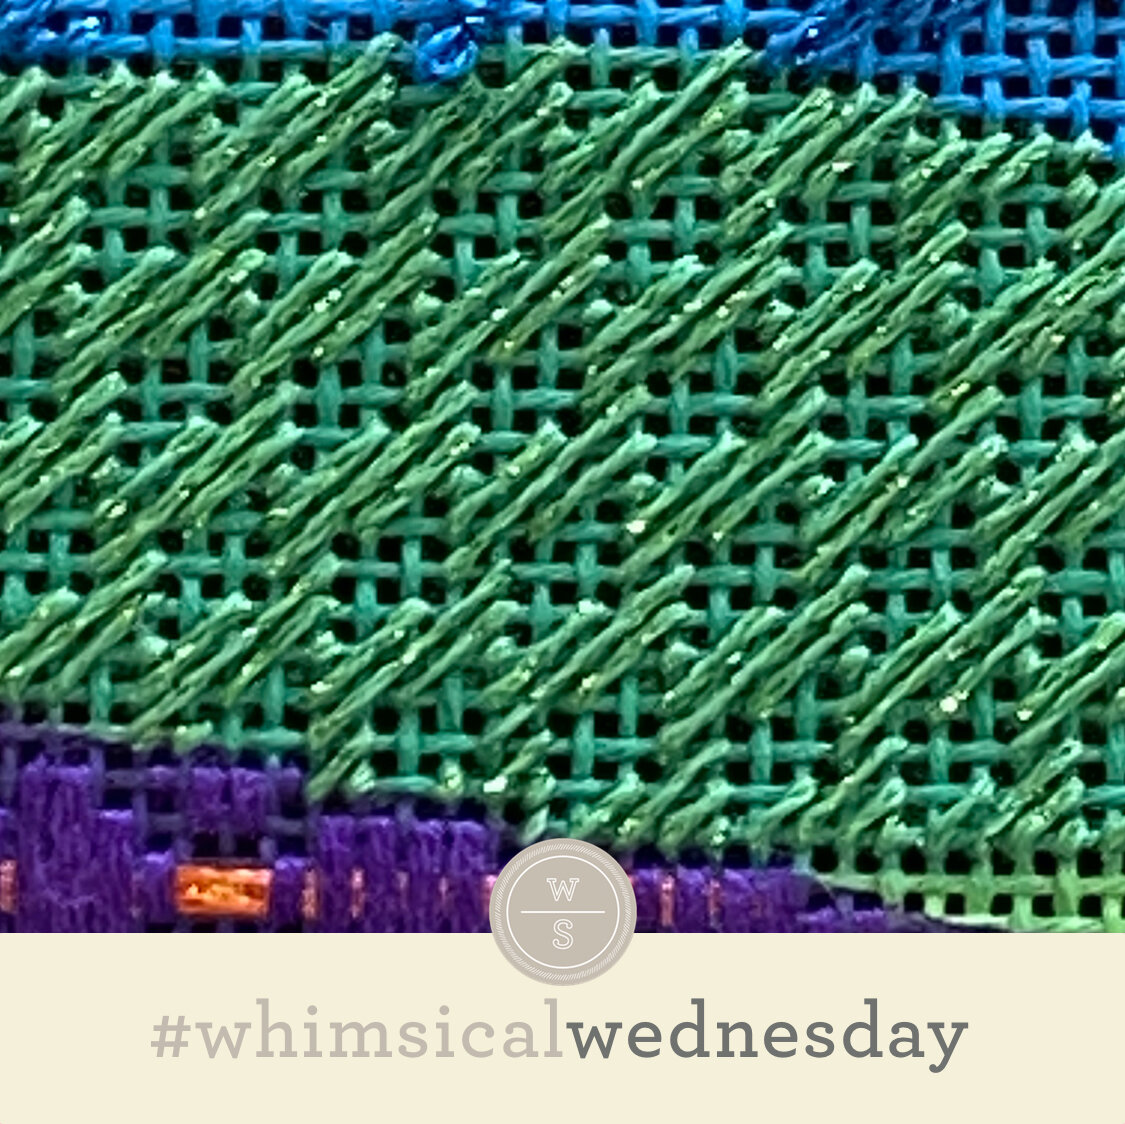
Again?

Sharing stories of some of my favorite stitchers was not a planned theme for this and the past couple of weeks, but here we are again. I’m pretty sure this stitcher gave me a minute to get settled before she asked me for help on a background. I immediately knew what I wanted her to do, and she had most of it done by the next morning. (All kidding aside, she gave me more than a minute to settle and thanked me profusely, though I love teasing her that she didn’t.)

Click the image to see the whimsicalstitch.com Stitch Library on pinterest.com. Includes all #whimsicalwednesday and #smallspacesunday stitch diagrams.

Click the image to see #whimsicalwednesday and #smallspacesunday Stitched Sample Gallery on Instagram.

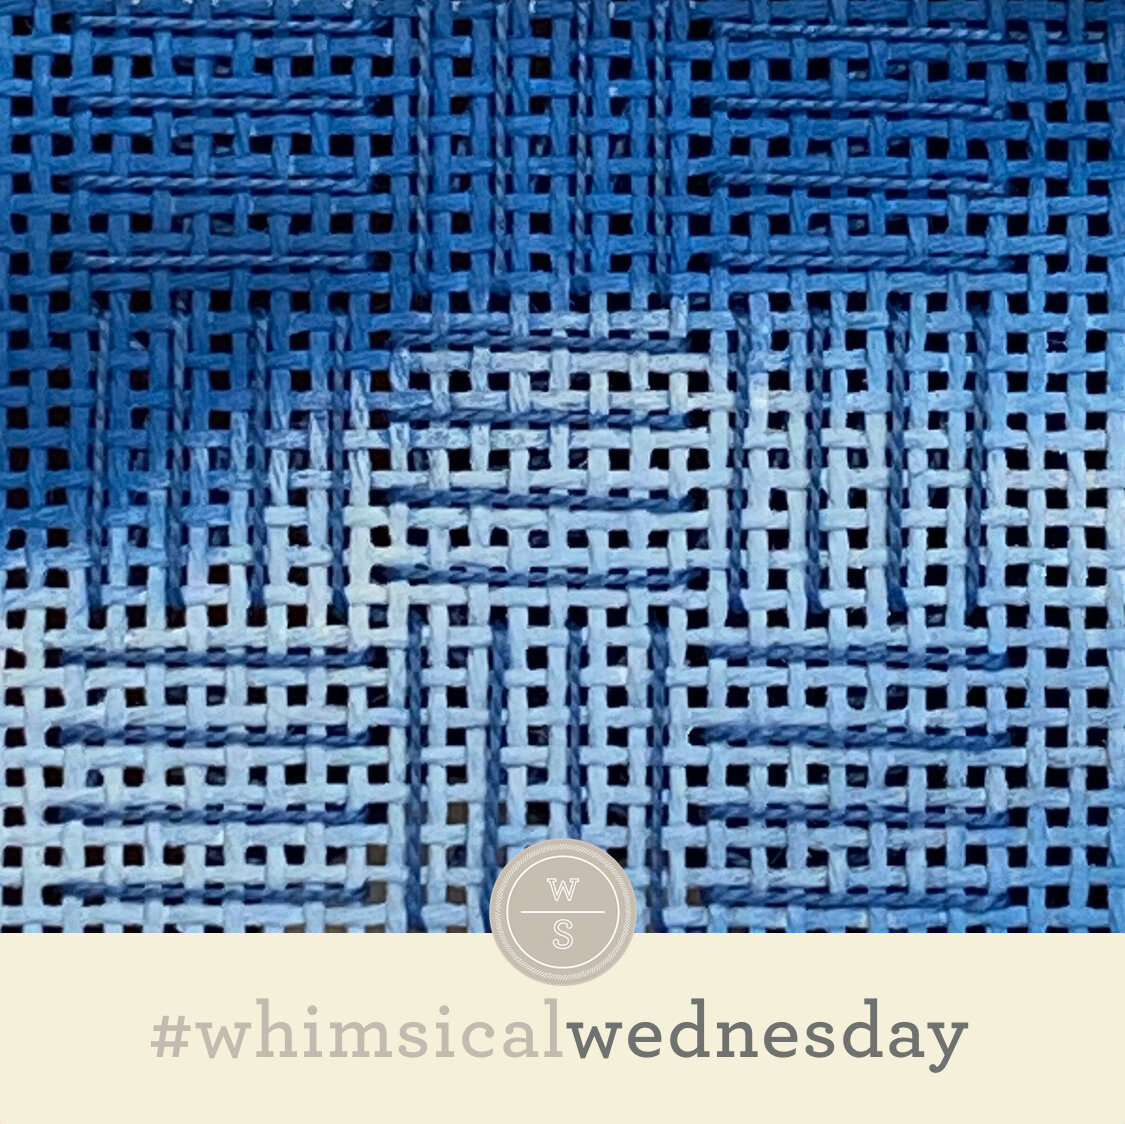
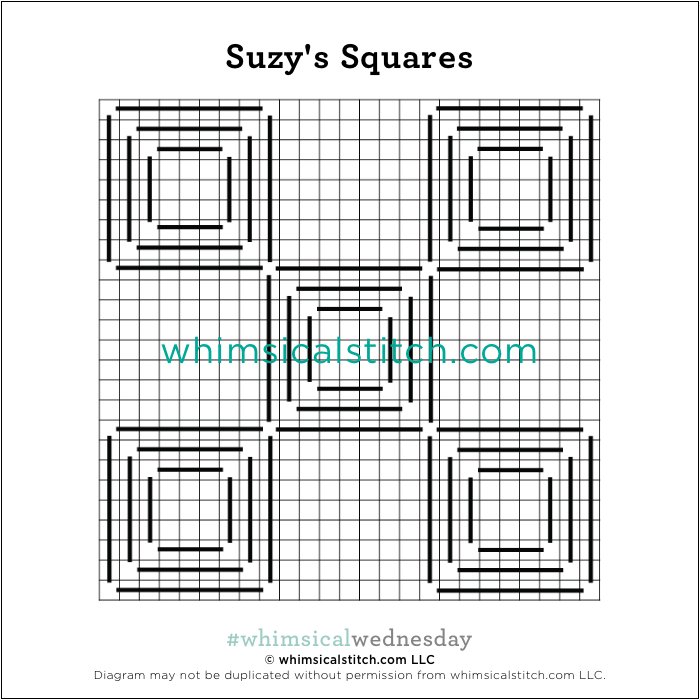
The stitched sample is the background on a sweet Sew Much Fun piece. The painting portrayed a beautiful watercolor-y effect that few threads could pull off in a basketweave or decorative stitch with multiple threads. The solution was a size 8 Kreinik in a simple open pattern that allows alllllll the colors to shine. It was absolute perfection and Suzy stitched it perfectly.

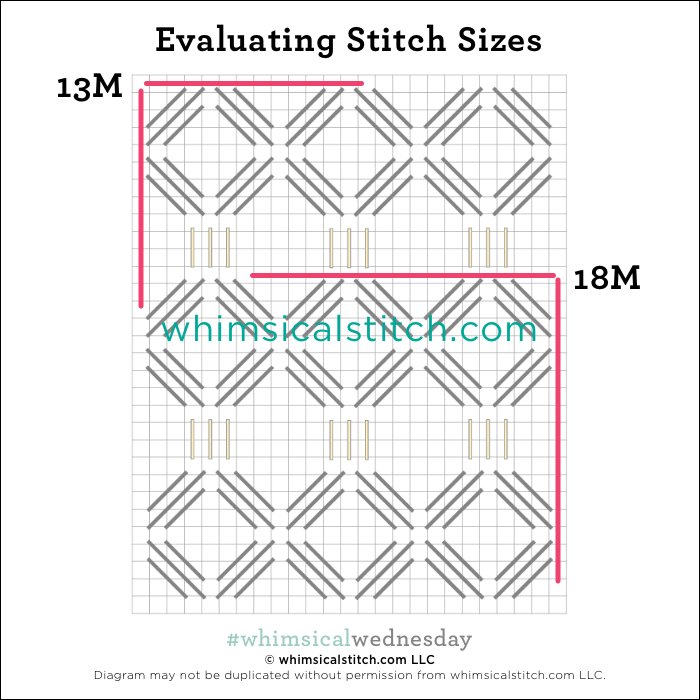
This stitch is also a great tabletop. The squares can be converted into diamonds by adding a second thread. It’s a deceptively fun variation, as illustrated on the right.


Click on image to see the whimsicalstitch.com Stitch Library on pinterest.com. Includes all #whimsicalwednesday and #smallspacesunday stitch diagrams.

As you are auditioning stitches (from any stitch source), count the number of canvas threads on the diagram that match your mesh size. And there you have what an inch of the stitch will look like. Evaluate that against the area where you plan to use the stitch and make your final decision. If you start integrating this step into your stitch selection process, you may be surprised at how many stitches you think are large are much smaller than you realize.

By (sometimes) including this step in my own process, I find I am now integrating much longer stitches than I ever thought I would. I used to think a stitch six rows long was super big. I have very much changed my tune, which has helped me expand my creativity, especially for large-space stitches.

Today’s stitch diagram, along with all other #whimsicalwednesday and #smallspacesunday stitch diagrams, can also be found on a Pinterest board here. Be sure to follow whimsicalstitch.com on FacebookPinterestInstagram, and Twitter.

If you like what you see on this blog, there's more. Mary’s Whimsical Stitches is a series of four books offering contemporary how-to collections of more than 200 stitches (in each volume) for all stitchers, regardless of skill level. All books include updated and sequenced diagrams from this blog, plus a collection of all-new stitches from private lessons and other class projects. Visit here to find a needlepoint retailer that carries my books.

New to needlepoint or looking for a refresher? Please download a handy how-to guide covering basic needlepoint stitches and stitch compensation techniques along with new top-line information on needlepoint materials and tools, how to handle threads, and other helpful needlepoint resources.

whimsicalstitch.com also sells Stitch Guides and Stitch Concepts for Melissa Shirley Designs, Zecca DesignsSandra Gilmore, Purple Palm, Maggie, and Penny MacLeod, and many more. Click here to see the newest guides and click here to see the entire collection.

I hope you have the perfect spot for this stitch! Please enjoy! Have a wonderful #whimsicalwednesday!

A Note about Diagrams
I use color in diagrams to make them as clear as possible.  The primary function of different colored lines is to illustrate a stitch sequence.  For example, the layering of colors demonstrates you add them in that order.  They can also provide ideas on integrating additional threads (one line for each color).  Or, you can use the same thread for all color lines.  That's where I encourage you to use your imagination for the space you are stitching!

What If We...?

One of my favorite stitchers wanted something a little different than what I suggested for a floor and that’s how we got this adorable little cashmere composite. She wanted something “tile-y but with a little something I can’t describe.” Um, sure?

Click the image to see the whimsicalstitch.com Stitch Library on pinterest.com. Includes all #whimsicalwednesday and #smallspacesunday stitch diagrams.

Click the image to see #whimsicalwednesday and #smallspacesunday Stitched Sample Gallery on Instagram.

The stitched sample is a floor stitched with two plies of white Splendor (black lines), light blue Petite Silk Lame (turquoise lines), and Elegance (yellow lines) on 18M. It’s absolutely full coverage but I like how the lighter threads help keep it chill. Well, as chill as three different threads can be in such a small space.

I love this idea for a jacket or coat with a hefty Vineyard Silk or Petite Very Velvet for the black lines, a Kreinik metallic for the turquoise lines, and Flair for the yellow lines to add a little peace and quiet. It will also make an adorable pathway with perle cotton for the black lines, a second perle in a slightly darker shade of its mate for the turquoise lines, and some silk floss for the yellow lines to mellow it out a little. I know people either love or loathe perle cotton. I absolutely love it in certain applications, especially size 8, largely because of its unique finish. I feel like you can see and identify it immediately because it is unique in our world of single-strand silks.

Have fun with it!

Click on image to see the whimsicalstitch.com Stitch Library on pinterest.com. Includes all #whimsicalwednesday and #smallspacesunday stitch diagrams.

As you are auditioning stitches (from any stitch source), count the number of canvas threads on the diagram that match your mesh size. And there you have what an inch of the stitch will look like. Evaluate that against the area where you plan to use the stitch and make your final decision. If you start integrating this step into your stitch selection process, you may be surprised at how many stitches you think are large are much smaller than you realize.

By (sometimes) including this step in my own process, I find I am now integrating much longer stitches than I ever thought I would. I used to think a stitch six rows long was super big. I have very much changed my tune, which has helped me expand my creativity, especially for large-space stitches.

Today’s stitch diagram, along with all other #whimsicalwednesday and #smallspacesunday stitch diagrams, can also be found on a Pinterest board here. Be sure to follow whimsicalstitch.com on FacebookPinterestInstagram, and Twitter.

If you like what you see on this blog, there's more. Mary’s Whimsical Stitches is a series of four books offering contemporary how-to collections of more than 200 stitches (in each volume) for all stitchers, regardless of skill level. All books include updated and sequenced diagrams from this blog, plus a collection of all-new stitches from private lessons and other class projects. Visit here to find a needlepoint retailer that carries my books.

New to needlepoint or looking for a refresher? Please download a handy how-to guide covering basic needlepoint stitches and stitch compensation techniques along with new top-line information on needlepoint materials and tools, how to handle threads, and other helpful needlepoint resources.

whimsicalstitch.com also sells Stitch Guides and Stitch Concepts for Melissa Shirley Designs, Zecca DesignsSandra Gilmore, Purple Palm, Maggie, and Penny MacLeod, and many more. Click here to see the newest guides and click here to see the entire collection.

I hope you have the perfect spot for this stitch! Please enjoy! Have a wonderful #whimsicalwednesday!

A Note about Diagrams
I use color in diagrams to make them as clear as possible.  The primary function of different colored lines is to illustrate a stitch sequence.  For example, the layering of colors demonstrates you add them in that order.  They can also provide ideas on integrating additional threads (one line for each color).  Or, you can use the same thread for all color lines.  That's where I encourage you to use your imagination for the space you are stitching!

Making a Go-To Different

I remember stitching this blanket from two years ago like it was yesterday. I recall this because I was disappointed in myself for returning, again, to a go-to stitch for a tall narrow area. There’s nothing wrong with tried and true, but I wanted something more. It was kinda fun (and enlightening) to see what the simple addition of two stitches to the pattern makes. Or should I say fun, enlightening, and a relief?

Click image to see the whimsicalstitch Stitch Library on pinterest.com. Includes all #whimsicalwednesday and #smallspacesunday stitch diagrams.

Click image to see the whimsicalstitch Stitch Library on pinterest.com. Includes all #whimsicalwednesday and #smallspacesunday stitch diagrams.

Click image to see the whimsicalstitch Stitch Library on pinterest.com. Includes all #whimsicalwednesday and #smallspacesunday stitch diagrams.

Click image to see the whimsicalstitch Stitch Library on pinterest.com. Includes all #whimsicalwednesday and #smallspacesunday stitch diagrams.

Click on image to see #whimsicalwednesday and #smallspacesunday Stitched Sample Gallery on Instagram.

Click on image to see #whimsicalwednesday and #smallspacesunday Stitched Sample Gallery on Instagram.

The go-to stitch is what I consider classic Tramme (far right), a layered stitch with a base thread (black lines) and trios of accent stitches (aqua lines). The original plan was to do that with pairs of accent stitches (instead of trios). It was working as the scale fit the space but *something* was missing. I was bummed and not sure what to do in its place. Disappointment can sometimes turn into great inspiration. On a whim, I added the vertical lines on either side of select pairs of accent stitches and was immediately smitten…and very relieved.

Today’s stitch has more texture than its cousins. While most tramme lends itself to clothing, this one has a little extra texture that will work well for coats, pants, blankets, or scarves. The stitched sample is a border on a blanket from Walking in the Rain by Zecca. I used Trebizond Silk for the base threads (black lines) and Petite Silk Lame for the accent threads (aqua lines). Imagine what fun you could have with color combinations. For example, I would stitch pants with Petite Very Velvet (black lines), a contrasting silk floss for the horizontal accent threads, and a matching metallic for the vertical accent threads.

This stitch diagram, along with all other #whimsicalwednesday and #smallspacesunday stitch diagrams, can also be found on a Pinterest board here. Be sure to follow whimsicalstitch.com on FacebookPinterestInstagram, and Twitter.

IIf you like what you see on this blog, there's more: Mary’s Whimsical Stitches Volume 1 is a contemporary how-to collection of more than 250 stitches for stitchers regardless of skill level. The book includes updated and sequenced diagrams from this blog, all-new stitches, and a chapter on the basics of needlepoint; Mary’s Whimsical Stitches Volume 2 features chapters on Balanced, Beading, Diagonal, Layered, Oblique, Small, and Straight stitches.

Also, you can download for free the first chapter from my first book which covers basic needlepoint stitches and stitch compensation techniques along with new top-line information on needlepoint materials and tools, how to handle threads, and other helpful needlepoint resources.

whimsicalstitch.com also sells Stitch Guides and Stitch Concepts for Melissa Shirley Designs, Zecca DesignsSandra Gilmore, Purple Palm, Maggie, and Penny MacLeod, and many more. Click here to see the newest guides and click here to see the entire collection.

I hope you have the perfect spot for this stitch! Please enjoy! Have a wonderful #whimsicalwednesday!

A Note about Diagrams
I use color in diagrams to make them as clear as possible.  The primary function of different colored lines is to illustrate a stitch sequence.  For example, layering of colors demonstrates you add them in that order.  They can also provide ideas on how to integrate additional threads (one line for each color).  Or, you can use the same thread for all color lines.  That's where I encourage you to use your imagination for the space you are stitching!
Back Down the Rabbit Hole

Don’t get me wrong. I love darning stitches, yet I’ve been eager for something other than my go-to darning stitches. Going down that rabbit hole this past weekend landed me on this cute little layered stripe.

Click on image to see on whimsicalstitch.com's Pinterest account. Visit pinterest.com/whimsicalstitch/whimsicalwednesday for a library of all #whimsicalwednesday and #smallspacesunday stitch diagrams.

Click on image to see on whimsicalstitch.com's Pinterest account. Visit pinterest.com/whimsicalstitch/whimsicalwednesday for a library of all #whimsicalwednesday and #smallspacesunday stitch diagrams.

Click on image to see on whimsicalstitch.com's Instagram account. Visit instagram.com/whimsicalstitch to see a library of stitched samples for select #whimsicalwednesday and #smallspacesunday stitch diagrams.

Click on image to see on whimsicalstitch.com's Instagram account. Visit instagram.com/whimsicalstitch to see a library of stitched samples for select #whimsicalwednesday and #smallspacesunday stitch diagrams.

The first layer is what I call the base threads with Petite Silk Lame (gray lines). I covered the base threads with pairs of horizontal stitches over three rows with size 12 Finca Perle (aqua lines). I filled the six rows in between the stripes in Alternating Skip Tent with white Petite Silk Lame (black lines). Truth be told, that could be any stitch you favor. You could do vertical (or horizontal) rows of Continental stitches with an empty row between columns. I strongly considered leaving the white areas completely empty but changed my mind when given the opportunity to add a bit more sparkle.

The great thing about this stitch is its scalability. It will literally work for columns of any width. The top layer of the stripes starts at the outer row and ends one row in from the opposite edge. For wider rows, consider making the groups of straight stitches more than two stitches. This stitch doesn’t need painted stripes to work. I would love to see the stripes on pants with 1-2 empty rows between the stripes. If the pants have shading, leave the rows between the stripes unstitched. If you want to add a stitch, I would stitch in between the stripes in basketweave or a Satin Stitch.

This stitch diagram, along with all other #whimsicalwednesday and #smallspacesunday stitch diagrams, can also be found on a Pinterest board here. Be sure to follow whimsicalstitch.com on FacebookPinterestInstagram, and Twitter.

IIf you like what you see on this blog, there's more: Mary’s Whimsical Stitches Volume 1 is a contemporary how-to collection of more than 250 stitches for stitchers regardless of skill level. The book includes updated and sequenced diagrams from this blog, all-new stitches, and a chapter on the basics of needlepoint. Mary’s Whimsical Stitches Volume 2 features chapters on Balanced, Beading, Diagonal, Layered, Oblique, Small, and Straight stitches.

Also, you can download The Essentials for free. The Essentials is the first chapter from my first book which covers basic needlepoint stitches and stitch compensation techniques along with new top-line information on needlepoint materials and tools, how to handle threads, and other helpful needlepoint resources.

whimsicalstitch.com also sells Stitch Guides and Stitch Concepts for Melissa Shirley Designs, Zecca DesignsSandra Gilmore, Purple Palm, Maggie, and Penny MacLeod, and many more. Click here to see the newest guides and click here to see the entire collection.

I hope you have the perfect spot for this stitch! Please enjoy! Have a wonderful #whimsicalwednesday!

A Note about Diagrams
I use color in diagrams to make them as clear as possible.  The primary function of different colored lines is to illustrate a stitch sequence.  For example, layering of colors demonstrates you add them in that order.  They can also provide ideas on how to integrate additional threads (one line for each color).  Or, you can use the same thread for all color lines.  That's where I encourage you to use your imagination for the space you are stitching!

Oh My!

The ratio of beads to threads in today’s stitch is a little on the high side. And, clearly (pun intended), I’m okay with that.

Click on image to see on whimsicalstitch.com's Pinterest account. Visit pinterest.com/whimsicalstitch/whimsicalwednesday for a library of all #whimsicalwednesday and #smallspacesunday stitch diagrams.

Click on image to see on whimsicalstitch.com's Pinterest account. Visit pinterest.com/whimsicalstitch/whimsicalwednesday for a library of all #whimsicalwednesday and #smallspacesunday stitch diagrams.

Click on image to see on whimsicalstitch.com's Instagram account. Visit instagram.com/whimsicalstitch to see a library of stitched samples for select #whimsicalwednesday and #smallspacesunday stitch diagrams.

Click on image to see on whimsicalstitch.com's Instagram account. Visit instagram.com/whimsicalstitch to see a library of stitched samples for select #whimsicalwednesday and #smallspacesunday stitch diagrams.

The stitched sample is clear Sundance beads with clear beading thread (gray circles), Soie D'Alger (aqua lines), and Petite Silk Lame (turquoise lines) on 18-mesh. A little background on the stitch origins. The project (which will be shared soon via a new Stitch Guide) is an exquisitely painted teacup, with beautiful shading and sweet details. I use two extremes with shading. I either use basketweave, as the area is painted, or I use a very open stitch to let the painting show through. (Fun fact, this upcoming project uses both.) I landed on this stitch because I wanted the teacup to be the center of attention (and beads are a great way to do that), but I also wanted something a little more than my standard Brick Beading. And here we are.

This stitch is scalable. For example, this is the stitch for the vase on Gold Pot and Figs. I used silks and metallics for the Oblique Cross Stitches and colored beads for the beaded columns. However, I made the Elongated X’s a row wider in that version. In fact, you could also change up the stitch in the columns in between the beads with simple horizontal straight stitches over two (or more!) rows, or a column of Alternating Skip Tent (in a width of your choosing), or a single column of Alternating Diamonds (as thought starters).

This stitch diagram, along with all other #whimsicalwednesday and #smallspacesunday stitch diagrams, can also be found on a Pinterest board here.

Be sure to follow whimsicalstitch.com on FacebookPinterestInstagram, and Twitter.

If you like what you see on this blog, want to learn some very creative decorative stitches, and how to put them all together, whimsicalstitch.com has a book for you! Mary’s Whimsical Stitches is a contemporary how-to collection of more than 250 stitches for stitchers regardless of skill level. The book includes updated and sequenced diagrams from this blog, all-new stitches, and a chapter on the basics of needlepoint. For more information, visit here.

whimsicalstitch.com also sells Stitch Guides and Stitch Concepts for Melissa Shirley Designs, Zecca DesignsSandra Gilmore, Purple Palm, Maggie, and Penny MacLeod, and many more. Click here to see the newest guides and click here to see the entire collection.

I hope you have the perfect spot for this stitch! Please enjoy! Have a wonderful #whimsicalwednesday!

A Note about Diagrams
I use color in diagrams to make them as clear as possible.  The primary function of different colored lines is to illustrate a stitch sequence.  For example, layering of colors demonstrates you add them in that order.  They can also provide ideas on how to integrate additional threads (one line for each color).  Or, you can use the same thread for all color lines.  That's where I encourage you to use your imagination for the space you are stitching!

Everyone is Right!

Today’s stitch is titled “Nobuko Variation” but, truth be told, it’s a variation of a variation. It’s kinda fun to see where being one row “off” lands.

Click on image to see on whimsicalstitch.com's Pinterest account. Visit pinterest.com/whimsicalstitch/whimsicalwednesday for a library of all #whimsicalwednesday and #smallspacesunday stitch diagrams.

Click on image to see on whimsicalstitch.com's Pinterest account. Visit pinterest.com/whimsicalstitch/whimsicalwednesday for a library of all #whimsicalwednesday and #smallspacesunday stitch diagrams.

Click on image to see on whimsicalstitch.com's Instagram account. Visit instagram.com/whimsicalstitch to see a library of stitched samples for select #whimsicalwednesday and #smallspacesunday stitch diagrams.

Click on image to see on whimsicalstitch.com's Instagram account. Visit instagram.com/whimsicalstitch to see a library of stitched samples for select #whimsicalwednesday and #smallspacesunday stitch diagrams.

The original diagram from the Stitch Guide is to the right. The stitch pattern for both is over 1-3-5-3 rows and repeat. On subsequent rows, the over 3 stitch shares a hole with the over 5 from the row above, and the over 5 stitch shares a hole with the over 3 from the above row. The difference between the two diagrams is which over 3 row I matched the over 5 stitches with.

Yep, I made a boo boo. It does not matter as they are both cute stitches.

The stitched sample is water stitched with Petite Silk Lame on 18M. This stitch (either variation) will serve well as a cloud with 1-2 strands of Floche. I would love to see it as a jacket, alternating rows with a matte thread (such as Petite Very Velvet) and a metallic (such as Fyre Werks). Overdyed silk floss or ovedyed wool would be a beautiful choice for this stitch in an open field, especially if you want to add the diagonal row feel.

Click on image to see on whimsicalstitch.com's Pinterest account. Visit pinterest.com/whimsicalstitch/whimsicalwednesday for a library of all #whimsicalwednesday and #smallspacesunday stitch diagrams.

Click on image to see on whimsicalstitch.com's Pinterest account. Visit pinterest.com/whimsicalstitch/whimsicalwednesday for a library of all #whimsicalwednesday and #smallspacesunday stitch diagrams.

These stitch diagrams, along with all other #whimsicalwednesday and #smallspacesunday stitch diagrams, can also be found on a Pinterest board here.

Be sure to follow whimsicalstitch.com on FacebookPinterestInstagram, and Twitter.

If you like what you see on this blog, want to learn some very creative decorative stitches, and how to put them all together, whimsicalstitch.com has a book for you! Mary’s Whimsical Stitches is a contemporary how-to collection of more than 250 stitches for stitchers regardless of skill level. The book includes updated and sequenced diagrams from this blog, all-new stitches, and a chapter on the basics of needlepoint. For more information, visit here.

whimsicalstitch.com also sells Stitch Guides and Stitch Concepts for Melissa Shirley Designs, Zecca DesignsSandra Gilmore, Purple Palm, Maggie, and Penny MacLeod, and many more. Click here to see the newest guides and click here to see the entire collection.

I hope you have the perfect spot for this stitch! Please enjoy! Have a wonderful #whimsicalwednesday!

A Note about Diagrams
I use color in diagrams to make them as clear as possible.  The primary function of different colored lines is to illustrate a stitch sequence.  For example, layering of colors demonstrates you add them in that order.  They can also provide ideas on how to integrate additional threads (one line for each color).  Or, you can use the same thread for all color lines.  That's where I encourage you to use your imagination for the space you are stitching!
Squirrel!

It happens almost every time. I’m on a roll. I’m focusing. I’m doing my thing. And a stitch idea that has nothing to do with what I’m working on pops in my head. Fun fact. I am not good at and I loathe hand drawing stitches. So, everything gets put aside so I can get the stitch on my version of paper…software. And that is exactly what happened Sunday afternoon and here we are.

Click on image to see on whimsicalstitch.com's Pinterest account. Visit pinterest.com/whimsicalstitch/whimsicalwednesday for a library of all #whimsicalwednesday and #smallspacesunday stitch diagrams.

Click on image to see on whimsicalstitch.com's Pinterest account. Visit pinterest.com/whimsicalstitch/whimsicalwednesday for a library of all #whimsicalwednesday and #smallspacesunday stitch diagrams.

Click on image to see on whimsicalstitch.com's Instagram account. Visit instagram.com/whimsicalstitch to see a library of stitched samples for select #whimsicalwednesday and #smallspacesunday stitch diagrams.

Click on image to see on whimsicalstitch.com's Instagram account. Visit instagram.com/whimsicalstitch to see a library of stitched samples for select #whimsicalwednesday and #smallspacesunday stitch diagrams.

The stitch is nothing more than incomplete diamonds on top of each other and I absolutely love the effect. I find it fascinating in any direction…up, down, or sideways…which means there are oodles of possibilities for this stitch. Having stitched it both ways, I share this stitch is much more interesting with a minimum of two threads as it enhances the faux layered look. The stitched sample is me playing with pink Trebizond Silk and blue Petite Silk Lame.

This will be a table runner in an upcoming Stitch Concept, using Soie D’Alger and Petite Silk Lame. It will also make fascinating fish scales with an overdyed metallic paired with a solid metallic. And, last but not least, it will make a great roof…perhaps one with Santa getting ready to climb down the chimney. Depending on the locale, it would be fun with white metallics or good old brown and tan solid wools.

This stitch diagram, along with all other #whimsicalwednesday and #smallspacesunday stitch diagrams, can also be found on a Pinterest board here.

Be sure to follow whimsicalstitch.com on FacebookPinterestInstagram, and Twitter.

If you like what you see on this blog, want to learn some very creative decorative stitches, and how to put them all together, whimsicalstitch.com has a book for you! Mary’s Whimsical Stitches is a contemporary how-to collection of more than 250 stitches for stitchers regardless of skill level. The book includes updated and sequenced diagrams from this blog, all-new stitches, and a chapter on the basics of needlepoint. For more information, visit here.

whimsicalstitch.com also sells Stitch Guides and Stitch Concepts for Melissa Shirley Designs, Zecca DesignsSandra Gilmore, Purple Palm, Maggie, and Penny MacLeod, and many more. Click here to see the newest guides and click here to see the entire collection.

I hope you have the perfect spot for this stitch! Please enjoy! Have a wonderful #whimsicalwednesday!

A Note about Diagrams
I use color in diagrams to make them as clear as possible.  The primary function of different colored lines is to illustrate a stitch sequence.  For example, layering of colors demonstrates you add them in that order.  They can also provide ideas on how to integrate additional threads (one line for each color).  Or, you can use the same thread for all color lines.  That's where I encourage you to use your imagination for the space you are stitching!

A in Geometry

Yes, I got an A in high school Geometry but that doesn’t mean I remember any of it and have laughable billiards skills. So, after trying to research the more precise terms to describe the three different sized shapes that emerge in today’s stitch, I leave you with…today’s wide open stitch is really pretty, uses lots of yummy threads, and please pay attention to the spacing of the base threads (black lines).

Click on image to see on whimsicalstitch.com's Pinterest account. Visit pinterest.com/whimsicalstitch/whimsicalwednesday for a library of all #whimsicalwednesday and #smallspacesunday stitch diagrams.

Click on image to see on whimsicalstitch.com's Pinterest account. Visit pinterest.com/whimsicalstitch/whimsicalwednesday for a library of all #whimsicalwednesday and #smallspacesunday stitch diagrams.

Click on image to see on whimsicalstitch.com's Instagram account. Visit instagram.com/whimsicalstitch to see a library of stitched samples for select #whimsicalwednesday and #smallspacesunday stitch diagrams.

Click on image to see on whimsicalstitch.com's Instagram account. Visit instagram.com/whimsicalstitch to see a library of stitched samples for select #whimsicalwednesday and #smallspacesunday stitch diagrams.

Before I talk about the threads, I want to bring your attention to the spacing of the black lines. What draws me to this stitch is the emerging shapes are not the same size. The stitch is composed of pairs of black lines with three empty rows between the stitches in a pair. There are five empty rows between pairs of stitches.

Today’s stitched sample is a great example of some of the beautifully painted canvases out there that scream for open stitches because the painting is almost too pretty to cover up. I like to consider the stitching on canvases like this as gently placed enhancements. The stitched sample is from an upcoming new Stitch Guide and uses three shade of Petite Silk Lame and Sundance Beads on 18M.

The first shade matches the dominant color in the area to be stitched and is represented by the black lines. Subsequent shades align with smaller color areas in the piece and are represented by the gray lines. (I used two different colors for the gray lines.) The bead color (represented by the yellow circles) was selected based on the dots on the painted canvas. (When this guide is ready, I’ll be able to show the whole thing in context.)

This stitch will make beautiful clothing with a silk Perle (such as Elegance) for the black lines, a lightweight Kreinik (gray lines) and a seed bead. I would love to see this in a sampler with more dramatic threads (dramatic = larger) such as Kreinik Medium Braid (size 16) for the black lines, Very Velvet (gray lines) and a larger bead for the bead accent. It will make a really pretty tabletop with silk floss (black lines) and Petite Silk Lame (gray lines). In this scenario, I would replace the bead with another Upright Cross and use a contrasting thread (either color or finish or both).

This stitch diagram, along with all other #whimsicalwednesday and #smallspacesunday stitch diagrams, can also be found on a Pinterest board here.

Be sure to follow whimsicalstitch.com on FacebookPinterestInstagram, and Twitter.

If you like what you see on this blog, want to learn some very creative decorative stitches, and how to put them all together, whimsicalstitch.com has a book for you! Mary’s Whimsical Stitches is a contemporary how-to collection of more than 250 stitches for stitchers regardless of skill level. The book includes updated and sequenced diagrams from this blog, all-new stitches, and a chapter on the basics of needlepoint. For more information, visit here.

whimsicalstitch.com also sells Stitch Guides and Stitch Concepts for Melissa Shirley Designs, Zecca DesignsSandra Gilmore, Purple Palm, Maggie, and Penny MacLeod, and many more. Click here to see the newest guides and click here to see the entire collection.

I hope you have the perfect spot for this stitch! Please enjoy! Have a wonderful #whimsicalwednesday!

A Note about Diagrams
I use color in diagrams to make them as clear as possible.  The primary function of different colored lines is to illustrate a stitch sequence.  For example, layering of colors demonstrates you add them in that order.  They can also provide ideas on how to integrate additional threads (one line for each color).  Or, you can use the same thread for all color lines.  That's where I encourage you to use your imagination for the space you are stitching!

It's Hard to be Lola

The highlight of yesterday morning’s unplanned visit to the vet was stumbling across a rubber mat, which forced me to look down…to see a fun pattern that inspired today’s stitches! (And, yes, it’s a two-fer!) (The stitch is named in honor of my poor girl Lola who was subjected to the vet yesterday morning. She’s home and fine now, and milking this for all it’s worth. Still.)

Click on image to see on whimsicalstitch.com's Pinterest account. Visit pinterest.com/whimsicalstitch/whimsicalwednesday for a library of all #whimsicalwednesday and #smallspacesunday stitch diagrams.

Click on image to see on whimsicalstitch.com's Pinterest account. Visit pinterest.com/whimsicalstitch/whimsicalwednesday for a library of all #whimsicalwednesday and #smallspacesunday stitch diagrams.

Click on image to see on whimsicalstitch.com's Instagram account. Visit instagram.com/whimsicalstitch to see a library of stitched samples for select #whimsicalwednesday and #smallspacesunday stitch diagrams.

Click on image to see on whimsicalstitch.com's Instagram account. Visit instagram.com/whimsicalstitch to see a library of stitched samples for select #whimsicalwednesday and #smallspacesunday stitch diagrams.

 
Click on image to see on whimsicalstitch.com's Pinterest account. Visit pinterest.com/whimsicalstitch/whimsicalwednesday for a library of all #whimsicalwednesday and #smallspacesunday stitch diagrams.

Click on image to see on whimsicalstitch.com's Pinterest account. Visit pinterest.com/whimsicalstitch/whimsicalwednesday for a library of all #whimsicalwednesday and #smallspacesunday stitch diagrams.

Click on image to see on whimsicalstitch.com's Instagram account (and be sure to swipe to see this photo). Visit instagram.com/whimsicalstitch to see a library of stitched samples for select #whimsicalwednesday and #smallspacesunday stitch diagrams.

Click on image to see on whimsicalstitch.com's Instagram account (and be sure to swipe to see this photo). Visit instagram.com/whimsicalstitch to see a library of stitched samples for select #whimsicalwednesday and #smallspacesunday stitch diagrams.

The stitched samples are me playing with Finca Perle (size 12) on 13M (top) and the same Finca Perle with a size 8 Kreinik on 13M (bottom). The top version is more representative of the pattern on the rubber mat, but I remembered a fun background I saw on Pinterest and added the smaller straight stitches in the empty rows on the second version. I expected to like the second one more than the first but the truth is they both have a place in needlepoint and I like them equally and for different reasons.

Obviously, any stitch over eight rows AND skipping a row is going to go fast. What I love about the top version is, yes, how little time it took to stitch but also the sheer simplicity of it. It’s an interesting pattern with two twists (the size and the skipped row). It will make a fantastic wallpaper or solid colored background, a large rooftop, smooth water, or a large green field. Consider using two colors or finishes, one for each direction. Based on the simplicity of this version, lighter weight threads come to mind here, such as a cotton or silk perle, Petite Silk Lame, silk floss (4 plies for 13M; 2-3 plies for 18M).

The second version adds more intrigue. As I mentioned, a background on Pinterest introduced me to the idea of adding the smaller stitches in the empty rows. It works well and makes this stitch one that will work well for areas that you want to bring attention to. I can see this working well on a Santa bag with Petite Very Velvet and Kreinik Metallics Tapestry Braid (#12). It will make beautiful clothing with a single strand silk and Silk Lame.

This stitch diagram, along with all other #whimsicalwednesday and #smallspacesunday stitch diagrams, can also be found on a Pinterest board here.

Be sure to follow whimsicalstitch.com on FacebookPinterestInstagram, and Twitter.

If you like what you see on this blog, want to learn some very creative decorative stitches, and how to put them all together, whimsicalstitch.com has a book for you! Mary’s Whimsical Stitches is a contemporary how-to collection of more than 250 stitches for stitchers regardless of skill level. The book includes updated and sequenced diagrams from this blog, all-new stitches, and a chapter on the basics of needlepoint. For more information, visit here.

whimsicalstitch.com also sells Stitch Guides and Stitch Concepts for Melissa Shirley Designs, Zecca DesignsSandra Gilmore, Purple Palm, Maggie, and Penny MacLeod, and many more. Click here to see the newest guides and click here to see the entire collection.

I hope you have the perfect spot for this stitch! Please enjoy! Have a wonderful #whimsicalwednesday!

A Note about Diagrams
I use color in diagrams to make them as clear as possible.  The primary function of different colored lines is to illustrate a stitch sequence.  For example, layering of colors demonstrates you add them in that order.  They can also provide ideas on how to integrate additional threads (one line for each color).  Or, you can use the same thread for all color lines.  That's where I encourage you to use your imagination for the space you are stitching!

Let There Be White

On the off chance you didn’t know, I adore tramme stitches. Today’s variation is a great way to add more subtle direction.

Click on image to see on whimsicalstitch.com's Pinterest account. Visit pinterest.com/whimsicalstitch/whimsicalwednesday for a library of all #whimsicalwednesday and #smallspacesunday stitch diagrams.

Click on image to see on whimsicalstitch.com's Pinterest account. Visit pinterest.com/whimsicalstitch/whimsicalwednesday for a library of all #whimsicalwednesday and #smallspacesunday stitch diagrams.

Click on image to see on whimsicalstitch.com's Instagram account. Visit instagram.com/whimsicalstitch to see a library of stitched samples for select #whimsicalwednesday and #smallspacesunday stitch diagrams.

Click on image to see on whimsicalstitch.com's Instagram account. Visit instagram.com/whimsicalstitch to see a library of stitched samples for select #whimsicalwednesday and #smallspacesunday stitch diagrams.

Most of the tramme stitches I’ve shared with you have been horizontal or vertical with cute accent stitches. Today’s tramme uses diagonal base threads with long accent stitches. The accent stitches provide the subtle angle of the stitch.

The stitched sample is the stomach of a flying puffin (naturally), hence the use of a whole lotta white threads. The base threads (black lines) are Kreinik 1/16” ribbon. The gray lines are Petite Silk Lame and the aqua lines are Soie D'Alger. I acknowledge you may not be able to distinguish between the Petite Silk Lame and the Soie on the stitched sample but I promise they are distinct on the actual canvas.

The most difficult part of this stitch is the first step (black lines). If one of these diagonal lines is off by even a single canvas thread, it will screw up the remainder of the stitch. My recommendation is to start small and work up to the longer diagonal stitches.

An easy way to accomplish this is to add your first short diagonal stitch in a corner. For this example, start in the upper left corner from the left edge to the top edge. Double and triple-check that your first diagonal stitch travels along a perfect 45° diagonal path. After it is complete, count across four rows to the right, bring your thread up from behind the canvas at that point and return it four rows below the left-hand side of the prior diagonal stitch. Count down four rows, bring the thread up from behind the canvas and return it four rows to the right of the prior stitch on the top edge.

Select members of the needlepoint police may offer a more complex way to ensure that your threads are wrapped around the edges versus an ever so slight resulting from my technique. I do the first step of most of my tramme stitches in this manner, especially for large areas, in order to minimize the use of the thread and make this go as quickly as possible. It is a matter of personal preference. I find this counting method effective and easy.

I stumbled across this stitch for a roof with a similar angle. The angle was reinforced with painted lines at that angle (in a different color). That is where the idea emerged to use two different color threads for the straight stitches.

This stitch diagram, along with all other #whimsicalwednesday and #smallspacesunday stitch diagrams, can also be found on a Pinterest board here.

Be sure to follow whimsicalstitch.com on FacebookPinterestInstagram, and Twitter.

If you like what you see on this blog, want to learn some very creative decorative stitches, and how to put them all together, whimsicalstitch.com has a book for you! Mary’s Whimsical Stitches is a contemporary how-to collection of more than 250 stitches for stitchers regardless of skill level. The book includes updated and sequenced diagrams from this blog, all-new stitches, and a chapter on the basics of needlepoint. For more information, visit here.

whimsicalstitch.com also sells Stitch Guides and Stitch Concepts for Melissa Shirley Designs, Zecca DesignsSandra Gilmore, Purple Palm, Maggie, and Penny MacLeod, and many more. Click here to see the newest guides and click here to see the entire collection.

I hope you have the perfect spot for this stitch! Please enjoy! Have a wonderful #whimsicalwednesday!

A Note about Diagrams
I use color in diagrams to make them as clear as possible.  The primary function of different colored lines is to illustrate a stitch sequence.  For example, the layering of colors demonstrates you add them in that order.  They can also provide ideas on how to integrate additional threads (one line for each color).  Or, you can use the same thread for all color lines.  That's where I encourage you to use your imagination for the space you are stitching!