I Love it When the Blog Writes Itself

There is no better feeling than the blog writing itself. This one came to be as I assembled a recent store order. Stitched sample and diagram done without lifting a finger! Bam!

Click on image to see on whimsicalstitch.com's Pinterest account. Visit pinterest.com/whimsicalstitch/whimsicalwednesday for a library of all #whimsicalwednesday and #smallspacesunday stitch diagrams.

Click on image to see on whimsicalstitch.com's Pinterest account. Visit pinterest.com/whimsicalstitch/whimsicalwednesday for a library of all #whimsicalwednesday and #smallspacesunday stitch diagrams.

Click on image to see on whimsicalstitch.com's Instagram account. Visit instagram.com/whimsicalstitch to see a library of stitched samples for select #whimsicalwednesday and #smallspacesunday stitch diagrams.

Click on image to see on whimsicalstitch.com's Instagram account. Visit instagram.com/whimsicalstitch to see a library of stitched samples for select #whimsicalwednesday and #smallspacesunday stitch diagrams.

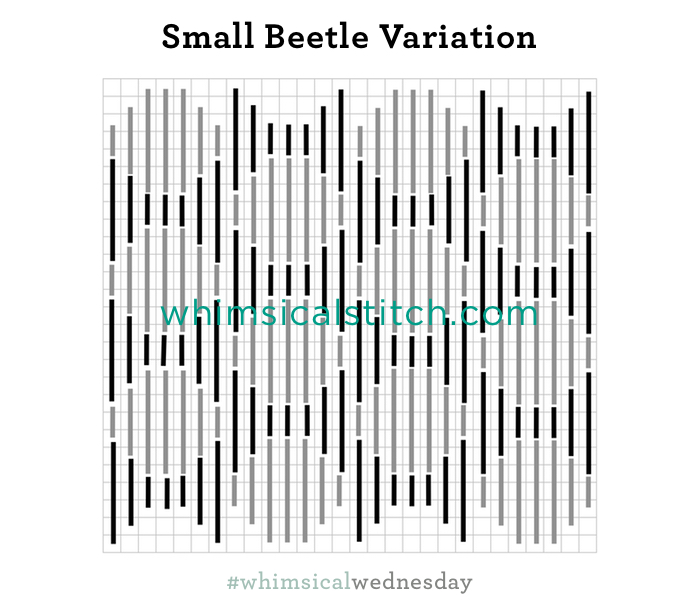
The downside is the stitched sample is black on black. (I lightened it up a bit to help.) The stitched sample is from Debbie Mumm’s Mr. Owl and uses Petite Very Velvet (black lines) and Fyre Werks Soft Sheen (gray lines).

Other ideas for this stitch include water with Kreinik Metallic Fine Braid (#8) (black lines) and Petite Silk Lame (gray lines) on 13-mesh. (I love really lightweight threads on 13-mesh. It’s a great way to integrate beautiful painted shading.) Flip the diagram 90° and stitch the beetles in vertical columns for a tall coat or dress with Flair (black lines) and your favorite silk floss (gray lines).

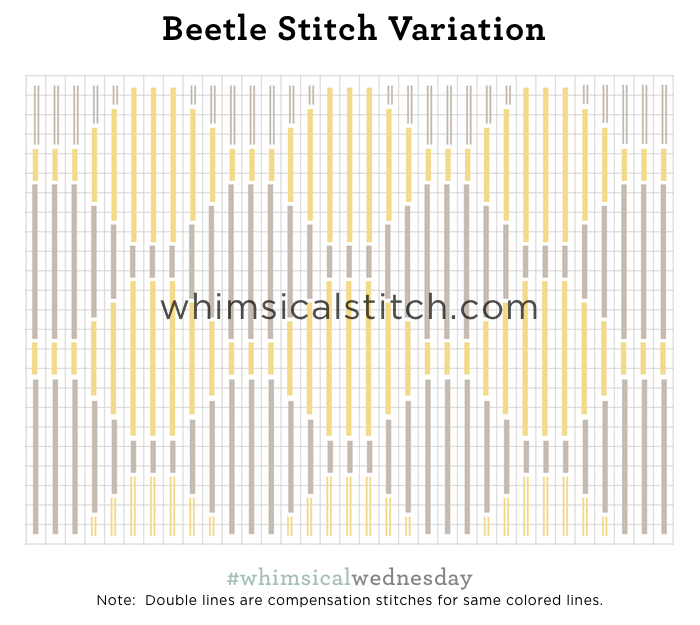
I swapped the matte and metallic in the last example because of a cute variation you should absolutely consider. Add a straight stitch three rows wide across the center of the gray lines where the stitches are split. (It would be a horizontal line in the diagram and a vertical line in the clothing example). For the clothing, I would add a single strand metallic such as Kreinik, Entice, Japan Thread, or Petite Silk Lame (as thought starters). You could even add a bugle bead across that intersection!

Using this as a stitch for clothing or water are simply thought starters. I would love to see what you do with this stitch! This stitch diagram, along with all other #whimsicalwednesday and #smallspacesunday stitch diagrams, can also be found on a Pinterest board here.

Be sure to follow whimsicalstitch.com on FacebookPinterestInstagram, and Twitter.

If you like what you see on this blog, want to learn some very creative decorative stitches, and how to put them all together, whimsicalstitch.com sells Stitch Guides and Stitch Concepts for Melissa Shirley Designs, Zecca DesignsSandra Gilmore, Purple Palm, Maggie, and Patience Brewster, and many more. Click here to see the newest guides and click here to see the entire collection.

I hope you have the perfect spot for this stitch!  Please enjoy!  

A Note about Diagrams
I use color in diagrams to make them as clear as possible.  The primary function of different colored lines is to illustrate a stitch sequence.  For example, layering of colors demonstrates you add them in that order.  They can also provide ideas on how to integrate additional threads (one line for each color).  Or, you can use the same thread for all color lines.  That's where I encourage you to use your imagination for the space you are stitching!

A Theme is Emerging

I am well aware I have a lot of Tramme and Beetle stitches in my work over time, but this month drives that point home in a borderline embarrassing way.  (Unless, of course, you really like Tramme and Beetles, then it is part of my plan!)

Meaning, yes, today's stitch combines Beetles and Tramme.  We knew it had to happen sometime. 

The stitched sample on Instagram is a retired Melissa Shirley fruit canvas.  I love me some fruit needlepoint.  You'll be seeing more of my fruit stitches in February, as they are great examples of open work (February's theme).

The stitched sample uses Elegance (gray lines), Flair (aqua lines), and Kreinik Metallics Fine Braid #8 (turquoise lines) on 13-mesh.  As you may know by now, I like a lighter touch, especially on background stitches.  Flair was a strategic choice.  I love the way that Flair lays flat.  It is a great base thread for Tramme.

This stitch diagram, along with all other #whimsicalwednesday and #smallspacesunday stitch diagrams, can also be found on a Pinterest board here.

Be sure to follow whimsicalstitch.com on FacebookPinterestInstagram, and Twitter.

If you like what you see on this blog, want to learn some very creative decorative stitches, and how to put them all together, whimsicalstitch.com sells stitch guides for Melissa Shirley Designs and Zecca Designs.  28 guides are currently available, including the newest Tea by the Sea, and more are in the pipeline.

I hope you have the perfect spot for this stitch!  Enjoy!

More Beetles

Today's stitch is a variation on a Beetle stitch.  By enclosing the individual beetles within borders, it makes for a fun look!

57 Likes, 2 Comments - whimsicalstitch.com (@whimsicalstitch) on Instagram: "Beetle Stitch Variation with Elegance and Kreinik Metallics Fine Braid (#8) (on 18-mesh) on this..."

The stitched sample on Instagram uses Elegance and Kreinik Metallics Fine Braid (#8) on 18-mesh.  

I used lighter weight threads since it was a background stitch that I wanted to recede.  This stitch, with lighter weight threads, would also work for a floor as it can mimic tiles.  A student just used it on a seat cushion as the beetles offered a puffy look.  It would also make a beautiful water stitch with two metallics with similar color values.  

You could use this with heavier weight threads, such as Vineyard Silk or 6+ plies of strandable silk (such as Splendor) to give it some gravitas, say on a sampler, a piece of clothing, or a roof.  The symmetry of this stitch (via the vertical stitches) make it highly adaptable to almost any medium to large area.

This stitch diagram, along with all other #whimsicalwednesday and #smallspacesunday stitch diagrams, can also be found on a Pinterest board here.

Be sure to follow whimsicalstitch.com on FacebookPinterestInstagram, and Twitter.

If you like what you see on this blog, want to learn some very creative decorative stitches, and how to put them all together, whimsicalstitch.com sells stitch guides for Melissa Shirley Designs and Zecca Designs.  28 guides are currently available, including the newest Tea by the Sea, and more are in the pipeline.

Enjoy!

It Takes A Village

While I already knew this stitch when it was presented to me in a workshop, it still surprised me.  It's another stunning example of why one shouldn't associate a stitch with a single theme...or thread combo.  Lastly, I hope you aren't tired of the Beetle Stitch yet because today is another riff on it.  What differentiates the Beetle Stitch this week is its application and the thread combos.  Let's start with the stitched sample.

It combines Burmilana and Fuzzy Stuff and I absolutely love it.  I was so pleasantly surprised to see this combination because, up to that point, I had always considered the Beetle Stitch as a background stitch and I had always associated Fuzzy Stuff with random French Knots or random long stitches.  Due to the size of the Polar Bear, the actual stitch sequence is a little taller than versions I've shared previously.

This stitch diagram, along with all other #whimsicalwednesday and #smallspacesunday stitch diagrams, can also be found on a Pinterest board here.

Be sure to follow whimsicalstitch.com on FacebookPinterestInstagram, and Twitter.

If you like what you see on this blog, want to learn some very creative decorative stitches, and how to put them all together, whimsicalstitch.com sells stitch guides for seasonal Melissa Shirley designs.  27 guides are currently available and more are in the pipeline.

Enjoy!

Beetle Border

This week covers a border six rows wide (unintended pun).   It's the skinny version of the Beetle Stitch.

Just as I took a stitch designed for columns (or a border) and exploded it into a background, here I took what I traditionally use as a background stitch and repurposed it as a border.

Beetle Border.jpg

Since this is a straight stitch, the pattern is self contained in each column, meaning you stitch from upper corner to lower corner.  You create mitered corners to make a clean transition from vertical to horizontal columns.  The bright turquoise line in the diagram illustrates the mitered corner, the diagonal seam that joins the left border with the bottom border.  

In the example, the border is six rows wide (or tall, depending on direction).  This means the full pattern begins on the sixth row.  Rows 1-5 (in the corners) are used to create the diagonal seam illustrated above.   

I recommend that your horizontal columns match, meaning they have the exact same pattern on the same rows.  The same goes for your vertical columns.  Once you lay in the pattern for the first column of each direction, the pattern is set.  For this stitch, there's no rule of what stitch to start with...start with the sequence that makes you comfortable.  Just make a note (in the way that works best for you) illustrating what row and what length stitch you started with so you can match it in the other corresponding column.

The stitched sample on Instagram illustrates a Beetle border with brightly metallic contrasting threads, specifically Flair and Shimmer Ribbon.   

This stitch diagram, along with other #whimsicalwednesday and #smallspacesunday stitch diagrams, can also be found on www.pinterest.com/whimsicalstitch/whimsicalwednesday.  

Be sure to follow whimsicalstitch.com on FacebookPinterestInstagram, and Twitter.

If you like what you see on this blog, want to learn some very creative decorative stitches, and how to put them all together, whimsicalstitch.com sells stitch guides for seasonal Melissa Shirley designs.  21 guides are currently available and more are in the pipeline.

Enjoy!