

Today's border concept is Padding. This post elaborates on the earlier #whimsicalwednesday post on padding and takes it one step further by illustrating how to get around corners.
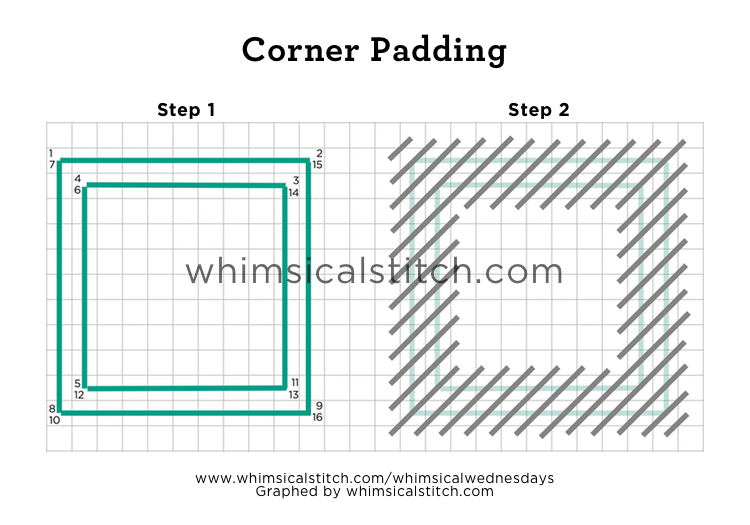
With all padding, the base rows (turquoise lines) can be added with efficiency. It is not critical to have crisp edges or coverage for the border rows on the back. They will be covered and no one will be able to tell that you took varying short cuts in between rows. However, it is important the path(s) you follow are contained within the border area so there are no base threads dragged across the non-border area of the canvas. Step 1 illustrates a potential path. This ensures the base threads will be covered by the top threads (gray lines) on both sides of the canvas, enclosing the entire border.
In Step 2, navigating the wide corners (upper left and lower right) requires focus. To get a crisp and clean inside corner, split the stitch where the inside corners meet for the first time. In this example, the border is over three rows. Corners will meet when the border will be over six rows (double the width). Don't do over six rows with one stitch! Split it into two stitches, over three rows each, for a crisp corner. The lime green and aqua stitched sample on Instagram illustrates a padded corner over three rows
There are a few things worth repeating from the first post about padding. Most padding requires only one layer of base thread. If you want to create more pronounced padding, add 1-2 additional layers of base thread. One of the stitched samples on Instagram illustrates a very thick padding. Kelly wasn't sure how many layers of padding he added to that border...but it might have been double digit. It's a dramatic and beautiful example of padding.
Very Velvet and Pearl Cotton #3 make excellent base rows. I prefer wider threads for the top thread, such as Flair, Fyre Werks, Treasure Ribbon, Frosty Rays, or plied floss (with a laying tool to maximize its width and coverage).
This stitch diagram, along with other #whimsicalwednesday and #smallspacesunday stitch diagrams, can also be found on www.pinterest.com/whimsicalstitch/whimsicalwednesday.
Be sure to follow whimsicalstitch.com on Facebook, Pinterest, Instagram, and Twitter.
If you like what you see on this blog, want to learn some very creative decorative stitches, and how to put them all together, whimsicalstitch.com sells stitch guides for seasonal Melissa Shirley designs. 20 guides are currently available and more are in the pipeline.
Enjoy!