

At the heart of all needlepoint is the single, simple needlepoint stitch. There are several names for what I call Plain Needlepoint. You may see it called Plain Needlepoint, Tent, Basketweave, Half Tent, Continental, or combinations of those. They are all variations of the same theme, specifically a single stitch laid diagonally (at a 45 degree angle) over an intersection from the lower left corner to the upper right corner.
Simply put, the methods vary in sequence, coverage, and look on the back of the canvas. However, they all look the same on the front of the canvas. Continental and Basketweave are the two primary methods I use for Plain Needlepoint and I recommend each for specific applications.
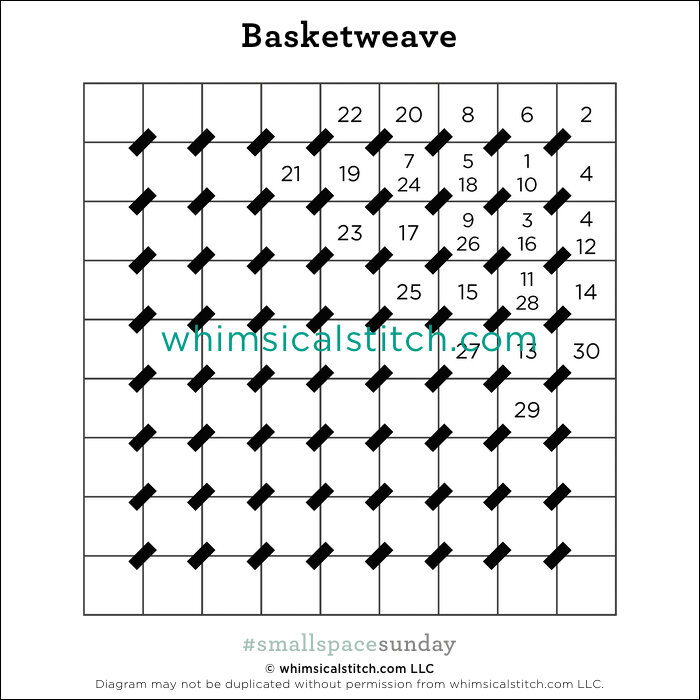
Basketweave is my primary and preferred method. It provides consistent and even coverage on both the front and back of a canvas. In addition, basketweave minimizes the need for blocking a canvas after it has been stitched.
Click on image to see on whimsicalstitch.com's Pinterest account. Visit pinterest.com/whimsicalstitch/whimsicalwednesday for a library of all #whimsicalwednesday and #smallspacesunday stitch diagrams.
Beginning in the upper right corner, add a stitch. Move to the row to the left and begin the second row of stitching…going down the diagonal row. Repeat this sequence up and down the area, always on the diagonal rows. The first diagram illustrates the concept. The second diagram illustrates each diagonal row by color to clearly separate the rows.

Click on image to see on whimsicalstitch.com's Pinterest account. Visit pinterest.com/whimsicalstitch/whimsicalwednesday for a library of all #whimsicalwednesday and #smallspacesunday stitch diagrams.
The Continental stitch covers each horizontal row in sequential order, both across and down, ending with a similar look as Basketweave.
Starting in the upper right corner, add the first stitch and move across the horizontal row to the left. When you complete the first row, you (literally) turn your canvas upside down and repeat the same stitch going back across the second row. You alternate the direction of the canvas for each row. (In the diagram, the canvas is upright for black stitches and upside down for turquoise stitches.)
If you do the turquoise rows with the canvas upright, the typical mistake is to start from the lower left corner and end in the upper right corner. This results in one tiny vertical stitch covering the row on the back of the canvas, leaving the area open to light and an uneven appearance on the front of the canvas.
My preferred combination is Continental stitch for any single row of needlepoint, such as an outline, window frame, or simple flower stem. For any areas wider or longer than one row in either direction, I use the Basketweave stitch.
Plain Needlepoint is a classic and good looking stitch. It is a nod to tradition and is quite elegant on its own, especially when used to add shading to an area. I don't have that many rules about needlepoint. However, I feel very strongly that all needlepoint projects should have spaces dedicated to Plain Needlepoint. I love decorative stitches and Plain Needlepoint helps set them apart and gives the eye someplace to rest. It's a matter of balance.
These stitch diagram, along with all other #whimsicalwednesday and #smallspacesunday stitch diagrams, can also be found on a Pinterest board here.
Be sure to follow whimsicalstitch.com on Facebook, Pinterest, Instagram, and Twitter.
If you like what you see on this blog, want to learn some very creative decorative stitches, and how to put them all together, whimsicalstitch.com has a book for you! Mary’s Whimsical Stitches is a contemporary how-to collection of more than 250 stitches for stitchers regardless of skill level. The book includes updated and sequenced diagrams from this blog, all-new stitches, and a chapter on the basics of needlepoint. For more information, visit here.
whimsicalstitch.com also sells Stitch Guides and Stitch Concepts for Melissa Shirley Designs, Zecca Designs, Sandra Gilmore, Purple Palm, Maggie, and Penny MacLeod, and many more. Click here to see the newest guides and click here to see the entire collection.
I hope you have the perfect spot for this stitch! Please enjoy! Have a wonderful #whimsicalwednesday!
A Note about Diagrams
I use color in diagrams to make them as clear as possible. The primary function of different colored lines is to illustrate a stitch sequence. For example, layering of colors demonstrates you add them in that order. They can also provide ideas on how to integrate additional threads (one line for each color). Or, you can use the same thread for all color lines. That's where I encourage you to use your imagination for the space you are stitching!