It Takes A Village

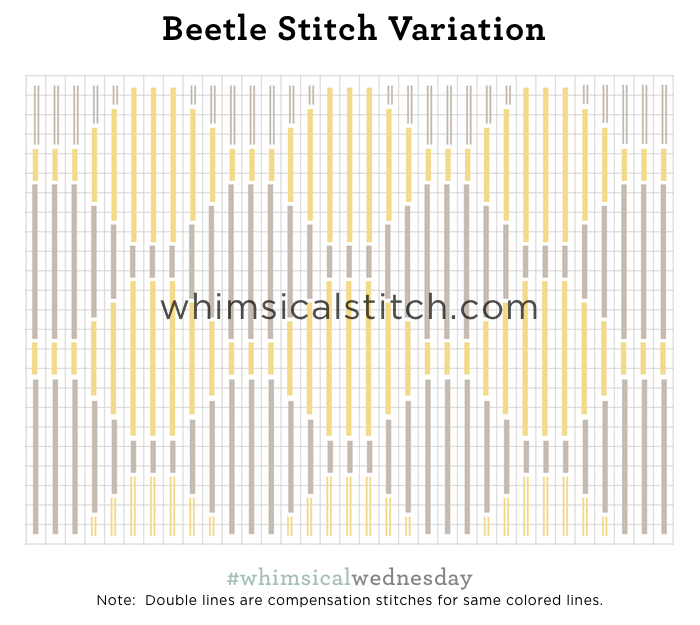
While I already knew this stitch when it was presented to me in a workshop, it still surprised me.  It's another stunning example of why one shouldn't associate a stitch with a single theme...or thread combo.  Lastly, I hope you aren't tired of the Beetle Stitch yet because today is another riff on it.  What differentiates the Beetle Stitch this week is its application and the thread combos.  Let's start with the stitched sample.

It combines Burmilana and Fuzzy Stuff and I absolutely love it.  I was so pleasantly surprised to see this combination because, up to that point, I had always considered the Beetle Stitch as a background stitch and I had always associated Fuzzy Stuff with random French Knots or random long stitches.  Due to the size of the Polar Bear, the actual stitch sequence is a little taller than versions I've shared previously.

This stitch diagram, along with all other #whimsicalwednesday and #smallspacesunday stitch diagrams, can also be found on a Pinterest board here.

Be sure to follow whimsicalstitch.com on FacebookPinterestInstagram, and Twitter.

If you like what you see on this blog, want to learn some very creative decorative stitches, and how to put them all together, whimsicalstitch.com sells stitch guides for seasonal Melissa Shirley designs.  27 guides are currently available and more are in the pipeline.

Enjoy!

Still Say Yes!

Say yes to today's TBT, the Nobuko Stitch.

It's a wonderful symmetrical stitch with oodles of variations.  It's great for many areas.  The stitched examples happen to be from greenery.  The first example on Instagram is from a leaf (Alternating Nobuko) which aligns with the original post.  

I included a second example just for fun.  It's from a tree and uses Double Alternating Nobuko.  I included that to illustrate just the beginning of the possibilities with this stitch.

The original Nobuko diagram, along with all other #whimsicalwednesday and #smallspacesunday stitch diagrams, can be found on a Pinterest board here.

Be sure to follow whimsicalstitch.com on FacebookPinterestInstagram, and Twitter.

If you like what you see on this blog, want to learn some very creative decorative stitches, and how to put them all together, whimsicalstitch.com sells stitch guides for Melissa Shirley Designs and Zecca Designs.  27 guides are currently available and more are in the pipeline.

Enjoy!

Wheeeeee!

Today's stitch is the Slide Stitch.  There are so many ways to play with this one.  Let's start with the base concept.

It combines an oblique and a diagonal stitch.  The above diagram illustrates how easy it is to flip directions as necessary.  It looks great either way.  As mentioned last week, I like to combine related color values in the same thread.  Depending on the animal, there may be an occasion to add a metallic.  A great example is a bird wing.

The next version doesn't skip a row and adds an angle.

You can also skip a row with this pattern.  If you don't skip a row, I strongly suggest you alternate thread weights.  The diagram on the right illustrates that concept.  Use a lightweight thread for the gray lines and a heavier thread for the colored lines.  Feel free to add metallics for the single stitches.

These stitch diagrams, along with all other #whimsicalwednesday and #smallspacesunday stitch diagrams, can also be found on a Pinterest board here.

Be sure to follow whimsicalstitch.com on FacebookPinterestInstagram, and Twitter.

If you like what you see on this blog, want to learn some very creative decorative stitches, and how to put them all together, whimsicalstitch.com sells stitch guides for seasonal Melissa Shirley designs.  27 guides are currently available and more are in the pipeline.

Enjoy!

Fish Sticks

I'm not going to bore you with how long it took me to find this week's stitch.  The moral of the story is to not always associate certain stitches with specific themes.  Meaning, all of these stitches are great for animals but they are great for many other areas.  And vice versa.

Case in point.  I first used this stitch on a sailboat on Emma Williams Rooftops.  Not an animal in sight on that piece.  But...I saw a picture of the same stitch on a fish this morning and voila!  We have a #smallspacesunday.  And it's perfect...absolutely perfect.

And I have not a single clue as to its name.  And that's okay.  I present the Fish Stitch.

Fish Stitch.jpg

This diagram is slightly different from other #whimsicalwednesday diagrams to provide clarity on the steps (left side of diagram) and the compensation stitches (right side of diagram).  The core stitch is up four rows and over two rows.  Always start four rows down from the top!  After you create the first row of stitches, each subsequent horizontal row of stitches overlaps the previous row by a single row.  The compensation stitches are a tiny bit tricky because their angle will rarely match the angle of adjacent stitches.  

The thread combinations are endless.  The diagram is in two colors for clarity.  On the Emma Williams sailboat, I used Silk Lame and Fyre Werks (shown here on Instagram).  The soon to be famous fish (stitch sample can be found here) used a single thread, Silk Lame Braid.  It really depends on the area you are stitching. I hope you have the perfect space for this stitch, whether it is a fish or something else.  More importantly, I hope you enjoy it.

This stitch diagram, along with all other #whimsicalwednesday and #smallspacesunday stitch diagrams, can also be found on a Pinterest board here.

Be sure to follow whimsicalstitch.com on FacebookPinterestInstagram, and Twitter.

If you like what you see on this blog, want to learn some very creative decorative stitches, and how to put them all together, whimsicalstitch.com sells stitch guides for seasonal Melissa Shirley designs.  27 guides are currently available and more are in the pipeline.

Enjoy!

Oui! Oui! Oui!

It's a very excited title because there are three stitches today.  All of them are related but each provides a different look and all work well for animals.  The common theme is alternating stitches over two and four rows.  And you can play with threads!

The first is the Parisian stitch.

Like the Brick Stitch works for a small animal, this works really well for a larger animal.  The stitched sample on Instagram is a version of the Parisian stitch above, but with two threads.

The next variation is a great opportunity to add a contrasting thread.

I really like this variation.  For an animal, I would use the same type of thread for both lines.  However, I would use a complementary color for the second thread, in a slightly lighter or darker value than the first thread.  

The last stitch isn't a Parisian stitch.  However, as I created the diagrams above, this emerged as another way to play with stitches over four rows.  I like the scale.

These stitch diagrams, along with all other #whimsicalwednesday and #smallspacesunday stitch diagrams, can also be found on a Pinterest board here.

Be sure to follow whimsicalstitch.com on FacebookPinterestInstagram, and Twitter.

If you like what you see on this blog, want to learn some very creative decorative stitches, and how to put them all together, whimsicalstitch.com sells stitch guides for seasonal Melissa Shirley designs.  27 guides are currently available and more are in the pipeline.

Enjoy!

Spread Your Wings and Fly!

It is highly likely you already know that leaf stitches make fabulous stitches for birds.  While there are a ton of leaf stitches, I selected two for you.

The first is what I consider a classic leaf stitch and works beautifully on the chest of a feathered friend.    

It's elegant and dramatic.  A lightly overdyed silk or wool works well here.  Pair it with a matching solid colored silk or wool for the face and you are off to the races.

The next stitch is a smaller leaf stitch, perfect for a wing.  It's illustrated in all the possible angles, showing how you can emphasize the direction of a wing.

For a lighter touch, add an empty row in between leaves.  This is a great way to show off the shading.  You can also take it one step further and add a sparkly accent, such as a bead. 

These stitch diagrams, along with all other #whimsicalwednesday and #smallspacesunday stitch diagrams, can also be found on a Pinterest board here.

Be sure to follow whimsicalstitch.com on FacebookPinterestInstagram, and Twitter.

If you like what you see on this blog, want to learn some very creative decorative stitches, and how to put them all together, whimsicalstitch.com sells stitch guides for seasonal Melissa Shirley designs.  27 guides are currently available and more are in the pipeline.

Enjoy!

A Menagerie!

Today's #smallspacesunday is pretty straightforward.  The stitches below have been covered on previous #smallspacesundays but are especially appropriate for animals, so I'm resharing here.

The first is Encroaching Gobelin, perfect for almost any animal, especially a small one, because of its compact size, smoothness, and ability to change directions.

The next stitch is one of my favorites.  While the Cushion Stitch is more complex, it makes a great wing or body stitch as it has a bit of texture.

Brick Stitch, especially over two rows is perfect for a small rabbit, duck, or squirrel.  Don't forget to switch the direction to horizontal if the animal isn't sitting up.  The Brick Stitch is also scalable.  For a larger space, go over four rows, instead of two as diagramed below.  

The Upright Cross is an all-purpose small space stitch for any animal.

These stitch diagrams, along with all other #whimsicalwednesday and #smallspacesunday stitch diagrams, can also be found on a Pinterest board here.

Be sure to follow whimsicalstitch.com on FacebookPinterestInstagram, and Twitter.

If you like what you see on this blog, want to learn some very creative decorative stitches, and how to put them all together, whimsicalstitch.com sells stitch guides for seasonal Melissa Shirley designs.  27 guides are currently available and more are in the pipeline.

Enjoy!

Nothing Like a Fur Coat in August

I'm sure all of our beloved four-legged friends would love to not have fur coats right about now, so let's honor them by talking about stitches that are perfect for animals!  The month of August is dedicated to stitches for animals.  

Before I share today's stitch, I have a confession.  While I agree there are no true rules for needlepoint, I admit I have a very strong opinion about stitches for anything with a face.  I truly believe Plain Needlepoint is the way to go with all faces, whether they are human or animal.  I can and do fun body stitches, but I believe the face needs to represent the animal's (or person's) face, with all the shading that conveys its personality and expression.

The best examples are Vicky Sawyer's animals.  She has back stories for all of her paintings and she is very particular about what personality or emotion her animals are expressing.  You can see exasperation, joy, shyness, and many other emotions in the animals' faces.  Take a look next time before you begin stitching.  It may make you reconsider how you approach their faces.

Okay, with that aside, let's get to the good stuff. Today's stitch offers two versions of a tied Gobelin stitch.   These stitches are great for chests, wings, or legs, especially when you want to add a directional element.

The first is a narrow version.

And the second is a wider version. 

For animals, my instinct is to use two matte threads with similar color values.  A few plies of Lorikeet (a gently overdyed stranded wool) with a solid colored single ply thread would make a great combination.  For certain areas, such as bird wings, the yellow line could be a lightweight metallic.  This is where Kreinik stands out, as they offer (at least) four different weights.  The Kreinik metallics also add a small textures and the thread retains its "round" shape.  

This stitch also makes great greenery.  The stitched sample on Instagram is a bush from a soon to be released Melissa Shirley piece.

These stitch diagrams, along with all other #whimsicalwednesday and #smallspacesunday stitch diagrams, can also be found on a Pinterest board here.

Be sure to follow whimsicalstitch.com on FacebookPinterestInstagram, and Twitter.

If you like what you see on this blog, want to learn some very creative decorative stitches, and how to put them all together, whimsicalstitch.com sells stitch guides for seasonal Melissa Shirley designs.  27 guides are currently available and more are in the pipeline.

Enjoy!

Skip a Row and...

...amazing things happen.

Today's stitch is a variation of Alternating Cashmere.  Examples of a small and large Alternating Cashmere are included here and here.  Today's version is different because a row is skipped between the individual rectangles.  By doing so, a whole new world opens up.

Click on image to see on whimsicalstitch.com's Pinterest account. Visit pinterest.com/whimsicalstitch/whimsicalwednesday for a library of all #whimsicalwednesday and #smallspacesunday stitch diagrams.

Click on image to see on whimsicalstitch.com's Pinterest account. Visit pinterest.com/whimsicalstitch/whimsicalwednesday for a library of all #whimsicalwednesday and #smallspacesunday stitch diagrams.

Click on image to see on whimsicalstitch.com's Instagram account. Visit instagram.com/whimsicalstitch to see a library of stitched samples for select #whimsicalwednesday and #smallspacesunday stitch diagrams.

Click on image to see on whimsicalstitch.com's Instagram account. Visit instagram.com/whimsicalstitch to see a library of stitched samples for select #whimsicalwednesday and #smallspacesunday stitch diagrams.

In the example, the cashmere rectangle is 3X5 rows.  When you skip the row in between the rectangles, fill that row with no more than the smallest dimension of the rectangle and center it against the adjacent edge of the rectangle (in this case, three rows).  This creates a 2X2 square to have fun with!  In the diagram above, and on the stitched sample on Instagram, I filled the square with a Smyrna Cross.  

You could fill it with beads, a single bead on the vertical over the center hole, or more Plain Needlepoint in a contrasting color.   It is an exceptionally elegant and fun stitch.

These stitch diagrams, along with all other #whimsicalwednesday and #smallspacesunday stitch diagrams, can also be found on a Pinterest board here. Be sure to follow whimsicalstitch.com on FacebookPinterestInstagram, and Twitter.

If you like what you see on this blog, there's more: Mary’s Whimsical Stitches Volume 1 is a contemporary how-to collection of more than 250 stitches for stitchers regardless of skill level. The book includes updated and sequenced diagrams from this blog, all-new stitches, and a chapter on the basics of needlepoint; Mary’s Whimsical Stitches Volume 2 features chapters on Balanced, Beading, Diagonal, Layered, Oblique, Small, and Straight stitches.

Also, you can download The Essentials, a free guide covering basic needlepoint stitches and stitch compensation techniques along with new top-line information on needlepoint materials and tools, how to handle threads, and other helpful needlepoint resources.

whimsicalstitch.com also sells Stitch Guides and Stitch Concepts for Melissa Shirley Designs, Zecca DesignsSandra Gilmore, Purple Palm, Maggie, and Penny MacLeod, and many more. Click here to see the newest guides and click here to see the entire collection.

I hope you have the perfect spot for this stitch! Please enjoy! Have a wonderful #whimsicalwednesday!

A Note about Diagrams
I use color in diagrams to make them as clear as possible.  The primary function of different colored lines is to illustrate a stitch sequence.  For example, layering of colors demonstrates you add them in that order.  They can also provide ideas on how to integrate additional threads (one line for each color).  Or, you can use the same thread for all color lines.  That's where I encourage you to use your imagination for the space you are stitching!

Chopsticks!

I found this little gem in Carolyn Hedge Baird's Teeny Tiny Needlepoint Stitches.  I'm having a blast with it of late.

The base stitch (the black lines) creates oblong diamonds.  Note the stitches are up (or down) two rows and over one.  Simply add an Upright Cross in the intersections and, voila!  Adorableness!

The second version integrates beads instead of Upright Crosses.  Frankly, more adorable.

I purposefully did not add the very small compensation stitches above the top row of beads and below the lower row of beads because the stitches are so small that their inclusion does not make a meaningful difference.

The stitched sample on Instagram illustrates the top version of this stitch on a roof on a Debbie Mumm cottage.  It was a quick and easy stitch.  


Frankly, due to the small nature of this stitch, I recommend a single strand thread such as Elegance, Pearl Cotton, Vineyard Silk, and the like.  If you use a stranded silk, cotton floss, or wool (as I did above), I recommend using a minimal number of strands to keep the elongated diamond well defined.

These stitch diagrams, along with other #whimsicalwednesday and #smallspacesunday stitch diagrams, can also be found on pinterest.com.

Be sure to follow whimsicalstitch.com on FacebookPinterestInstagram, and Twitter.

If you like what you see on this blog, want to learn some very creative decorative stitches, and how to put them all together, whimsicalstitch.com sells stitch guides for seasonal Melissa Shirley designs.  26 guides are currently available, including three new Debbie Mumm Santa guides and the blue version of the Shell Table.  More are in the pipeline.  In fact, I'm waiting for one finished piece to return from the finisher, so it will be any day now!

I hope you enjoy this stitch as much as I am!