So Many Odd Photos

I am often asked how I come up with my stitches. I travel down a few different paths in search of a stitch. For example, my camera roll has more than its fair share of rugs, fabric patterns (from chairs, naturally), and leaded windows from…wait for it…TV shows. (And, yes, I frequently receive an eye roll when I pause an episode for a photo). I, too, am inspired by all of the stitches we see in our internet travels and today’s stitch is a good example.

Click image to see the whimsicalstitch.com Stitch Library on pinterest.com. Includes all #whimsicalwednesday and #smallspacesunday stitch diagrams.

Click image to see #whimsicalwednesday and #smallspacesunday Stitched Sample Gallery on Instagram.

Today’s stitch is a hybrid of a cute background from a Zecca piece from @themarquissisters (scroll until you see the diamonds on the yellow background) and a stitch I saw for the briefest moment on my pinterest.com feed.

The stitched sample is me playing with two plies of Soie d’Alger (black lines) and Treasure Braid (yellow lines). These diamond groups are a little large, so I added some extra space between the groups to let each group shine. To minimize bringing threads up from under pre-existing threads, I added the split stitches in the center of each diamond first. I parked the Soie to the side, added the Treasure Braid for the yellow lines, and resumed the stitches on both sides of the split stitches to complete a single diamond. When I was done with all four diamonds of a group, I buried both threads behind the group of diamonds and moved on to the next diamond.

This stitch will make a fantastic background or wall covering. To take that one step further, and if you are a fan of more open spaces, consider adding the groups of (four) diamonds in a random pattern. They are large enough to stand alone and the randomness will add lightness to the background or wall, redirecting the eye to the main subject on the canvas. I am also already planning on using this stitch, as diagrammed, on clothing for a rather large Halloween personality. My current thoughts are to use a Petite Very Velvet for the black lines and Fyre Werks or a Kreinik ribbon for the yellow lines.

Click on image to see the whimsicalstitch.com Stitch Library on pinterest.com. Includes all #whimsicalwednesday and #smallspacesunday stitch diagrams.

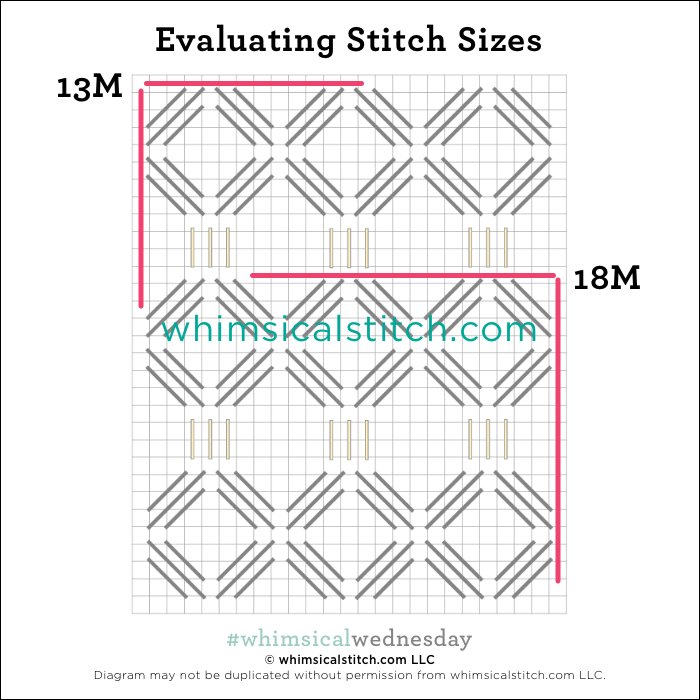
Just a reminder about how to evaluate stitches for size on your project.

As you are auditioning stitches (from any stitch source), count the number of canvas threads on the diagram that match your mesh size. And there you have what an inch of the stitch will look like. Evaluate that against the area where you plan to use the stitch and make your final decision. If you start integrating this step into your stitch selection process, you may be surprised at how many stitches you think are large are much smaller than you realize. (Or, in today’s case, the stitch is much larger than it looks.)

By (sometimes) including this step in my own process, I find I am now integrating much longer stitches than I ever thought I would. I used to think a stitch six rows long was super big. I have very much changed my tune, which has helped me expand my creativity, especially for large-space stitches.

Today’s stitch diagram, along with all other #whimsicalwednesday and #smallspacesunday stitch diagrams, can also be found on a Pinterest board here. Be sure to follow whimsicalstitch.com on FacebookPinterestInstagram, and Twitter.

If you like what you see on this blog, there's more. Mary’s Whimsical Stitches is a series of three books offering contemporary how-to collections of more than 250 stitches (in each volume) for all stitchers, regardless of skill level. All books include updated and sequenced diagrams from this blog plus a collection of all-new stitches from private lessons and other class projects. Visit here to find a needlepoint retailer that carries my books.

New to needlepoint or looking for a refresher? Please download a handy how-to guide covering basic needlepoint stitches and stitch compensation techniques along with new top-line information on needlepoint materials and tools, how to handle threads, and other helpful needlepoint resources.

whimsicalstitch.com also sells Stitch Guides and Stitch Concepts for Melissa Shirley Designs, Zecca DesignsSandra Gilmore, Purple Palm, Maggie, and Penny MacLeod, and many more. Click here to see the newest guides and click here to see the entire collection.

I hope you have the perfect spot for this stitch! Please enjoy! Have a wonderful #whimsicalwednesday!

A Note about Diagrams
I use color in diagrams to make them as clear as possible.  The primary function of different colored lines is to illustrate a stitch sequence.  For example, the layering of colors demonstrates you add them in that order.  They can also provide ideas on integrating additional threads (one line for each color).  Or, you can use the same thread for all color lines.  That's where I encourage you to use your imagination for the space you are stitching!

Split Decision

It’s kinda funny to me how vexing columns can be. Satin stitches or satin stitch variations (like last week) are great solutions. But I also enjoy mixing it up and challenging myself to find other approaches. Today’s stitch is a new favorite. As with most of my column stitches, it is quick, scalable, and cute.

Click image to see the whimsicalstitch.com Stitch Library on pinterest.com. Includes all #whimsicalwednesday and #smallspacesunday stitch diagrams.

Click image to see #whimsicalwednesday and #smallspacesunday Stitched Sample Gallery on Instagram.

The stitched sample is a Plum Stitchery holiday round from my rather large (and unfinished) stash of ornament canvases. I used one strand of white Floche for the yellow lines and blue Fyre Werks for the black lines. Full disclosure…that is how the canvas was painted, so I was highly motivated to find a column stitch that fit the white space between the blue lines.

The original plan was to do nothing more than the horizontal stitches across four rows for this column but I realized by the fourth stitch I was going to be bored out of my bloody mind, so I split the stitch into two halves for the next block of stitches. And, poof, we have a stitch. And you can make the yellow lines as wide as you need, as long as it’s an even number of rows wide (so you can evenly divide the split rows).

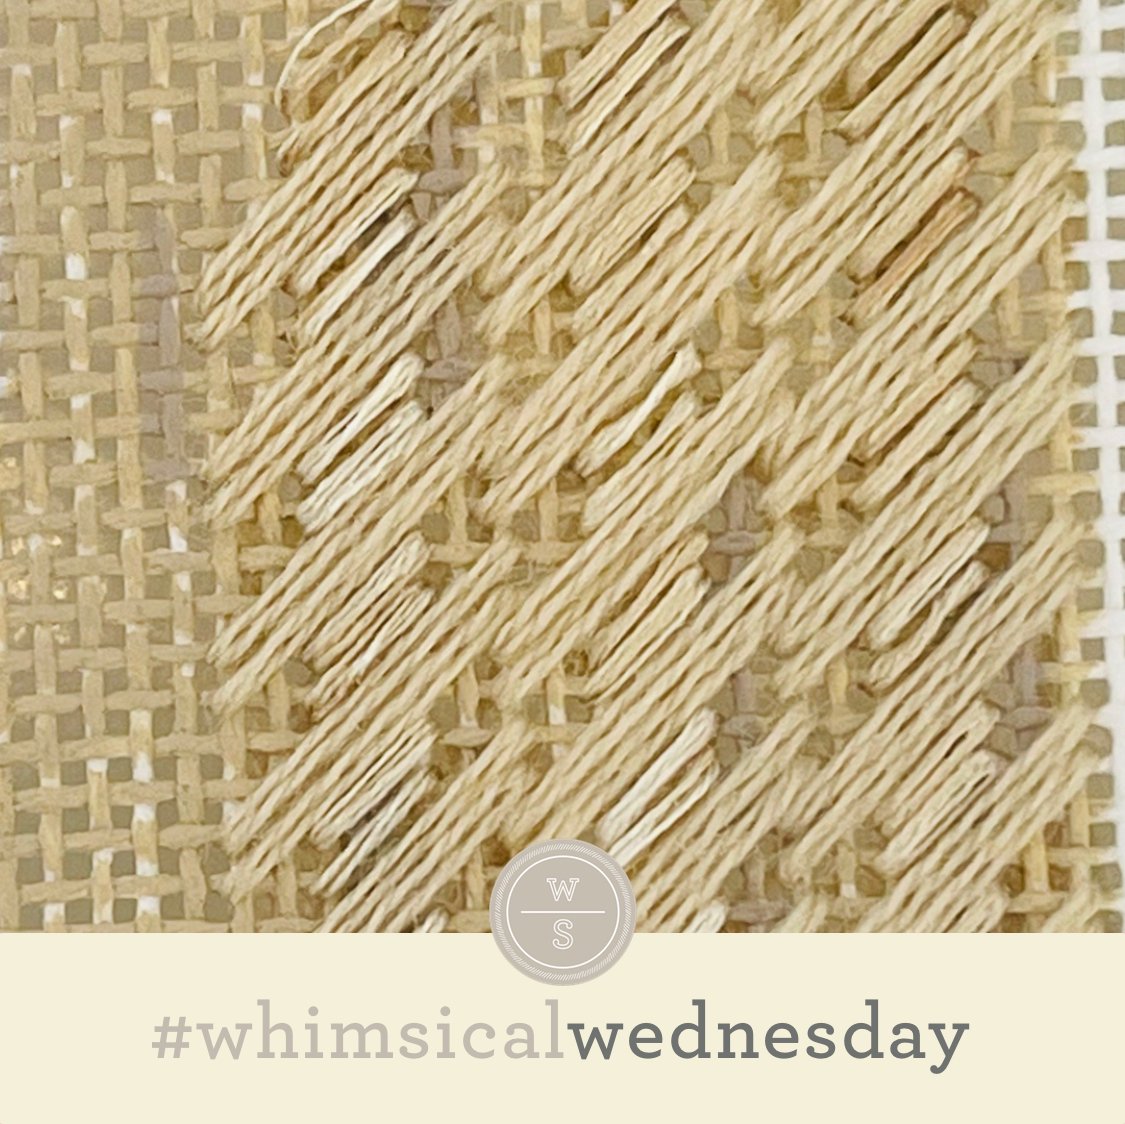
The stitched sample is wallpaper behind a fireplace. This stitch will make a beautiful bedspread with Alpaca (yellow lines) and a contrasting single strand silk, such as Vineyard Silk, for the black lines. I am also looking forward to using it for a shirt with Soie D'Alger (three plies for 18M and five plies for 13M) for the yellow lines and a Kreinik Metallic for the black lines.

Click on image to see the whimsicalstitch.com Stitch Library on pinterest.com. Includes all #whimsicalwednesday and #smallspacesunday stitch diagrams.

Just a reminder about how to evaluate stitches for size on your project.

As you are auditioning stitches (from any stitch source), count the number of canvas threads on the diagram that match your mesh size. And there you have what an inch of the stitch will look like. Evaluate that against the area where you plan to use the stitch and make your final decision. If you start integrating this step into your stitch selection process, you may be surprised at how many stitches you think are large are much smaller than you realize. (Or, in today’s case, the stitch is much larger than it looks.)

By (sometimes) including this step in my own process, I find I am now integrating much longer stitches than I ever thought I would. I used to think a stitch six rows long was super big. I have very much changed my tune, which has helped me expand my creativity, especially for large-space stitches.

Today’s stitch diagram, along with all other #whimsicalwednesday and #smallspacesunday stitch diagrams, can also be found on a Pinterest board here. Be sure to follow whimsicalstitch.com on FacebookPinterestInstagram, and Twitter.

If you like what you see on this blog, there's more. Mary’s Whimsical Stitches is a series of three books offering contemporary how-to collections of more than 250 stitches (in each volume) for all stitchers, regardless of skill level. All books include updated and sequenced diagrams from this blog plus a collection of all-new stitches from private lessons and other class projects. Visit here to find a needlepoint retailer that carries my books.

New to needlepoint or looking for a refresher? Please download a handy how-to guide covering basic needlepoint stitches and stitch compensation techniques along with new top-line information on needlepoint materials and tools, how to handle threads, and other helpful needlepoint resources.

whimsicalstitch.com also sells Stitch Guides and Stitch Concepts for Melissa Shirley Designs, Zecca DesignsSandra Gilmore, Purple Palm, Maggie, and Penny MacLeod, and many more. Click here to see the newest guides and click here to see the entire collection.

I hope you have the perfect spot for this stitch! Please enjoy! Have a wonderful #whimsicalwednesday!

A Note about Diagrams
I use color in diagrams to make them as clear as possible.  The primary function of different colored lines is to illustrate a stitch sequence.  For example, the layering of colors demonstrates you add them in that order.  They can also provide ideas on integrating additional threads (one line for each color).  Or, you can use the same thread for all color lines.  That's where I encourage you to use your imagination for the space you are stitching!

Little Miss Stitch

Was very excited to throw my opinion into the mix on the background of a certain someone’s stocking on Instagram. (I’m looking at you, @millennial_needlepointer.) In unsurprising news, the stitch involves diamonds.

Click image to see the whimsicalstitch.com Stitch Library on pinterest.com. Includes all #whimsicalwednesday and #smallspacesunday stitch diagrams.

Click image to see #whimsicalwednesday and #smallspacesunday Stitched Sample Gallery on Instagram.

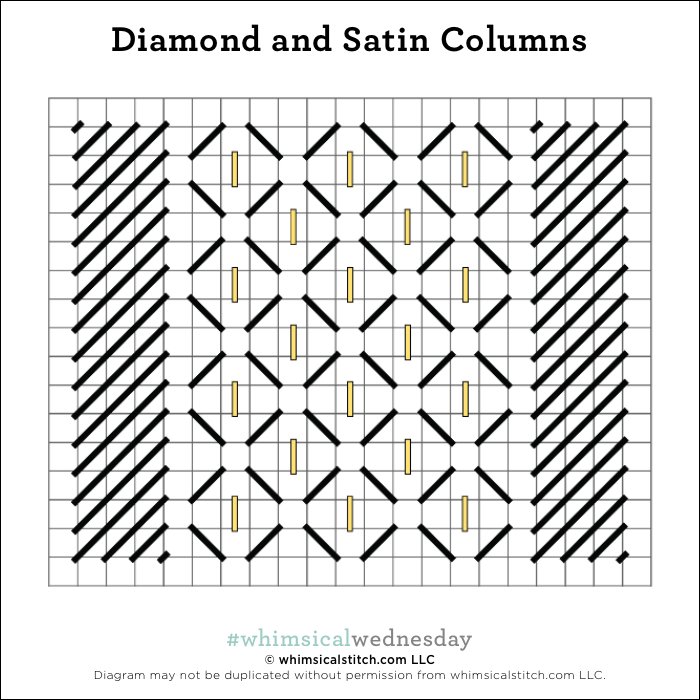
Alexandra used a single strand of Watercolours for the black lines and a Silk Lame for the yellow lines on 13M. It’s almost full coverage but open enough to let the nutcracker and other items on the stocking to stand out, as they should.

The satin stitch over four rows can be adjusted to almost any width that you want for your piece. I’m working with another customer with a version of today’s stitch with columns three rows wide and a far more open stitch in between the columns. (I’ll be sharing that in the weeks ahead.) The diamonds are fun as they are illustrated. There are quite a few alternatives for the center that should fit any mood.

Consider changing the color of the satin columns for a more dramatic stitch for a pair of pants. I would love to see black silk floss used for the satin columns and gray silk floss used for the diamonds with a gray metallic for the straight lines. I want to play with this for the exterior walls of a house with Vineyard Silk for the black lines and an Upright Cross in the center of the diamonds with Flair.

Click on image to see the whimsicalstitch.com Stitch Library on pinterest.com. Includes all #whimsicalwednesday and #smallspacesunday stitch diagrams.

Just a reminder about how to evaluate stitches for size on your project.

As you are auditioning stitches (from any stitch source), count the number of canvas threads on the diagram that match your mesh size. And there you have what an inch of the stitch will look like. Evaluate that against the area where you plan to use the stitch and make your final decision. If you start integrating this step into your stitch selection process, you may be surprised at how many stitches you think are large are much smaller than you realize. (Or, in today’s case, the stitch is much larger than it looks.)

By (sometimes) including this step in my own process, I find I am now integrating much longer stitches than I ever thought I would. I used to think a stitch six rows long was super big. I have very much changed my tune, which has helped me expand my creativity, especially for large-space stitches.

Today’s stitch diagram, along with all other #whimsicalwednesday and #smallspacesunday stitch diagrams, can also be found on a Pinterest board here. Be sure to follow whimsicalstitch.com on FacebookPinterestInstagram, and Twitter.

If you like what you see on this blog, there's more. Mary’s Whimsical Stitches is a series of three books offering contemporary how-to collections of more than 250 stitches (in each volume) for all stitchers, regardless of skill level. All books include updated and sequenced diagrams from this blog plus a collection of all-new stitches from private lessons and other class projects. Visit here to find a needlepoint retailer that carries my books.

New to needlepoint or looking for a refresher? Please download a handy how-to guide covering basic needlepoint stitches and stitch compensation techniques along with new top-line information on needlepoint materials and tools, how to handle threads, and other helpful needlepoint resources.

whimsicalstitch.com also sells Stitch Guides and Stitch Concepts for Melissa Shirley Designs, Zecca DesignsSandra Gilmore, Purple Palm, Maggie, and Penny MacLeod, and many more. Click here to see the newest guides and click here to see the entire collection.

I hope you have the perfect spot for this stitch! Please enjoy! Have a wonderful #whimsicalwednesday!

A Note about Diagrams
I use color in diagrams to make them as clear as possible.  The primary function of different colored lines is to illustrate a stitch sequence.  For example, the layering of colors demonstrates you add them in that order.  They can also provide ideas on integrating additional threads (one line for each color).  Or, you can use the same thread for all color lines.  That's where I encourage you to use your imagination for the space you are stitching!

Happy Trails

As you may know by now, I love diamond stitches created from all angles, including straight stitches, diagonal stitches, or tent stitches…as beautifully illustrated by today’s stitch.

Click image to see the whimsicalstitch.com Stitch Library on pinterest.com. Includes all #whimsicalwednesday and #smallspacesunday stitch diagrams.

Click image to see #whimsicalwednesday and #smallspacesunday Stitched Sample Gallery on Instagram.

The stitched sample is a background from a sweet and whimsical Halloween piece, Agatha Hated Brooms, from the Plum Stitchery. It uses three plies of Soie d’Alger (black lines) and Petite Silk Lame (yellow lines).

I love the delicateness of this stitch and how it can stand alone, yet it also recedes into the background, allowing Agatha and her balloon to take center stage. Clearly, it makes a great background (or wall) stitch. It would also make a great floor, tabletop, or bedspread with two different colors of thread. I would love to see it in all metallic for a floor. If you want to really dress it up, consider adding beads, whether Traditional Beading or Brick Beading to the empty diamond centers. That would make one gorgeous and showstopping vase. (Fun fact. The brick beading link takes you back to the very first #whimsicalwednesday blog post.)

Click on image to see the whimsicalstitch.com Stitch Library on pinterest.com. Includes all #whimsicalwednesday and #smallspacesunday stitch diagrams.

Just a reminder about how to evaluate stitches for size on your project.

As you are auditioning stitches (from any stitch source), count the number of canvas threads on the diagram that match your mesh size. And there you have what an inch of the stitch will look like. Evaluate that against the area where you plan to use the stitch and make your final decision. If you start integrating this step into your stitch selection process, you may be surprised at how many stitches you think are large are much smaller than you realize. (Or, in today’s case, the stitch is much larger than it looks.)

By (sometimes) including this step in my own process, I find I am now integrating much longer stitches than I ever thought I would. I used to think a stitch six rows long was super big. I have very much changed my tune, which has helped me expand my creativity, especially for large-space stitches.

Today’s stitch diagram, along with all other #whimsicalwednesday and #smallspacesunday stitch diagrams, can also be found on a Pinterest board here. Be sure to follow whimsicalstitch.com on FacebookPinterestInstagram, and Twitter.

If you like what you see on this blog, there's more. Mary’s Whimsical Stitches is a series of three books offering contemporary how-to collections of more than 250 stitches (in each volume) for all stitchers, regardless of skill level. All books include updated and sequenced diagrams from this blog plus a collection of all-new stitches from private lessons and other class projects. Visit here to find a needlepoint retailer that carries my books.

New to needlepoint or looking for a refresher? Please download a handy how-to guide covering basic needlepoint stitches and stitch compensation techniques along with new top-line information on needlepoint materials and tools, how to handle threads, and other helpful needlepoint resources.

whimsicalstitch.com also sells Stitch Guides and Stitch Concepts for Melissa Shirley Designs, Zecca DesignsSandra Gilmore, Purple Palm, Maggie, and Penny MacLeod, and many more. Click here to see the newest guides and click here to see the entire collection.

I hope you have the perfect spot for this stitch! Please enjoy! Have a wonderful #whimsicalwednesday!

A Note about Diagrams
I use color in diagrams to make them as clear as possible.  The primary function of different colored lines is to illustrate a stitch sequence.  For example, the layering of colors demonstrates you add them in that order.  They can also provide ideas on integrating additional threads (one line for each color).  Or, you can use the same thread for all color lines.  That's where I encourage you to use your imagination for the space you are stitching!

Taking Direction

Today’s stitch is a fun way to add direction to an area. The fact it is a quick stitch is a bonus!

Click image to see the whimsicalstitch.com Stitch Library on pinterest.com. Includes all #whimsicalwednesday and #smallspacesunday stitch diagrams.

Click image to see #whimsicalwednesday and #smallspacesunday Stitched Sample Gallery on Instagram.

The stitched sample is me playing with two strands of Burmilana (black lines) and split Straw Silk (yellow lines) for a tree trunk on 18M.

Yes, you can split Straw Silk! Before you begin, find the center of the strand and gently pull it apart to create two intact strands. If it doesn’t easily split, using the tip of a needle will help get the split started. Of course, a full strand would have worked here but I like the lighter touch of the split strand on 18M. I love a full strand for random stitches on 18M and 13M. And, despite my love of laying tools, I love to integrate the natural twist of Straw Silk in random stitches.

Back to the stitch! This is a great stitch for nature, such as a nearby mountain with two hues of single-strand silk. I would love to use it for bird wings with silk floss and overdyed ThreadWorx metallic. (I would use the mirror image of this stitch for the opposite wing.) It will make beautiful water with two related hues of Petite Silk Lame or size 8 Kreinik (on 13M) or size 4 Kreinik (on 18M).

Consider filling the empty spaces with two tent stitches in a contrasting fiber OR making the yellow lines five rows wide for a full coverage stitch. You can also make each group of stitches larger than two stitches. You can add more height to this stitch by increasing the groups to four plus stitches.

Click on image to see the whimsicalstitch.com Stitch Library on pinterest.com. Includes all #whimsicalwednesday and #smallspacesunday stitch diagrams.

Just a reminder about how to evaluate stitches for size on your project.

As you are auditioning stitches (from any stitch source), count the number of canvas threads on the diagram that match your mesh size. And there you have what an inch of the stitch will look like. Evaluate that against the area where you plan to use the stitch and make your final decision. If you start integrating this step into your stitch selection process, you may be surprised at how many stitches you think are large are much smaller than you realize. (Or, in today’s case, the stitch is much larger than it looks.)

By (sometimes) including this step in my own process, I find I am now integrating much longer stitches than I ever thought I would. I used to think a stitch six rows long was super big. I have very much changed my tune, which has helped me expand my creativity, especially for large-space stitches.

Today’s stitch diagram, along with all other #whimsicalwednesday and #smallspacesunday stitch diagrams, can also be found on a Pinterest board here. Be sure to follow whimsicalstitch.com on FacebookPinterestInstagram, and Twitter.

If you like what you see on this blog, there's more. Mary’s Whimsical Stitches is a series of three books offering contemporary how-to collections of more than 250 stitches (in each volume) for all stitchers, regardless of skill level. All books include updated and sequenced diagrams from this blog plus a collection of all-new stitches from private lessons and other class projects. Visit here to find a needlepoint retailer that carries my books.

New to needlepoint or looking for a refresher? Please download a handy how-to guide covering basic needlepoint stitches and stitch compensation techniques along with new top-line information on needlepoint materials and tools, how to handle threads, and other helpful needlepoint resources.

whimsicalstitch.com also sells Stitch Guides and Stitch Concepts for Melissa Shirley Designs, Zecca DesignsSandra Gilmore, Purple Palm, Maggie, and Penny MacLeod, and many more. Click here to see the newest guides and click here to see the entire collection.

I hope you have the perfect spot for this stitch! Please enjoy! Have a wonderful #whimsicalwednesday!

A Note about Diagrams
I use color in diagrams to make them as clear as possible.  The primary function of different colored lines is to illustrate a stitch sequence.  For example, the layering of colors demonstrates you add them in that order.  They can also provide ideas on integrating additional threads (one line for each color).  Or, you can use the same thread for all color lines.  That's where I encourage you to use your imagination for the space you are stitching!
So Many Ways to Play

Today’s stitch is a lovely reminder of how easy it is to create variations from the core repeat pattern of virtually any stitch.

Click image to see the whimsicalstitch.com Stitch Library on pinterest.com. Includes all #whimsicalwednesday and #smallspacesunday stitch diagrams.

Click image to see #whimsicalwednesday and #smallspacesunday Stitched Sample Gallery on Instagram.

I love playing with variations. Flipping a horizontal diagram into a vertical design is a quick and easy switch. Creating a mirror image of a diagonal pattern adds lovely symmetry to opposite sides of a flower or a sail. Taking a pattern and adding a skipped row can create, well, magic.

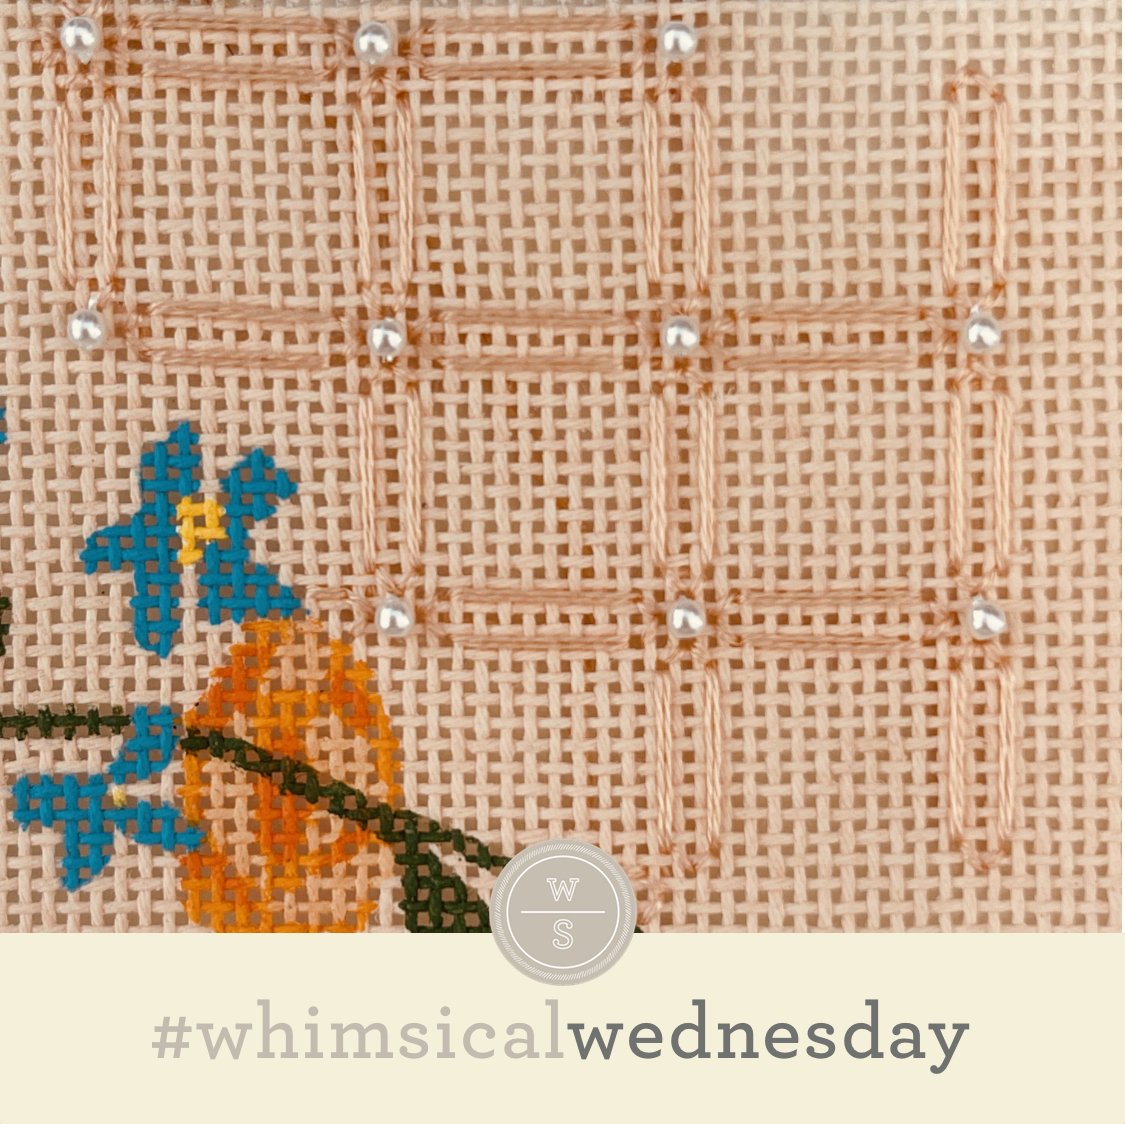
Today I cobbled together a grid by inserting horizontal rows into vertical columns and I love the results. I hope you recognize the stitch that inspired today’s stitch. (If not, no worries, here’s the link.) The stitched sample is a background on a sweet Madeline Elizabeth piece I picked up recently. I used two plies of Splendor (black lines) and 2mm S&J Designs pearls (yellow circles).

Grids are great stitches for architectural elements such as floors, walls, or fences. For 18M, I would use silk floss or a lightweight metallic such as Petite Silk Lame or Kreinik Metallics Fine Braid (#8) for any of those and change the pearl to an Upright Cross or an X (with each diagonal stitch over two rows). I’m looking forward to using this for clothing with a heavier touch. This stitch would make a great Santa coat or a fun shirt with Vineyard Silk (black lines) and tiny buttons for the yellow circles.

Click on image to see the whimsicalstitch.com Stitch Library on pinterest.com. Includes all #whimsicalwednesday and #smallspacesunday stitch diagrams.

Just a reminder about how to evaluate stitches for size on your project.

As you are auditioning stitches (from any stitch source), count the number of canvas threads on the diagram that match your mesh size. And there you have what an inch of the stitch will look like. Evaluate that against the area where you plan to use the stitch and make your final decision. If you start integrating this step into your stitch selection process, you may be surprised at how many stitches you think are large are much smaller than you realize. (Or, in today’s case, the stitch is much larger than it looks.)

By (sometimes) including this step in my own process, I find I am now integrating much longer stitches than I ever thought I would. I used to think a stitch six rows long was super big. I have very much changed my tune, which has helped me expand my creativity, especially for large-space stitches.

Today’s stitch diagram, along with all other #whimsicalwednesday and #smallspacesunday stitch diagrams, can also be found on a Pinterest board here. Be sure to follow whimsicalstitch.com on FacebookPinterestInstagram, and Twitter.

If you like what you see on this blog, there's more. Mary’s Whimsical Stitches is a series of three books offering contemporary how-to collections of more than 250 stitches (in each volume) for all stitchers, regardless of skill level. All books include updated and sequenced diagrams from this blog plus a collection of all-new stitches from private lessons and other class projects. Visit here to find a needlepoint retailer that carries my books.

New to needlepoint or looking for a refresher? Please download a handy how-to guide covering basic needlepoint stitches and stitch compensation techniques along with new top-line information on needlepoint materials and tools, how to handle threads, and other helpful needlepoint resources.

whimsicalstitch.com also sells Stitch Guides and Stitch Concepts for Melissa Shirley Designs, Zecca DesignsSandra Gilmore, Purple Palm, Maggie, and Penny MacLeod, and many more. Click here to see the newest guides and click here to see the entire collection.

I hope you have the perfect spot for this stitch! Please enjoy! Have a wonderful #whimsicalwednesday!

A Note about Diagrams
I use color in diagrams to make them as clear as possible.  The primary function of different colored lines is to illustrate a stitch sequence.  For example, the layering of colors demonstrates you add them in that order.  They can also provide ideas on integrating additional threads (one line for each color).  Or, you can use the same thread for all color lines.  That's where I encourage you to use your imagination for the space you are stitching!