Skinny Fish

Today's stitch was an accident.  The original plan was a #stitchingsunday with this stitch.  It was only when I assembled this blog that I learned it was ever so slightly different.  Oops!  The silver lining is you now have another new stitch!

Click on image to see on whimsicalstitch.com's Pinterest account. Visit pinterest.com/whimsicalstitch/whimsicalwednesday for a library of all #whimsicalwednesday and #smallspacesunday stitch diagrams.

Click on image to see on whimsicalstitch.com's Pinterest account. Visit pinterest.com/whimsicalstitch/whimsicalwednesday for a library of all #whimsicalwednesday and #smallspacesunday stitch diagrams.

Click on image to see on whimsicalstitch.com's Instagram account. Visit instagram.com/whimsicalstitch to see a library of stitched samples for select #whimsicalwednesday and #smallspacesunday stitch diagrams.

Click on image to see on whimsicalstitch.com's Instagram account. Visit instagram.com/whimsicalstitch to see a library of stitched samples for select #whimsicalwednesday and #smallspacesunday stitch diagrams.

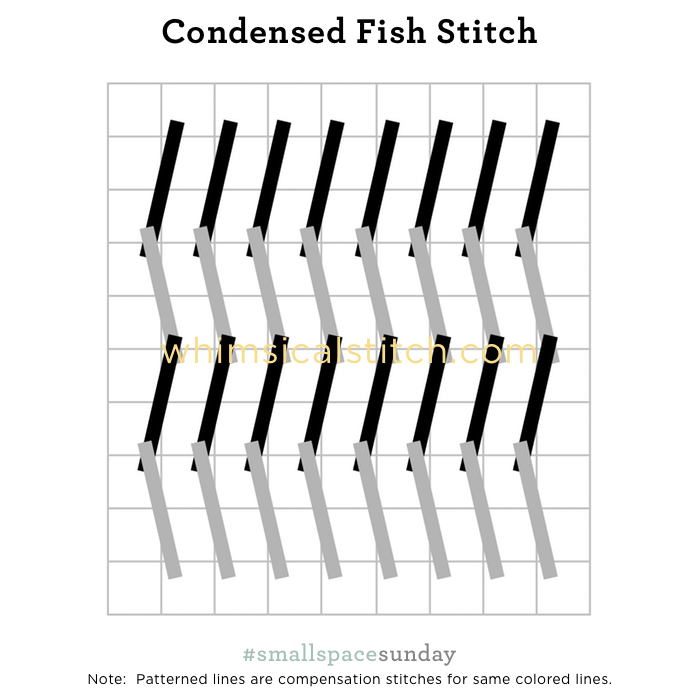
The stitched sample is another bird wing from a student in a recent embellishment class, using three plies of Splendor and Kreinik Metallics Fine Braid (#8).  Technically, this is a Herringbone stitch.  However, I don't see it that way because the alternating thread finishes draw my eye to horizontal columns of oblique stitches. 

This stitch is perfect for tall narrow spaces, such as fireplaces, tree trunks, (shirt or coat) arms, or stripes in wallpaper.  Some of those ideas are oddly specific, but isn't kinda cool to have ideas for some of those off the radar areas?  I also think it would be an adorable moon using two metallics with distinctly different finishes, such as Flair and Kreinik or Silk Lame and Entice.  Just some food for thought.

This stitch diagram, along with all other #whimsicalwednesday and #smallspacesunday stitch diagrams, can also be found on a Pinterest board here.

Be sure to follow whimsicalstitch.com on FacebookPinterestInstagram, and Twitter.

If you like what you see on this blog, want to learn some very creative decorative stitches, and how to put them all together, whimsicalstitch.com sells stitch guides and stitch concepts for Melissa Shirley Designs, Zecca Designs, and Patience Brewster. 81 guides are currently available, with 20 new Stitch Concepts just added! Click here to see the newest guides and click here to see the entire collection.

I hope you have the perfect spot for this stitch! Happy #smallspacesunday!

A Note about Diagrams
I use color in diagrams to make them as clear as possible.  The primary function of different colored lines is to illustrate a stitch sequence.  For example, layering of colors demonstrates you add them in that order.  They can also provide ideas on how to integrate additional threads (one line for each color).  Or, you can use the same thread for all color lines.  That's where I encourage you to use your imagination for the space you are stitching!

Herringbone, Gobelin, Whatever

The original pin for this stitch did not include a name.  When I first came across it on Pinterest, I thought it was a Gobelin stitch.  When I started to diagram it, I realized it is a Herringbone.  And that, my friends, is how you come up with a blog post title.

Unlike most stitches using a single thread, the sequence is critical.  The core single stitch is easy; it is over two rows and up three.  The graph below illustrates it three ways.

The layered effect of this stitch results from a consistent starting point, specifically the top (or the bottom) for every row.  In addition, to keep the integrity of the stitch intact, note the first stitch is a compensation stitch (the double aqua lines).  

Personally, I have no preference between starting from the bottom or top (or the far right or far left if you are doing this on a horizontal axis).  However, I strongly believe you should do one or the other and not do alternating.  It's a subtle difference but I prefer the consistent pattern presented by the top or bottom starting point.

I am not aware of any trick to make this easier.  It will involve tying off the thread at the end of every row and beginning the next row at the top (or bottom).  If the space is not overly large, you could drag the thread across the back to begin the next row, but that is not always the best solution as it can add bulk to the back of the canvas which can impact finishing, especially framing.

While I may not favor the "Alternating" sequence, that doesn't mean you shouldn't do it!  It could work on a basket or shrubbery stitch, where the alternating directions could enhance the woven appearance.

The stitched sample on Instagram is a small taste of the "starting from bottom" version.

This stitch diagram, along with all other #whimsicalwednesday and #smallspacesunday stitch diagrams, can also be found on a Pinterest board here.

Be sure to follow whimsicalstitch.com on FacebookPinterestInstagram, and Twitter.

If you like what you see on this blog, want to learn some very creative decorative stitches, and how to put them all together, whimsicalstitch.com sells stitch guides for Melissa Shirley Designs and Zecca Designs.  28 guides are currently available and more are in the pipeline.

Enjoy!