

This week moves to a slightly wider border, specifically five rows wide.
My go-to recommendation for borders this size is my 5X5 standard, the Split Square. Here, you alternate directions to create a column.
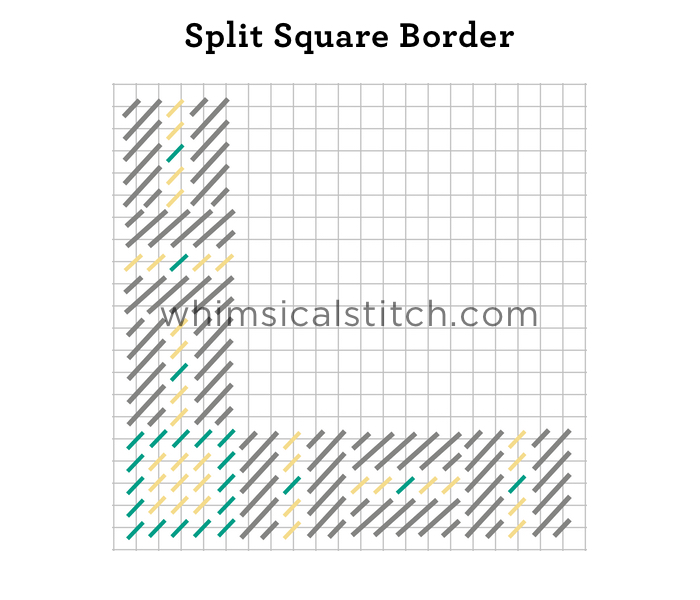
The bright green and yellow corner is a safeguard for you. By doing the four corners of the overall border separate from the overall border stitch, you avoid heartbreak if the row count (either horizontally or vertically or both) isn't divisible by five*.
This means each of the four columns (two horizontal and two vertical) of the border are separate items. I recommend you start each vertical column at the top and compensate at the bottom just above the corner. For each horizontal column, start at the left and compensate on the right hand side.
* It's lovely to think that any of us will take the time to count out the rows, both on the horizontal and the vertical. Typically (and honestly), I do not have the patience because I am so excited to be starting a new stitch or I am so over the piece that I just want to be done with it.
Case in point (and confession time): The perfectly matched border on my Red Cottage pillow was a freak of nature. I didn't count. I just started doing it without even thinking. I was very, very lucky. Remember, handpainted canvases are just that...handpainted. There will be variations between individual canvases of the same design. Sometimes that is a single row. And a single row in either direction would have changed that border completely. Hence, my advice for doing corners differently than the primary border stitch.
The diagram above is colored for clarity. You can mix colors, as illustrated, or use different threads with the same color value. Regardless of color, I typically use a matte thread for the two rectangles, such as Vineyard Silk or Silk & Ivory, along with a metallic thread for the center row. The center stitch of the center row is a way to add an accent, whether it is a bead or a different color thread. Doing the center row in one color and type thread provides a far less dramatic look.
These stitch diagrams, along with other #whimsicalwednesday and #smallspacesunday stitch diagrams, can also be found on www.pinterest.com/whimsicalstitch/whimsicalwednesday.
Be sure to follow whimsicalstitch.com on Facebook, Pinterest, Instagram, and Twitter.
If you like what you see on this blog, want to learn some very creative decorative stitches, and how to put them all together, whimsicalstitch.com sells stitch guides for seasonal Melissa Shirley designs. 20 guides are currently available and more are in the pipeline.
Enjoy!