

Rather, please do!
This month's post will focus on borders. I went through a border obsession several years ago, when I added a border (or two) to almost every canvas I stitched. An example is one of my favorite Halloween pillows from Melissa Shirley. The only border painted on it was the black border surrounding the witch. I added two borders on top of that. By the time the finisher was done, it had five borders. And I love all of them.
So, not the best planning in the world when it's time for a new theme month, that month begins with a #smallspacesunday, and the theme is borders.
I prevailed. :)
The first idea for your consideration is Elongated Crosses.
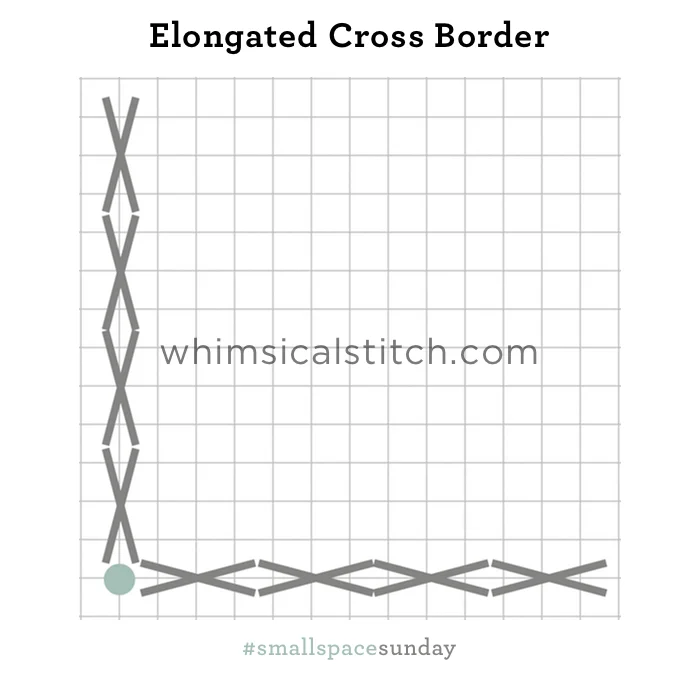
This stitch provides full coverage and a bit of texture, which helps define it as a border. It's almost deceiving that it is only over one row. The circle in the corner represents a bead, cross stitch, or a French Knot.
The next border is a version of the above stitch. I increased its length so I could add a contrasting stitch.

The contrast could be color or thread type. The stitched sample on Instagram is an example of this border and uses contrasting colors originating from the canvas. It's a great way to draw the viewer's eye to those areas of the stitched canvas.
The next over one border is the Greek Stitch. This one is interesting (to me) because I typically use Greek over a minimum of two rows, usually more. I scaled this stitch down for this border and love it.

Similar to the Open Step Diamond stitch (aka Herringbone stitch), this stitch must be started at the farthest end of a row. Each stitch overlaps the previous, so it is easiest to do it in one straight shot.
Your thread choice for any of the above borders is critical. In order to achieve a distinct stitch look over only one row, use very lightweight threads. My metallic thread suggestions for 18-mesh are Kreinik Metallics Very Fine Braid (#4), Petite Silk Lame, Neon Rays, Neon Rays+, or Shimmer Ribbon. Matte thread suggestions include 2-3 plies of your favorite floss or silk. (Add one additional ply for 13 mesh.) I do not recommend the heavier silks, such as Pepper Pot or Vineyard Vines. I love them, but think the coverage is too much for a one row border.
The last border for your consideration is beads. A single row border of beads is a very elegant and dramatic statement for the right piece. If you like the idea but not the execution, consider this.
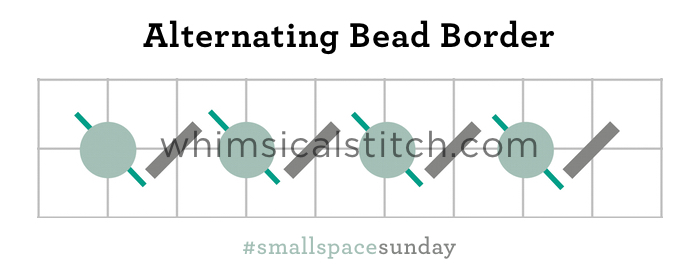
I recommend adding the Plain Needlepoint first, followed by the beading. As a gentle reminder, the bead is attached with beading thread in a stitch going in the opposite direction than the traditional tent stitch. This ensures the bead will be laying in the same direction as the other stitches.
These stitch diagrams, along with other #whimsicalwednesday and #smallspacesunday stitch diagrams, can also be found on www.pinterest.com/whimsicalstitch/whimsicalwednesday.
Be sure to follow whimsicalstitch.com on Facebook, Pinterest, Instagram, and Twitter.
If you like what you see on this blog, want to learn some very creative decorative stitches, and how to put them all together, whimsicalstitch.com sells stitch guides for seasonal Melissa Shirley designs. 20 guides are currently available and more are in the pipeline.
Enjoy!