Spread Your Wings and Fly!

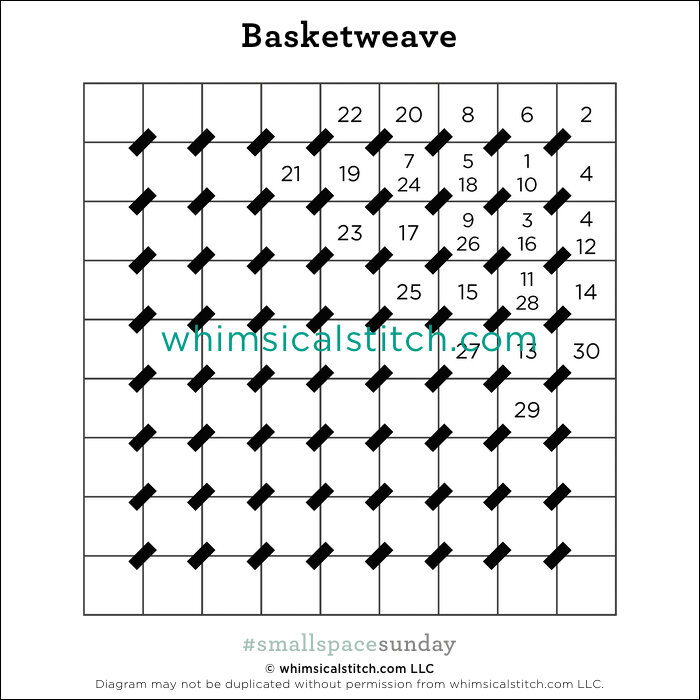
It is highly likely you already know that leaf stitches make fabulous stitches for birds.  While there are a ton of leaf stitches, I selected two for you.

The first is what I consider a classic leaf stitch and works beautifully on the chest of a feathered friend.    

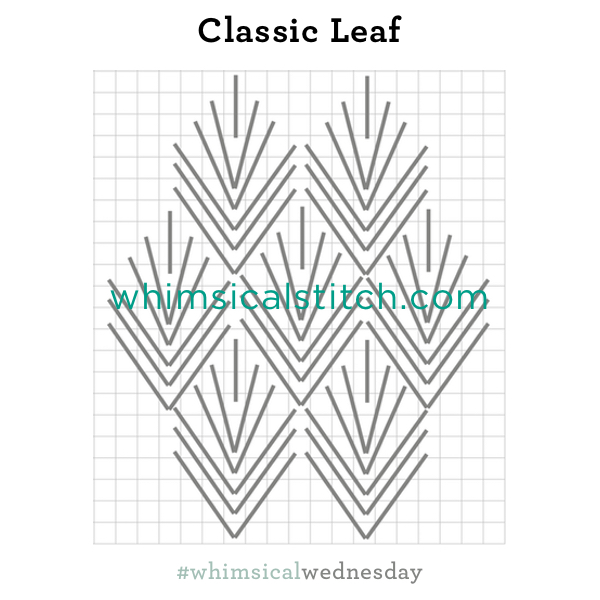
It's elegant and dramatic.  A lightly overdyed silk or wool works well here.  Pair it with a matching solid colored silk or wool for the face and you are off to the races.

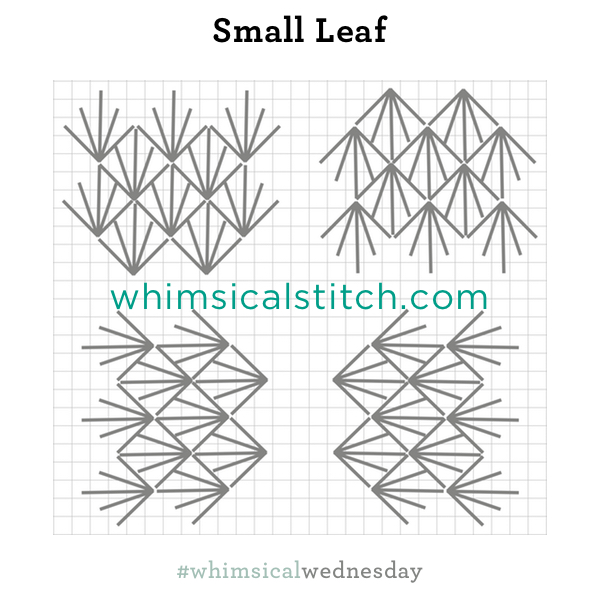
The next stitch is a smaller leaf stitch, perfect for a wing.  It's illustrated in all the possible angles, showing how you can emphasize the direction of a wing.

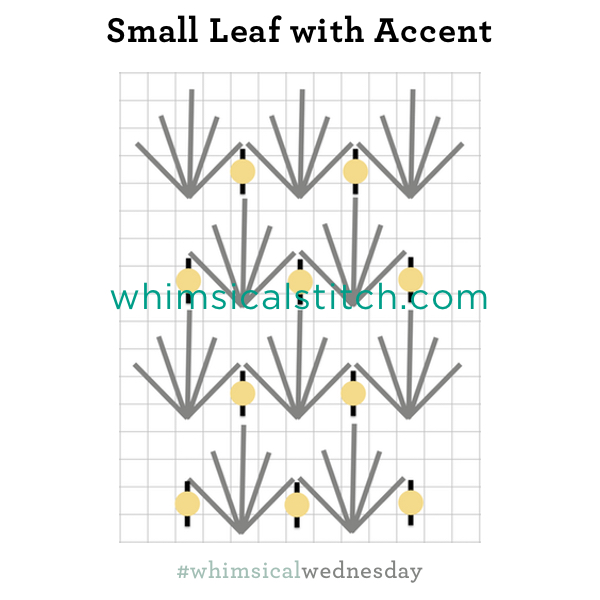
For a lighter touch, add an empty row in between leaves.  This is a great way to show off the shading.  You can also take it one step further and add a sparkly accent, such as a bead. 

These stitch diagrams, along with all other #whimsicalwednesday and #smallspacesunday stitch diagrams, can also be found on a Pinterest board here.

Be sure to follow whimsicalstitch.com on FacebookPinterestInstagram, and Twitter.

If you like what you see on this blog, want to learn some very creative decorative stitches, and how to put them all together, whimsicalstitch.com sells stitch guides for seasonal Melissa Shirley designs.  27 guides are currently available and more are in the pipeline.

Enjoy!

A Menagerie!

Today's #smallspacesunday is pretty straightforward.  The stitches below have been covered on previous #smallspacesundays but are especially appropriate for animals, so I'm resharing here.

The first is Encroaching Gobelin, perfect for almost any animal, especially a small one, because of its compact size, smoothness, and ability to change directions.

The next stitch is one of my favorites.  While the Cushion Stitch is more complex, it makes a great wing or body stitch as it has a bit of texture.

Brick Stitch, especially over two rows is perfect for a small rabbit, duck, or squirrel.  Don't forget to switch the direction to horizontal if the animal isn't sitting up.  The Brick Stitch is also scalable.  For a larger space, go over four rows, instead of two as diagramed below.  

The Upright Cross is an all-purpose small space stitch for any animal.

These stitch diagrams, along with all other #whimsicalwednesday and #smallspacesunday stitch diagrams, can also be found on a Pinterest board here.

Be sure to follow whimsicalstitch.com on FacebookPinterestInstagram, and Twitter.

If you like what you see on this blog, want to learn some very creative decorative stitches, and how to put them all together, whimsicalstitch.com sells stitch guides for seasonal Melissa Shirley designs.  27 guides are currently available and more are in the pipeline.

Enjoy!

Nothing Like a Fur Coat in August

I'm sure all of our beloved four-legged friends would love to not have fur coats right about now, so let's honor them by talking about stitches that are perfect for animals!  The month of August is dedicated to stitches for animals.  

Before I share today's stitch, I have a confession.  While I agree there are no true rules for needlepoint, I admit I have a very strong opinion about stitches for anything with a face.  I truly believe Plain Needlepoint is the way to go with all faces, whether they are human or animal.  I can and do fun body stitches, but I believe the face needs to represent the animal's (or person's) face, with all the shading that conveys its personality and expression.

The best examples are Vicky Sawyer's animals.  She has back stories for all of her paintings and she is very particular about what personality or emotion her animals are expressing.  You can see exasperation, joy, shyness, and many other emotions in the animals' faces.  Take a look next time before you begin stitching.  It may make you reconsider how you approach their faces.

Okay, with that aside, let's get to the good stuff. Today's stitch offers two versions of a tied Gobelin stitch.   These stitches are great for chests, wings, or legs, especially when you want to add a directional element.

The first is a narrow version.

And the second is a wider version. 

For animals, my instinct is to use two matte threads with similar color values.  A few plies of Lorikeet (a gently overdyed stranded wool) with a solid colored single ply thread would make a great combination.  For certain areas, such as bird wings, the yellow line could be a lightweight metallic.  This is where Kreinik stands out, as they offer (at least) four different weights.  The Kreinik metallics also add a small textures and the thread retains its "round" shape.  

This stitch also makes great greenery.  The stitched sample on Instagram is a bush from a soon to be released Melissa Shirley piece.

These stitch diagrams, along with all other #whimsicalwednesday and #smallspacesunday stitch diagrams, can also be found on a Pinterest board here.

Be sure to follow whimsicalstitch.com on FacebookPinterestInstagram, and Twitter.

If you like what you see on this blog, want to learn some very creative decorative stitches, and how to put them all together, whimsicalstitch.com sells stitch guides for seasonal Melissa Shirley designs.  27 guides are currently available and more are in the pipeline.

Enjoy!

Skip a Row and...

...amazing things happen.

Today's stitch is a variation of Alternating Cashmere.  Examples of a small and large Alternating Cashmere are included here and here.  Today's version is different because a row is skipped between the individual rectangles.  By doing so, a whole new world opens up.

Click on image to see on whimsicalstitch.com's Pinterest account. Visit pinterest.com/whimsicalstitch/whimsicalwednesday for a library of all #whimsicalwednesday and #smallspacesunday stitch diagrams.

Click on image to see on whimsicalstitch.com's Pinterest account. Visit pinterest.com/whimsicalstitch/whimsicalwednesday for a library of all #whimsicalwednesday and #smallspacesunday stitch diagrams.

Click on image to see on whimsicalstitch.com's Instagram account. Visit instagram.com/whimsicalstitch to see a library of stitched samples for select #whimsicalwednesday and #smallspacesunday stitch diagrams.

Click on image to see on whimsicalstitch.com's Instagram account. Visit instagram.com/whimsicalstitch to see a library of stitched samples for select #whimsicalwednesday and #smallspacesunday stitch diagrams.

In the example, the cashmere rectangle is 3X5 rows.  When you skip the row in between the rectangles, fill that row with no more than the smallest dimension of the rectangle and center it against the adjacent edge of the rectangle (in this case, three rows).  This creates a 2X2 square to have fun with!  In the diagram above, and on the stitched sample on Instagram, I filled the square with a Smyrna Cross.  

You could fill it with beads, a single bead on the vertical over the center hole, or more Plain Needlepoint in a contrasting color.   It is an exceptionally elegant and fun stitch.

These stitch diagrams, along with all other #whimsicalwednesday and #smallspacesunday stitch diagrams, can also be found on a Pinterest board here. Be sure to follow whimsicalstitch.com on FacebookPinterestInstagram, and Twitter.

If you like what you see on this blog, there's more: Mary’s Whimsical Stitches Volume 1 is a contemporary how-to collection of more than 250 stitches for stitchers regardless of skill level. The book includes updated and sequenced diagrams from this blog, all-new stitches, and a chapter on the basics of needlepoint; Mary’s Whimsical Stitches Volume 2 features chapters on Balanced, Beading, Diagonal, Layered, Oblique, Small, and Straight stitches.

Also, you can download The Essentials, a free guide covering basic needlepoint stitches and stitch compensation techniques along with new top-line information on needlepoint materials and tools, how to handle threads, and other helpful needlepoint resources.

whimsicalstitch.com also sells Stitch Guides and Stitch Concepts for Melissa Shirley Designs, Zecca DesignsSandra Gilmore, Purple Palm, Maggie, and Penny MacLeod, and many more. Click here to see the newest guides and click here to see the entire collection.

I hope you have the perfect spot for this stitch! Please enjoy! Have a wonderful #whimsicalwednesday!

A Note about Diagrams
I use color in diagrams to make them as clear as possible.  The primary function of different colored lines is to illustrate a stitch sequence.  For example, layering of colors demonstrates you add them in that order.  They can also provide ideas on how to integrate additional threads (one line for each color).  Or, you can use the same thread for all color lines.  That's where I encourage you to use your imagination for the space you are stitching!

Chopsticks!

I found this little gem in Carolyn Hedge Baird's Teeny Tiny Needlepoint Stitches.  I'm having a blast with it of late.

The base stitch (the black lines) creates oblong diamonds.  Note the stitches are up (or down) two rows and over one.  Simply add an Upright Cross in the intersections and, voila!  Adorableness!

The second version integrates beads instead of Upright Crosses.  Frankly, more adorable.

I purposefully did not add the very small compensation stitches above the top row of beads and below the lower row of beads because the stitches are so small that their inclusion does not make a meaningful difference.

The stitched sample on Instagram illustrates the top version of this stitch on a roof on a Debbie Mumm cottage.  It was a quick and easy stitch.  


Frankly, due to the small nature of this stitch, I recommend a single strand thread such as Elegance, Pearl Cotton, Vineyard Silk, and the like.  If you use a stranded silk, cotton floss, or wool (as I did above), I recommend using a minimal number of strands to keep the elongated diamond well defined.

These stitch diagrams, along with other #whimsicalwednesday and #smallspacesunday stitch diagrams, can also be found on pinterest.com.

Be sure to follow whimsicalstitch.com on FacebookPinterestInstagram, and Twitter.

If you like what you see on this blog, want to learn some very creative decorative stitches, and how to put them all together, whimsicalstitch.com sells stitch guides for seasonal Melissa Shirley designs.  26 guides are currently available, including three new Debbie Mumm Santa guides and the blue version of the Shell Table.  More are in the pipeline.  In fact, I'm waiting for one finished piece to return from the finisher, so it will be any day now!

I hope you enjoy this stitch as much as I am!

A Darning TBT

I can't count how many times I've used this stitch since the original post.  Snow, windows, ground cover.  It's fantastic.

Today's TBT features the Darning stitch.

A diagram for this stitch, along with other #whimsicalwednesday and #smallspacesunday stitch diagrams, can also be found on Pinterest.com.   

Be sure to follow whimsicalstitch.com on FacebookPinterestInstagram, and Twitter.

If you like what you see on this blog, want to learn creative decorative stitches, and how to put them all together, whimsicalstitch.com sells stitch guides for seasonal Melissa Shirley designs.  25 guides are currently available, including three new Debbie Mumm Santa guides, and more are in the pipeline.

Enjoy!

Diamond Columns

This stitch is one of my favorite backgrounds, especially white-on-white.

The background is columns of diamonds connected by straight lines.  It is best to work this stitch vertically by column.

Create the diamond in the diagrammed sequence (numbered steps), illustrated in left diagram.  The next step (the lettered steps) adds the connector.  When done with B, return to A and repeat the numbered steps.  Repeat until the area is full of diamonds.  Add the Upright Crosses inside each diamond to complete the stitch. 

You can adjust the length of the connectors to suit your space.  I've done connectors over three rows, four rows (as diagrammed above), and as many as six rows.  It depends on the size of the space and the amount of open canvas you want to display.

This stitch works for baskets, floors, foliage (with a short connector), or clothing with large areas to stitch so there is room for the pattern to emerge.  More often than not, I use this as a background stitch, as illustrated by the stitched sample on Instagram.    

This stitch diagram, along with other #whimsicalwednesday and #smallspacesunday stitch diagrams, can also be found on www.pinterest.com/whimsicalstitch/whimsicalwednesday.  

Be sure to follow whimsicalstitch.com on Facebook, Pinterest, Instagram, and Twitter.

If you like what you see on this blog, want to learn some very creative decorative stitches, and how to put them all together, whimsicalstitch.com sells stitch guides for seasonal Melissa Shirley designs.  25 guides are currently available, including three new Debbie Mumm Santa guides, and more are in the pipeline.

Enjoy!

Horizontal Brick

Not the most clever of blog post titles, but it's early here.  :)

Today's stitch is one of those universal solutions.  Depending on the thread combination, it can be clothing, a background, a tabletop, a piece of fruit (as illustrated on Instagram), or foliage.

It's really simple.

As I mentioned earlier, the thread combination defines its use.  For an area you'd like to recede a little, I recommend a lightweight pearl silk or cotton, such as Elegance, Thread Gatherer Silken Pearl, DMC (or Anchor) Pearl #8 for the gray lines and a lightweight metallic for the yellow lines, such as Neon Rays, Shimmer, or Kreinik Metallics #4 or #8. 

For a more intense area, such as a coat, Very Velvet, Pepper Pot Silk, Vineyard Silk, or a multi-ply wool are great alternatives.  Flair, Frosty Rays, Kreinik Metallics #12 or #16 balance these threads well.  

On a separate but related subject, I would love to receive feedback on whimsicalstitch.com.  Please visit this link to fill out a short survey.  Thank you!

This stitch diagram, along with other #whimsicalwednesday and #smallspacesunday stitch diagrams, can also be found on www.pinterest.com/whimsicalstitch/whimsicalwednesday.  

Be sure to follow whimsicalstitch.com on FacebookPinterestInstagram, and Twitter.

If you like what you see on this blog, want to learn some very creative decorative stitches, and how to put them all together, whimsicalstitch.com sells stitch guides for seasonal Melissa Shirley designs.  22 guides are currently available and more are in the pipeline.

Enjoy!

The Smallest of All

At the heart of all needlepoint is the single, simple needlepoint stitch.  There are several names for what I call Plain Needlepoint.  You may see it called Plain Needlepoint, Tent, Basketweave, Half Tent, Continental, or combinations of those.  They are all variations of the same theme, specifically a single stitch laid diagonally (at a 45 degree angle) over an intersection from the lower left corner to the upper right corner.

Simply put, the methods vary in sequence, coverage, and look on the back of the canvas. However, they all look the same on the front of the canvas.  Continental and Basketweave are the two primary methods I use for Plain Needlepoint and I recommend each for specific applications.

Basketweave is my primary and preferred method.  It provides consistent and even coverage on both the front and back of a canvas.  In addition, basketweave minimizes the need for blocking a canvas after it has been stitched.    

Click on image to see on whimsicalstitch.com's Pinterest account. Visit pinterest.com/whimsicalstitch/whimsicalwednesday for a library of all #whimsicalwednesday and #smallspacesunday stitch diagrams.

Click on image to see on whimsicalstitch.com's Pinterest account. Visit pinterest.com/whimsicalstitch/whimsicalwednesday for a library of all #whimsicalwednesday and #smallspacesunday stitch diagrams.

Beginning in the upper right corner, add a stitch.  Move to the row to the left and begin the second row of stitching…going down the diagonal row.  Repeat this sequence up and down the area, always on the diagonal rows.   The first diagram illustrates the concept.  The second diagram illustrates each diagonal row by color to clearly separate the rows.

 
Click on image to see on whimsicalstitch.com's Pinterest account. Visit pinterest.com/whimsicalstitch/whimsicalwednesday for a library of all #whimsicalwednesday and #smallspacesunday stitch diagrams.

Click on image to see on whimsicalstitch.com's Pinterest account. Visit pinterest.com/whimsicalstitch/whimsicalwednesday for a library of all #whimsicalwednesday and #smallspacesunday stitch diagrams.

The Continental stitch covers each horizontal row in sequential order, both across and down, ending with a similar look as Basketweave.

Starting in the upper right corner, add the first stitch and move across the horizontal row to the left.  When you complete the first row, you (literally) turn your canvas upside down and repeat the same stitch going back across the second row.  You alternate the direction of the canvas for each row.  (In the diagram, the canvas is upright for black stitches and upside down for turquoise stitches.)

If you do the turquoise rows with the canvas upright, the typical mistake is to start from the lower left corner and end in the upper right corner.  This results in one tiny vertical stitch covering the row on the back of the canvas, leaving the area open to light and an uneven appearance on the front of the canvas.


My preferred combination is Continental stitch for any single row of needlepoint, such as an outline, window frame, or simple flower stem.  For any areas wider or longer than one row in either direction, I use the Basketweave stitch. 

Plain Needlepoint is a classic and good looking stitch.  It is a nod to tradition and is quite elegant on its own, especially when used to add shading to an area.  I don't have that many rules about needlepoint.  However, I feel very strongly that all needlepoint projects should have spaces dedicated to Plain Needlepoint.  I love decorative stitches and Plain Needlepoint helps set them apart and gives the eye someplace to rest.  It's a matter of balance. 

These stitch diagram, along with all other #whimsicalwednesday and #smallspacesunday stitch diagrams, can also be found on a Pinterest board here.

Be sure to follow whimsicalstitch.com on FacebookPinterestInstagram, and Twitter.

If you like what you see on this blog, want to learn some very creative decorative stitches, and how to put them all together, whimsicalstitch.com has a book for you! Mary’s Whimsical Stitches is a contemporary how-to collection of more than 250 stitches for stitchers regardless of skill level. The book includes updated and sequenced diagrams from this blog, all-new stitches, and a chapter on the basics of needlepoint. For more information, visit here.

whimsicalstitch.com also sells Stitch Guides and Stitch Concepts for Melissa Shirley Designs, Zecca DesignsSandra Gilmore, Purple Palm, Maggie, and Penny MacLeod, and many more. Click here to see the newest guides and click here to see the entire collection.

I hope you have the perfect spot for this stitch! Please enjoy! Have a wonderful #whimsicalwednesday!

A Note about Diagrams
I use color in diagrams to make them as clear as possible.  The primary function of different colored lines is to illustrate a stitch sequence.  For example, layering of colors demonstrates you add them in that order.  They can also provide ideas on how to integrate additional threads (one line for each color).  Or, you can use the same thread for all color lines.  That's where I encourage you to use your imagination for the space you are stitching!

A Small TBT

Today's TBT is the Encroaching Gobelin...on a Christmas tree...because it's never too early for Christmas*.

07.07.2016 TBT.jpg

Today's TBT features the Encroaching Gobelin stitch.

Diagrams for this stitch, along with other #whimsicalwednesday and #smallspacesunday stitch diagrams, can also be found on www.pinterest.com/whimsicalstitch/whimsicalwednesday.  

Be sure to follow whimsicalstitch.com on FacebookPinterestInstagram, and Twitter.

If you like what you see on this blog, want to learn some very creative decorative stitches, and how to put them all together, whimsicalstitch.com sells stitch guides for seasonal Melissa Shirley designs.  22 guides are currently available and more are in the pipeline.

Enjoy!

*  Yes, there is such a thing as too early for Christmas.  Most big box retailers should take note of this fact.