Beetle Border

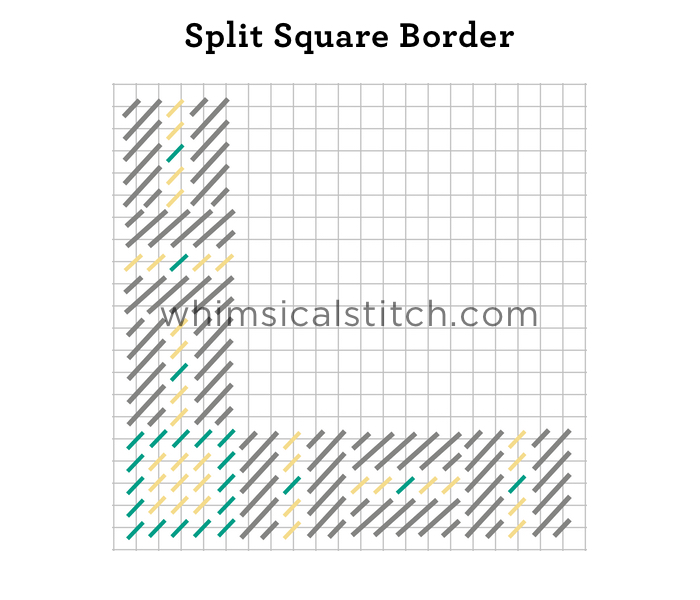
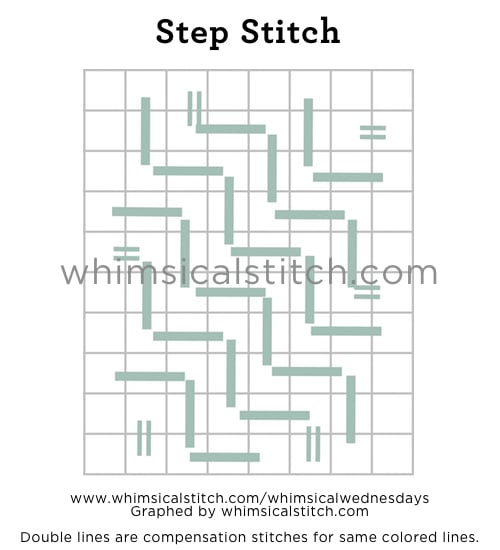
This week covers a border six rows wide (unintended pun).   It's the skinny version of the Beetle Stitch.

Just as I took a stitch designed for columns (or a border) and exploded it into a background, here I took what I traditionally use as a background stitch and repurposed it as a border.

Beetle Border.jpg

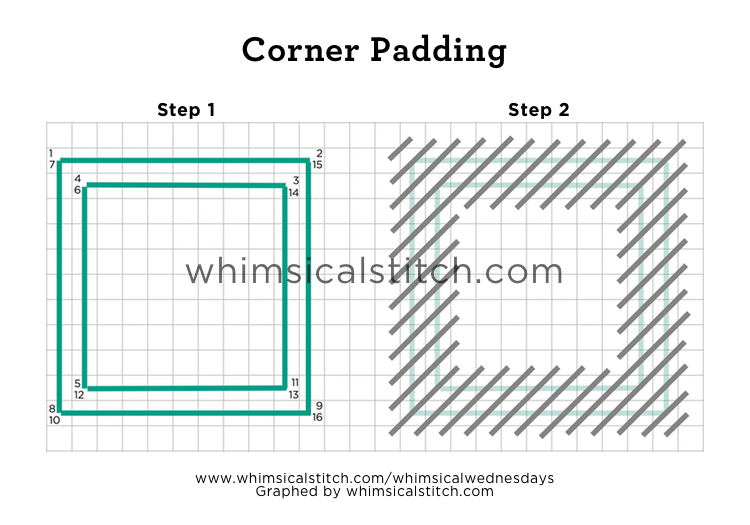
Since this is a straight stitch, the pattern is self contained in each column, meaning you stitch from upper corner to lower corner.  You create mitered corners to make a clean transition from vertical to horizontal columns.  The bright turquoise line in the diagram illustrates the mitered corner, the diagonal seam that joins the left border with the bottom border.  

In the example, the border is six rows wide (or tall, depending on direction).  This means the full pattern begins on the sixth row.  Rows 1-5 (in the corners) are used to create the diagonal seam illustrated above.   

I recommend that your horizontal columns match, meaning they have the exact same pattern on the same rows.  The same goes for your vertical columns.  Once you lay in the pattern for the first column of each direction, the pattern is set.  For this stitch, there's no rule of what stitch to start with...start with the sequence that makes you comfortable.  Just make a note (in the way that works best for you) illustrating what row and what length stitch you started with so you can match it in the other corresponding column.

The stitched sample on Instagram illustrates a Beetle border with brightly metallic contrasting threads, specifically Flair and Shimmer Ribbon.   

This stitch diagram, along with other #whimsicalwednesday and #smallspacesunday stitch diagrams, can also be found on www.pinterest.com/whimsicalstitch/whimsicalwednesday.  

Be sure to follow whimsicalstitch.com on FacebookPinterestInstagram, and Twitter.

If you like what you see on this blog, want to learn some very creative decorative stitches, and how to put them all together, whimsicalstitch.com sells stitch guides for seasonal Melissa Shirley designs.  21 guides are currently available and more are in the pipeline.

Enjoy!

Go Wide!

This week moves to a slightly wider border, specifically five rows wide.  

My go-to recommendation for borders this size is my 5X5 standard, the Split Square.  Here, you alternate directions to create a column.

The bright green and yellow corner is a safeguard for you.  By doing the four corners of the overall border separate from the overall border stitch, you avoid heartbreak if the row count (either horizontally or vertically or both) isn't divisible by five*.

This means each of the four columns (two horizontal and two vertical) of the border are separate items.  I recommend you start each vertical column at the top and compensate at the bottom just above the corner.  For each horizontal column, start at the left and compensate on the right hand side.

* It's lovely to think that any of us will take the time to count out the rows, both on the horizontal and the vertical.  Typically (and honestly), I do not have the patience because I am so excited to be starting a new stitch or I am so over the piece that I just want to be done with it.  

Case in point (and confession time):  The perfectly matched border on my Red Cottage pillow was a freak of nature.  I didn't count.  I just started doing it without even thinking.  I was very, very lucky.  Remember, handpainted canvases are just that...handpainted.  There will be variations between individual canvases of the same design.  Sometimes that is a single row.  And a single row in either direction would have changed that border completely.  Hence, my advice for doing corners differently than the primary border stitch.

The diagram above is colored for clarity.  You can mix colors, as illustrated, or use different threads with the same color value.  Regardless of color, I typically use a matte thread for the two rectangles, such as Vineyard Silk or Silk & Ivory, along with a metallic thread for the center row.   The center stitch of the center row is a way to add an accent, whether it is a bead or a different color thread.  Doing the center row in one color and type thread provides a far less dramatic look.   

These stitch diagrams, along with other #whimsicalwednesday and #smallspacesunday stitch diagrams, can also be found on www.pinterest.com/whimsicalstitch/whimsicalwednesday.  

Be sure to follow whimsicalstitch.com on FacebookPinterestInstagram, and Twitter.

If you like what you see on this blog, want to learn some very creative decorative stitches, and how to put them all together, whimsicalstitch.com sells stitch guides for seasonal Melissa Shirley designs.  20 guides are currently available and more are in the pipeline.

Enjoy!

Turning a Corner

Today's border concept is Padding.  This post elaborates on the earlier #whimsicalwednesday post on padding and takes it one step further by illustrating how to get around corners.

With all padding, the base rows (turquoise lines) can be added with efficiency.  It is not critical to have crisp edges or coverage for the border rows on the back.  They will be covered and no one will be able to tell that you took varying short cuts in between rows.  However, it is important the path(s) you follow are contained within the border area so there are no base threads dragged across the non-border area of the canvas.   Step 1 illustrates a potential path.  This ensures the base threads will be covered by the top threads (gray lines) on both sides of the canvas, enclosing the entire border.

In Step 2, navigating the wide corners (upper left and lower right) requires focus.  To get a crisp and clean inside corner, split the stitch where the inside corners meet for the first time.  In this example, the border is over three rows.  Corners will meet when the border will be over six rows (double the width).  Don't do over six rows with one stitch!  Split it into two stitches, over three rows each, for a crisp corner.  The lime green and aqua stitched sample on Instagram illustrates a padded corner over three rows

There are a few things worth repeating from the first post about padding.  Most padding requires only one layer of base thread.  If you want to create more pronounced padding, add 1-2 additional layers of base thread.  One of the stitched samples on Instagram illustrates a very thick padding.  Kelly wasn't sure how many layers of padding he added to that border...but it might have been double digit.  It's a dramatic and beautiful example of padding.  

Very Velvet and Pearl Cotton #3 make excellent base rows.  I prefer wider threads for the top thread, such as Flair, Fyre Werks, Treasure Ribbon, Frosty Rays, or plied floss (with a laying tool to maximize its width and coverage).

This stitch diagram, along with other #whimsicalwednesday and #smallspacesunday stitch diagrams, can also be found on www.pinterest.com/whimsicalstitch/whimsicalwednesday.  

Be sure to follow whimsicalstitch.com on FacebookPinterestInstagram, and Twitter.

If you like what you see on this blog, want to learn some very creative decorative stitches, and how to put them all together, whimsicalstitch.com sells stitch guides for seasonal Melissa Shirley designs.  20 guides are currently available and more are in the pipeline.

Enjoy!

Don't Fence Me In

Rather, please do!

This month's post will focus on borders.  I went through a border obsession several years ago, when I added a border (or two) to almost every canvas I stitched.  An example is one of my favorite Halloween pillows from Melissa Shirley.  The only border painted on it was the black border surrounding the witch.  I added two borders on top of that.  By the time the finisher was done, it had five borders.  And I love all of them.

So, not the best planning in the world when it's time for a new theme month, that month begins with a #smallspacesunday, and the theme is borders.  

I prevailed.  :)

The first idea for your consideration is Elongated Crosses.  

This stitch provides full coverage and a bit of texture, which helps define it as a border.  It's almost deceiving that it is only over one row.  The circle in the corner represents a bead, cross stitch, or a French Knot.  

The next border is a version of the above stitch.  I increased its length so I could add a contrasting stitch.

Elongated Cross Border with accent.jpg

The contrast could be color or thread type.  The stitched sample on Instagram is an example of this border and uses contrasting colors originating from the canvas.  It's a great way to draw the viewer's eye to those areas of the stitched canvas.  

The next over one border is the Greek Stitch.  This one is interesting (to me) because I typically use Greek over a minimum of two rows, usually more.  I scaled this stitch down for this border and love it.  

Similar to the Open Step Diamond stitch (aka Herringbone stitch), this stitch must be started at the farthest end of a row.  Each stitch overlaps the previous, so it is easiest to do it in one straight shot.  

Your thread choice for any of the above borders is critical.  In order to achieve a distinct stitch look over only one row, use very lightweight threads.  My metallic thread suggestions for 18-mesh are Kreinik Metallics Very Fine Braid (#4), Petite Silk Lame, Neon Rays, Neon Rays+, or Shimmer Ribbon.  Matte thread suggestions include 2-3 plies of your favorite floss or silk.  (Add one additional ply for 13 mesh.)  I do not recommend the heavier silks, such as Pepper Pot or Vineyard Vines.  I love them, but think the coverage is too much for a one row border.

The last border for your consideration is beads.  A single row border of beads is a very elegant and dramatic statement for the right piece.  If you like the idea but not the execution, consider this.

I recommend adding the Plain Needlepoint first, followed by the beading.  As a gentle reminder, the bead is attached with beading thread in a stitch going in the opposite direction than the traditional tent stitch.  This ensures the bead will be laying in the same direction as the other stitches.

These stitch diagrams, along with other #whimsicalwednesday and #smallspacesunday stitch diagrams, can also be found on www.pinterest.com/whimsicalstitch/whimsicalwednesday.  

Be sure to follow whimsicalstitch.com on FacebookPinterestInstagram, and Twitter.

If you like what you see on this blog, want to learn some very creative decorative stitches, and how to put them all together, whimsicalstitch.com sells stitch guides for seasonal Melissa Shirley designs.  20 guides are currently available and more are in the pipeline.

Enjoy!

Old Glass

If you are looking for a more vintage window, look no further.  The pattern is a series of small bursts giving the area a slightly pinched look, similar to antique glass.

The pattern is a tiny 2X2 square with four single stitches.  The diagram provides two alternatives.  The first is square shaped and the second is diamond shaped.

The heart of this stitch is very simple and straightforward.  Canvas is left exposed to highlight the content of the windows.  If this is too much open space for you, consider adding an accent.

The accent is in a different color to make the diagram easier to understand.  

These stitch diagrams, along with other #whimsicalwednesday and #smallspacesunday stitch diagrams, can also be found on www.pinterest.com/whimsicalstitch/whimsicalwednesday.  

Be sure to follow whimsicalstitch.com on FacebookPinterestInstagram, and Twitter.

If you like what you see on this blog, want to learn some very creative decorative stitches, and how to put them all together, whimsicalstitch.com sells stitch guides for seasonal Melissa Shirley designs.  20 guides are currently available and more are in the pipeline.

Enjoy!

Guilt Works

The original plan for today's post was Reverse Basketweave, a great glass stitch.  After all, It is the month of glass.  However, I felt guilty I already shared Reverse Basketweave in a post last year. So, here's where guilt works...and you benefit.  Here's a link to the original post about Reverse Basketweave.  Summary:  it's great for glass.  Please use it.

And here is how I compensated for my original plan...a bonus glass stitch.  I named it the Square Stitch.  It should be obvious why I did so.

The coverage is more substantial than it appears.  It works best in a medium sized window.  The next two diagrams are variations of this stitch.  Each offers an increasingly open perspective.

This variation includes boxes that do not share any sides.  It's good for a medium to large glass areas, such as a jar full of candy.  

The last example skips a full row between squares.

These stitch diagrams, along with other #whimsicalwednesday and #smallspacesunday stitch diagrams, can also be found on www.pinterest.com/whimsicalstitch/whimsicalwednesday.  

Be sure to follow whimsicalstitch.com on FacebookPinterestInstagram, and Twitter.

If you like what you see on this blog, want to learn some very creative decorative stitches, and how to put them all together, whimsicalstitch.com sells stitch guides for seasonal Melissa Shirley designs.  20 guides are currently available and more are in the pipeline.

Enjoy!

Step Into It

This week's glass stitch is a very welcome find for me.  It's a variation of a more open stitch I found in a book last Fall while I was working on Melissa's new Emma Williams Rooftops piece.  

It's clean and simple, though the compensation gave me a tiny headache.  (I can't lie to you.)  Once I got through it, I was thrilled I hung in there.

An appropriate colored Kreinik Metallic is a great thread for any glass.  For some windows, especially on canvases with historical or vintage themes, consider one of their vintage metallics (connoted by a V in the thread color) for a slightly matte metallic.  It's a great look.

This stitch diagram, along with other #whimsicalwednesday and #smallspacesunday stitch diagrams, can also be found on www.pinterest.com/whimsicalstitch/whimsicalwednesday.  

Be sure to follow whimsicalstitch.com on FacebookPinterestInstagram, and Twitter.

If you like what you see on this blog, want to learn some very creative decorative stitches, and how to put them all together, whimsicalstitch.com sells stitch guides for seasonal Melissa Shirley designs.  20 guides are currently available and more are in the pipeline.

Enjoy!

PS Due to technical difficulties, the Instagram photo for this stitch can't be posted today. It will be posted no later than Friday morning. Thanks! 

Darn it!

The darning stitch is a fantastic glass stitch*.  I love how you can play with the width of the stitches based on the size of your window.  I'm sharing three variations today, offering ideas for different sized windows. 

Today's stitched sample on Instagram illustrates the first stitch.  It is a wider darning stitch I used for a very large window in a Sandra Gilmore piece.    

For a medium to small window, consider a darning stitch over two rows.  

I did this stitch in pairs as I like the way they look.  However, if you prefer your open space to be in smaller bits, feel free to use the over two pattern in single rows with the same offset pattern for every other row, instead of every two rows.

I suspect you have figured out where we will end for this stitch.  Yup...over one row. I was completely doubtful and uncertain the first time I did this stitch.  And I absolutely loved how it so delicately showed the shading, yet was still a stitch.  It's perfect for a tiny window.

I hope you have the perfect windows for these stitches!

*  Yes, I know I wrote about the darning stitch way back when.  I briefly mentioned I used it for glass but didn't elaborate.  Today, I elaborated.  :)

These stitch diagrams, along with other #whimsicalwednesday and #smallspacesunday stitch diagrams, can also be found on www.pinterest.com/whimsicalstitch/whimsicalwednesday.  

Be sure to follow whimsicalstitch.com on FacebookPinterestInstagram, and Twitter.

If you like what you see on this blog, want to learn some very creative decorative stitches, and how to put them all together, whimsicalstitch.com sells stitch guides for seasonal Melissa Shirley designs.  20 guides are currently available and more are in the pipeline.

Enjoy!

Glittery Glass

March posts focus on stitches for glass.  My glass stitches are variations of a single theme, specifically using lightweight metallic threads in an open stitch.  My go-to metallic is Kreinik Metallics Braids.  

The key to my glass stitches is a lighter weight thread than the canvas size typically calls for.  As an example, I use Kreinik Metallics Fine Braid (#8) on 13-mesh and Very Fine Braid (#4) on 18-mesh. 

For those of you who aren't comfortable with open stitches, a few of this month's stitches provide mostly full coverage, including today's example.  

We begin with Alicia's Lace.  It's a very straightforward stitch that alternates directions of simple tent stitches.  

I find it easiest to do this stitch going horizontally across a row, alternating directions for each stitch.  In addition, as you will see on the stitched sample on Instagram, this is a an especially great stitch for the smallest of windows.

Speaking of small stitches, we have whimsicalstitch.com/whimsicalwednesdays first PROGRAMMING ALERT:  Due to the small nature of these stitches, there will be no #smallspacesundays during the month of March.  #smallspacesundays will return to their regularly scheduled time on April 3.

This stitch diagram, along with other #whimsicalwednesday and #smallspacesunday stitch diagrams, can also be found on www.pinterest.com/whimsicalstitch/whimsicalwednesday.  

Be sure to follow whimsicalstitch.com on FacebookPinterestInstagram, and Twitter.

If you like what you see on this blog, want to learn some very creative decorative stitches, and how to put them all together, whimsicalstitch.com sells stitch guides for seasonal Melissa Shirley designs.  20 guides are currently available and more are in the pipeline.

Enjoy!

Connections Part 2

With no intent, this week continues last week's theme of connections.  We talked about connected diamonds last week and this week morphs into connected squares.

So, funny thing happened on way to this post.  I diagrammed it from memory yet the stitched sample on Instagram reminds me how flexible this stitch is.

The diagonal connections between the squares on the diagram are over two rows.  The connections on stitched sample are over three rows.  Both are correct!  Adjust according to the area you are filling.  Over four rows is great for a larger space, especially with shading, while over two is great for a smaller space.  

You may also notice the stitched sample has bling inside the squares.  Those are hotfix Swarovski crystals and are fantastic accents for needlepoint.  You may also attach a bead (over two rows on the vertical or horizontal).  I love bling and I especially love contrasting bling, so have fun with accents when you use this stitch.

This stitch diagram, along with other #whimsicalwednesday and #smallspacesunday stitch diagrams, can also be found on www.pinterest.com/whimsicalstitch/whimsicalwednesday.  

Be sure to follow whimsicalstitch.com on FacebookPinterestInstagram, and Twitter.

If you like what you see on this blog, want to learn very creative decorative stitches, and how to put them all together, whimsicalstitch.com sells stitch guides for seasonal Melissa Shirley designs.  20 guides are currently available and more are in the pipeline.

Enjoy!