It Takes Two

Today's #smallspacesunday focuses on the 2X2 square.  

The standard for a 2X2 square is the Mosaic Stitch, the smallest Satin Stitch there is.  

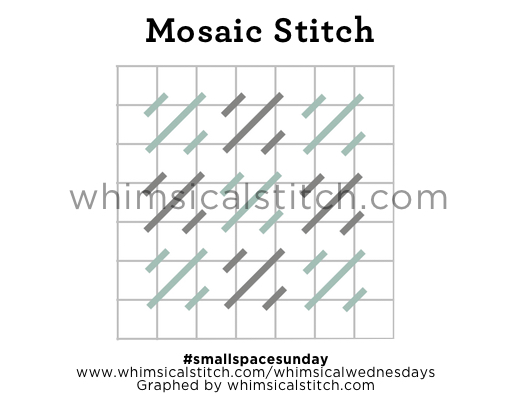
I diagrammed it in two colors to expand your thinking on small spaces.  The two colors represent two colors, thread types or both.  

The next is the Cross Stitch or, as I like to elegantly call it, an X.

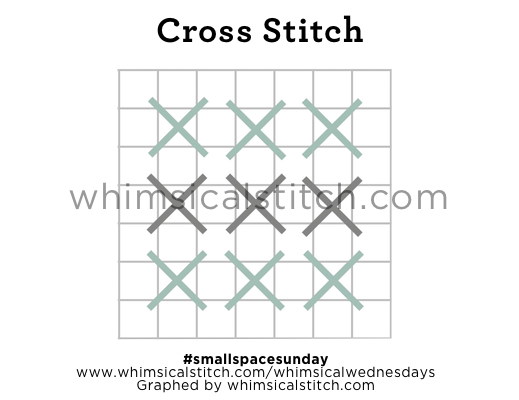
You will notice the diagram is in same colors and in the same size.  But the color pattern is different.  Just another way to look at a space.

The next 2X2 is the Upright Cross.  

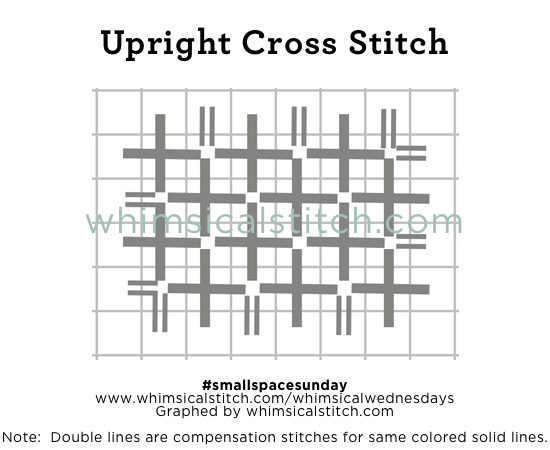
The Upright Cross is featured as the stitched sample on whimsicalstitch.com's Instagram page this week.

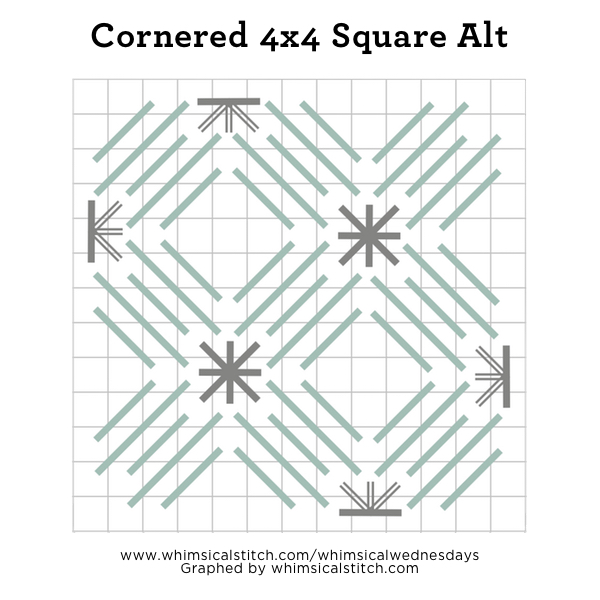
The Smyrna Cross is often overlooked because it adds a lovely pop of texture and most people think of it for only texture.  This begs the question...why not add the surprise of texture in a small space?  It's a lovely and unexpected touch.  And that's why I love it so.  

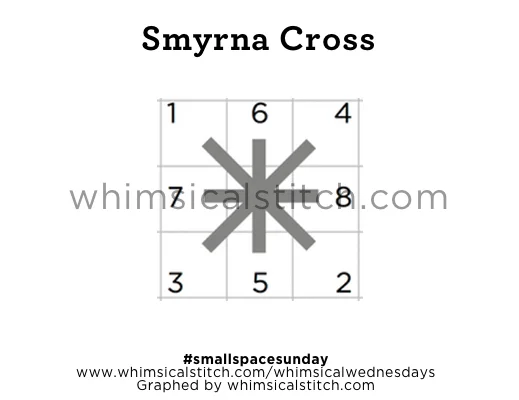
You will be surprised at how fun this stitch can be.  I've used it in "larger" small spaces such as a two-row high border, boots on a Santa, and as small bushes in the background in addition to the traditional small spaces such as a snowflake, a holiday ornament, or a button.  The Smyrna Cross adds a pop of contrasting color and texture in a larger stitch combo.

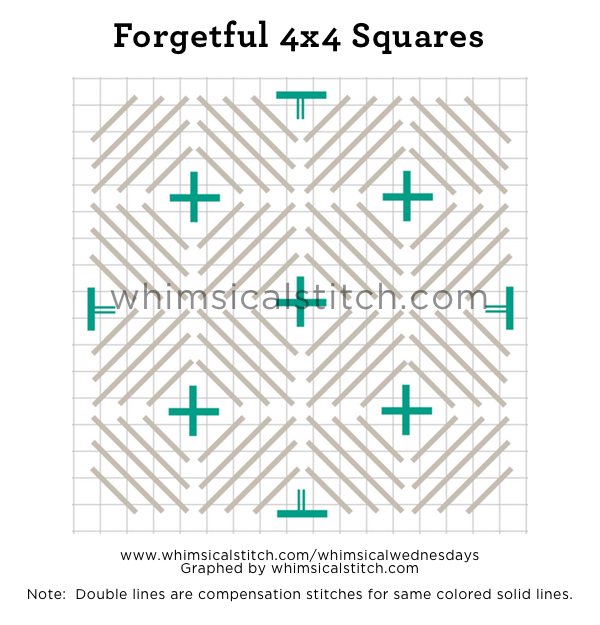
The possibilities are endless.  The only thing I obsess about is the application of a consistent stitch sequence.  My recommended sequence is above.  If you do a different sequence, I strongly encourage you to do the same sequence in all of the crosses.  

These stitch diagrams, along with other #whimsicalwednesday and #smallspacesunday stitch diagrams, can also be found on www.pinterest.com/whimsicalstitch/whimsicalwednesday.  

Be sure to follow whimsicalstitch.com on FacebookPinterestInstagram, and Twitter.

If you like what you see on this blog, want to learn some very creative decorative stitches, and how to put them all together, whimsicalstitch.com sells stitch guides for seasonal Melissa Shirley designs.  20 guides are currently available and more are in the pipeline.

Enjoy!

Silly Squares

A very happy New Year to you and yours!  

I'm trying something a little different for you this month. #whimsicalwednesdays and #smallspacesunday posts for January will focus on variations of a common stitch, specifically square stitches.

The collection of diagrams for this month were curated from my personal favorite stitches, stitched pieces that inspire me (from my circle of needlepoint friends), and my go-to books.  Each post focuses on a specific size square and includes a small sampling of the stitch possibilities for that size square. These are just thought starters and I hope they help you create something magical!

The month begins with 4X4 squares.  A simple and elegant way to dress up 4X4's is to alternate the directions of the squares AND add contrasting threads, in the opposite direction, on top of the square.

The stitched sample on Instagram illustrates a tone on tone with a bright accent with similarly weighted threads.  However, don't let that or the width of the gray line in the diagram restrict you.  This is a great stitch when you add a light thread across the top.  Think Vineyard Silk on 13-mesh with an overlay of Kreinik Metallics Fine Braid #8.  

By alternating the squares and setting the corner stitches apart with a contrasting thread (color or finish), you begin to see whole new patterns that don't even look like squares, but are squares.

4X4 Square Corners.jpg

I call it the Corner Stitch because the eye is drawn to the unique corners.  You can take this one step further and add open space and more pronounced accents.

This version removes the single stitch corners, creating two open spaces.  One is shaped like a square and one is shaped like a triangle.   You can fill one or both with the same or contrasting stitches.  Personally, I like to fill only one as it creates a smoother design pattern, but it is a matter of personal taste and what the space requires.  Alternate filling stitches include Plain Needlepoint, Smyrna Cross, Beads, or French Knots (select list).  Mix and match to your heart's delight.

The next diagram splits the widest stitch in half.  This is a personal favorite as I like the subtle texture it adds.  It is a technique that works better with lighter colored threads, so the split stitch is more clearly visible.

The next diagram provides an open alternative.  It is an exact square but looks much softer than other square alternatives.

The above diagram is scalable as well and works especially well with even numbered squares, allowing the gray Upright Cross to be in the exact center of the stitch.

The last two diagrams are related.  I call them "Forgetful" Squares.  By "forgetting" to add the single stitch in each corner, a world of possibilities opens up.

When you start expanding the color palette, as you do in the larger version of Forgetful Squares, it can be downright clever and beautiful.  

The color inspiration for the pattern in the larger diagram is drawn from the stitched photo in the lower right hand corner of this collage on flickr.  I absolutely love the colors in the sample.  

I hope these diagrams prompt a lot of creative ideas for your next square stitch!

These stitch diagrams, along with other #whimsicalwednesday and #smallspacesunday stitch diagrams, can also be found on www.pinterest.com/whimsicalstitch/whimsicalwednesday.  

Be sure to follow whimsicalstitch.com on FacebookPinterestInstagram, and Twitter.

If you like what you see on this blog, want to learn some very creative decorative stitches, and how to put them all together, whimsicalstitch.com sells stitch guides for seasonal Melissa Shirley designs.  20 guides are currently available and more are in the pipeline.

Enjoy!

The Wrapped Diamond

I'm wrapping up 2015 with a classic diamond stitch.  I call it the "Wrapped Diamond" because of the border surrounding it.  (No pun intended.  Really.) 

This diamond is slightly different from other diamonds on this site.  Specifically, the pattern is based on an odd number of rows.  

The diamond pattern is over 3 rows, 5 rows, 7 rows, 7 rows, 5 rows, and ends with over 3 rows. The two that are over seven rows establish a larger open space at the top and bottom of the diamond, allowing a more pronounced accent.

Click on image to see on whimsicalstitch.com's Pinterest account. Visit pinterest.com/whimsicalstitch/whimsicalwednesday for a library of all #whimsicalwednesday and #smallspacesunday stitch diagrams.

Click on image to see on whimsicalstitch.com's Pinterest account. Visit pinterest.com/whimsicalstitch/whimsicalwednesday for a library of all #whimsicalwednesday and #smallspacesunday stitch diagrams.

To make this stitch easier to manage, add the diamonds first (aqua lines), followed by the borders surrounding the diamonds (gray lines) and ending with the french knot accents (black circles).

This diagram is a smidge deceiving as this stitch provides rather full coverage.  The lines are thinner to illustrate the individual stitches.  So, don't be concerned about the small gap between the outer rows of the diamond and the adjacent French Knot.  That should not happen in your stitched version.

The stitched sample on Instagram is from a pumpkin sampler I did many moons ago.  The threads are the same color values and provide a great choice for an an area where you want to be elegant yet still have a little pizazz.  Combining colors and thread finishes and/or weights will make a great coat, rooftop, floor, or background.  Using lighter weight threads in similar color values would lend themselves very well to a sky or pasture.  Use your imagination!

These stitch diagrams, along with other #whimsicalwednesday and #smallspacesunday stitch diagrams, can also be found on www.pinterest.com/whimsicalstitch/whimsicalwednesday.  

Be sure to follow whimsicalstitch.com on FacebookPinterestInstagram, and Twitter.

If you like what you see on this blog, want to learn some very creative decorative stitches, and how to put them all together, whimsicalstitch.com sells stitch guides for seasonal Melissa Shirley designs.  20 guides are available and more are in the pipeline.

Enjoy!

Another Trifecta

This stitch is easy, clever, and wildly deceiving...another Trifecta.

Now that Santa has a warm coat, he needs a complementary bag.   This stitch is nothing more than vertical diamonds, yet the combo of similarly colored metallic threads make this stitch very elegant, understated, and stunning.

This diagram is best viewed alongside the stitched sample for this stitch.  The stitched sample is found on whimsicalstitch.com's Instagram page. 

There are four lines in the diagram, representing four different threads.  The two dark gray lines (thin and wider) represent two different metallics in similar color values.  The aqua line and the light gray line represent another two different metallics in similar color values (but different from the dark gray lines).  (Note:  I did not add the compensation stitches, as I do with most stitch diagrams, because I wanted the focus to be on the overall pattern.)

In the stitched sample, the dark gray lines are a very light gold/copper metallic (in Neon Rays and Kreinik Metallics Fine Braid #8).  The aqua line and the light gray line are two separate cream colored metallics (Neon Rays and Flair).

It's a really easy stitch with such an elegant twist.  It would also be great to mix colors and thread finishes to draw more attention to an area.  This stitch would make a terrific coat, bag, roof, or floor.  You could expand the diamonds (and the overall stitch) to create a really fantastic large space stitch.  You may also consider eliminating the center diamond (the wide dark gray line) and covering that area in an (over) 2-4-6-4-2 (row) solid diamond for an even more subtle stitch.

This stitch diagram, along with other #whimsicalwednesday and #smallspacesunday stitch diagrams, can also be found on www.pinterest.com/whimsicalstitch/whimsicalwednesday.  

Be sure to follow whimsicalstitch.com on FacebookPinterestInstagram, and Twitter.

If you like what you see on this blog, want to learn some very creative decorative stitches, and how to put them all together, whimsicalstitch.com sells stitch guides for seasonal Melissa Shirley designs.  17 guides are currently available and more are in the pipeline.

Enjoy!


Baby, It's Cold Outside

And Santa needs a coat.

Today's stitch is a pared down version of a layered stitch I came across in a book.  As you will see on the stitched sample on Instagram, there is nothing special about the canvas that shows through, but the open area is a great way to add lightness to a stitched area.

I named the stitch "Tied Squares."  It's a combo of Scotch Squares in alternating directions and Oblong Upright Crosses connecting the squares.

I suggest adding the squares first, followed by the Oblong Upright Crosses.  The diagram below is my personal preference for the stitch sequence for the crosses.

If you choose to do a different sequence on the crosses, I strongly recommend you do the exact same sequence on all crosses.  It will maintain the stitch symmetry and pattern.

So, a little insight on layered stitches.  They are a wonderful way to add color and pattern to a canvas and there are times layered stitches are perfect.  However, don't forget to look at the cumulative total of the steps.  Sometimes you only need to do a portion of them.  The original diagram for this stitch included another set of oblong crosses in the open area.  And that's a great idea, especially if you want to add another color, but I loved the simplicity of the first two steps.

This stitch diagram, along with other #whimsicalwednesday and #smallspacesunday stitch diagrams, can also be found on www.pinterest.com/whimsicalstitch/whimsicalwednesday.  

Be sure to follow whimsicalstitch.com on FacebookPinterestInstagram, and Twitter.

If you like what you see on this blog, want to learn some very creative decorative stitches, and how to put them all together, whimsicalstitch.com sells stitch guides for seasonal Melissa Shirley designs.  18 guides are currently available and more are in the pipeline.

Enjoy!

It's a Small Stitch. Seriously.

This stitch doesn't look small, but it is a perfect small stitch.  I discovered it while auditioning stitches for a soon to be released Melissa Shirley piece.  (The piece and the stitch guide will debut at the TNNA San Diego Show in early January, so stay tuned.)

Okay, self-promotion aside, this is a great stitch for small and large spaces.  I'm not aware of a proper name for it.  So, I'm calling it the Small Surprise Stitch.

The only real trick to this stitch is to do it one row at a time in a specific order.  As an explanation, the single stitch accent covering the larger base stitch is added in the opposite direction, so it is much easier to add that accent while there is less thread surrounding it.  

Specifically, starting in the upper left corner, do one row of the base stitch (the gray lines) traveling down the canvas on the diagonal, skipping a row in between.  Follow up with the first accent thread (the green line).  Add the next row of the base thread, going up the canvas on the diagonal, followed by the second contrasting thread (the yellow line).  Repeat that sequence to fill the area.  The stitched sample on Instagram helps you see how the compensation works.

The compensation looks intimidating, but it's quite easy once you realize the base thread is the only thread requiring compensation.    

This stitch diagram, along with other #whimsicalwednesday and #smallspacesunday stitch diagrams, can also be found on www.pinterest.com/whimsicalstitch/whimsicalwednesday.  

Be sure to follow whimsicalstitch.com on FacebookPinterestInstagram, and Twitter.

If you like what you see on this blog, want to learn some very creative decorative stitches, and how to put them all together, whimsicalstitch.com sells stitch guides for seasonal Melissa Shirley designs.  18 guides are currently available and more are in the pipeline.

I hope you have the perfect space for this stitch and enjoy it!

Scrumptious Scallops

Scallop stitches are wonderful additions to many canvases.  The most obvious use for a scallop stitch is water.  It replicates waves...literally.  Think beyond that and you will find a highly versatile stitch that is appropriate for backgrounds, clothing, or roofs, just as thought starters.  The perfect symmetry lends itself to many applications.

Scallop Over Three.jpg

The above stitch has perfectly matched rows of over three on the vertical with one empty row in between.  Skipping a row is purely optional...I just so happen to like the way the skipped row helps the stitch become understated.  This stitch was used as a sky on a Melissa Shirley birdhouse, as shown on Instagram.

The next example also skips a row and adds varied scallop widths.  This is fun application for clothing.


Scallop stitches are wonderful with multiple thread finishes.  You can alternate rows of matte and metallic or even add a row of beads (on the vertical) for an "over two row" possibility.  Consider alternating rows of different colors in the same thread.  (The stitched sample on Instagram illustrates that look.)  

These stitch diagrams, along with other #whimsicalwednesday and #smallspacesunday stitch diagrams, can also be found on www.pinterest.com/whimsicalstitch/whimsicalwednesday.  

Be sure to follow whimsicalstitch.com on FacebookPinterestInstagram, and Twitter.

If you like what you see on this blog, want to learn some very creative decorative stitches, and how to put them all together, whimsicalstitch.com sells stitch guides for seasonal Melissa Shirley designs.  18 guides are currently available and more are in the pipeline.

I hope you have the perfect space for this stitch and enjoy it!

Tiniest Changes

The tiniest changes make a huge difference.  For example, take the Satin Stitch.  The generally accepted form is over two or more rows on the diagonal, going from lower left intersection to upper right intersection.  If you want to go a little wild, try alternating directions in the columns.  It's the perfect stitch standard for so many areas, especially leaves, furniture, walls, backgrounds, or clothing, to name just a few.  

Yet, you can take this wonderfully straightforward stitch and make it something that really pops by doing one thing.  Add a contrasting row.

The gray lines in the diagram are a high contrast color or thread finish.  A color example is City Needlework Silk red for the aqua lines with a blue silk for the gray lines.  A thread finish example is using a lighter weight thread for the green lines and a heavier Very Velvet, in the same color values, adding interesting texture to an area.  You can also combine contrasting color and finish.

You can also play with it by adding more rows in between the gray rows, or fewer rows.  It's up to your imagination and what the space requires.

The first stitched sample on Instagram is a leaf on a Melissa Shirley bird houses canvas and is a highly contrasting color version of the stitch and has two rows in between the contrasting row.  The second sample on Instagram is an example of using contrasting finishes (stranded silk and shiny Fyre Werks).

This stitch diagram, along with other #whimsicalwednesday and #smallspacesunday stitch diagrams, can also be found on www.pinterest.com/whimsicalstitch/whimsicalwednesday.  

Be sure to follow whimsicalstitch.com on FacebookPinterestInstagram, and Twitter.

If you like what you see on this blog, want to learn some very creative decorative stitches, and how to put them all together, whimsicalstitch.com sells stitch guides for seasonal Melissa Shirley designs.  18 guides are currently available and more are in the pipeline.

Enjoy!

Baby Bling

As you may have noticed, I use very fancy, technical terms for stitch concepts.  Darling (for sweet stitches), Bling (fun dressy stitches with at least one metallic thread or bead), Trifecta (classy stitch with an element of three of some kind).  Today's #smallspacesunday features a Baby Bling stitch.  It's the clever combo of an upright cross stitch and a bead.

This stitch is great for any small space requiring more than a splash of excitement.  The beads are a nice surprise in this stitch, adding elegance and glamour.  What I also really like about this stitch is its inherent openness, allowing shading to show through.

Baby Bling Stitch.jpg

Since this is a bling stitch, I wholeheartedly encourage using a metallic for the Upright Cross.  If you want the beads to pop more, do the Upright Cross in a matte thread.  I've seen this stitch used as a flower petal, a lemon (as seen on the stitched sample on Instagram), and a roof.  It's truly versatile...yet the common denominator is a small space.

Speaking of the stitched sample, it uses a Kreinik Metallics Fine Braid (#8) and a #11 Sundance Bead.  It is a very light application of this stitch.  Consider a heavier metallic and larger bead if you would like the area to pop even more.  

This stitch diagram, along with other #whimsicalwednesday and #smallspacesunday stitch diagrams, can also be found on www.pinterest.com/whimsicalstitch/whimsicalwednesday.  

Be sure to follow whimsicalstitch.com on FacebookPinterestInstagram, and Twitter.

If you like what you see on this blog, want to learn some very creative decorative stitches, and how to put them all together, whimsicalstitch.com sells stitch guides for seasonal Melissa Shirley designs.  18 guides are currently available and more are in the pipeline.

Enjoy!

Pumpkin Pie

Today's stitch was chosen because, well, it's from a pumpkin I stitched more than a few years ago...and it's Thanksgiving Eve.  And a very happy Thanksgiving to all!  I'm very grateful for your support and input as I got this little labor of stitching love off the ground this year.

The stitch is called Bargello Circles.  It's a great large space stitch for an area you want to draw attention to.  It is a complex stitch yet, once you identify patterns, it becomes manageable.

Bargello Circles.jpg

Seeing this stitch in context is very helpful and the stitched sample is on Instagram.  Let's break down the stitch into sections to help it make sense.  Each circle is made up of four separate crescents.  

Bargello Crescent.jpg

What makes the crescents so easy is all of the stitches, whether horizontal (the gray lines in the first diagram) or vertical (yellow lines), are over four rows.  Each "section" of the individual crescents making up a circle is five rows wide, with a shared row on either side of the middle section.  

I find it best to have two needles threaded at the same time.  Create one circle at a time, adding each of the four crescents in the order most comfortable for you.

The center of each circle is where the fun begins.  As I mentioned earlier, this stitch commands attention.  You can moderate that attention through whatever you do in the centers.  The diagram below offers five different scenarios.

Starting in the upper left corner,

  1. Use long stitches to create a spiral

  2. Add beads in the Brick Beading style (one bead over two rows on the vertical)

  3. Brick stitch on the vertical (center diagram; also on the Instagram stitched sample)

  4. A tied Cross Stitch in the center, with a small amount of exposed canvas to allow shading to show through (lower right)

  5. Upright Crosses (lower left)

I do not recommend any sort of diagonal stitch, such as Plain Needlepoint, for the centers.  The crescents and resulting circles are horizontal or vertical straight stitches and I believe the direction they established should be maintained.

I tend to use matte threads with similar color values for the crescents and a metallic in the center.  Think Silk & Ivory, Pepper Pot Silk, or Vineyard Silk for the crescents and a Rainbow Galleries metallic, such as Frosty Rays, for the centers.

If you want to really make this stand out, use two contrasting colors for the crescents, such as red and purple or black and white, with a gold, silver, or white metallic in the center.  Be warned...that will be a very dramatic stitch.  And, for some pieces, absolutely perfect!

These stitch diagrams, along with other #whimsicalwednesday and #smallspacesunday stitch diagrams, can also be found on www.pinterest.com/whimsicalstitch/whimsicalwednesday.  

Be sure to follow whimsicalstitch.com on FacebookPinterestInstagram, and Twitter.

If you like what you see on this blog, want to learn some very creative decorative stitches, and how to put them all together, whimsicalstitch.com sells stitch guides for seasonal Melissa Shirley designs.  18 guides are currently available and more are in the pipeline.

Enjoy!  And I hope you have a very, very happy Thanksgiving!