And I fully endorse it!
Okay, today's post is about padding. But it's so easy, I consider it cheating.
On the off chance you don't know, Melissa Shirley does great holiday stuff. And holiday stuff often involves snow. The big snow spaces are a lot of fun as you can do fun and creative stitches. The smaller snow spaces can be a challenge. Plain needlepoint often works, but it's not always the perfect choice.
Enter padding. I love it, especially for snow. It's a great technique for snow on trees, on a window sill, or chimney, just as thought starters.
There are two steps and two threads. The first step, with the base thread, adds depth to the padded area. The second thread is the top thread. It covers the base thread and is the only visible thread when the padding is complete.
The base thread is a strand of thicker thread. Very Velvet or a larger than normal Pearl Cotton work well here. You should choose a color similar to the top thread. The top thread covers the base thread in the opposite direction and provides the final look. Be sure to cover the first and last rows of the base thread so the base thread isn't visible (step 1-2 and final step in Step 2).

Most padding requires only one layer of base thread. If you want to create more pronounced padding, add 1-2 more layers of base thread. Be careful to not add so many layers that the canvas holes get stretched.
If you don't like the coverage one round of top thread provides, cover the padding with a second round of the top thread.
Very Velvet and Pearl Cotton make excellent base rows. I prefer wider threads for the top thread, such as Flair, Fyre Werks, Treasure Ribbon, Frosty Rays, or plied floss (with a laying tool to maximize its width and coverage).
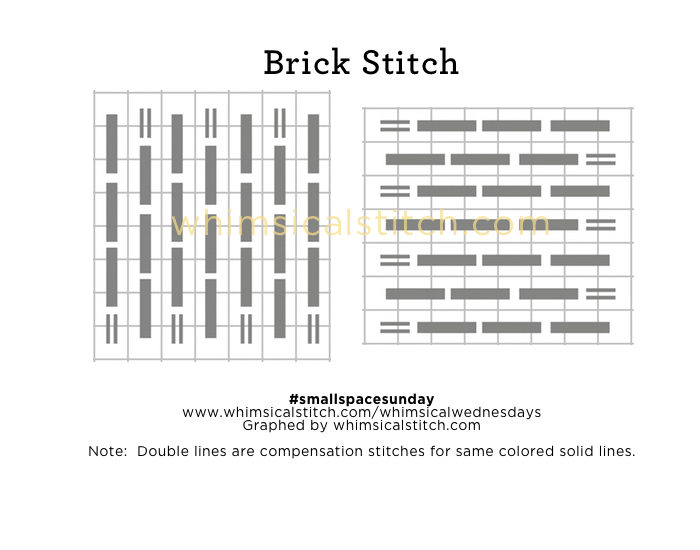
These stitch diagrams, along with other #whimsicalwednesday and #smallspacesunday stitch diagrams, can also be found on www.pinterest.com/whimsicalstitch/whimsicalwednesday.
Be sure to follow whimsicalstitch.com on Facebook, Pinterest, Instagram, and Twitter.
If you like what you see on this blog, want to learn some very creative decorative stitches, and how to put them all together, whimsicalstitch.com sells stitch guides for seasonal Melissa Shirley designs. Ten guides are currently available and more are in the pipeline.
Enjoy!