The Cushion Stitch

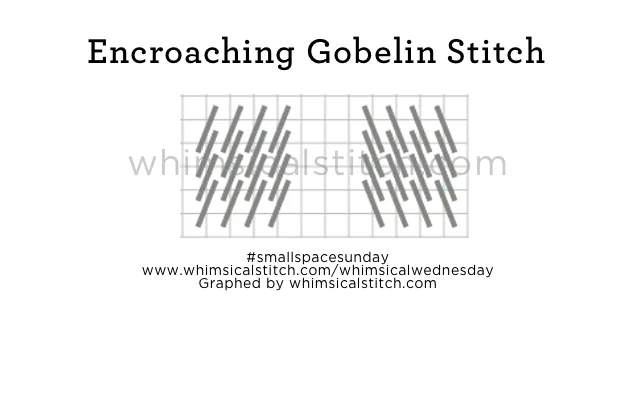
#smallspacesunday found a new (to her) small space stitch.

I found this truly unique small space stitch while looking for a stitch to do a cushion.  It was a beautifully shaded cushion, and I was leaning towards stitching it as painted in plain needlepoint...until I found this stitch.

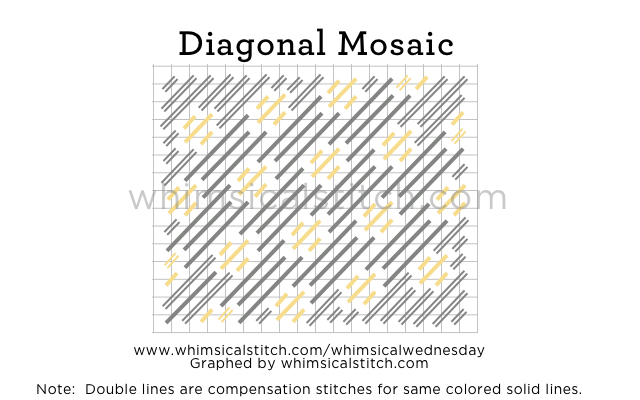
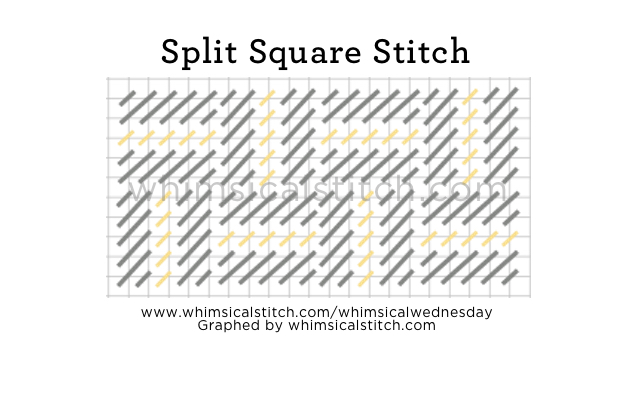
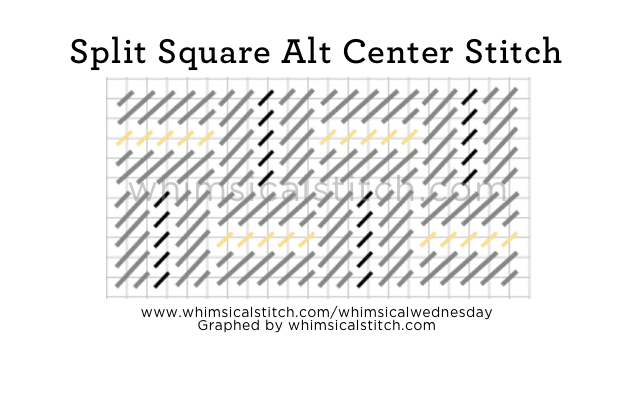
I named it the cushion stitch, as that was its inspiration.  However, it can serve many purposes.  It would make excellent tree bark, roof, ground covering, bush, coat or jacket.

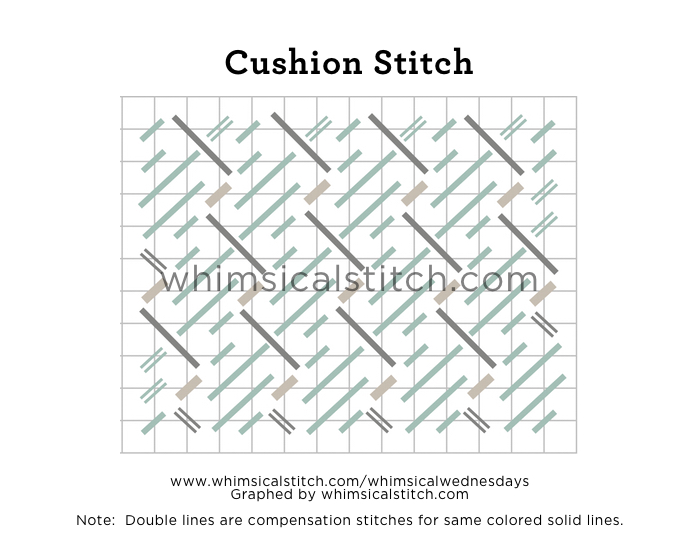
For my cushion, I used three different threads of the same color family.  For the aqua lines, I used a pliable wool.  I used Neon Rays for the dark gray line and Frosty Rays for the light gray line.  I think it would be great fun to use this on a coat in three different colors as diagrammed.

This stitch diagram, along with other #whimsicalwednesday and #smallspacesunday stitch diagrams, can also be found on www.pinterest.com/whimsicalstitch/whimsicalwednesdays.  

Be sure to follow whimsicalstitch.com on FacebookPinterestInstagram, and Twitter.

If you like what you see on this blog, want to learn some very creative decorative stitches, and how to put them all together, whimsicalstitch.com sells stitch guides for seasonal Melissa Shirley Designs.  Eight guides are currently available and more are in the pipeline.

I hope you enjoy this latest find as much as I do!  

There is Always an Exception

You may notice I am a big fan of symmetrical stitches.  There are not very many overtly diagonal stitches in my day to day repertoire.  There are always exceptions.

I rediscovered this stitch as I was admiring the array of completed needlepoint just back from the finisher at my local needlepoint store the other day.  It's called Diagonal Mosaic*.

It's a great way to fill a larger space, works well in either direction (whether I like that or not), and an excellent way to add contrast with fibers, either in complementary or contrasting colors.

My favorite combo for this is Pepper Pot silk and a soft sheen metallic such as Rainbow Galleries Fyre Werks.  It's a great stitch for a roof as it lends itself to the angle of the roof (if the canvas is painted that way).  I also use it on coats (in alternating directions), bags, baskets, and trees.

This stitch diagram, along with other #whimsicalwednesday and #smallspacesunday stitch diagrams, can also be found on www.pinterest.com/whimsicalstitch/whimsicalwednesday.  

Be sure to follow whimsicalstitch.com on Facebook, Pinterest, Instagram, and Twitter.

If you like what you see on this blog, want to learn some very creative decorative stitches, and how to put them all together, whimsicalstitch.com sells stitch guides for seasonal Melissa Shirley designs.  Eight guides are currently available and more are in the pipeline.

Enjoy!

* One of the many names I found for this stitch.  As this is not unusual, you will find I describe a stitch in a widely known name (if it exists) or create my own name for it.

Hip to be Square

Today's stitch is another go-to stitch for me.  I use it for skies, coats, baskets, tabletops, house exteriors, and backgrounds.  The ability to enhance it defines its versatility.  The base layout is below.  It is a 5X5 square split into two rectangles with a row of plain needlepoint down the center.  Typically, I use a matte thread for the gray lines and metallic thread for the yellow lines.  

The first variation is the center row.  I make the center stitch of the center row a contrasting element, such as a bead, a different color metallic thread, a French knot, or a cross stitch.

The next variation alternates the center row colors, which is a great way to add a subtle dimension to a coat or background.

The last variation is alternating color combos, a great way to add dimension to a basket or large space.

Split Square Alternate Boxes.jpg

This stitch is scalable as well.  Consider doing a 7X7 or 9X9 square for an especially large space.  Those would break down into two 3X7 rectangles and two 4X9 rectangles, respectively, with a row of plain needlepoint in the center.

This stitch diagram, along with other #whimsicalwednesday and #smallspacesunday stitch diagrams, can also be found on www.pinterest.com/whimsicalstitch/whimsicalwednesday.  

Be sure to follow whimsicalstitch.com on FacebookPinterestInstagram, and Twitter.

If you like what you see on this blog, want to learn some very creative decorative stitches, and how to put them all together, whimsicalstitch.com sells stitch guides for seasonal Melissa Shirley designs.  Eight guides are currently available and more are in the pipeline. 

Enjoy!  

Small Space Sunday

I always smile when stitch books and blogs preach there are no rules in needlepoint.  Technically, they are correct.  I appreciated the guideposts provided by teachers and other resources over the years, especially as I relearned the craft in the 1990's as decorative stitches and fiber choices exploded.    

One of those guiding principles is plain needlepoint belongs in every piece.  It brings balance, helps define the focal area, enhances shading, and is a nod to tradition.  I always use plain needlepoint for human faces, hands, eyes, most animal faces, and most lettering.  If there is a beautifully shaded leaf in my project, I often use plain needlepoint to enhance that leaf, despite the fact there are fantastic leaf stitches out there.  Often, plain needlepoint is the first solution stitchers consider for small spaces.

The good news is plain needlepoint is not the only answer for small spaces as there are interesting small space stitches available.  Combine them with today's array of fibers and you have a wide palette to choose from for your smallest spaces.

I am thrilled to introduce #smallspacesunday where I will share my go-to small space stitches as well as new small space discoveries.  I can't promise it will be every Sunday.  But I promise they will be good.

My first #smallspacesunday stitch is Encroaching Gobelin.  This extremely simple stitch is virtually identical to plain needlepoint but you as you go across one row but up two rows.  

Compensation is also very easy as you don't compensate when you reach the top or bottom.  It is also one of the few stitches I don't cringe when doing in the opposite direction, especially on birds, as the alternating direction adds to the dimension this stitch provides.  (Personally, I am a stickler for needlepoint going from lower left corner to upper right corner in an intersection...but that's just me.)

In smaller spaces, this stitch is fantastic for Santa bags, birds, grass, clothing (such as sleeves or shoes), leaves, tree bark, hats.  The possibilities are endless.  Unlike other small space stitches, Encroaching Gobelin works well in larger areas such as grass, ground cover, and/or animal bodies (especially birds, dogs, and cats).  It helps balance a piece, aids in defining the focal point, and adds to the diversity of stitches in an understated way.  Generally speaking, I don't recommend using this stitch on a focal point as the stitch is too subtle.

This stitch is uniquely suited to overdyed threads, especially on grass and ground cover as the various hues work well together to give the space dimension while not overpowering it with a complicated decorative stitch.  Shading is enhanced with Encroaching Gobelin as the subsequent rows are embedded in rows above,  which translates to a subtle transition between colors.  

This stitch diagram, along with other #whimsicalwednesday and future #smallspacesunday stitch diagrams, can also be found on www.pinterest.com/whimsicalstitch/whimsicalwednesdays.  

Be sure to follow whimsicalstitch.com on FacebookPinterestInstagram, and Twitter.

If you like what you see on this blog, want to learn some very creative decorative stitches, and how to put them all together, whimsicalstitch.com sells stitch guides for seasonal Melissa Shirley designs.  Eight guides are currently available and more are in the pipeline.

I hope you enjoy the first #smallspacesunday.  Thank you for stopping by! 

Tramme Time

Tramme is a great stitch for contemporary canvases and has a fascinating history (at least to me).

First, today's use.  Tramme is a fantastic symmetrical stitch that is clean and simple, yet provides texture and color.  It is also incredibly, and stupidly, easy as it is a version of couching.

The easiest part is adding the base thread.  It can be horizontal, vertical, or diagonal.  The stitch diagram shows a vertical tramme.  For this example, add the base thread in vertical rows, skipping a row in between threads (numbered steps on the diagram).  When you reach the bottom or top of a row, simply go across two rows from where you are and insert the needle and return in the opposite direction.  Add the accent rows (lettered steps) on top of the base thread.  

The only trick is how to finish off the base thread.  If you have a stitched area nearby, insert and tie off the base thread there.  If not, while it is still on the needle, take the base thread and pull it up through the canvas in an unused area just out of the way.  Once you tie down the rows with the accent thread, there will be plenty of space for you to tie off the base thread in the accent thread on the back.

It's a great stitch for large or small spaces.  My favorite base threads are velour, a larger cotton pearl (#3 or #5), or a single ply silk (Silk & Ivory, Pepper Pot Silk, Vineyard Silk).  I cover those with a complementary metallic in the same or contrasting color.  The stitched sample here illustrates that combo. A fun background is a single strand light sheen metallic (Fyre Werks Soft Sheen, Flair, Neon Rays+) with a lightweight matte accent thread (Elegance, smaller cotton pearl).  The trick here is to ensure the metallic thread lies flat and wide.

Click on image to see on whimsicalstitch.com's Pinterest account. Visit pinterest.com/whimsicalstitch/whimsicalwednesday for a library of all #whimsicalwednesday and #smallspacesunday stitch diagrams.

Click on image to see on whimsicalstitch.com's Pinterest account. Visit pinterest.com/whimsicalstitch/whimsicalwednesday for a library of all #whimsicalwednesday and #smallspacesunday stitch diagrams.

Now, a very brief history.  Tramme is also a type of needlepoint canvas.  On a tramme canvas, a professional stitches the design (not painted nor transferred), using long horizontal stitches of various lengths and colors of wool.  The stitcher purchases the tramme kit with this canvas and the wools required to complete it.  The stitcher stitches over the horizontal wool threads with continental stitches (or cross stitches) of the same color wool, using the horizontal stitch as the guide for color and number of stitches required.  Shading is easier in a tramme needlepoint because there is there is no question what color thread to use as the stitcher is covering the horizontal lines with the exact same color thread and a wider range of colors are available in the wool fibers used. Many of the finest tramme tapestries are stitched on the Portuguese island of Madeira.

Be sure to follow whimsicalstitch.com on FacebookPinterestInstagram, and Twitter.

If you like what you see on this blog, want to learn some very creative decorative stitches, and how to put them all together, whimsicalstitch.com has a book for you! Mary’s Whimsical Stitches is a contemporary how-to collection of more than 250 stitches for stitchers regardless of skill level. The book includes updated and sequenced diagrams from this blog, all-new stitches, and a chapter on the basics of needlepoint. For more information, visit here. My favorite needlepoint retailers that carry the book can be found here.

whimsicalstitch.com also sells Stitch Guides and Stitch Concepts for Melissa Shirley Designs, Zecca DesignsSandra Gilmore, Purple Palm, Maggie, and Penny MacLeod, and many more. Click here to see the newest guides and click here to see the entire collection.

I hope you have the perfect spot for this stitch! Please enjoy! Have a wonderful #whimsicalwednesday!

A Note about Diagrams
I use color in diagrams to make them as clear as possible.  The primary function of different colored lines is to illustrate a stitch sequence.  For example, layering of colors demonstrates you add them in that order.  They can also provide ideas on how to integrate additional threads (one line for each color).  Or, you can use the same thread for all color lines.  That's where I encourage you to use your imagination for the space you are stitching!

More Woven Whimsy

It's always fun to pull out old pieces and see what stitches I may have forgotten.  I started a new stitch guide yesterday with one of my favorite Melissa Shirley Halloween pieces.  (More about that in a future blog.)

I found a perfect example of a stitch I enjoy but never remember to use.  For some reason, I remember Woven Hungarian as a great small space stitch.  This stitch is similar and just as versatile.

I call it Diagonal Woven Ribbon.  It's a great way to integrate multiple colors or multiple thread finishes (e.g., matte and metallic) into a small space.  Typically, I use a matte thread for the gray lines and metallics for the colored lines in between.  That said, there are many ways this stitch will fit your stitching needs.

You can use threads of the same color for the entire section, or integrate multiple colors (as shown below).

You can alternate colors by row.  In this example, each row is defined by the direction the stitches are facing.  Even here, I would use a matte thread for the thin lines and a metallic for the wider line in between. 

You can leave the middle stitch out all together for a nice open stitch where the shading of the canvas shows through.

Enjoy!  Let us know how you use it!

Woven Whimsy

There is something to be said for the tried and true stitches.  And when they can serve in multiple roles, all the better.  

Allow me to introduce you to (what I call) the Woven Ribbon stitch.  There are far too many things I like about it.  It is a clean, symmetrical design.  It serves well in large spaces without overpowering the piece.  The 2X2 row of stitches in between the larger squares can be glammed up with beads or a Smyrna Cross or dressed down with simple single stitches.

My favorite thing about it is that it does the job for a variety of larger spaces.  I've used it as a sky, a coat, a basket, a table top, wallpaper.

Enjoy the stitch!  Help inspire us by letting us know how you use it!

PS  I admit I might be more excited I figured out how to insert the image in the original blog post.  That said, I'm still posting all #whimsicalwednesday stitches on Pinterest (www.pinterest.com/whimsicalstitch) and Instagram (www.instagram.com/whimsicalstitch).  Enjoy!

A Small #whimsicalwednesday

Small spaces are often the most challenging spaces to be creative.  I have a variety of go-to stitches for small spaces and get overly excited when I can add to that library.

I discovered this stitch last night as I thumbing through books for a new piece I'm working on.  The beauty of this stitch is that it works as an open stitch with a lighter thread and a skipped row (as diagrammed) or as a full coverage stitch with a heavier thread and no skipped row.

I'm using it for a sky but it would work really well as ground covering (grass, dirt, or even snow).  

Small Space Stitch.jpg

#whimsicalwednesday

I'm shocked at how much I use the simplest of darning stitches...and how many things I use it for.  Just in the past month, I used the darning stitch for snow on the ground, a window, furniture, the sky, and a background.  It is an understated stitch with amazing versatility.

I used Kreinik Very Fine Braid #4 on 18 mesh to stitch the window.  I used white Flair to create the snow...a decision made because the shading of the snow would show through.  And, alternating rows of thread types (Elegance and Shimmer Ribbon), I created a background.  It's easy and the end result is gorgeous as it truly highlights the artistry of the painted canvas.  

Darning stitches run a straight line (in any direction) across the canvas, providing a softer feel, versus the traditional diagonal needlepoint with crisp wrapped rows.    

Darning stitches start from the outer edge of the area to be stitched.  When you reach the end of the row, move to next row immediately below where you ended and stitch back across.  Always ensure you have enough thread to complete a row as a darning stitch should only be ended at the end of a row.  If you end it in the middle of a row, there will be a crisp pull on the thread, disrupting the soft flow of the darning stitch.

The darning stitch I use the most is the basic running stitch.  Over three, down one, over one and up again to repeat the pattern from one side of the canvas to the other.  Then repeat on the row below centering the over three beneath the skipped row in the row above.  


I googled "needlepoint darning stitch" as I prepared this blog and was stunned to find articles on it that go as far back as 1982.  This simply means I'm not the first person to share this with you.  However, I hope you can see some additional possibilities for it. 

Happy Stitching!

#whimsicalwednesday

Welcome to our first #whimsicalwednesday.  The purpose of #whimsicalwednesday is to share fun stitches.  This week's theme is FAQ...FAQ from my first TNNA trade show in Columbus.  

One of the most commonly asked questions involved beading.  As far as I am concerned, Brick Beading is the best thing that ever happened to beading.  So, I'm here to answer the first question, "What is brick beading?"

Brick beading is the same as the Brick Stitch, with a bead and thread instead of yarn.  


Simply thread your beading needle, come up from the back through a hole, string the needle with your bead, and return the needle through the canvas two rows up (on the vertical).  Skip a row on the horizontal and repeat.  When you complete the horizontal row, go down one row and repeat the same steps in the vertical rows you just skipped.

The second question was, "And how do you pronounce your last name?"  (Trust me, it's not the first and won't be the last time anyone asks that question.)  Yes, it's French and it's pronounced Leg - uh -ley.  Just like cabaret, except with a leg and a ley instead of a cab and a rey.

I hope you enjoy #whimsicalwednesday.  Please let me know if you have any suggestions for topics you would like to see covered.

Enjoy!