Random Wonderfulness

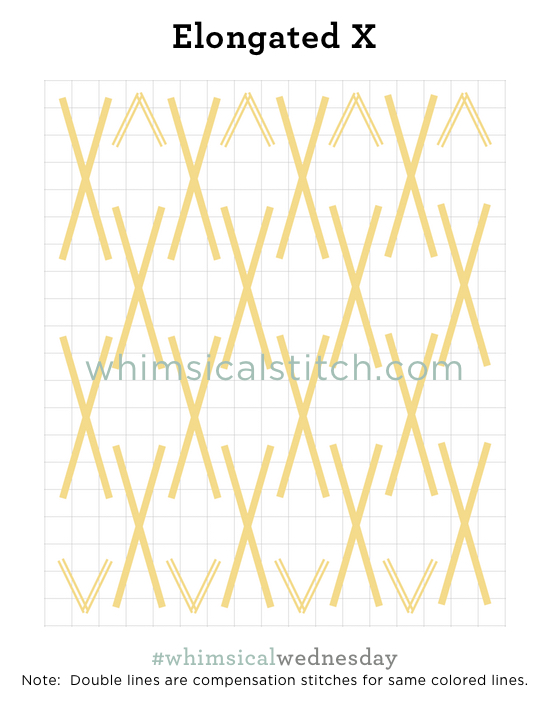
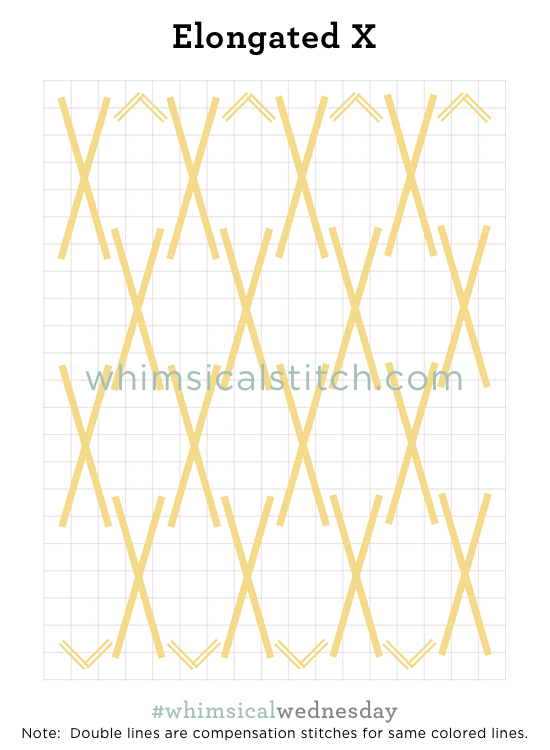
I stumbled across this stitch on Pinterest* a few months ago.  I had never seen it before and have used it multiple times since.  It looks complex, but is the farthest thing from it.  I named the stitch Horizontal Pairs.

The amount of symmetry in this stitch makes it so easy.  I named it as I did to draw your attention to the fact each row of pairs aligns on the horizontal axis.  Add two stitches over two rows, skip two rows on the horizontal, and repeat.  It's that easy!  (Just don't forget to change directions between the complete horizontal rows.)

The end result looks far more advanced than the stitch really is.  I love it so!

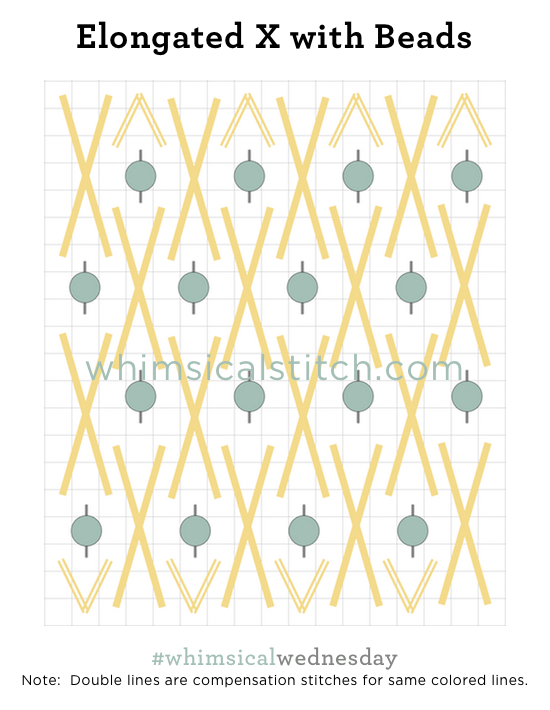
As for threads, virtually anything works.  So far, I've only done the stitch in one color with one thread.  The stitched sample on Instagram uses Vineyard Silk on 18-mesh.  It would look great with rows in alternating colors or thread finishes.  

This stitch diagram, along with all other #whimsicalwednesday and #smallspacesunday stitch diagrams, can also be found on a Pinterest board here.

Be sure to follow whimsicalstitch.com on FacebookPinterestInstagram, and Twitter.

If you like what you see on this blog, want to learn some very creative decorative stitches, and how to put them all together, whimsicalstitch.com sells stitch guides for seasonal Melissa Shirley designs.  28 guides are currently available, including the newest Tea by the Sea, and more are in the pipeline.

Enjoy!

* Speaking of Pinterest, the month of January will focus on stitches and techniques I discovered on Pinterest.

I Always Wanted to be Tall

We wrap up the month of snow with some thought-starters on spacing.  Let's start with the Elongated X.

It's straightforward, fills a large space quickly, allows the beautiful shading to show through (especially for snow), and doesn't overpower an area.  

What if we moved the X's one row up? 

It gets really fun when you incorporate beads.  Here's the first version with a bead in the open area.  (And remember, my diagrams use color for clarity!  For snow, I recommend a white metallic with a white, clear, or translucent bead.  It's a little challenging to distinguish white on white on a diagram.)

So, here is where I usually talk about mesh sizes and bead sizes.  The traditionalist in me would typically say size 14/15 beads on 18-mesh and size 11 beads on 13-mesh.  But here's the thing.  This is snow and it's fun.  The space between the X's in the above example is a good size with potential.  Have fun with it!  Depending on the area, consider using size 8 beads!  Or even size 6 if you want it to really pop!

Speaking of popping, here's a fun addition to the second Elongated X.  Bugle Beads!

You may want to also consider stringing 2-3 beads on a needle and adding those on the vertical.  There are so many possibilities.  The space you are stitching and your personal preferences will dictate the best way.

These stitch diagrams, along with all other #whimsicalwednesday and #smallspacesunday stitch diagrams, can also be found on a Pinterest board here.

Be sure to follow whimsicalstitch.com on FacebookPinterestInstagram, and Twitter.

If you like what you see on this blog, want to learn some very creative decorative stitches, and how to put them all together, whimsicalstitch.com sells stitch guides for seasonal Melissa Shirley designs.  28 guides are currently available and more are in the pipeline.

Enjoy!

Darn Snow

Virtually any darning stitch can work for snow.  I favor straight darning stitches and today's stitch is a recent favorite.  (Here is a refresher on darning stitches.)

The gaps in the row with stitches over three rows are a great opportunity to show off any shading.  Remember to always start from the far side of any row. The diagram starts on the left side.  

While neither stitched sample on Instagram is snow, they are ground covers and are great examples of how this stitch works.  The first is a dirt path on a J. Mahalay piece. The second is the sand from Melissa Shirley's Beach House.

52 Likes, 0 Comments - whimsicalstitch.com (@whimsicalstitch) on Instagram: "5-3 Darning Stitch with ThreadWorx wool (on 18-mesh) for today's snow stitch on..."

32 Likes, 0 Comments - whimsicalstitch.com (@whimsicalstitch) on Instagram: "5-3 Darning Stitch with DMC Pearl Cotton #8 (on 13-mesh) for today's snow stitch on..."

This stitch diagram, along with other #whimsicalwednesday and #smallspacesunday stitch diagrams, can also be found on a Pinterest board (dedicated to whimsicalstitch.com stitch diagrams).  

Be sure to follow whimsicalstitch.com on FacebookPinterestInstagram, and Twitter.

If you like what you see on this blog, want to learn some very creative decorative stitches, and how to put them all together, whimsicalstitch.com sells stitch guides for seasonal Melissa Shirley designs.  27 guides are currently available and more are in the pipeline.

Enjoy!

Santa's Landing Pad

This stitch is unique, to say the least.  And I love it.  I've used it for a blouse and a piece of fruit.  Yes, random areas but the proportions were perfect.  It also makes a perfect snow covered roof.  

When using this stitch for a roof, I strongly recommend a well-defined thread that keeps its shape, such as a Kreinik Metallic, for the dark gray line.  If you want a little less bling on your roof, I recommend a lightweight Silk Pearl (Elegance, Grandeur, or Gloriana Princess Pearl) for the dark gray line.  For the light gray line, Flair or Crystal Braid have the perfect amount of flexibility to cover the area without overwhelming it.  The final touch is the bead between the rectangles.  A clear, white, or clear opal bead would be perfect.  Consider using light blue beading thread for the bead to add a unique smidge of color.

The two stitch samples are from the obscure objects I mentioned earlier.  The first is from a blouse on a Melissa Shirley Indian Girl. The second is from a pear on Melissa Shirley's Vintage Pears...also known as my cat's favorite napping spot.

 Changing directions on this stitch is especially impactful.  This stitch on the vertical is perfect for a tall, slender area.

These stitch diagrams, along with all other #whimsicalwednesday and #smallspacesunday stitch diagrams, can also be found on a Pinterest board here.

Be sure to follow whimsicalstitch.com on FacebookPinterestInstagram, and Twitter.

If you like what you see on this blog, want to learn some very creative decorative stitches, and how to put them all together, whimsicalstitch.com sells stitch guides for seasonal Melissa Shirley designs.  27 guides are currently available and more are in the pipeline.

Enjoy!

X's and O's

I love stitching snow.  The variety of stitches we can use are virtually limitless.  I can't think of a needlepoint artist who doesn't add some sort of secondary color, whether it is gray or blue, to add depth and nuance to the snow.

And those additional colors are exactly why I favor open stitches.  The shading is so beautiful and subtle I don't want to cover it up.  Today's stitch honors that objective and is for a snowman you want to stand out.

Add the base threads (gray lines) first, and follow up with the accent threads (green and yellow lines).  

With most tramme stitches I previously shared with you on this site, I used a matte thread for the base (typically Very Velvet or a heavy Pearl Cotton).  On the stitched sample on Instagram for this stitch, I used all shiny threads.  The base thread is Petite Sparkle Rays.  The green accent thread is Crystal Braid and the yellow accent thread is Shimmer Ribbon.  

When using threads with the same finish, take a moment to make sure they are distinguishable from each other.  As an example, Neon Ray would not work with either Neon Rays + or Shimmer Ribbon as the finishes are too similar.  If you are using contrasting colors, have fun with the colors!  Finish matters less in that scenario.

This stitch diagram, along with all other #whimsicalwednesday and #smallspacesunday stitch diagrams, can also be found on a Pinterest board here.

Be sure to follow whimsicalstitch.com on FacebookPinterestInstagram, and Twitter.

If you like what you see on this blog, want to learn some very creative decorative stitches, and how to put them all together, whimsicalstitch.com sells stitch guides for Melissa Shirley and Zecca Designs.  27 guides are currently available and more are in the pipeline.

Enjoy!

It Takes A Village

While I already knew this stitch when it was presented to me in a workshop, it still surprised me.  It's another stunning example of why one shouldn't associate a stitch with a single theme...or thread combo.  Lastly, I hope you aren't tired of the Beetle Stitch yet because today is another riff on it.  What differentiates the Beetle Stitch this week is its application and the thread combos.  Let's start with the stitched sample.

It combines Burmilana and Fuzzy Stuff and I absolutely love it.  I was so pleasantly surprised to see this combination because, up to that point, I had always considered the Beetle Stitch as a background stitch and I had always associated Fuzzy Stuff with random French Knots or random long stitches.  Due to the size of the Polar Bear, the actual stitch sequence is a little taller than versions I've shared previously.

This stitch diagram, along with all other #whimsicalwednesday and #smallspacesunday stitch diagrams, can also be found on a Pinterest board here.

Be sure to follow whimsicalstitch.com on FacebookPinterestInstagram, and Twitter.

If you like what you see on this blog, want to learn some very creative decorative stitches, and how to put them all together, whimsicalstitch.com sells stitch guides for seasonal Melissa Shirley designs.  27 guides are currently available and more are in the pipeline.

Enjoy!

Wheeeeee!

Today's stitch is the Slide Stitch.  There are so many ways to play with this one.  Let's start with the base concept.

It combines an oblique and a diagonal stitch.  The above diagram illustrates how easy it is to flip directions as necessary.  It looks great either way.  As mentioned last week, I like to combine related color values in the same thread.  Depending on the animal, there may be an occasion to add a metallic.  A great example is a bird wing.

The next version doesn't skip a row and adds an angle.

You can also skip a row with this pattern.  If you don't skip a row, I strongly suggest you alternate thread weights.  The diagram on the right illustrates that concept.  Use a lightweight thread for the gray lines and a heavier thread for the colored lines.  Feel free to add metallics for the single stitches.

These stitch diagrams, along with all other #whimsicalwednesday and #smallspacesunday stitch diagrams, can also be found on a Pinterest board here.

Be sure to follow whimsicalstitch.com on FacebookPinterestInstagram, and Twitter.

If you like what you see on this blog, want to learn some very creative decorative stitches, and how to put them all together, whimsicalstitch.com sells stitch guides for seasonal Melissa Shirley designs.  27 guides are currently available and more are in the pipeline.

Enjoy!

Oui! Oui! Oui!

It's a very excited title because there are three stitches today.  All of them are related but each provides a different look and all work well for animals.  The common theme is alternating stitches over two and four rows.  And you can play with threads!

The first is the Parisian stitch.

Like the Brick Stitch works for a small animal, this works really well for a larger animal.  The stitched sample on Instagram is a version of the Parisian stitch above, but with two threads.

The next variation is a great opportunity to add a contrasting thread.

I really like this variation.  For an animal, I would use the same type of thread for both lines.  However, I would use a complementary color for the second thread, in a slightly lighter or darker value than the first thread.  

The last stitch isn't a Parisian stitch.  However, as I created the diagrams above, this emerged as another way to play with stitches over four rows.  I like the scale.

These stitch diagrams, along with all other #whimsicalwednesday and #smallspacesunday stitch diagrams, can also be found on a Pinterest board here.

Be sure to follow whimsicalstitch.com on FacebookPinterestInstagram, and Twitter.

If you like what you see on this blog, want to learn some very creative decorative stitches, and how to put them all together, whimsicalstitch.com sells stitch guides for seasonal Melissa Shirley designs.  27 guides are currently available and more are in the pipeline.

Enjoy!

Spread Your Wings and Fly!

It is highly likely you already know that leaf stitches make fabulous stitches for birds.  While there are a ton of leaf stitches, I selected two for you.

The first is what I consider a classic leaf stitch and works beautifully on the chest of a feathered friend.    

It's elegant and dramatic.  A lightly overdyed silk or wool works well here.  Pair it with a matching solid colored silk or wool for the face and you are off to the races.

The next stitch is a smaller leaf stitch, perfect for a wing.  It's illustrated in all the possible angles, showing how you can emphasize the direction of a wing.

For a lighter touch, add an empty row in between leaves.  This is a great way to show off the shading.  You can also take it one step further and add a sparkly accent, such as a bead. 

These stitch diagrams, along with all other #whimsicalwednesday and #smallspacesunday stitch diagrams, can also be found on a Pinterest board here.

Be sure to follow whimsicalstitch.com on FacebookPinterestInstagram, and Twitter.

If you like what you see on this blog, want to learn some very creative decorative stitches, and how to put them all together, whimsicalstitch.com sells stitch guides for seasonal Melissa Shirley designs.  27 guides are currently available and more are in the pipeline.

Enjoy!

Nothing Like a Fur Coat in August

I'm sure all of our beloved four-legged friends would love to not have fur coats right about now, so let's honor them by talking about stitches that are perfect for animals!  The month of August is dedicated to stitches for animals.  

Before I share today's stitch, I have a confession.  While I agree there are no true rules for needlepoint, I admit I have a very strong opinion about stitches for anything with a face.  I truly believe Plain Needlepoint is the way to go with all faces, whether they are human or animal.  I can and do fun body stitches, but I believe the face needs to represent the animal's (or person's) face, with all the shading that conveys its personality and expression.

The best examples are Vicky Sawyer's animals.  She has back stories for all of her paintings and she is very particular about what personality or emotion her animals are expressing.  You can see exasperation, joy, shyness, and many other emotions in the animals' faces.  Take a look next time before you begin stitching.  It may make you reconsider how you approach their faces.

Okay, with that aside, let's get to the good stuff. Today's stitch offers two versions of a tied Gobelin stitch.   These stitches are great for chests, wings, or legs, especially when you want to add a directional element.

The first is a narrow version.

And the second is a wider version. 

For animals, my instinct is to use two matte threads with similar color values.  A few plies of Lorikeet (a gently overdyed stranded wool) with a solid colored single ply thread would make a great combination.  For certain areas, such as bird wings, the yellow line could be a lightweight metallic.  This is where Kreinik stands out, as they offer (at least) four different weights.  The Kreinik metallics also add a small textures and the thread retains its "round" shape.  

This stitch also makes great greenery.  The stitched sample on Instagram is a bush from a soon to be released Melissa Shirley piece.

These stitch diagrams, along with all other #whimsicalwednesday and #smallspacesunday stitch diagrams, can also be found on a Pinterest board here.

Be sure to follow whimsicalstitch.com on FacebookPinterestInstagram, and Twitter.

If you like what you see on this blog, want to learn some very creative decorative stitches, and how to put them all together, whimsicalstitch.com sells stitch guides for seasonal Melissa Shirley designs.  27 guides are currently available and more are in the pipeline.

Enjoy!