Speaking of Star Octagon...

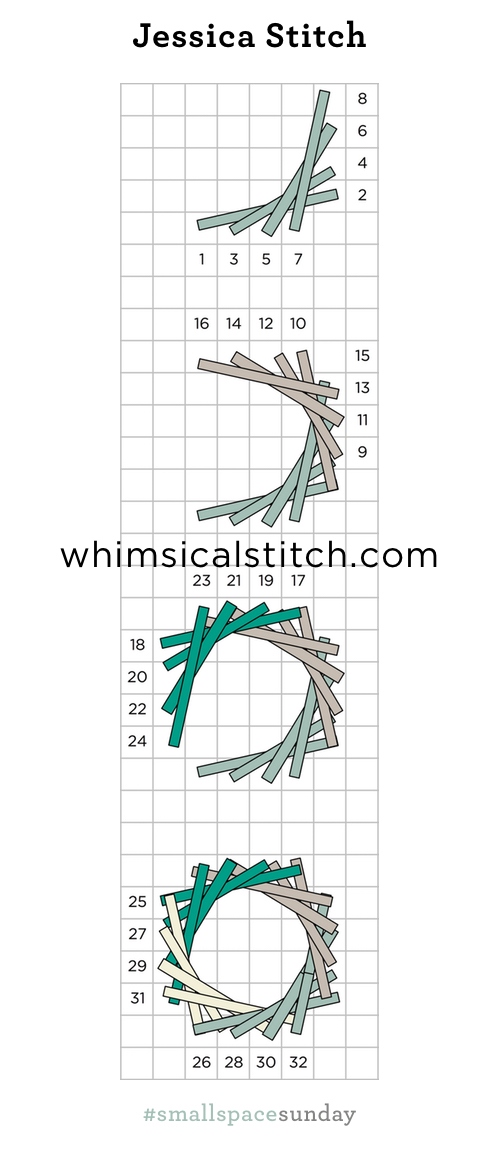
Last week, I reminded you about Star Octagon on TBT.  It is a great stitch and it is also a great case study for skipping a row.  As you may also recall, I recently shared a stitch that found its magic in skipping a row, specifically the Alternating Cashmere variation.

I tried the same approach on Star Octagon...and loved it.

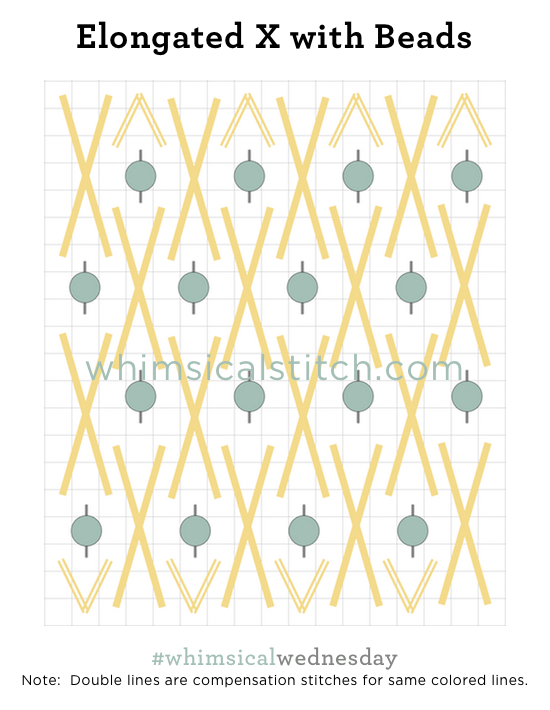
I like the empty centers.  It's a great way to show off the beautiful painting on so many of today's hand painted canvases.  However, they can be filled with Upright Crosses, a Rhodes stitch, or even more beads.  The space will tell you what to do.  

This stitch would work great on water, a sky, a bird's chest or wing, many pieces of clothing...even grass (with a cross-stitch in the center instead of a bead).  There are a lot of possibilities.  

Unfortunately, there is no stitched sample on Instagram this week.  Instead, to keep the stitching theme going on Instagram, I posted a picture of my cat, Lola, helping me stitch.  She's very good at helping.  Just ask her.  

These stitch diagrams, along with all other #whimsicalwednesday and #smallspacesunday stitch diagrams, can also be found on a Pinterest board here.

Be sure to follow whimsicalstitch.com on FacebookPinterestInstagram, and Twitter.

If you like what you see on this blog, want to learn some very creative decorative stitches, and how to put them all together, whimsicalstitch.com sells stitch guides for Melissa Shirley Designs and Zecca Designs.  28 guides are currently available and more are in the pipeline.

Enjoy!

A Green TBT

Today's TBT is the Star Octagon.

The diagram for this stitch, along with other #whimsicalwednesday and #smallspacesunday stitch diagrams, can also be found on a Pinterest board here.   

Be sure to follow whimsicalstitch.com on FacebookPinterestInstagram, and Twitter.

If you like what you see on this blog, want to learn some very creative decorative stitches, and how to put them all together, whimsicalstitch.com sells stitch guides for Melissa Shirley Designs and Zecca Designs.  28 guides are currently available and more are in the pipeline.

Enjoy!

Large and in Charge

Today's stitch is a doozy.  With the exception of the Smyrna crosses and any required compensation stitches, the smallest stitch is over four rows.  As much as I advocate for Plain Needlepoint, on certain days a small stitch can be no smaller than four rows.  I give you Double Square Diamonds.

Click on image to see on whimsicalstitch.com's Pinterest account. Visit pinterest.com/whimsicalstitch/whimsicalwednesday for a library of all #whimsicalwednesday and #smallspacesunday stitch diagrams.

Click on image to see on whimsicalstitch.com's Pinterest account. Visit pinterest.com/whimsicalstitch/whimsicalwednesday for a library of all #whimsicalwednesday and #smallspacesunday stitch diagrams.

This is one of those stitches where the diagram looks kinda "meh."  I recommend doing the aqua lines first, followed by the light gray lines, and end with the Smyrna Crosses.  Take a look at the stitched sample for a moment to see how wonderful it can be. 

I love the concept of stitching the smallest lines (the straight light gray lines) in a different color.  In my opinion, it is what makes this stitch stand out.  This also provides more thread combination possibilities.  The stitched sample uses three threads with two finishes with related color values.  To translate the photo to the diagram, the aqua and light gray lines are matte finishes (in related colors) and the darkest gray lines utilize a metallic thread (in a related color).  

Another approach is to stitch the light gray lines (both straight and diagonal) in a lightweight metallic with a wonderful single ply silk for the aqua lines.  I also love the idea of stitching the three colored lines in three different colors.  For example, this could make a great coat for Santa with a matte red thread for the aqua lines, a gold metallic for the straight light gray lines, a red metallic for the diagonal gray lines, and a purple metallic for the Smyrna Cross.  

You could do the whole things in a single hue...let's say a blue sky.  Stitch the aqua lines in a pearl cotton.  Stitch the vertical light gray lines in Flair and the diagonal light gray lines in a lightweight Kreinik Metallic (Fine Braid #8 on 13-mesh and Very Fine Braid #4 on 18-mesh). Stitch the Smyrna Crosses in the same Flair or the same Kreinik Metallic. 

This stitch diagram, along with all other #whimsicalwednesday and #smallspacesunday stitch diagrams, can also be found on a Pinterest board here.

Be sure to follow whimsicalstitch.com on FacebookPinterestInstagram, and Twitter.

If you like what you see on this blog, want to learn some very creative decorative stitches, and how to put them all together, whimsicalstitch.com sells stitch guides for Melissa Shirley Designs and Zecca Designs.  28 guides are currently available, including the newest Tea by the Sea, and more are in the pipeline.

I hope you have the perfect spot for this stitch!  Enjoy!

Don't Hate Me

This is a fantastic small space stitch and is one of the few stitches that can stand alone with only one.  But, I swear out loud every single time I use it...and am always thrilled with the end result.  Always.  Today's stitch is the Jessica Stitch.

The important thing to remember about the Jessica is, despite appearances, there is a pattern to the stitch and you have to pay attention to the diagram.  The core element is repeated four times, once from each side of the circle.

Jessica Core Element.jpg

For clarity in this diagram (and the next diagram),  the sequence numbers are on the rows just outside the stitch sequence location.  

This pattern repeats itself in all four directions of the stitch.   The pattern begins up one row and over the number of rows your Jessica size will be.  Each subsequent stitch is one row over, UP a single row higher and OVER a single row lower.  For the diagram example, it's four rows.  So, the pattern is:

Up one and over four
Up two and over three
Up three and over two
Up four and over one

You repeat this pattern four times to create the circle.  If you have a stitch starting or ending in any of the four corners, it is no longer a circle, it is a square.  

Jessica.jpg
Click on image to see on whimsicalstitch.com's Instagram account. Visit instagram.com/whimsicalstitch to see a library of stitched samples for select #whimsicalwednesday and #smallspacesunday stitch diagrams.

Click on image to see on whimsicalstitch.com's Instagram account. Visit instagram.com/whimsicalstitch to see a library of stitched samples for select #whimsicalwednesday and #smallspacesunday stitch diagrams.

Different colors are used on each side to highlight the comment element for clarity.  In addition, and this is very important, on the last step, each of the four stitches (cream lines) are tucked under the stitches already there (light aqua lines).

The stitched sample on Instagram is from a Melissa Shirley stocking I did for MF9YO (my favorite 9-year old).

This stitch diagram, along with all other #whimsicalwednesday and #smallspacesunday stitch diagrams, can also be found on a Pinterest board here.

Be sure to follow whimsicalstitch.com on FacebookPinterestInstagram, and Twitter.

If you like what you see on this blog, want to learn some very creative decorative stitches, and how to put them all together, whimsicalstitch.com sells stitch guides for Melissa Shirley Designs and Zecca Designs.  28 guides are currently available, including the newest Tea by the Sea, and more are in the pipeline.

So, as the blog title says, don't hate me.  I hope this helps you embrace a really fun stitch and I hope you have the perfect spot for it!  Enjoy!

SOS

If anyone is aware of a name for this stitch, please share!  I discovered it a couple years ago and I absolutely love how it looks like a circle, looks better without every intersection covered (in my opinion), and is a fantastic stitch to combine threads (whether it be finish or color).

I'm calling it Circles with Straight Lines until I hear otherwise.

A quick note to acknowledge I did not include compensation stitches because it is a complex stitch and I want you to focus on the stitch itself and to not be distracted by compensation stitches.

The base pattern (the dark gray lines) is over 3-4-5-skip a row-5-4-3.  You fill the 2X2 intersections between the base pattern with plain needlepoint (light aqua lines), a Smyrna Cross, beads...whatever your heart desires.

The skipped row in the base pattern (turquoise line) is filled with a contrasting stitch of some kind (whether it be the same color thread with a different finish or a contrasting color).  Here's where the fun starts.  The diagram shows a center stitch over two rows (turquoise line) with yet another contrasting color (the light gray lines) on either side.  Personally, I prefer this stitch with just the single stitch without the light gray stitches on either side.  It makes a more dramatic circle.

The stitched samples tell it all.  The first one is a classic rendition.  It has full coverage and, for the most part, contrasting thread finishes.

The sample on the left below is from a piece in my personal collection.  The stitch is on a pillow and uses beads in the intersections and does not include the accent stitches on either side of the center stitch. The sample on the right below is from Debbie Mumm's Polar Express.  This includes full coverage with multiple colors and finishes.

32 Likes, 0 Comments - whimsicalstitch.com (@whimsicalstitch) on Instagram: "Circle Stitch (for lack of a better name) with DMC Floss, Flair, and Kreinik Metallics Tapestry..."

As you can see, this stitch can be all and do all.  I hope you have the perfect spot for it.  And I hope you enjoy it as much as I do.

This stitch diagram, along with all other #whimsicalwednesday and #smallspacesunday stitch diagrams, can also be found on a Pinterest board here.

Be sure to follow whimsicalstitch.com on FacebookPinterestInstagram, and Twitter.

If you like what you see on this blog, want to learn some very creative decorative stitches, and how to put them all together, whimsicalstitch.com sells stitch guides for Melissa Shirley Designs and Zecca Designs.  28 guides are currently available, including the newest Tea by the Sea, and more are in the pipeline.

Enjoy!

A Beading TBT

Today's TBT is Traditional Beading.

The diagram for this stitch, along with other #whimsicalwednesday and #smallspacesunday stitch diagrams, can also be found on a Pinterest board here.   

Be sure to follow whimsicalstitch.com on FacebookPinterestInstagram, and Twitter.

If you like what you see on this blog, want to learn some very creative decorative stitches, and how to put them all together, whimsicalstitch.com sells stitch guides for Melissa Shirley Designs and Zecca Designs.  28 guides are currently available and more are in the pipeline.

Enjoy!

One of the First Stitches I Learned

Byzantine with Smyrna Crosses.jpg

The Byzantine is one of the first stitches I learned.  This, of course, means I shunned it in for several years as I found stitches I considered more fun or more intriguing.  Frankly, it just meant this was one of the first stitches taught to me and I always thought there had to be something better.  Sometimes, there is nothing better.  The Byzantine can be manipulated in so many ways as it is a fantastic, all-purpose, go-to stitch.  I need to use it more often.

It is a great way to mix thread finishes and colors.  Due to technical difficulties, you can find the stitched sample here. The stitched sample uses good old DMC Floss (4-ply) with Kreinik Metallics Tapestry Braid (#12) on 18-mesh.  

This stitch works for countless spaces, including trees and shrubs, clothing, floors, water, samplers...the list is endless, which also means the threads are endless.  

This stitch diagram, along with all other #whimsicalwednesday and #smallspacesunday stitch diagrams, can be found on a Pinterest board here.

Be sure to follow whimsicalstitch.com on FacebookPinterestInstagram, and Twitter.

If you like what you see on this blog, want to learn some very creative decorative stitches, and how to put them all together, whimsicalstitch.com sells stitch guides for Melissa Shirley Designs and Zecca Designs. 28 guides are available, including the newest Tea by the Sea, and more are in the pipeline.

Enjoy!

Random Wonderfulness

I stumbled across this stitch on Pinterest* a few months ago.  I had never seen it before and have used it multiple times since.  It looks complex, but is the farthest thing from it.  I named the stitch Horizontal Pairs.

The amount of symmetry in this stitch makes it so easy.  I named it as I did to draw your attention to the fact each row of pairs aligns on the horizontal axis.  Add two stitches over two rows, skip two rows on the horizontal, and repeat.  It's that easy!  (Just don't forget to change directions between the complete horizontal rows.)

The end result looks far more advanced than the stitch really is.  I love it so!

As for threads, virtually anything works.  So far, I've only done the stitch in one color with one thread.  The stitched sample on Instagram uses Vineyard Silk on 18-mesh.  It would look great with rows in alternating colors or thread finishes.  

This stitch diagram, along with all other #whimsicalwednesday and #smallspacesunday stitch diagrams, can also be found on a Pinterest board here.

Be sure to follow whimsicalstitch.com on FacebookPinterestInstagram, and Twitter.

If you like what you see on this blog, want to learn some very creative decorative stitches, and how to put them all together, whimsicalstitch.com sells stitch guides for seasonal Melissa Shirley designs.  28 guides are currently available, including the newest Tea by the Sea, and more are in the pipeline.

Enjoy!

* Speaking of Pinterest, the month of January will focus on stitches and techniques I discovered on Pinterest.

I Always Wanted to be Tall

We wrap up the month of snow with some thought-starters on spacing.  Let's start with the Elongated X.

It's straightforward, fills a large space quickly, allows the beautiful shading to show through (especially for snow), and doesn't overpower an area.  

What if we moved the X's one row up? 

It gets really fun when you incorporate beads.  Here's the first version with a bead in the open area.  (And remember, my diagrams use color for clarity!  For snow, I recommend a white metallic with a white, clear, or translucent bead.  It's a little challenging to distinguish white on white on a diagram.)

So, here is where I usually talk about mesh sizes and bead sizes.  The traditionalist in me would typically say size 14/15 beads on 18-mesh and size 11 beads on 13-mesh.  But here's the thing.  This is snow and it's fun.  The space between the X's in the above example is a good size with potential.  Have fun with it!  Depending on the area, consider using size 8 beads!  Or even size 6 if you want it to really pop!

Speaking of popping, here's a fun addition to the second Elongated X.  Bugle Beads!

You may want to also consider stringing 2-3 beads on a needle and adding those on the vertical.  There are so many possibilities.  The space you are stitching and your personal preferences will dictate the best way.

These stitch diagrams, along with all other #whimsicalwednesday and #smallspacesunday stitch diagrams, can also be found on a Pinterest board here.

Be sure to follow whimsicalstitch.com on FacebookPinterestInstagram, and Twitter.

If you like what you see on this blog, want to learn some very creative decorative stitches, and how to put them all together, whimsicalstitch.com sells stitch guides for seasonal Melissa Shirley designs.  28 guides are currently available and more are in the pipeline.

Enjoy!

Tiny Tiny Diamonds!

Today's post is September's final #smallspacesunday.  And it's a really special stitch.  It's an even more petite variation on last week's #smallspacesunday.  .

The stitch is Tiny Diamonds with Beads.  The image file name is "water snow whatever."  Part of that is that it is 6:00 am and I'm a little tired and the other part is this stitch is perfect for snow or water, especially snow or water that is receding in the background of a piece.

Small Diamonds with Beads.jpg

For water (or snow), I recommend a lightweight metallic such as Kreinik Metallics Fine Braid #8 (for 13-mesh) or Kreinik Metallics Very Fine Braid #4 (for 18-mesh).  Any clear, translucent, or light-colored crystal bead will work in the center. 

This stitch diagram, along with all other #whimsicalwednesday and #smallspacesunday stitch diagrams, can also be found on a Pinterest board here.

Be sure to follow whimsicalstitch.com on FacebookPinterestInstagram, and Twitter.

If you like what you see on this blog, want to learn some very creative decorative stitches, and how to put them all together, whimsicalstitch.com sells stitch guides for seasonal Melissa Shirley designs.  28 guides are currently available, including the newest Tea by the Sea, and more are in the pipeline.

Enjoy!