545

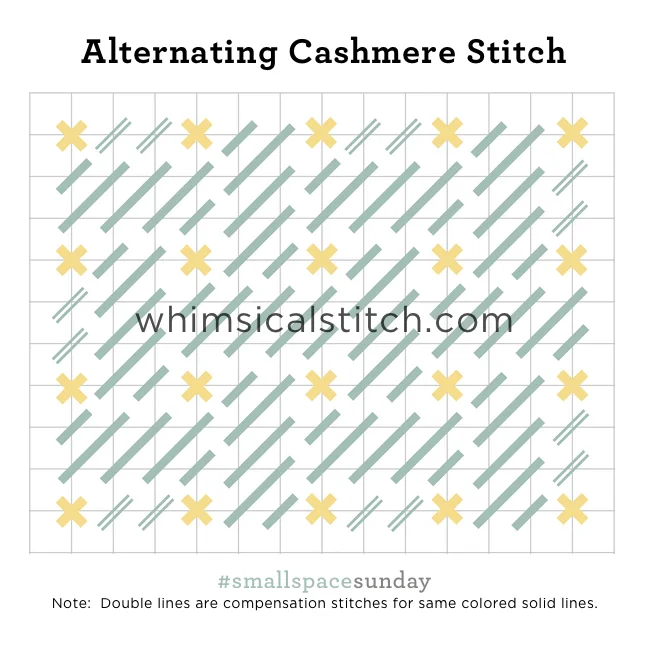
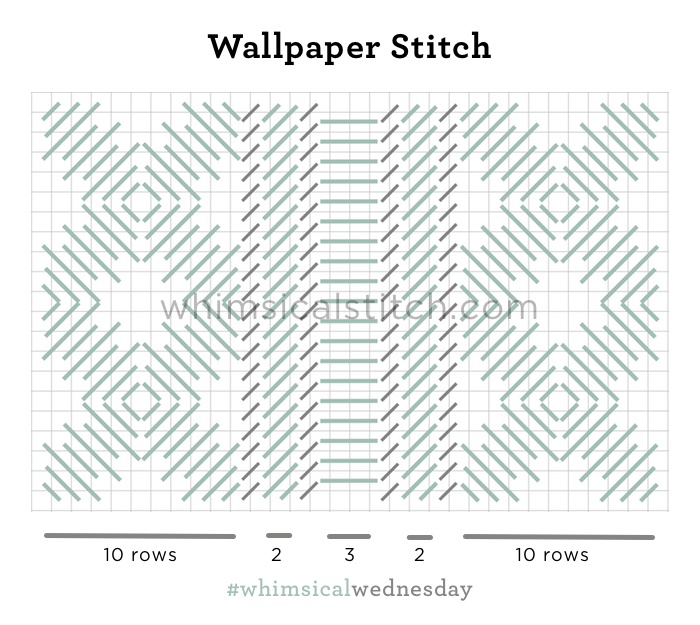
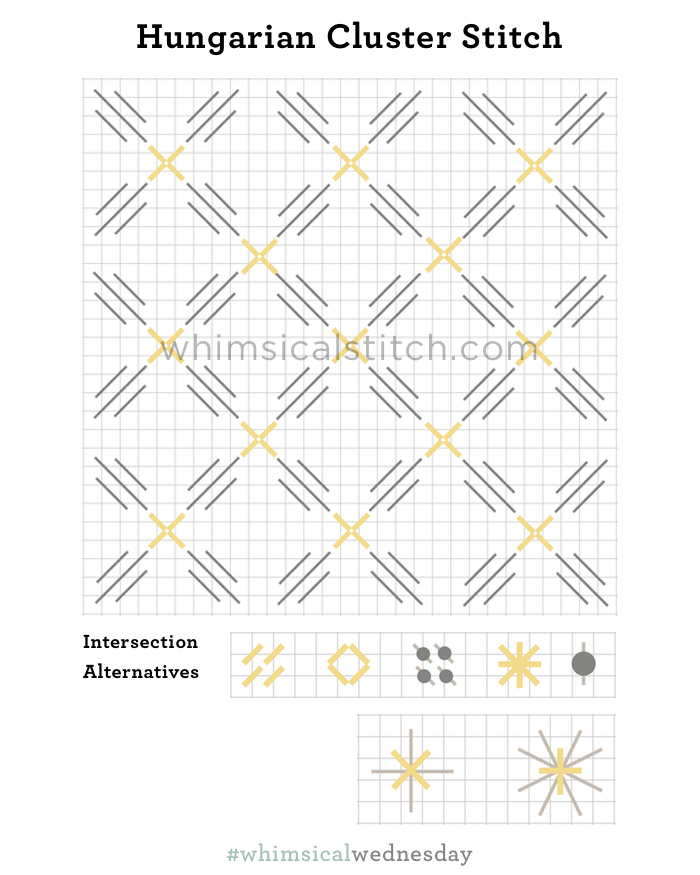
I remember a lot of stitches simply by their stitch sequences, hence the name 5-4-5 for this one.  This is a fantastic background stitch, especially when you want the background to recede just a little bit, but not too much.  It's perfect for many Mary Lake Thompson canvases by Melissa Shirley.

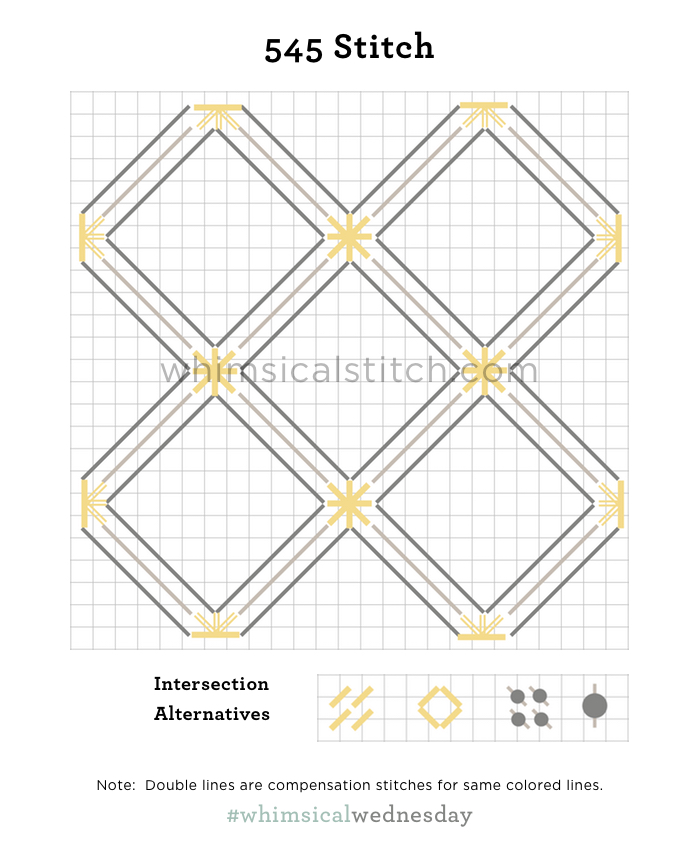
This stitch is easy and quite fun, mainly because it goes so quickly.  I like the wide open feel.  It is ideal for a background, a sky, or a tabletop.  Typically, I do the dark gray lines first, followed by the light gray lines.  My typical thread combo is matte for the dark gray lines and metallic for the light gray and yellow lines.  I like to use two different metallics to define the elements.  I prefer Kreinik Metallics for the light gray lines, largely because they have a variety of braid sizes, allowing me to control the overall impact of the stitch.  For most of these scenarios, I like to use threads with similar color values.

The stitched sample on Instagram provides a work in progress.  It is a background stitch for a Mary Lake Thompson piece using similar color values with matte and metallic threads.  I suspect the end result will include a bead in the intersections.  

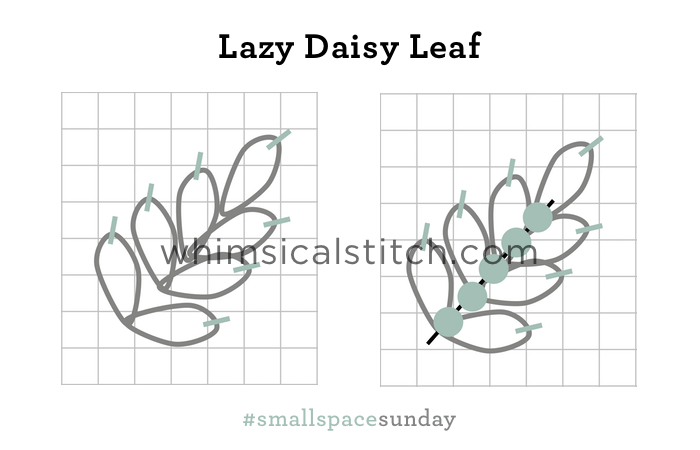
With one more step, this stitch changes completely.

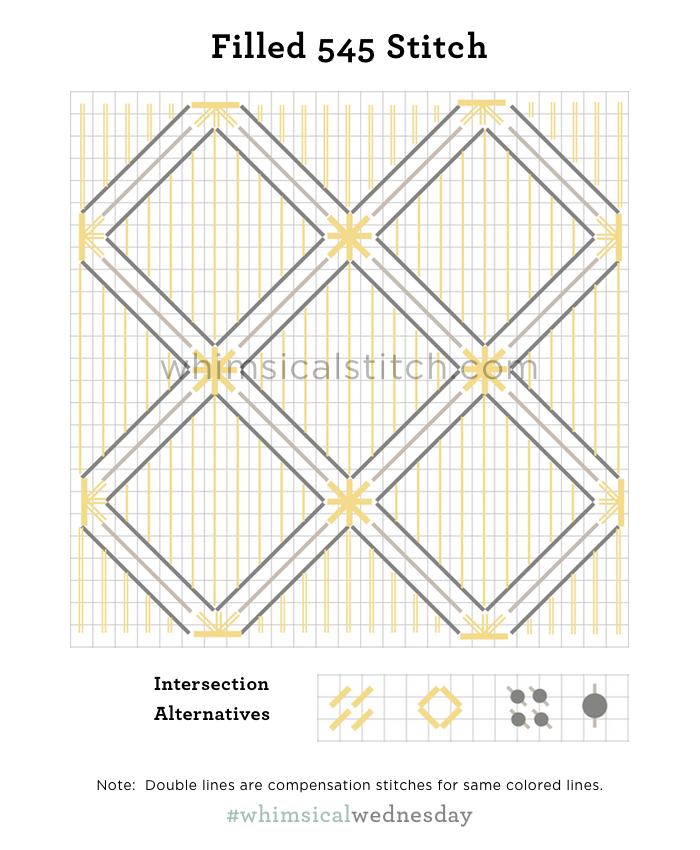
By filling the stitch, you expand its possibilities.  This would make an excellent Santa coat or bag, floor, or wallpaper, to name just a few. You can play with the color combinations, especially for Santa, for the different elements.

These stitch diagrams, along with other #whimsicalwednesday and #smallspacesunday stitch diagrams, can also be found on www.pinterest.com/whimsicalstitch/whimsicalwednesday.  

Be sure to follow whimsicalstitch.com on FacebookPinterestInstagram, and Twitter.

If you like what you see on this blog, want to learn some very creative decorative stitches, and how to put them all together, whimsicalstitch.com sells stitch guides for seasonal Melissa Shirley designs.  22 guides are currently available and more are in the pipeline.

Enjoy! 

It's a (Small) Brick House

Today's stitch is a small version of the Cashmere stitch.  The Alternating Cashmere stitch simply alternates 4X2 rectangles, leaving one intersection available for an accent.

It's great for small houses, as illustrated by the stitched sample on Instagram.  Other ideas for areas include backgrounds for small pieces (ornaments, box inserts, eyeglass cases, etc), clothing in smaller areas (especially pants), boots (for any size boots), rooftops, or ground cover.    

So, a funny thing happened on the way to the accent stitch (the yellow lines).  While I charted it to be distinctly different, whether through contrasting color or contrasting thread type, when I stitch, I've been using the same thread as the remainder of the area for a really subtle end result. 

This stitch diagram, along with other #whimsicalwednesday and #smallspacesunday stitch diagrams, can also be found on www.pinterest.com/whimsicalstitch/whimsicalwednesday.  

Be sure to follow whimsicalstitch.com on FacebookPinterestInstagram, and Twitter.

If you like what you see on this blog, want to learn some very creative decorative stitches, and how to put them all together, whimsicalstitch.com sells stitch guides for seasonal Melissa Shirley designs.  22 guides are currently available and more are in the pipeline.

Enjoy! 

Tramme for Two!

For a border over two rows, a great solution is Tramme.  It's a unique and attractive border solution that breaks outside of the traditional extended cashmere stitch or padding.  The overarching concept is discussed here and here.  

I like it for a border because it is understated and can be subtle.  The first diagram demonstrates that point.

For the base rows (the gray lines), I encourage you to use a wide and dramatic thread like velvet or an oversized pearl.  For a border stitch, both the base thread and the accent threads (yellow lines) contribute significantly to the overall look, more so than the typical tramme stitch (in my opinion).

The second variation of this theme adds a contrasting accent.

The sequence is to add the base rows (gray lines), followed by first set of accent threads (numbered lines), and end with the last set of accent threads (lettered lines).  The contrast can be with color (as diagrammed) or with thread finish in the same color values.

The last variation is to add an X over the base threads.

These stitch diagrams, along with other #whimsicalwednesday and #smallspacesunday stitch diagrams, can also be found on www.pinterest.com/whimsicalstitch/whimsicalwednesday.  

Be sure to follow whimsicalstitch.com on FacebookPinterestInstagram, and Twitter.

If you like what you see on this blog, want to learn some very creative decorative stitches, and how to put them all together, whimsicalstitch.com sells stitch guides for seasonal Melissa Shirley designs.  20 guides are currently available and more are in the pipeline.

Enjoy!

Still Hip to be Square

And it's still one of my favorite stitches.

Today's TBT features the Split Square stitch.

Diagrams for this stitch, along with other #whimsicalwednesday and #smallspacesunday stitch diagrams, can also be found on www.pinterest.com/whimsicalstitch/whimsicalwednesday.  

Be sure to follow whimsicalstitch.com on FacebookPinterestInstagram, and Twitter.

If you like what you see on this blog, want to learn some very creative decorative stitches, and how to put them all together, whimsicalstitch.com sells stitch guides for seasonal Melissa Shirley designs.  22 guides are currently available and more are in the pipeline.

Enjoy!

Cross My Heart...Again!

Today's stitch is Tied Oblong Crosses.  As I diagrammed this stitch, I quickly realized I could have added an indefinite number of variations, so please consider these nothing more than thought starters!

Scalability and versatility define this stitch.  The three possibilities illustrated below include oblong crosses five rows high and two rows wide.  You can make it as small as three rows high and literally as tall as he space.  

The chart on the left includes three base patterns that differ based on their accent stitches (the gray lines).  You can center the accents on the vertical, horizontal, or both.  To make the vertical accent work, the underlying cross (the aqua lines) needs to be at least two rows wide (as illustrated).  The diagram on the right illustrates how a base pattern is put together to create the overall look.   

Generally speaking, I prefer a matte thread for the crosses and a metallic thread for the accent stitches.  If you use the bottom pattern with two accent threads, be sure to use threads with enough color contrast between them to distinguish the look.

The stitched sample on Instagram is from a roof on piece I'm currently stitching.  It would make a great border stitch, especially on clothing.  There is so much you can do with this...let your imagination go wild!

On a separate but related subject, I would love to receive feedback on whimsicalstitch.com.  Please visit this link to fill out a short survey.  Thank you!

This stitch diagram, along with other #whimsicalwednesday and #smallspacesunday stitch diagrams, can also be found on www.pinterest.com/whimsicalstitch/whimsicalwednesday.  

Be sure to follow whimsicalstitch.com on FacebookPinterestInstagram, and Twitter.

If you like what you see on this blog, want to learn some very creative decorative stitches, and how to put them all together, whimsicalstitch.com sells stitch guides for seasonal Melissa Shirley designs.  22 guides are currently available and more are in the pipeline.

Enjoy!

Patterns

This week's post is less about a specific stitch and more about how to mix patterns to fit rigid space definitions.  The backstory is someone asked me for a wallpaper stitch.  My first thought was some sort of huge, open, and fun stitch (my favorite).  Turns out the wallpaper was really columns surrounded by single vertical rows painted in a different color.  This person needed three stripe stitches to fit an overarching wallpaper.  A completely different request, but a great opportunity to mix things up a little.

The trick was to define the dimensions of the individual spaces, find a pattern, and mix stitches to fit that pattern.  Turns out the column width pattern was 10, 2, 3, 2, 10, 2, 3, 2, 10 with a row of plain needlepoint on either side of every column.  So, I needed three stitches, one ten rows wide, two rows wide, and three rows wide.

Here's where I landed.

Clearly, the 10 row column has the most stitching potential.  Any pair of 5X5 squares would fill the width of the space.  A smaller pattern, such as the Star OctagonWoven Hungarian, or even a Tramme stitch would fit.  It's all a matter of personal taste.

The smaller columns are best handled in traditional stripe stitches.  But, don't be afraid to mix it up on the direction.  Mix diagonal and horizontal for a little change of pace.  You could do the over-2 columns in a single row of Tramme, or fill them with Smyrna Crosses from top to bottom.   

In terms of threads for backgrounds, I tend to understate the threads.  The stitched sample on Instagram illustrates the above diagram with a cream Subtlety.  I've seen versions of these columns with the all the columns in a matte thread and the gray lines are in a light sheen metallic.  The small splash of a muted metallic was a nice touch.  The final determination is the space you are stitching.  These are simply thought-starters.

These stitch diagrams, along with other #whimsicalwednesday and #smallspacesunday stitch diagrams, can also be found on www.pinterest.com/whimsicalstitch/whimsicalwednesday.  

Be sure to follow whimsicalstitch.com on FacebookPinterestInstagram, and Twitter.

If you like what you see on this blog, want to learn some very creative decorative stitches, and how to put them all together, whimsicalstitch.com sells stitch guides for seasonal Melissa Shirley designs.  22 guides are currently available and more are in the pipeline.

Enjoy!

Sweet Small Leaves

One of the perks of my job is visiting Melissa Shirley's studio.  It's like a visit to the candy store, Christmas morning, and my birthday all mixed together.  While one would think the canvases would keep me busy enough to overstay my welcome, I'm also fascinated by the stitched samples.  I'm always on the lookout for new stitches to integrate into my stitch work or this blog.

Today's #smallspacesunday comes to you from Melissa's studio.  These are some really clever stitches for small leaves that I absolutely fell in adoration with.  They were part of a lovely purse from Melissa's collection.

The first is a really simple addition to plain needlepoint.

The first step is to fill the section with Plain Needlepoint.  The second step is to add beads in every other hole where any two stitches meet.  The key to success here is to bring the beading needle up and down in the same hole, centering the bead on the intersection.  The stitched sample is on Instagram.

The next leaf is what I consider a universal small space stitch.  I never thought of it for a leaf and I love the idea.

Depending on your mood, or the leaf direction, you can do the alternating rows on the horizontal or vertical.  The stitched sample on Instagram is on the vertical (and corresponds to the above diagram).

The last adorable leaf is a series of Lazy Daisies shaped into a leaf with an extra little something something.

The photo on Instagram shows how charming the addition of beads is.  The beads are simply strung from the base to below the tip of the leaf.  I love this idea.

In other news, thank you for participating in State of the Whimsical Union survey.  Current survey findings can be found here.  Survey is still open, if you would like to add your voice.  Visit the survey here.

These stitch diagrams, along with other #whimsicalwednesday and #smallspacesunday stitch diagrams, can also be found on www.pinterest.com/whimsicalstitch/whimsicalwednesday.  

Be sure to follow whimsicalstitch.com on FacebookPinterestInstagram, and Twitter.

If you like what you see on this blog, want to learn some very creative decorative stitches, and how to put them all together, whimsicalstitch.com sells stitch guides for Melissa Shirley and Zecca designs.  22 guides are currently available and more are in the pipeline.

Enjoy! 

Survey Says!

A huge thank you to all of you who participated in the still open survey about whimsicalstitch.com's products and services.  It's great to know what I'm doing right and what I can be doing better.  (If you want to add your thoughts, please go here.)

The following were common themes in the open-ended questions, along with direct quotes representing the theme.

Instagram
"I don't do Instagram." - Survey Respondent

You don't need to "do Instagram" to see the photos.  The whimsicalstitch.com Instagram page is public, so anyone can see whimsicalstitch.com photos whether or not they have an account.  A link is embedded in the whimsicalstitch.com blog post that takes you directly to the stitched sample on Instagram.  

I chose Instagram to share the stitched samples because it's a popular social media site that aligns perfectly with creative endeavors.  In addition, it's an opportunity to broaden awareness of the beauty of today's needlepoint and how it can enhance a home.  It's important we grow our community!

On a related note, please don't overlook whimsicalstitch.com on Pinterest!  whimsicalstitch.com's Pinterest page has a board dedicated to the diagrams from #whimsicalwednesday and #smallspacesunday.  You can find that here.  

Custom Stitch Guides
"Can I purchase a stitch guide for a piece I purchased?" - Survey Respondent

As I write this, I am working on a template and pricing structure and hope to make a formal announcement soon.  

Teaching
"Are you available for private lessons?" - Survey Respondent

Currently, my teaching focuses on workshops hosted by local needlepoint stores.  My events page lists all the announced events.  Please join us if you are in any of those neighborhoods!  If you would like me to come to your local store, please let your local store owner know.  

More Posts Please
"Put two Wednesdays in a week; hard to beat what you are doing now." - Survey Respondent

Ha!  I don't have that power.  (Frankly, if I'm going to add a day to the week, it's going to be a Saturday.)  I'd like to remind everyone about #smallspacesundays, occasional posts dedicated to small space stitches published on Sundays.  So, every couple of weeks, it's just like there are two Wednesdays!

Honestly, I don't have plans to expand beyond posting stitch diagrams more than 1-2X per week, which leads me to...

Book
"Would love to see her compile a book of her whimsical stitches!" - Survey Respondent

Funny you should mention that...I would love her to do that too!  (And by her, I mean me.)  Please stay tuned!

Again, thank you for your recent feedback and your future feedback.  It is invaluable.

Throwback Tramme

It's Tramme time once again.  

Today's TBT features the Tramme stitch.  

Diagrams for this stitch, along with other #whimsicalwednesday and #smallspacesunday stitch diagrams, can also be found on www.pinterest.com/whimsicalstitch/whimsicalwednesday.  

Be sure to follow whimsicalstitch.com on FacebookPinterestInstagram, and Twitter.

If you like what you see on this blog, want to learn some very creative decorative stitches, and how to put them all together, whimsicalstitch.com sells stitch guides for seasonal Melissa Shirley designs.  22 guides are currently available and more are in the pipeline.

Enjoy! 

It's a Cluster

But in the best possible way.

Today's stitch is another base pattern from Ann Strite Kurz's book, "The Potpourri of Pattern" by Ann Strite Kurz.  The base pattern begins with a Hungarian stitch, or over 2-3-2 rows.  You may recognize the sequence from the more well known Criss Cross or Woven Hungarian stitch.

As with the Explosion stitch of last week, the fun begins with what stitch to put in the intersection.  Five 2X2 alternatives are provided.  Yet, if you want to fill more space with dramatic effect, I suggest either of the larger crosses at the bottom of the image.  Both fit in the exact center.  For both over four alternatives, the yellow cross on top would be exactly where the yellow alternating tent stitches are in the main diagram.  That will help you visualize the position of the gray lines.

This would make a fantastic background for a seasonal piece, whether it is Halloween, Christmas, or Spring.  You can select colors from the main area of interest from the canvas to bring it all together.  It also works well in a sampler.

On a separate but related subject, I would love to receive feedback on whimsicalstitch.com.  Please visit this link to fill out a short survey.  Thank you!

My preferred thread combination is matte threads, such as Pepper Pot Silk or DMC Pearl for the clusters and a contrasting metallic for the yellow centers.  The stitched sample on Instagram is a tone on tone version of this stitch, using a Smyrna Cross in the intersections.

This stitch diagram, along with other #whimsicalwednesday and #smallspacesunday stitch diagrams, can also be found on www.pinterest.com/whimsicalstitch/whimsicalwednesday.  

Be sure to follow whimsicalstitch.com on FacebookPinterestInstagram, and Twitter.

If you like what you see on this blog, want to learn some very creative decorative stitches, and how to put them all together, whimsicalstitch.com sells stitch guides for seasonal Melissa Shirley designs.  22 guides are currently available and more are in the pipeline.

Enjoy!