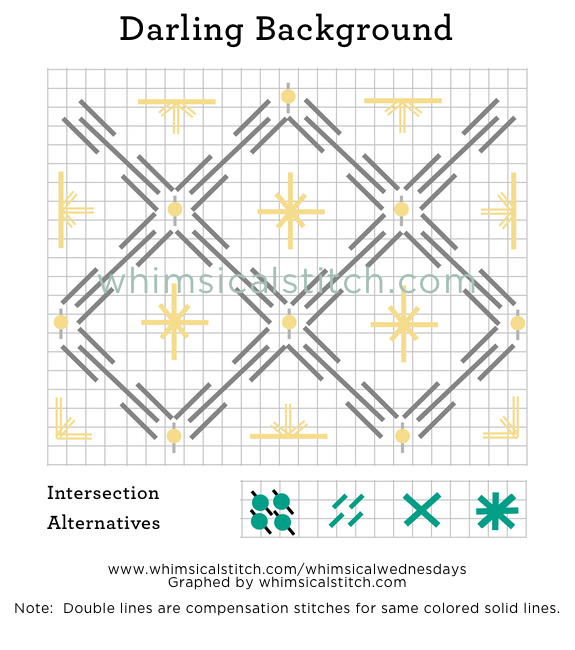
Our Best Friend

Diamonds.  Duh.

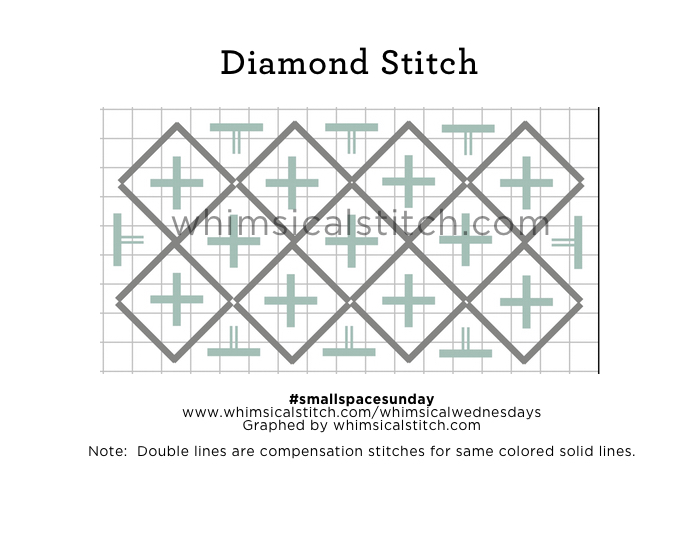
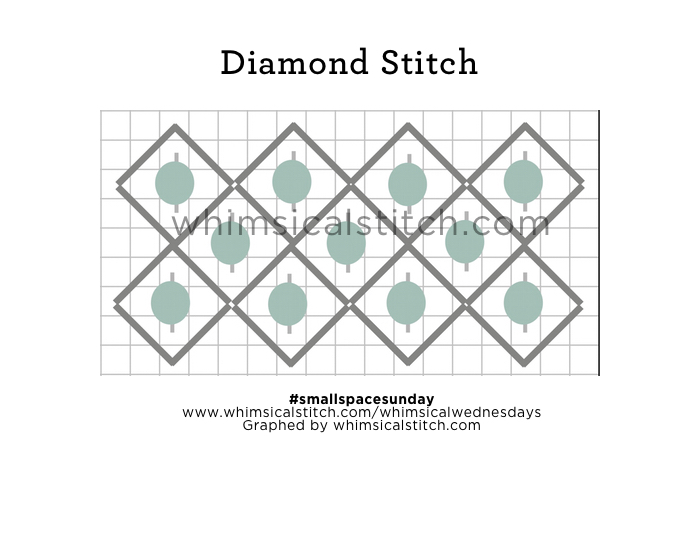
I wrote about the Diamond Stitch in a recent #smallspacesunday post.  It's versatility goes way beyond a small space stitch.

I call this stitch the Large Diamond.  Imagine the gray lines as a matte thread and the aqua crosses as a metallic.  I share that info now because it helps demonstrate the control this stitch gives you. 

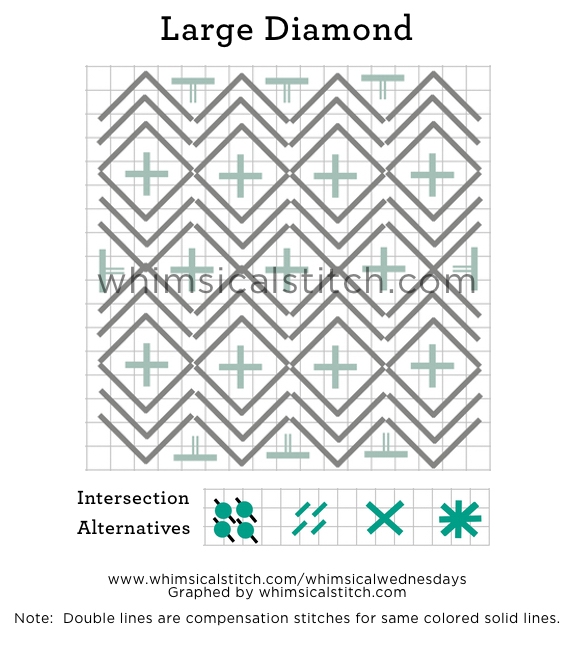
In the example above, the diamond is three rows both above and below the cross.  After you add the cross, it results in a moderate metallic accent.  If you want more of a metallic accent, consider doing only two rows above and below.  Or, if you want less metallic, consider doing four plus rows above and below.

The intersection alternatives provide even more ways to emphasize (or de-emphasize) the metallic.  This stitch can be so glamorous or understated, which makes it a great option for many spaces.  

You may notice the stitched sample on whimsicalstitch.com's Instagram page has four rows above and below the diamond.  This stitch is wildly flexible to fit your stitching contrast needs.

This stitch diagram, along with other #whimsicalwednesday and #smallspacesunday stitch diagrams, can also be found on www.pinterest.com/whimsicalstitch/whimsicalwednesday.  

Be sure to follow whimsicalstitch.com on FacebookPinterestInstagram, and Twitter.

If you like what you see on this blog, want to learn some very creative decorative stitches, and how to put them all together, whimsicalstitch.com sells stitch guides for seasonal Melissa Shirley designs.  17 guides are currently available and more are in the pipeline.

I hope you have the perfect space for this stitch and enjoy it!

More Darlingness

The basis for this stitch is called "Main Network of Four-Way Enlarged Hot Wheels."  I prefer "More Darlingness."  (Thank you to Ann Strite-Kurz for the stitch inspiration and apologies for the name change.)

The dark gray lines define the stitch concept.  The heart of the stitch exists in the large diamond center.  The yellow tied cross in the center is just a thought starter.  Consider Smryna Crosses, more diamonds, or leave it blank.  

In my stitched sample, I used a matte thread for the gray lines, a metallic for the yellow lines, and a single bead in the intersection to keep it clean and simple.  There are many alternatives for the intersection spot, including more beads, as illustrated at the bottom of the diagram.  Truly, the only limit is your imagination.  (The stitched sample can be found on whimsicalstitch.com's Instagram account.)

I discovered this stitch years ago and used it once for a solid colored background on a JP piece.  You really need a large space to pull it off.   The pillow still sits on my front window seat...I have yet to tire of it.  That's always a good thing.

This stitch diagram, along with other #whimsicalwednesday and #smallspacesunday stitch diagrams, can also be found on www.pinterest.com/whimsicalstitch/whimsicalwednesday.  

Be sure to follow whimsicalstitch.com on FacebookPinterestInstagram, and Twitter.

If you like what you see on this blog, want to learn some very creative decorative stitches, and how to put them all together, whimsicalstitch.com sells stitch guides for seasonal Melissa Shirley designs.  17 guides are currently available and more are in the pipeline.

I hope you have the perfect space for this stitch and enjoy it!

A Girl's Best Friend

The Diamond Stitch may not be the first stitch you think of for a small space, but it's a fun and versatile solution.

More often than not, the simplest of Diamond Stitches is the best for a small space.

Diamond Stitch.jpg

Don't freak out at the openness of the diagram.  Imagine the gray lines as a Frosty Rays, Fyre Werks, or Vineyard Silk.  The coverage is far better than the diagram illustrates.  With a lighter thread, such as Soy Lustre, Elegance, or Kreinik Metallics Very Fine Braid (#4), it works as a fantastic open stitch that highlights shading.

If you are using the Diamond Stitch as a small space stitch, filling the center of the diamond requires discretion.  You don't want to make it too busy and overpower the area.  Two quick ideas are an Upright Cross or a single bead.

As a small space stitch, I like to mix matte and metallic threads (my favorite combo) with similar color values.  I've also used two different colors...one as the diamond and one as the Upright Cross...to add color to an area or to relate the area to another section of the canvas. 

If you choose to add a single bead, remember the size of the bead will define the stitch.  A larger bead will draw attention to the area.  

These stitch diagrams, along with other #whimsicalwednesday and #smallspacesunday stitch diagrams, can also be found on www.pinterest.com/whimsicalstitch/whimsicalwednesday.  

Be sure to follow whimsicalstitch.com on FacebookPinterestInstagram, and Twitter.

If you like what you see on this blog, want to learn some very creative decorative stitches, and how to put them all together, whimsicalstitch.com sells stitch guides for seasonal Melissa Shirley designs.  17 guides are currently available and more are in the pipeline.

Enjoy!

The Darling Stitch

"I call everyone 'Darling' because I can't remember their name."  - Zsa Zsa Gabor

I call this the Darling Stitch because, despite an hour of book and online research, I could not find a name for this stitch.  Never mind the fact I named the files used to create the stitch diagram for this stitch "Anonymous."

I favor this stitch for an area I want to keep understated but still want to show a little spark with a small color accent.  Think backgrounds for small pieces such as Christmas or Halloween ornaments. 

Click on image to see on whimsicalstitch.com's Pinterest account. Visit pinterest.com/whimsicalstitch/whimsicalwednesday for a library of all #whimsicalwednesday and #smallspacesunday stitch diagrams.

Click on image to see on whimsicalstitch.com's Pinterest account. Visit pinterest.com/whimsicalstitch/whimsicalwednesday for a library of all #whimsicalwednesday and #smallspacesunday stitch diagrams.

Click on image to see on whimsicalstitch.com's Instagram account. Visit instagram.com/whimsicalstitch to see a library of stitched samples for select #whimsicalwednesday and #smallspacesunday stitch diagrams.

Click on image to see on whimsicalstitch.com's Instagram account. Visit instagram.com/whimsicalstitch to see a library of stitched samples for select #whimsicalwednesday and #smallspacesunday stitch diagrams.

The black lines drive the primary pattern.  I like to do the Plain Needlepoint (the light gray lines) in a different color to add a little personality.  Think a very light pink Flair with white Vineyard Silk...or a pewter Kreinik Metallic with a black DMC Floss.  I hope you get the idea.  

These stitch diagrams, along with other #whimsicalwednesday and #smallspacesunday stitch diagrams, can also be found on www.pinterest.com/whimsicalstitch/whimsicalwednesday.  

Be sure to follow whimsicalstitch.com on FacebookPinterestInstagram, and Twitter.

If you like what you see on this blog, want to learn some very creative decorative stitches, and how to put them all together, whimsicalstitch.com sells stitch guides for seasonal Melissa Shirley designs.  Seventeen guides are currently available and more are in the pipeline.

I hope you have the perfect space for this stitch and enjoy it!

Balancing on a Thread

The Star Octagon* is one of the first stitches I remember connecting with as it is decorative, allows a fun combo of threads, and has the perfect, balanced look I love (meaning not overtly diagonal). It's a simple concept.  The base pattern is over 1-2-1-2-1 in alternating directions as you go across the canvas.  

The intersection is where the fun begins.  A larger bead adds shine, simplicity, and a pop of surprising texture.  A 2X2 "X" keeps it clean and understated.  A Smyrna Cross adds a different level of texture.  Appropriately sized beads bring glamour and texture. You can also keep the intersections empty to show the shading or fill them with Plain Needlepoint to downplay the area.

There's no end to the thread combos that work here.  This stitch is great for clothing, baskets, ground cover, roofs, or trees and works in both small and large spaces.  

I really need to remember to use this stitch more often again! This stitch diagram, along with other #whimsicalwednesday and #smallspacesunday stitch diagrams, can also be found on www.pinterest.com/whimsicalstitch/whimsicalwednesday.  

Be sure to follow whimsicalstitch.com on FacebookPinterestInstagram, and Twitter.

If you like what you see on this blog, want to learn some very creative decorative stitches, and how to put them all together, whimsicalstitch.com sells stitch guides for seasonal Melissa Shirley designs.  Seventeen guides are currently available and more are in the pipeline.

I hope you have the perfect space for this stitch and enjoy!

*  A huge thank you to Suzanne Howren and Beth Robertson for giving me the name of this stitch.  I always called it "1-2-1-2-1" until today! 

Kneedlepoint

The Knit Stitch is, quite possibly, the most obvious, underused, and appropriate small space stitch for almost any situation.

It's Plain Needlepoint with columns alternating directions.  As its name suggests, it mimics knitting and is one of the cleanest ways to dress up Plain Needlepoint in a small space.

The most obvious use is for scarves, mittens, sweaters, and other articles of clothing.  There are so many wonderful wool threads available now that allow you to shade to your heart's delight, add fuzzy texture with a Bunca Brush, or stay with a traditional flat knitted look.  Some of my favorite wools include Amy's Burmilana, &more's Baby Alpaca, or Fleur de Paris' Bella Lusso Merino Wools.

The Knit Stitch also works well for small nature objects such as tree trunks, ground cover, or bushes.  It's fun to use two different colors to make more of a statement, say on a small Christmas tree ornament or a pair of socks.

Use your imagination and have fun with it.  It may be a small stitch, but it is a mighty stitch. 

This stitch diagram, along with other #whimsicalwednesday and #smallspacesunday stitch diagrams, can also be found on www.pinterest.com/whimsicalstitch/whimsicalwednesday.  

Be sure to follow whimsicalstitch.com on FacebookPinterestInstagram, and Twitter.

If you like what you see on this blog, want to learn some very creative decorative stitches, and how to put them all together, whimsicalstitch.com sells stitch guides for seasonal Melissa Shirley designs.  Seventeen guides are currently available and more are in the pipeline.

I hope you have the perfect space for this stitch and enjoy!

Don't Say No to Nobuko

This is another stitch that defies my limited memory.  Just like last week's post about the Ribbon Background, I always return to a stitched piece or a book to refresh my memory on this one.

It's called Nobuko and I love its pattern and symmetry.  It's one of the few stitches I don't automatically balance matte threads with a metallic accent.  I don't necessarily have a rational reason, except for the fact I first used this stitch for the leaves on a tree.  

The only trick is to remember to put the yellow accent stitches in the same direction as the wider stitches in the same column.  Once you catch that pattern, it is my opinion this stitch becomes easier.

This stitch diagram, along with other #whimsicalwednesday and #smallspacesunday stitch diagrams, can also be found on www.pinterest.com/whimsicalstitch/whimsicalwednesday.  

Be sure to follow whimsicalstitch.com on FacebookPinterestInstagram, and Twitter.

If you like what you see on this blog, want to learn some very creative decorative stitches, and how to put them all together, whimsicalstitch.com sells stitch guides for seasonal Melissa Shirley designs.  17 guides are currently available and more are in the pipeline.

I hope you have the perfect space for this stitch and enjoy!

My Head Explodes

This stitch always perplexes me, yet I love it.  Kinda like my grumpy cat, Max.

I take pride in identifying and remembering the pattern, sequence, and matching points on stitches.  This one?  Not so much.  Ok, never is more accurate.

Yet, it is perfect for most large spaces such as a background, walls, Santa bags or coats, sand, or sky, especially if you want those areas to recede a little bit.  So, whenever I want to do this stitch, I whip out a book or an already stitched piece to refresh my memory.

If it has a name, I can't remember it.  I identify it as the Ribbon Background.

Ribbon Background.jpg

It's a great way to mix thread finishes.  You can use a matte thread for the gray lines and a metallic for the yellow lines or vice versa depending on the look you are going for.  I've provided four alternatives for the intersections (stitched in yellow on the main diagram) that can help you glam up or dress down as much as you would like.

These stitch diagrams, along with other #whimsicalwednesday and #smallspacesunday stitch diagrams, can also be found on www.pinterest.com/whimsicalstitch/whimsicalwednesday.  

Be sure to follow whimsicalstitch.com on FacebookPinterestInstagram, and Twitter.

If you like what you see on this blog, want to learn some very creative decorative stitches, and how to put them all together, whimsicalstitch.com sells stitch guides for seasonal Melissa Shirley designs.  Seventeen guides are available and more are in the pipeline.

I hope you have the perfect space for this stitch and enjoy!

PS Now if I could just remember to visit my own Pinterest page when I want to refresh myself on this stitch.

Cross My Heart


Today's #smallspacesunday shares the Extended Cross Stitch.  It's a versatile stitch suiting many stitch needs, including small spaces (duh), shading enhancement, and texture.  

The concept is very simple.  For a vertical cross, it's over one row and up three rows.  For a horizontal cross, it's over three rows and up one row.  It's always important to have the second stitch is the cross going from the lower left to the upper right.  (It's one of the "Purist Principles" I follow in needlepoint.)

Extended Cross Stitch.jpg

For shading to show through, leave the intersection between the crosses empty.  You can fill that space with a French Knot, bead, or traditional cross stitch to add glamour or texture.

The cross stitch over one row condenses the stitch and adds a small level of bulk.  If you do not want that added texture, your thread choice should be lighter than you normally use for the specific canvas size.  As an example, I like to use DMC Pearl #5 or Kreinik Metallics Fine Braid (#8) or Tapestry Braid (#12) on 13 mesh.  Elegance or 4-ply floss is a good choice for 18 mesh.  

Truth be told, just last night, I used this stitch with a 4-ply floss on 13 mesh because 6-ply floss added way too much bulk for the stitched area.  It was a great reminder that there are guidelines in needlepoint, but you need to let your eye tell you what the right thing to do is.

These stitch diagrams, along with other #whimsicalwednesday and #smallspacesunday stitch diagrams, can also be found on www.pinterest.com/whimsicalstitch/whimsicalwednesday.  

Be sure to follow whimsicalstitch.com on FacebookPinterestInstagram, and Twitter.

If you like what you see on this blog, want to learn some very creative decorative stitches, and how to put them all together, whimsicalstitch.com sells stitch guides for seasonal Melissa Shirley designs.  Ten guides are currently available and more are in the pipeline.

I hope you have the perfect space for this stitch and enjoy!

Tramme Time Part 2

I get excited when I come across the perfect stitch for an area.  Still.  And I am more excited when it is an all-new stitch to me.

I found this stitch in a random book and can't figure out a. how I never discovered it before or b. why no one shared it with me before.  It is a derivative of the Tramme concept I shared with you in July but has enough unique qualities to warrant its own post.

What drew me in was the amount of space in between the base rows.  I loved the openness of this stitch as it was very understated yet a nice whimsical touch.

Add the base thread in vertical rows, with three empty rows in between threads (numbered steps on the diagram).  When you reach the bottom or top of a row, simply go across four rows from where you are and insert the needle and return in the opposite direction.  

The only trick is how to finish off the base thread.  If you have a stitched area nearby, insert and tie off the base thread there.  If not, while it is still on the needle, take the base thread and pull it up through the canvas in an unused area just out of the way.  Once you tie down the rows with the accent threads, there will be plenty of space for you to tie off the base thread in the accent thread on the back.

Add the accent threads (lettered steps) on top of the base thread.  The sequence of subsequent crosses is a little different than I normally recommend.  The beginning of each cross ends on the upper right and the next one begins on the upper left.  This sequence aids in tying down the base threads on the back of the canvas.

These stitch diagrams, along with other #whimsicalwednesday and #smallspacesunday stitch diagrams, can also be found on www.pinterest.com/whimsicalstitch/whimsicalwednesday.  

Be sure to follow whimsicalstitch.com on FacebookPinterestInstagram, and Twitter.

If you like what you see on this blog, want to learn some very creative decorative stitches, and how to put them all together, whimsicalstitch.com sells stitch guides for seasonal Melissa Shirley designs.  Ten guides are currently available and more are in the pipeline.

I hope you have the perfect space for this stitch and enjoy!