You're a Square!

I choose to take that alleged insult as a compliment, thank you very much.

Today's post is really about utilizing complementary stitches in shared spaces.  My case study is a dress on an ice skater.  The shared space is the dress and I used two different square stitches for the bodice and the skirt.  I made that choice because of the tiny waist, blouse, and arms.  I also wanted something to stand out.  Once I landed on a standout stitch for the skirt, I selected a similar stitch on a smaller scale for the blouse.

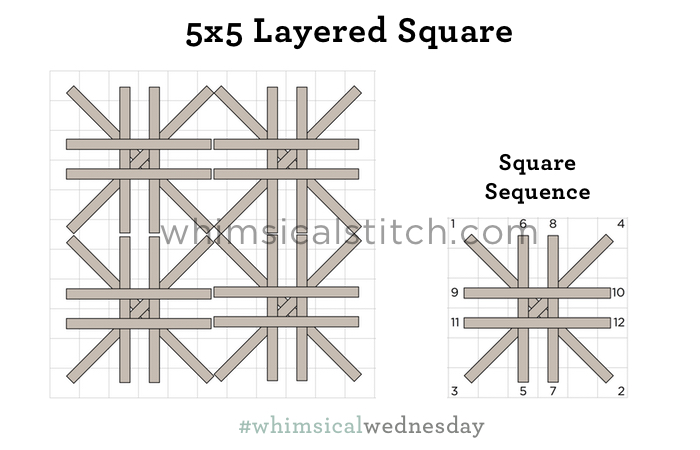
The blouse is stitched in a simple Mosaic stitch and the skirt is a fun 5X5 layered square.

The stitched sample used Neon Rays on 13-mesh.  What I like about Neon Rays for this application is how smooth and flat it is.  It lays perfectly (with a little help from a laying tool).  

50 Likes, 0 Comments - whimsicalstitch.com (@whimsicalstitch) on Instagram: "Layered Squares with Neon Rays (on 13-mesh) on this morning's..."

If you want a more pronounced lift with a metallic thread, use a more defined and substantial thread such as Kreinik Metallic (size 8 on 18-mesh and size 12 on 13-mesh).  For a flatter matte finish, use a stranded floss (silk or cotton) with a laying tool.   

This stitch diagram, along with all other #whimsicalwednesday and #smallspacesunday stitch diagrams, can also be found on a Pinterest board here.

Be sure to follow whimsicalstitch.com on FacebookPinterestInstagram, and Twitter.

If you like what you see on this blog, want to learn some very creative decorative stitches, and how to put them all together, whimsicalstitch.com sells stitch guides for Melissa Shirley Designs and Zecca Designs.  28 guides are currently available and more are in the pipeline.

Enjoy!

Diagonal Straight Lines

Yes, it's another tramme, but all I see are the diagonal (straight) lines.  

So, a little background (no pun intended).  My primary source of stitch ideas come from stitched pieces that cross my path.  Some are from stitching friend's pieces, some are from students, and most are from my own pieces.  When I am convinced I don't have an idea to share, I literally walk through my house and try to find something A. I forgot about and B. I think you will like.

This stitch is a perfect example of "A."  Today's stitch is from a holiday pillow.  (And, yes, I put out my Christmas pillows before Thanksgiving.  And, yes, I judge Costco harshly for doing the same.)

You will see why I call it Diagonal Straight lines.

The stitched sample uses DMC Pearl Cotton #8 (gray lines) and Crystal Braid (aqua lines) on 13-mesh.  

This stitch diagram, along with all other #whimsicalwednesday and #smallspacesunday stitch diagrams, can also be found on a Pinterest board here.

Be sure to follow whimsicalstitch.com on FacebookPinterestInstagram, and Twitter.

If you like what you see on this blog, want to learn some very creative decorative stitches, and how to put them all together, whimsicalstitch.com sells stitch guides for Melissa Shirley Designs and Zecca Designs.  28 guides are currently available, including the newest Tea by the Sea, and more are in the pipeline.

I hope you have the perfect spot for this stitch!  Enjoy!

Skipping Rows

About a month ago, I talked about skipping rows.  Today's stitch is another riff on that theme and builds on this month's (unintentional) tramme theme.

So, a funny thing happened on the way to these diagrams.  I planned for one diagram this week.  I charted the diagram below from (I now know) an incorrect memory as it is not a perfect match to the stitched sample.  Technically, it's still correct because it's just one of the many ways you can play with this stitch. So, voila!, you have three diagrams.

The first version of this "skipping a row" stitch includes Tramme.  

Layered column sequence: 1. Gray lines 2. Yellow lines 3. Aqua lines

Layered column sequence: 1. Gray lines 2. Yellow lines 3. Aqua lines

Pay attention to the empty rows in between the vertical black lines and the oblique yellow lines.  It adds a crisp edge to the columns on either side.

The next version of this stitch eliminates the Tramme effect (by removing the gray lines), yet fills in that area with a small vertical stitch.  It's a subtle difference but makes the stitch a little less pronounced (by removing the thread underneath the crosses).

The graph above matches the stitched sample on Instagram.

As a reminder, I use multiple colors for clarity in the graphs.  As you can see in the stitched sample, I used Elegance for the black and yellow lines and Kreinik Metallics Fine Braid (#8) for the accent stitches (the turquoise lines) on 13-mesh. 

The last diagram leaves the Extended Crosses with the horizontal accent stitches as standalone stitches, with no tramme nor vertical accents in between.  I must admit I like the simplicity of this stitch.

These stitch diagrams, along with all other #whimsicalwednesday and #smallspacesunday stitch diagrams, can also be found on a Pinterest board here.

Be sure to follow whimsicalstitch.com on FacebookPinterestInstagram, and Twitter.

If you like what you see on this blog, want to learn some very creative decorative stitches, and how to put them all together, whimsicalstitch.com sells stitch guides for Melissa Shirley Designs and Zecca Designs.  28 guides are currently available, including the newest Tea by the Sea, and more are in the pipeline.

I hope you have the perfect spot for any one of these stitches!  Enjoy!

A Theme is Emerging

I am well aware I have a lot of Tramme and Beetle stitches in my work over time, but this month drives that point home in a borderline embarrassing way.  (Unless, of course, you really like Tramme and Beetles, then it is part of my plan!)

Meaning, yes, today's stitch combines Beetles and Tramme.  We knew it had to happen sometime. 

The stitched sample on Instagram is a retired Melissa Shirley fruit canvas.  I love me some fruit needlepoint.  You'll be seeing more of my fruit stitches in February, as they are great examples of open work (February's theme).

The stitched sample uses Elegance (gray lines), Flair (aqua lines), and Kreinik Metallics Fine Braid #8 (turquoise lines) on 13-mesh.  As you may know by now, I like a lighter touch, especially on background stitches.  Flair was a strategic choice.  I love the way that Flair lays flat.  It is a great base thread for Tramme.

This stitch diagram, along with all other #whimsicalwednesday and #smallspacesunday stitch diagrams, can also be found on a Pinterest board here.

Be sure to follow whimsicalstitch.com on FacebookPinterestInstagram, and Twitter.

If you like what you see on this blog, want to learn some very creative decorative stitches, and how to put them all together, whimsicalstitch.com sells stitch guides for Melissa Shirley Designs and Zecca Designs.  28 guides are currently available, including the newest Tea by the Sea, and more are in the pipeline.

I hope you have the perfect spot for this stitch!  Enjoy!

More Beetles

Today's stitch is a variation on a Beetle stitch.  By enclosing the individual beetles within borders, it makes for a fun look!

57 Likes, 2 Comments - whimsicalstitch.com (@whimsicalstitch) on Instagram: "Beetle Stitch Variation with Elegance and Kreinik Metallics Fine Braid (#8) (on 18-mesh) on this..."

The stitched sample on Instagram uses Elegance and Kreinik Metallics Fine Braid (#8) on 18-mesh.  

I used lighter weight threads since it was a background stitch that I wanted to recede.  This stitch, with lighter weight threads, would also work for a floor as it can mimic tiles.  A student just used it on a seat cushion as the beetles offered a puffy look.  It would also make a beautiful water stitch with two metallics with similar color values.  

You could use this with heavier weight threads, such as Vineyard Silk or 6+ plies of strandable silk (such as Splendor) to give it some gravitas, say on a sampler, a piece of clothing, or a roof.  The symmetry of this stitch (via the vertical stitches) make it highly adaptable to almost any medium to large area.

This stitch diagram, along with all other #whimsicalwednesday and #smallspacesunday stitch diagrams, can also be found on a Pinterest board here.

Be sure to follow whimsicalstitch.com on FacebookPinterestInstagram, and Twitter.

If you like what you see on this blog, want to learn some very creative decorative stitches, and how to put them all together, whimsicalstitch.com sells stitch guides for Melissa Shirley Designs and Zecca Designs.  28 guides are currently available, including the newest Tea by the Sea, and more are in the pipeline.

Enjoy!

Welcome to November

November posts are dedicated to background stitches.  We start the month with what I call the Crown Stitch. 

47 Likes, 1 Comments - whimsicalstitch.com (@whimsicalstitch) on Instagram: "The Crown Stitch (in vertical columns) with Burmilana (3-ply) (on 18-mesh) on this morning's..."

As with other very large stitches, I did not include compensation stitches so the overall pattern is as clear as possible.  My preferred fibers for most backgrounds are lightweight matte threads.  For 18-mesh canvas, these include cotton or silk pearls in size 8 or 12.  Examples include DMC Pearl, Anchor Pearl, Elegance, and Subtlety.  I'm also a big fan of Petite Silk Lame for 18-mesh backgrounds.  For 13-mesh canvas, I favor cotton pearls in size 8 or 5, single strand silk such as Pepper Pot or Vineyard Silk.  It's all a matter of taste.  My style tends to be slightly light, so adjust your threads accordingly if you like stronger coverage.

This stitch also works well for other large areas, such as clothing, rooftops, floors, skies, beards...it is truly diverse.  Speaking of beards, the stitched sample on Instagram is a beard from a Debbie Mumm Santa.  And it's vertical.  But we all know that's okay by now, right?

This stitch diagram, along with all other #whimsicalwednesday and #smallspacesunday stitch diagrams, can also be found on a Pinterest board here.

Be sure to follow whimsicalstitch.com on FacebookPinterestInstagram, and Twitter.

If you like what you see on this blog, want to learn some very creative decorative stitches, and how to put them all together, whimsicalstitch.com sells stitch guides for Melissa Shirley Designs and Zecca Designs.  28 guides are currently available, including the newest Tea by the Sea, and more are in the pipeline.

I hope you enjoy today's stitch and have the perfect spot for it.

Speaking of Star Octagon...

Last week, I reminded you about Star Octagon on TBT.  It is a great stitch and it is also a great case study for skipping a row.  As you may also recall, I recently shared a stitch that found its magic in skipping a row, specifically the Alternating Cashmere variation.

I tried the same approach on Star Octagon...and loved it.

I like the empty centers.  It's a great way to show off the beautiful painting on so many of today's hand painted canvases.  However, they can be filled with Upright Crosses, a Rhodes stitch, or even more beads.  The space will tell you what to do.  

This stitch would work great on water, a sky, a bird's chest or wing, many pieces of clothing...even grass (with a cross-stitch in the center instead of a bead).  There are a lot of possibilities.  

Unfortunately, there is no stitched sample on Instagram this week.  Instead, to keep the stitching theme going on Instagram, I posted a picture of my cat, Lola, helping me stitch.  She's very good at helping.  Just ask her.  

These stitch diagrams, along with all other #whimsicalwednesday and #smallspacesunday stitch diagrams, can also be found on a Pinterest board here.

Be sure to follow whimsicalstitch.com on FacebookPinterestInstagram, and Twitter.

If you like what you see on this blog, want to learn some very creative decorative stitches, and how to put them all together, whimsicalstitch.com sells stitch guides for Melissa Shirley Designs and Zecca Designs.  28 guides are currently available and more are in the pipeline.

Enjoy!

Large and in Charge

Today's stitch is a doozy.  With the exception of the Smyrna crosses and any required compensation stitches, the smallest stitch is over four rows.  As much as I advocate for Plain Needlepoint, on certain days a small stitch can be no smaller than four rows.  I give you Double Square Diamonds.

Click on image to see on whimsicalstitch.com's Pinterest account. Visit pinterest.com/whimsicalstitch/whimsicalwednesday for a library of all #whimsicalwednesday and #smallspacesunday stitch diagrams.

Click on image to see on whimsicalstitch.com's Pinterest account. Visit pinterest.com/whimsicalstitch/whimsicalwednesday for a library of all #whimsicalwednesday and #smallspacesunday stitch diagrams.

This is one of those stitches where the diagram looks kinda "meh."  I recommend doing the aqua lines first, followed by the light gray lines, and end with the Smyrna Crosses.  Take a look at the stitched sample for a moment to see how wonderful it can be. 

I love the concept of stitching the smallest lines (the straight light gray lines) in a different color.  In my opinion, it is what makes this stitch stand out.  This also provides more thread combination possibilities.  The stitched sample uses three threads with two finishes with related color values.  To translate the photo to the diagram, the aqua and light gray lines are matte finishes (in related colors) and the darkest gray lines utilize a metallic thread (in a related color).  

Another approach is to stitch the light gray lines (both straight and diagonal) in a lightweight metallic with a wonderful single ply silk for the aqua lines.  I also love the idea of stitching the three colored lines in three different colors.  For example, this could make a great coat for Santa with a matte red thread for the aqua lines, a gold metallic for the straight light gray lines, a red metallic for the diagonal gray lines, and a purple metallic for the Smyrna Cross.  

You could do the whole things in a single hue...let's say a blue sky.  Stitch the aqua lines in a pearl cotton.  Stitch the vertical light gray lines in Flair and the diagonal light gray lines in a lightweight Kreinik Metallic (Fine Braid #8 on 13-mesh and Very Fine Braid #4 on 18-mesh). Stitch the Smyrna Crosses in the same Flair or the same Kreinik Metallic. 

This stitch diagram, along with all other #whimsicalwednesday and #smallspacesunday stitch diagrams, can also be found on a Pinterest board here.

Be sure to follow whimsicalstitch.com on FacebookPinterestInstagram, and Twitter.

If you like what you see on this blog, want to learn some very creative decorative stitches, and how to put them all together, whimsicalstitch.com sells stitch guides for Melissa Shirley Designs and Zecca Designs.  28 guides are currently available, including the newest Tea by the Sea, and more are in the pipeline.

I hope you have the perfect spot for this stitch!  Enjoy!

SOS

If anyone is aware of a name for this stitch, please share!  I discovered it a couple years ago and I absolutely love how it looks like a circle, looks better without every intersection covered (in my opinion), and is a fantastic stitch to combine threads (whether it be finish or color).

I'm calling it Circles with Straight Lines until I hear otherwise.

A quick note to acknowledge I did not include compensation stitches because it is a complex stitch and I want you to focus on the stitch itself and to not be distracted by compensation stitches.

The base pattern (the dark gray lines) is over 3-4-5-skip a row-5-4-3.  You fill the 2X2 intersections between the base pattern with plain needlepoint (light aqua lines), a Smyrna Cross, beads...whatever your heart desires.

The skipped row in the base pattern (turquoise line) is filled with a contrasting stitch of some kind (whether it be the same color thread with a different finish or a contrasting color).  Here's where the fun starts.  The diagram shows a center stitch over two rows (turquoise line) with yet another contrasting color (the light gray lines) on either side.  Personally, I prefer this stitch with just the single stitch without the light gray stitches on either side.  It makes a more dramatic circle.

The stitched samples tell it all.  The first one is a classic rendition.  It has full coverage and, for the most part, contrasting thread finishes.

The sample on the left below is from a piece in my personal collection.  The stitch is on a pillow and uses beads in the intersections and does not include the accent stitches on either side of the center stitch. The sample on the right below is from Debbie Mumm's Polar Express.  This includes full coverage with multiple colors and finishes.

32 Likes, 0 Comments - whimsicalstitch.com (@whimsicalstitch) on Instagram: "Circle Stitch (for lack of a better name) with DMC Floss, Flair, and Kreinik Metallics Tapestry..."

As you can see, this stitch can be all and do all.  I hope you have the perfect spot for it.  And I hope you enjoy it as much as I do.

This stitch diagram, along with all other #whimsicalwednesday and #smallspacesunday stitch diagrams, can also be found on a Pinterest board here.

Be sure to follow whimsicalstitch.com on FacebookPinterestInstagram, and Twitter.

If you like what you see on this blog, want to learn some very creative decorative stitches, and how to put them all together, whimsicalstitch.com sells stitch guides for Melissa Shirley Designs and Zecca Designs.  28 guides are currently available, including the newest Tea by the Sea, and more are in the pipeline.

Enjoy!

One of the First Stitches I Learned

Byzantine with Smyrna Crosses.jpg

The Byzantine is one of the first stitches I learned.  This, of course, means I shunned it in for several years as I found stitches I considered more fun or more intriguing.  Frankly, it just meant this was one of the first stitches taught to me and I always thought there had to be something better.  Sometimes, there is nothing better.  The Byzantine can be manipulated in so many ways as it is a fantastic, all-purpose, go-to stitch.  I need to use it more often.

It is a great way to mix thread finishes and colors.  Due to technical difficulties, you can find the stitched sample here. The stitched sample uses good old DMC Floss (4-ply) with Kreinik Metallics Tapestry Braid (#12) on 18-mesh.  

This stitch works for countless spaces, including trees and shrubs, clothing, floors, water, samplers...the list is endless, which also means the threads are endless.  

This stitch diagram, along with all other #whimsicalwednesday and #smallspacesunday stitch diagrams, can be found on a Pinterest board here.

Be sure to follow whimsicalstitch.com on FacebookPinterestInstagram, and Twitter.

If you like what you see on this blog, want to learn some very creative decorative stitches, and how to put them all together, whimsicalstitch.com sells stitch guides for Melissa Shirley Designs and Zecca Designs. 28 guides are available, including the newest Tea by the Sea, and more are in the pipeline.

Enjoy!