Spring in Autumn!

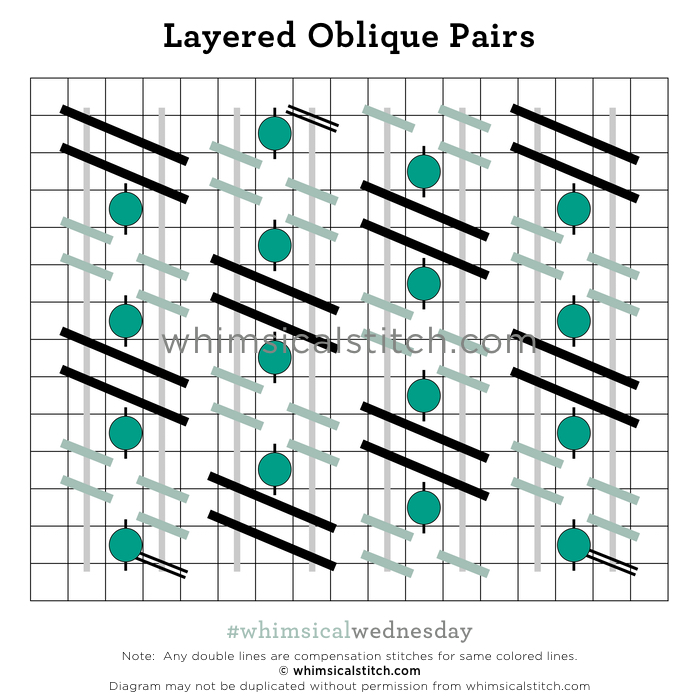
Today’s stitch is the promised alternate to the Layered Oblique Stitch from a few weeks ago. Truth be told, today’s stitch is what I included in the Stitch Concept until the very charming student went off the reservation. And, for the record, I love this stitch and I love the student’s interpretation of it.

Click on image to see on whimsicalstitch.com's Pinterest account. Visit pinterest.com/whimsicalstitch/whimsicalwednesday for a library of all #whimsicalwednesday and #smallspacesunday stitch diagrams.

Click on image to see on whimsicalstitch.com's Pinterest account. Visit pinterest.com/whimsicalstitch/whimsicalwednesday for a library of all #whimsicalwednesday and #smallspacesunday stitch diagrams.

Click on image to see on whimsicalstitch.com's Instagram account. Visit instagram.com/whimsicalstitch to see a library of stitched samples for select #whimsicalwednesday and #smallspacesunday stitch diagrams.

Click on image to see on whimsicalstitch.com's Instagram account. Visit instagram.com/whimsicalstitch to see a library of stitched samples for select #whimsicalwednesday and #smallspacesunday stitch diagrams.

The stitched sample is me playing with threads on hand on 18-mesh canvas. I used Petite Very Velvet (light gray lines), yellow Trebizond Silk (aqua lines), pink Trebizond Silk (black lines), and purple…wait for it…purple Trebizond Silk (dark gray lines).

Consider this stitch for a dramatic coat, bag, or blanket with a Kreinik 1/16” ribbon for the gray lines, Vineyard Silk or silk floss for the black lines, and a contrasting metallic in a smaller size (like a Petite Silk Lame or size 8 Kreinik) for the aqua lines. Cover the Vineyard Silk or silk floss (black lines) with a Kreinik braid (#8 or #12) (dark gray lines) and you are good to go.

This stitch diagram, along with all other #whimsicalwednesday and #smallspacesunday stitch diagrams, can also be found on a Pinterest board here.

Be sure to follow whimsicalstitch.com on FacebookPinterestInstagram, and Twitter.

If you like what you see on this blog, want to learn creative decorative stitches, and how to put them all together, whimsicalstitch.com sells Stitch Guides and Stitch Concepts for Melissa Shirley Designs, Zecca DesignsSandra Gilmore, Purple Palm, Maggie, and Penny MacLeod, and many more. Click here to see the newest guides and click here to see the entire collection.

I hope you have the perfect spot for this stitch! Please enjoy!  

A Note about Diagrams
I use color in diagrams to make them as clear as possible.  The primary function of different colored lines is to illustrate a stitch sequence.  For example, layering of colors demonstrates you add them in that order.  They can also provide ideas on how to integrate additional threads (one line for each color).  Or, you can use the same thread for all color lines.  That's where I encourage you to use your imagination for the space you are stitching!

Connections

Simply put, today’s stitch makes me smile. It’s wide open, sparkly, and stitched in this week’s favorite color, blue.

Click on image to see on whimsicalstitch.com's Pinterest account. Visit pinterest.com/whimsicalstitch/whimsicalwednesday for a library of all #whimsicalwednesday and #smallspacesunday stitch diagrams.

Click on image to see on whimsicalstitch.com's Pinterest account. Visit pinterest.com/whimsicalstitch/whimsicalwednesday for a library of all #whimsicalwednesday and #smallspacesunday stitch diagrams.

Click on image to see on whimsicalstitch.com's Instagram account. Visit instagram.com/whimsicalstitch to see a library of stitched samples for select #whimsicalwednesday and #smallspacesunday stitch diagrams.

Click on image to see on whimsicalstitch.com's Instagram account. Visit instagram.com/whimsicalstitch to see a library of stitched samples for select #whimsicalwednesday and #smallspacesunday stitch diagrams.

The stitched sample is a background for a bolster pillow. It uses Soie D’Alger (black lines) and Kreinik Fine Braid (#8) (gray lines) on 13-mesh. With open stitches such as these, I recommend stitching the octagons in halves, using a modified back stitch. Stitch the top half and then return across the canvas adding the bottom half. Add the pairs of straight stitches following the diagonal axis, weaving your thread through the stitching in the back to navigate around a wide open area to get to the next axis.

This stitch would serve you very well for clothing, such as a dress or a jacket, especially if it includes beautiful shading. I would love to see this with Petite Very Velvet with Silk Lame for a jacket. Consider using two lightweight metallics, such as Petite Silk Lame and Sparkle Rays, for water or a night sky. If you want to really bling it up, consider stringing 2-3 beads across the straight stitches.

This stitch diagram, along with all other #whimsicalwednesday and #smallspacesunday stitch diagrams, can also be found on a Pinterest board here.

Be sure to follow whimsicalstitch.com on FacebookPinterestInstagram, and Twitter.

If you like what you see on this blog, want to learn some very creative decorative stitches, and how to put them all together, whimsicalstitch.com sells Stitch Guides and Stitch Concepts for Melissa Shirley Designs, Zecca DesignsSandra Gilmore, Purple Palm, Maggie, and Patience Brewster, and many more. Click here to see the newest guides and click here to see the entire collection.

I hope you have the perfect spot for this stitch! Please enjoy!  

A Note about Diagrams
I use color in diagrams to make them as clear as possible.  The primary function of different colored lines is to illustrate a stitch sequence.  For example, layering of colors demonstrates you add them in that order.  They can also provide ideas on how to integrate additional threads (one line for each color).  Or, you can use the same thread for all color lines.  That's where I encourage you to use your imagination for the space you are stitching!

Just Right

Sometimes I am my own worst enemy, especially when I’m under a deadline. I needed multiple 3X3 square stitches…and I had a bunch of available diagrams to choose from…but not a single one moved me. I’m so glad I kept searching because the final stitch was just right.

Click on image to see on whimsicalstitch.com's Pinterest account. Visit pinterest.com/whimsicalstitch/whimsicalwednesday for a library of all #whimsicalwednesday and #smallspacesunday stitch diagrams.

Click on image to see on whimsicalstitch.com's Pinterest account. Visit pinterest.com/whimsicalstitch/whimsicalwednesday for a library of all #whimsicalwednesday and #smallspacesunday stitch diagrams.

Click on image to see on whimsicalstitch.com's Instagram account. Visit instagram.com/whimsicalstitch to see a library of stitched samples for select #whimsicalwednesday and #smallspacesunday stitch diagrams.

Click on image to see on whimsicalstitch.com's Instagram account. Visit instagram.com/whimsicalstitch to see a library of stitched samples for select #whimsicalwednesday and #smallspacesunday stitch diagrams.

The stitched sample is a blanket on an adorable reindeer. It uses Splendor (turquoise and light gray lines) and Entice (black and dark gray lines). The sequence is to add the corners and center of a 3X3 square with the red Splendor, add a diagonal stitch over three rows in the opposite direction with the Entice, and then cover the Entice with the “missing” diagonal stitches over two rows with the same Splendor. I love the layering and additional interest it adds to a simple area.

This stitch would make an adorable border. I’m itching to use it on a floor with Silk ‘N Colors overdyed silk floss for the square and a solid silk floss for the contrasting diagonal stitch. This would make a Santa bag complete with Very Velvet and a Kreinik 1/16” ribbon. Last, but certainly not least, consider it for a bedspread or blanket with Gloriana’s Pashmina and a lightweight metallic, such as Petite Silk Lame.

This stitch diagram, along with all other #whimsicalwednesday and #smallspacesunday stitch diagrams, can also be found on a Pinterest board here.

Be sure to follow whimsicalstitch.com on FacebookPinterestInstagram, and Twitter.

If you like what you see on this blog, want to learn some very creative decorative stitches, and how to put them all together, whimsicalstitch.com sells Stitch Guides and Stitch Concepts for Melissa Shirley Designs, Zecca DesignsSandra Gilmore, Purple Palm, Maggie, and Patience Brewster, and many more. Click here to see the newest guides and click here to see the entire collection.

I hope you have the perfect spot for this stitch!  Please enjoy!  

A Note about Diagrams
I use color in diagrams to make them as clear as possible.  The primary function of different colored lines is to illustrate a stitch sequence.  For example, layering of colors demonstrates you add them in that order.  They can also provide ideas on how to integrate additional threads (one line for each color).  Or, you can use the same thread for all color lines.  That's where I encourage you to use your imagination for the space you are stitching!

A Wing & A Prayer

You have no clue a. what a great pun that is and b. how lucky I am for students who stitch fast and well.

Click on image to see on whimsicalstitch.com's Pinterest account. Visit pinterest.com/whimsicalstitch/whimsicalwednesday for a library of all #whimsicalwednesday and #smallspacesunday stitch diagrams.

Click on image to see on whimsicalstitch.com's Pinterest account. Visit pinterest.com/whimsicalstitch/whimsicalwednesday for a library of all #whimsicalwednesday and #smallspacesunday stitch diagrams.

Click on image to see on whimsicalstitch.com's Instagram account. Visit instagram.com/whimsicalstitch to see a library of stitched samples for select #whimsicalwednesday and #smallspacesunday stitch diagrams.

Click on image to see on whimsicalstitch.com's Instagram account. Visit instagram.com/whimsicalstitch to see a library of stitched samples for select #whimsicalwednesday and #smallspacesunday stitch diagrams.

It’s a great pun because today’s stitch is from an outrageous orange bird on Este MacLeod’s Summer Birds (distributed through Melissa Shirley Designs). In addition, if I hadn’t had this photo (from said student who stitches fast and well), we may not have had a blog post today. I have a guardian angel who stitches! (Truth be told, I have a few. And I am very grateful).

The stitched sample uses Petite Very Velvet (light gray lines), Trebizond Silk (black lines), Gloriana Floss (aqua lines), and Bead Dazzle Beads (turquoise circles). It’s a purposefully dramatic stitch to draw attention to this gorgeous bird in the left corner of the canvas.

Consider this stitch for a dramatic coat, bag, or blanket with a Kreinik 1/16” ribbon for the gray lines, Vineyard Silk or silk floss for the black lines, and a contrasting metallic in a smaller size (like a Petite Silk Lame or size 8 Kreinik) for the aqua lines. Finish it off with a bead and, voila!, perfection. I would love to see this with contrasting colors in any combination. I have another version of this diagram without the bead that I’ll share in the upcoming weeks. It’s a slightly more modest version of this that illustrates the interest that even more layering adds. (Ooooh, I hope that builds some sort of intrigue).

This stitch diagram, along with all other #whimsicalwednesday and #smallspacesunday stitch diagrams, can also be found on a Pinterest board here.

Be sure to follow whimsicalstitch.com on FacebookPinterestInstagram, and Twitter.

If you like what you see on this blog, want to learn some very creative decorative stitches, and how to put them all together, whimsicalstitch.com sells Stitch Guides and Stitch Concepts for Melissa Shirley Designs, Zecca DesignsSandra Gilmore, Purple Palm, Maggie, and Patience Brewster, and many more. Click here to see the newest guides and click here to see the entire collection.

I hope you have the perfect spot for this stitch!  Please enjoy!  

A Note about Diagrams
I use color in diagrams to make them as clear as possible.  The primary function of different colored lines is to illustrate a stitch sequence.  For example, layering of colors demonstrates you add them in that order.  They can also provide ideas on how to integrate additional threads (one line for each color).  Or, you can use the same thread for all color lines.  That's where I encourage you to use your imagination for the space you are stitching!

Decisions, Decisions

A club I’m stitching up was a great chance to experiment with new stitches. As it played out, I realized it was an opportunity to illustrate how I land on a stitch, which isn’t always what the diagram shows you. All are great stitches but it’s all about finding the right one for the spot and for you.

My objective was to find a medium-sized stitch (3-5 rows tall or wide) that integrated the exquisite shading of the canvas, so it needed to be an open stitch. And it needed to complement an adjacent stitch that included diamonds.

Click on image to see on whimsicalstitch.com's Pinterest account. Visit pinterest.com/whimsicalstitch/whimsicalwednesday for a library of all #whimsicalwednesday and #smallspacesunday stitch diagrams.

Click on image to see on whimsicalstitch.com's Pinterest account. Visit pinterest.com/whimsicalstitch/whimsicalwednesday for a library of all #whimsicalwednesday and #smallspacesunday stitch diagrams.

Click on image to see on whimsicalstitch.com's Pinterest account. Visit pinterest.com/whimsicalstitch/whimsicalwednesday for a library of all #whimsicalwednesday and #smallspacesunday stitch diagrams.

Click on image to see on whimsicalstitch.com's Pinterest account. Visit pinterest.com/whimsicalstitch/whimsicalwednesday for a library of all #whimsicalwednesday and #smallspacesunday stitch diagrams.

Click on image to see on whimsicalstitch.com's Pinterest account. Visit pinterest.com/whimsicalstitch/whimsicalwednesday for a library of all #whimsicalwednesday and #smallspacesunday stitch diagrams.

Click on image to see on whimsicalstitch.com's Pinterest account. Visit pinterest.com/whimsicalstitch/whimsicalwednesday for a library of all #whimsicalwednesday and #smallspacesunday stitch diagrams.

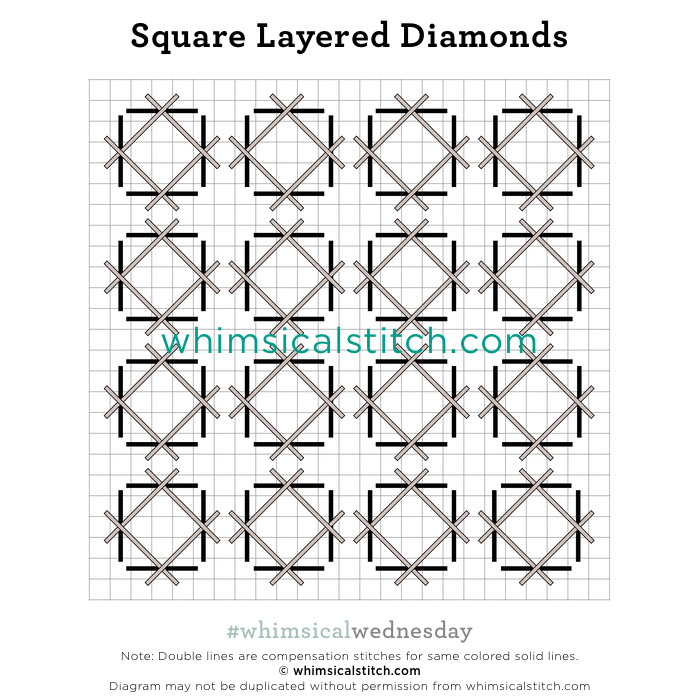
I found the original inspiration, the Square Diamond Scotch (diagram on far left), in Ruth Schmuff’s latest book Stitches Volume 5. The squares and diamonds were a great partner with the adjacent diamond stitch. But five rows was too tall for the area and the Scotch squares in the center were too much. I removed the squares and made the sides of the squares four rows wide/tall and created the Square Diamonds (center diagram).

This stitch was too open for the area and it was tough to distinguish the squares versus the diamonds, so I altered the diamonds to be overlapping, hence the Square Layered Diamonds (diagram on far right). This added unnecessary texture and height to the area, so it went bye bye.

Click on image to see on whimsicalstitch.com's Pinterest account. Visit pinterest.com/whimsicalstitch/whimsicalwednesday for a library of all #whimsicalwednesday and #smallspacesunday stitch diagrams.

Click on image to see on whimsicalstitch.com's Pinterest account. Visit pinterest.com/whimsicalstitch/whimsicalwednesday for a library of all #whimsicalwednesday and #smallspacesunday stitch diagrams.

Click on image to see on whimsicalstitch.com's Instagram account. Visit instagram.com/whimsicalstitch to see a library of stitched samples for select #whimsicalwednesday and #smallspacesunday stitch diagrams.

Click on image to see on whimsicalstitch.com's Instagram account. Visit instagram.com/whimsicalstitch to see a library of stitched samples for select #whimsicalwednesday and #smallspacesunday stitch diagrams.

My obsession with diamonds covering the corners wasn’t helping. Walking away really helped. When I returned to the piece, I took the diagonal stitches and moved them to cover the open area where the corners meet. Voila! This is what worked for me for the area. The stitched sample uses Elegance (black lines) and Petite Silk Lame (gray lines) on 18-mesh.

I feel the need to reiterate that I liked every single one of the stitches I discarded. It’s all about what works for the unique space you are stitching. All four stitches would make excellent architectural stitches for floors, walls, or roofs. I would love to see the Square Diamond Scotch for a dramatic coat or dress with Petite Very Velvet (black lines) and a size 12 or size 16 Kreinik Metallic. The Square Diamonds will make a beautiful water stitch with Petite Silk Lame (black lines) and Kreinik Metallic (gray lines). Consider the Square Layered Diamonds for a tree with Elegance (black lines) and Silk ‘N Colors (gray lines). You could also glam up any of those stitches by adding a single in the center hole of the intersection where the four corners meet.

This stitch diagram, along with all other #whimsicalwednesday and #smallspacesunday stitch diagrams, can also be found on a Pinterest board here.

Be sure to follow whimsicalstitch.com on FacebookPinterestInstagram, and Twitter.

If you like what you see on this blog, want to learn some very creative decorative stitches, and how to put them all together, whimsicalstitch.com sells Stitch Guides and Stitch Concepts for Melissa Shirley Designs, Zecca DesignsSandra Gilmore, Purple Palm, Maggie, and Patience Brewster, and many more. Click here to see the newest guides and click here to see the entire collection.

I hope you have the perfect spot for this stitch!  Please enjoy!  

A Note about Diagrams
I use color in diagrams to make them as clear as possible.  The primary function of different colored lines is to illustrate a stitch sequence.  For example, layering of colors demonstrates you add them in that order.  They can also provide ideas on how to integrate additional threads (one line for each color).  Or, you can use the same thread for all color lines.  That's where I encourage you to use your imagination for the space you are stitching!

Hello Wednesday

Hello Wednesday. (You snuck up on me there.) Little did I know that last Sunday’s post was going to provide more inspiration for this week.

Click on image to see on whimsicalstitch.com's Pinterest account. Visit pinterest.com/whimsicalstitch/whimsicalwednesday for a library of all #whimsicalwednesday and #smallspacesunday stitch diagrams.

Click on image to see on whimsicalstitch.com's Pinterest account. Visit pinterest.com/whimsicalstitch/whimsicalwednesday for a library of all #whimsicalwednesday and #smallspacesunday stitch diagrams.

Click on image to see on whimsicalstitch.com's Instagram account. Visit instagram.com/whimsicalstitch to see a library of stitched samples for select #whimsicalwednesday and #smallspacesunday stitch diagrams.

Click on image to see on whimsicalstitch.com's Instagram account. Visit instagram.com/whimsicalstitch to see a library of stitched samples for select #whimsicalwednesday and #smallspacesunday stitch diagrams.

Today's stitch comes from the same Melissa Shirley tree skirt as this week’s #smallspacesunday. The stitched sample uses Vineyard Silk (black lines), Kreinik Metallics Tapestry Braid (#12), and Kreinik Metallics Medium Braid (#16) (turquoise lines). It’s the coat from one of the Santas.

The sequence is important here. Start with the black lines, follow with the gray lines (from edge to edge) and end by tying down the gray lines with the turquoise lines. There are two schools of thought here. The first is as diagrammed, leaving one intersection empty during the first step. This intersection is covered by the final step. (In the stitched sample, it is covered by the green metallic.) The other idea to consider is to stitch that intersection with the same thread as the black lines. Proceed with the rest of the stitch as diagrammed. The difference is the turquoise lines (or green metallic in the stitched sample) has a small bit of elevation and texture.

This full coverage stitch makes wonderful clothing (as illustrated). Change the finish of the thread for the gray line and you could have a very interesting ground cover or tree. For ground cover, I would love to see the thread combo of Bella Lusso Merino Wool (black lines), Gloriana Princess Perle (gray line), and Vineyard Silk (turquoise lines).

This stitch diagram, along with all other #whimsicalwednesday and #smallspacesunday stitch diagrams, can also be found on a Pinterest board here.

Be sure to follow whimsicalstitch.com on FacebookPinterestInstagram, and Twitter.

If you like what you see on this blog, want to learn some very creative decorative stitches, and how to put them all together, whimsicalstitch.com sells Stitch Guides and Stitch Concepts for Melissa Shirley Designs, Zecca DesignsSandra Gilmore, Purple Palm, Maggie, and Patience Brewster, and many more. Click here to see the newest guides and click here to see the entire collection.

I hope you have the perfect spot for this stitch!  Please enjoy!  

A Note about Diagrams
I use color in diagrams to make them as clear as possible.  The primary function of different colored lines is to illustrate a stitch sequence.  For example, layering of colors demonstrates you add them in that order.  They can also provide ideas on how to integrate additional threads (one line for each color).  Or, you can use the same thread for all color lines.  That's where I encourage you to use your imagination for the space you are stitching!

Lovely Layers

I love everything about today’s stitch…the four threads, the perfect balance, and the final elegance. It also happens to fill a beautiful space on a beautiful canvas.

Click on image to see on whimsicalstitch.com's Pinterest account. Visit pinterest.com/whimsicalstitch/whimsicalwednesday for a library of all #whimsicalwednesday and #smallspacesunday stitch diagrams.

Click on image to see on whimsicalstitch.com's Pinterest account. Visit pinterest.com/whimsicalstitch/whimsicalwednesday for a library of all #whimsicalwednesday and #smallspacesunday stitch diagrams.

Click on image to see on whimsicalstitch.com's Instagram account. Visit instagram.com/whimsicalstitch to see a library of stitched samples for select #whimsicalwednesday and #smallspacesunday stitch diagrams.

Click on image to see on whimsicalstitch.com's Instagram account. Visit instagram.com/whimsicalstitch to see a library of stitched samples for select #whimsicalwednesday and #smallspacesunday stitch diagrams.

Today's stitch comes from my Stitch Guide for Melissa Shirley’s Lemons canvas. Sequence is critical. Begin with the black lines, followed by the aqua, light gray, and end with the dark gray Upright Crosses. The stitched sample uses Petite Very Velvet (black lines), Fyre Werks Soft Sheen (aqua lines), Elegance (light gray lines), and Silk Lame (dark gray lines).

This stitch is perfect for a medium to large area you want to draw attention to, such as clothing, large pieces of fruit, bowls, baskets. I hope you get the idea. If you want to add even more bling, consider filling the open spaces with straight stitches over two rows (essentially extending the Upright Tied Cross in the center). Or fill those spaces with a single seed bead over two rows.

The thread possibilities are endless. I prefer more durable, single strand threads for the base thread (black lines). It helps define the shapes and adds a bit of texture. I recommend a perle cotton, Very Velvet, or a size 16 Kreinik Metallic for that role. Once you’ve established the base thread, have a blast. You could go wild with all metallics in contrasting colors, say purples, oranges, and (lime) greens for Halloween fun, or mix threads from the same color family for a sampler.

In all honesty, I would love to see this as a pumpkin with Vineyard Silk (black lines), Kreinik Metallic 1/16” Ribbon (aqua lines), Elegance (light gray lines), and ThreadWorx Metallic (gray lines). If you want a slightly less pronounced version, consider using a strand-able silk, such as Splendor or Soie D’Alger, for the base thread. Use a laying tool to keep to smooth and flat. Add the remaining layers. This will bring more attention to the centers of the diamonds for another pretty perspective.

This stitch diagram, along with all other #whimsicalwednesday and #smallspacesunday stitch diagrams, can also be found on a Pinterest board here.

Be sure to follow whimsicalstitch.com on FacebookPinterestInstagram, and Twitter.

If you like what you see on this blog, want to learn some very creative decorative stitches, and how to put them all together, whimsicalstitch.com sells Stitch Guides and Stitch Concepts for Melissa Shirley Designs, Zecca DesignsSandra Gilmore, and Patience Brewster, and many more. Click here to see the newest guides and click here to see the entire collection.

I hope you have the perfect spot for this stitch!  Please enjoy!  

A Note about Diagrams
I use color in diagrams to make them as clear as possible.  The primary function of different colored lines is to illustrate a stitch sequence.  For example, layering of colors demonstrates you add them in that order.  They can also provide ideas on how to integrate additional threads (one line for each color).  Or, you can use the same thread for all color lines.  That's where I encourage you to use your imagination for the space you are stitching!

Big Red

I can't decide if today's column is about a stitch (it is) or about threads (it is).  Because, frankly, the diagram is kinda boring.  The stitched sample is far from boring.

Click on image to see on whimsicalstitch.com's Pinterest account. Visit pinterest.com/whimsicalstitch/whimsicalwednesday for a library of all #whimsicalwednesday and #smallspacesunday stitch diagrams.

Click on image to see on whimsicalstitch.com's Pinterest account. Visit pinterest.com/whimsicalstitch/whimsicalwednesday for a library of all #whimsicalwednesday and #smallspacesunday stitch diagrams.

Click on image to see on whimsicalstitch.com's Instagram account. Visit instagram.com/whimsicalstitch to see a library of stitched samples for select #whimsicalwednesday and #smallspacesunday stitch diagrams.

Click on image to see on whimsicalstitch.com's Instagram account. Visit instagram.com/whimsicalstitch to see a library of stitched samples for select #whimsicalwednesday and #smallspacesunday stitch diagrams.

The stitched sample uses DMC Perle #5 (light gray lines), Neon Rays (black lines), and Fyre Werks (turquoise lines).  The layering for this stitch is very important. Start with the light gray (vertical) lines, followed by the black (horizontal) lines, and end with the X's on top (aqua lines). The stitched sample is from the retired Linda Carter Holman piece I've featured in a few posts recently (here and here). 

More often than not, I use the same threads for the straight stitches in a layered stitch.  Today's sample is an exception to my typical pattern...and I like it. Two distinct threads for the straight stitches add contrast, especially the Neon Rays. The two rows of Neon Rays merge together to look like a wide ribbon, a fun contrast to the distinct shape of the DMC Perle. Clearly, a laying tool played a role here. 

This stitch would be so much fun with different colors.  Imagine it as a coat for a Santa with Very Velvet (vertical lines), Vineyard Silk (horizontal lines), and an oversized Kreinik in a contrasting color, such as gold, for the X.  Consider using two colors for the stripes, say blue for the vertical and green for the horizontal, tied down with a third color for a bedspread or decorative pillow.  Combine some really unique textures, such as Rainbow Linen and Impressions for the straight lines, and tie it down with Wisper or Fuzzy Stuff for a very au natural roof.

This stitch diagram, along with all other #whimsicalwednesday and #smallspacesunday stitch diagrams, can also be found on a Pinterest board here.

Be sure to follow whimsicalstitch.com on FacebookPinterestInstagram, and Twitter.

If you like what you see on this blog, want to learn some very creative decorative stitches, and how to put them all together, whimsicalstitch.com sells Stitch Guides and Stitch Concepts for Melissa Shirley Designs, Zecca Designs, and Patience Brewster. Click here to see the 20 newest guides and click here to see the entire collection.

I hope you have the perfect spot for this stitch!  Please enjoy!

A Note about Diagrams
I use color in diagrams to make them as clear as possible.  The primary function of different colored lines is to illustrate a stitch sequence.  For example, layering of colors demonstrates you add them in that order.  They can also provide ideas on how to integrate additional threads (one line for each color).  Or, you can use the same thread for all color lines.  That's where I encourage you to use your imagination for the space you are stitching!

Layered Loveliness

Today's stitch is another background from a sweet small piece.  I love how the Flair expanded to fill the space so it looks like a full coverage stitch.

Click on image to see on whimsicalstitch.com's Pinterest account. Visit pinterest.com/whimsicalstitch/whimsicalwednesday for a library of all #whimsicalwednesday and #smallspacesunday stitch diagrams.

Click on image to see on whimsicalstitch.com's Pinterest account. Visit pinterest.com/whimsicalstitch/whimsicalwednesday for a library of all #whimsicalwednesday and #smallspacesunday stitch diagrams.

Click on image to see on whimsicalstitch.com's Instagram account. Visit instagram.com/whimsicalstitch to see a library of stitched samples for select #whimsicalwednesday and #smallspacesunday stitch diagrams.

Click on image to see on whimsicalstitch.com's Instagram account. Visit instagram.com/whimsicalstitch to see a library of stitched samples for select #whimsicalwednesday and #smallspacesunday stitch diagrams.

The stitched sample uses Flair (gray lines) and Elegance (yellow lines) on 18-mesh.  Using Flair as the base thread is an atypical choice for me.  In most cases, I use two stronger threads.

A semi-brief tangent on base threads (the gray lines in the diagram).  My go-to base threads for layered (and tramme) stitches are Very Velvet, Perle Cotton (size 3 for 13-mesh and size 5 for 18-mesh), Grandeur (for 13-mesh), Elegance (for 18-mesh), and Kreinik Metallics (size 16 for 13-mesh and size 12 for 18-mesh).  Each of those threads is well-defined and strong.  Strong is important because, in most cases, the base thread adds height and definition to the accent threads (the threads on top).  With any of these threads, the stitch is fairly open.  I say most cases because there are times I throw all of this out the window and use surprisingly light threads for layered and tramme stitches, like I did today.

So, back to today's stitch.  Since this is a typically open stitch, it would work really well for many architectural elements that can handle the texture (of the layered threads)...think roof, floor, ground covering, rug.  For these stitches, consider using any of the base threads I mentioned above and cover them with something a little different, as stitch combos are not all matte and metallic. Don't be afraid to incorporate threads with a less than smooth finish.  Ideas for accent threads include overdyed floss (or wool), Rainbow Linen (one of my favorite threads for a roof), or a subdued metallic such as Silk Lame or Petite Silk Lame.   

Traditional matte and metallic combinations would make great clothing, sampler, or large flower petals.  I love Elegance and Flair (as illustrated above).  I love the idea of Very Velvet and Fyre Werks (or Neon Rays).  Another idea is to add a bead to the single open intersections between the pairs of yellow lines.  That would up the glamour level quite a bit, especially for a flower petal.  

This stitch diagram, along with all other #whimsicalwednesday and #smallspacesunday stitch diagrams, can also be found on a Pinterest board here.

Be sure to follow whimsicalstitch.com on FacebookPinterestInstagram, and Twitter.

If you like what you see on this blog, want to learn some very creative decorative stitches, and how to put them all together, whimsicalstitch.com sells stitch guides and stitch concepts for Melissa Shirley Designs, Zecca Designs, and Patience Brewster. Click here to see the 20 newest guides and click here to see the entire collection.

I hope you have the perfect spot for this stitch!  Please enjoy!

A Note about Diagrams
I use color in diagrams to make them as clear as possible.  The primary function of different colored lines is to illustrate a stitch sequence.  For example, layering of colors demonstrates you add them in that order.  They can also provide ideas on how to integrate additional threads (one line for each color).  Or, you can use the same thread for all color lines.  That's where I encourage you to use your imagination for the space you are stitching!
Confession Time

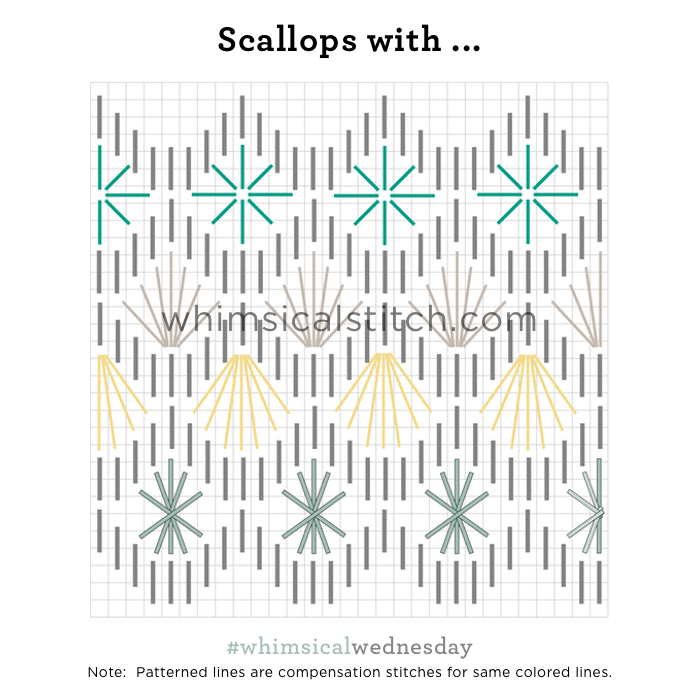
Today is a blog in two parts.  First, I'm offering up a fun Scallop Stitch with four(!) different and fun options for filling.  The second part spends a little extra time on one of the fillings.  

The stitch is a scallop stitch over three rows.  The topmost points of the scallops in subsequent rows are centered along the lowest point of the row above, creating small shell-shaped spaces in between the horizontal columns of scallops. 

Click on image to see on whimsicalstitch.com's Pinterest account. Visit pinterest.com/whimsicalstitch/whimsicalwednesday for a library of all #whimsicalwednesday and #smallspacesunday stitch diagrams.

Click on image to see on whimsicalstitch.com's Pinterest account. Visit pinterest.com/whimsicalstitch/whimsicalwednesday for a library of all #whimsicalwednesday and #smallspacesunday stitch diagrams.

Click on image to see on whimsicalstitch.com's Instagram account. Visit instagram.com/whimsicalstitch to see a library of stitched samples for select #whimsicalwednesday and #smallspacesunday stitch diagrams.

Click on image to see on whimsicalstitch.com's Instagram account. Visit instagram.com/whimsicalstitch to see a library of stitched samples for select #whimsicalwednesday and #smallspacesunday stitch diagrams.

There are four ideas to fill the empty space (from top to bottom):  Eyelet Stitch (turquoise lines on diagram, purple thread in diagram), Traditional Leaf Stitch (light gray lines on diagram, blue thread in diagram), Shell Stitch (yellow lines on diagram, white thread in diagram), Oblique Tied Stitch (aqua lines on diagram, purple thread in diagram).  Feel free to mix and match the scallops and filling stitch to your heart's desire.  The stitched sample uses Gloriana Florimell (yellow thread), Kreinik 1/16" ribbon, Kreinik Medium Braid (#16) (purple thread), and Gloriana Princess Perle (white thread). 

Personally, I like the idea of the Eyelet or Oblique Tied Stitch as a single filling.  Each offers a smidge of open work and lightness to the overall stitch.  Conversely, I like the combination of the Traditional Leaf and Shell Stitch on alternating horizontal rows.  They are very similar in shape (but not exactly the same!) and I like the alternating directions the two fillings offer.  This is all a matter of personal taste!  Mix and match to your delight.

Now it's time for my confession.  This is the first time I've included an eyelet stitch on my blog.  My confession is they make me nervous.  Today, this changes.

Eyelet stitches are adorable and I appreciate what they can add to a piece, as the added element of a larger hole draws the eye in a unique way.  And therein lies my fear...that the larger holes I create will not be identical sizes and chaos reigns.  (I have enough chaos with my new kitten.)

Here's how I navigated this for the eyelet stitch above.  A tapered laying tool is critical, as it provides more control over the size of the final hole.

Use a tapered laying tool as a guide for consistent eyelet hole sizes.  Final knotted ribbon on laying tool.  Just make sure it's tight!

Use a tapered laying tool as a guide for consistent eyelet hole sizes.  Final knotted ribbon on laying tool.  Just make sure it's tight!

Insert the laying tool in the hole from the front of the canvas and gently push it down until the hole is the desired size.  Don't remove the laying tool yet.  Tie a wide piece of a stash thread (e.g., silk ribbon) where the laying tool meets the canvas on the front, creating a guide for future holes.   

Tie the thread tight, pull the laying tool out of the hole, and complete the knot by tying it again, making sure is tight.  Move across the canvas, creating holes as needed.  Revisit any outlier holes and repeat the process if required to make the hole larger. (I recommend silk ribbon because it is not a slippery thread and will, if tied tightly, stay still on the laying tool.) 

Sometimes, you might make a hole a little too large (compared to other eyelet holes).  To make that hole smaller, use the eye end of a size 22 needle to push the canvas threads back into place.  Put the needle in the immediately adjacent hole, and gently push the needle against the canvas thread, helping nudge the thread back into place.  You may need to do this on all four sides of the hole.  It may take a couple pushes, so be patient.  You can push them back and start over again or just push in a bit to get it to the desired size.  Use your judgment.

This stitch diagram, along with all other #whimsicalwednesday and #smallspacesunday stitch diagrams, can also be found on a Pinterest board here.

Be sure to follow whimsicalstitch.com on FacebookPinterestInstagram, and Twitter.

If you like what you see on this blog, want to learn some very creative decorative stitches, and how to put them all together, whimsicalstitch.com sells stitch guides and stitch concepts for Melissa Shirley Designs, Zecca Designs, and Patience Brewster.  60 guides are currently available, with 12 new Stitch Concepts just added! Click here to see the newest guides and click here to see the entire collection.

I hope you have the perfect spot for this stitch!  Please enjoy!