Everything but the Kitchen Sink

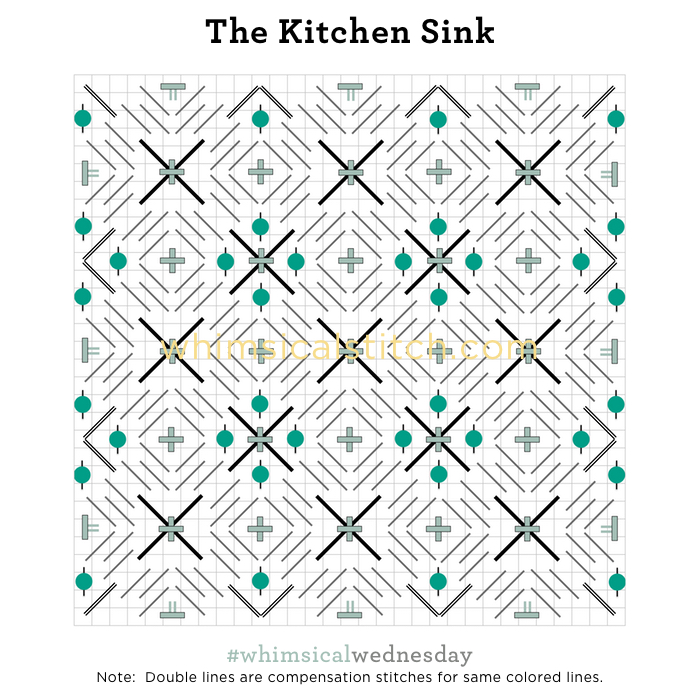
Technically, this stitch is a composite of small stitches.  However, there are too many elements to name that make it wonderful.  As I was creating the diagram image, no other title that popped into my head after the first one seemed appropriate.  It truly is everything but the kitchen sink.

Click on image to see on whimsicalstitch.com's Pinterest account. Visit pinterest.com/whimsicalstitch/whimsicalwednesday for a library of all #whimsicalwednesday and #smallspacesunday stitch diagrams.

Click on image to see on whimsicalstitch.com's Pinterest account. Visit pinterest.com/whimsicalstitch/whimsicalwednesday for a library of all #whimsicalwednesday and #smallspacesunday stitch diagrams.

Click on image to see on whimsicalstitch.com's Instagram account. Visit instagram.com/whimsicalstitch to see a library of stitched samples for select #whimsicalwednesday and #smallspacesunday stitch diagrams.

Click on image to see on whimsicalstitch.com's Instagram account. Visit instagram.com/whimsicalstitch to see a library of stitched samples for select #whimsicalwednesday and #smallspacesunday stitch diagrams.

Believe it or not, the stitch includes only two threads and one bead.  The gray lines are Shimmer Ribbon; the black lines AND aqua lines are one strand of Impressions; the turquoise circles are gold beads.  The best sequence to use (and I say this from experience) is to stitch the gray lines first, followed by the black and aqua lines, and end with the gold beads.  Establishing the pattern with the gray lines will make the rest of it go much easier.  I swear.

Clearly, this stitch belongs in a space you want to draw attention to.  I used it on a dress.  It would make a great roof, Santa bag, sampler area, or grass area (without the beads).  It would also be wonderful as snow, but only if you want that snow to dominate the piece.  Have fun with it.  You can experiment with different sized beads for a more subtle effect.

This stitch diagram, along with all other #whimsicalwednesday and #smallspacesunday stitch diagrams, can also be found on a Pinterest board here.

Be sure to follow whimsicalstitch.com on FacebookPinterestInstagram, and Twitter.

If you like what you see on this blog, want to learn some very creative decorative stitches, and how to put them all together, whimsicalstitch.com sells stitch guides and stitch concepts for Melissa Shirley Designs, Zecca Designs, and Patience Brewster. 45 guides are currently available and more are in the pipeline.

I hope you have the perfect spot for this stitch! Enjoy!

Dressing Up!

Today's stitch is from a dress, hence the very clever blog title name.  Honestly, it's a universal stitch that finds its roots in the Star Octagon.

Typically, when I have open spaces with differing shapes, I fill only one.  In this case, we have a 2X2 square and a 2X2 diamond and both are filled with an upright cross.  If left to my own devices, I would have filled just the 2X2 square.  Yet, despite my love of open work, I acknowledge there are times full coverage will only do.  And this dress needed full coverage.

The stitched sample uses Vineyard Silk and Shimmer Ribbon on 18-mesh.

As I mentioned earlier, this is a great universal stitch.  I can see it on a basket with Sea Grass or Silken Straw (to be really fun) and almost any piece of clothing.  It could be a wonderful wall or tabletop.  

This stitch diagram, along with all other #whimsicalwednesday and #smallspacesunday stitch diagrams, can also be found on a Pinterest board here.

Be sure to follow whimsicalstitch.com on FacebookPinterestInstagram, and Twitter.

If you like what you see on this blog, want to learn some very creative decorative stitches, and how to put them all together, whimsicalstitch.com sells stitch guides for Melissa Shirley Designs, Zecca Designs, and Patience Brewster.  32 guides are currently available and more are in the pipeline.

I hope you have the perfect spot for this stitch!  Enjoy!

X's and O's

I love stitching snow.  The variety of stitches we can use are virtually limitless.  I can't think of a needlepoint artist who doesn't add some sort of secondary color, whether it is gray or blue, to add depth and nuance to the snow.

And those additional colors are exactly why I favor open stitches.  The shading is so beautiful and subtle I don't want to cover it up.  Today's stitch honors that objective and is for a snowman you want to stand out.

Add the base threads (gray lines) first, and follow up with the accent threads (green and yellow lines).  

With most tramme stitches I previously shared with you on this site, I used a matte thread for the base (typically Very Velvet or a heavy Pearl Cotton).  On the stitched sample on Instagram for this stitch, I used all shiny threads.  The base thread is Petite Sparkle Rays.  The green accent thread is Crystal Braid and the yellow accent thread is Shimmer Ribbon.  

When using threads with the same finish, take a moment to make sure they are distinguishable from each other.  As an example, Neon Ray would not work with either Neon Rays + or Shimmer Ribbon as the finishes are too similar.  If you are using contrasting colors, have fun with the colors!  Finish matters less in that scenario.

This stitch diagram, along with all other #whimsicalwednesday and #smallspacesunday stitch diagrams, can also be found on a Pinterest board here.

Be sure to follow whimsicalstitch.com on FacebookPinterestInstagram, and Twitter.

If you like what you see on this blog, want to learn some very creative decorative stitches, and how to put them all together, whimsicalstitch.com sells stitch guides for Melissa Shirley and Zecca Designs.  27 guides are currently available and more are in the pipeline.

Enjoy!

Horizontal Brick

Not the most clever of blog post titles, but it's early here.  :)

Today's stitch is one of those universal solutions.  Depending on the thread combination, it can be clothing, a background, a tabletop, a piece of fruit (as illustrated on Instagram), or foliage.

It's really simple.

As I mentioned earlier, the thread combination defines its use.  For an area you'd like to recede a little, I recommend a lightweight pearl silk or cotton, such as Elegance, Thread Gatherer Silken Pearl, DMC (or Anchor) Pearl #8 for the gray lines and a lightweight metallic for the yellow lines, such as Neon Rays, Shimmer, or Kreinik Metallics #4 or #8. 

For a more intense area, such as a coat, Very Velvet, Pepper Pot Silk, Vineyard Silk, or a multi-ply wool are great alternatives.  Flair, Frosty Rays, Kreinik Metallics #12 or #16 balance these threads well.  

On a separate but related subject, I would love to receive feedback on whimsicalstitch.com.  Please visit this link to fill out a short survey.  Thank you!

This stitch diagram, along with other #whimsicalwednesday and #smallspacesunday stitch diagrams, can also be found on www.pinterest.com/whimsicalstitch/whimsicalwednesday.  

Be sure to follow whimsicalstitch.com on FacebookPinterestInstagram, and Twitter.

If you like what you see on this blog, want to learn some very creative decorative stitches, and how to put them all together, whimsicalstitch.com sells stitch guides for seasonal Melissa Shirley designs.  22 guides are currently available and more are in the pipeline.

Enjoy!

Layered Squares

Today's stitch is what I call Layered Squares, as the final look appears as squares with alternating corners tied down.  

Create the squares by laying the base threads in two adjacent rows, skipping two rows in between pairs.  In the diagram, I added the vertical pairs first, followed by the horizontal rows on top (creating the layers of the layered stitch).  Follow up with the 3X3 crosses on top of alternating intersections.  

The truth is the order you use to lay the base threads down doesn't matter.  Honestly, I didn't think about it when I stitched it.  In hindsight, I am very happy with the order I chose because the eye sees the horizontal lines more than the vertical.  And, for that space I used it in at the time (more about that soon), that is appropriate.

Thread choices are important for this stitch.  In my opinion, the base thread should be a single strand thread.  The single strand provides definition and texture for the base layer.  For a strong, well-defined base, good matte base thread choices are Very Velvet, Vineyard Silk, Pepper Pot Silk, or DMC or Anchor Pearl Cotton (especially size 3).  Good choices for a metallic base thread are Kreinik Metallics Medium Braid (size 16), Kreinik Metallics Tapestry Braid (size 12), Crystal Braid, or Silk Lame.  Plied threads will work, of course, but it will be a vastly different look than what you will see on the stitched sample on Instagram.

Conversely, have fun with the metallics!  As they are the top thread, their only responsibility is to be pretty!  The stitched sample on Instagram uses Shimmer Ribbon by YLI.

This stitch is ideal for areas requiring symmetry.  As an example, the Instagram sample is the front door of Melissa Shirley's Halloween House.  The symmetry, provided by evenly spaced threads on the horizontal and vertical axises, keep the appearance of the door as, well, a door.  In my opinion, an openly diagonal stitch (such as Diagonal Mosaic) would distract the eye and prompt the viewer to try to reconcile the actual use of the space versus the stitch chosen.  I would use this as a table top or floor covering (perhaps with lighter weight threads), a roof, or clothing areas with large spaces, to name a few.

This stitch diagrams, along with other #whimsicalwednesday and #smallspacesunday stitch diagrams, can also be found on www.pinterest.com/whimsicalstitch/whimsicalwednesday.  

Be sure to follow whimsicalstitch.com on FacebookPinterestInstagram, and Twitter.

If you like what you see on this blog, want to learn some very creative decorative stitches, and how to put them all together, whimsicalstitch.com sells stitch guides for seasonal Melissa Shirley designs.  22 guides are currently available and more are in the pipeline.

Enjoy!