The Darling Stitch

"I call everyone 'Darling' because I can't remember their name."  - Zsa Zsa Gabor

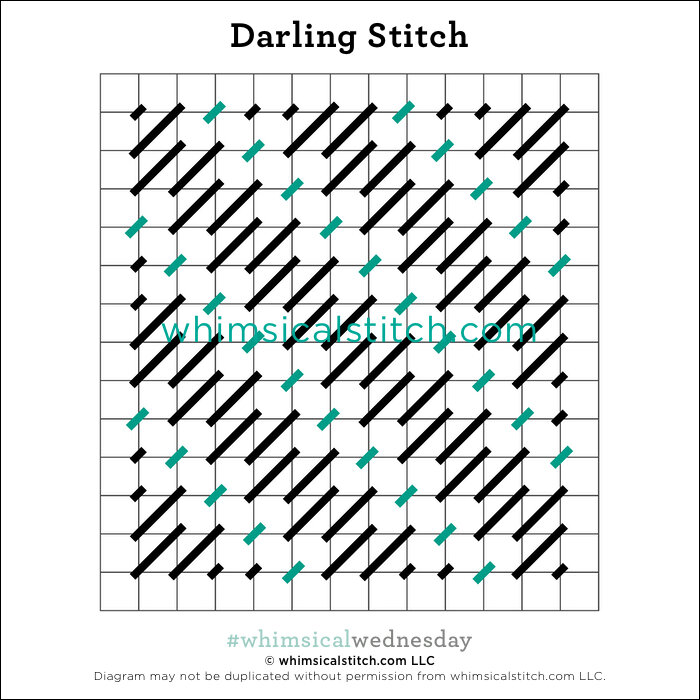
I call this the Darling Stitch because, despite an hour of book and online research, I could not find a name for this stitch.  Never mind the fact I named the files used to create the stitch diagram for this stitch "Anonymous."

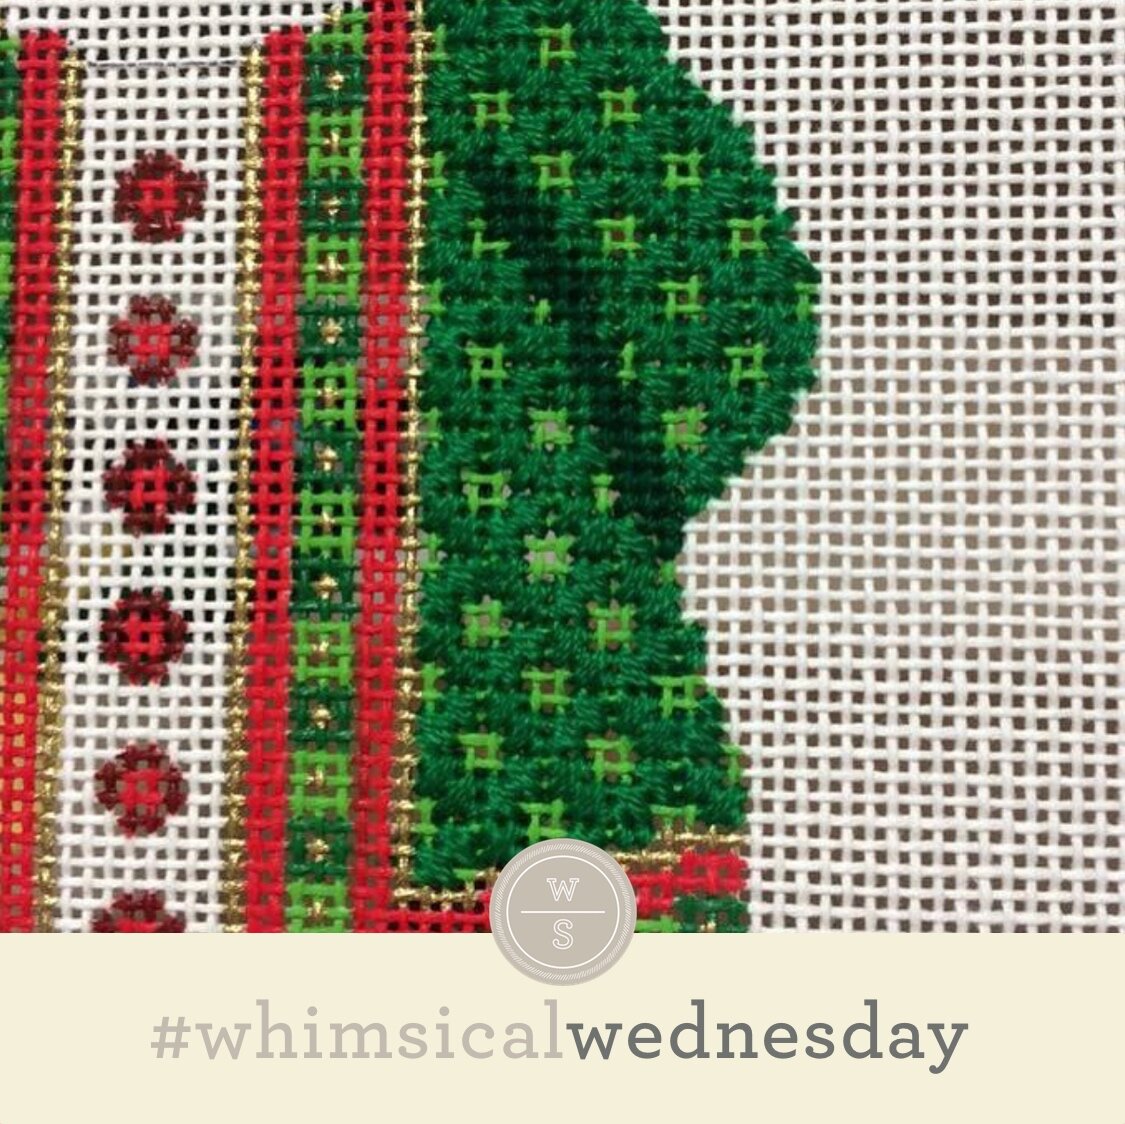
I favor this stitch for an area I want to keep understated but still want to show a little spark with a small color accent.  Think backgrounds for small pieces such as Christmas or Halloween ornaments. 

Click on image to see on whimsicalstitch.com's Pinterest account. Visit pinterest.com/whimsicalstitch/whimsicalwednesday for a library of all #whimsicalwednesday and #smallspacesunday stitch diagrams.

Click on image to see on whimsicalstitch.com's Pinterest account. Visit pinterest.com/whimsicalstitch/whimsicalwednesday for a library of all #whimsicalwednesday and #smallspacesunday stitch diagrams.

Click on image to see on whimsicalstitch.com's Instagram account. Visit instagram.com/whimsicalstitch to see a library of stitched samples for select #whimsicalwednesday and #smallspacesunday stitch diagrams.

Click on image to see on whimsicalstitch.com's Instagram account. Visit instagram.com/whimsicalstitch to see a library of stitched samples for select #whimsicalwednesday and #smallspacesunday stitch diagrams.

The black lines drive the primary pattern.  I like to do the Plain Needlepoint (the light gray lines) in a different color to add a little personality.  Think a very light pink Flair with white Vineyard Silk...or a pewter Kreinik Metallic with a black DMC Floss.  I hope you get the idea.  

These stitch diagrams, along with other #whimsicalwednesday and #smallspacesunday stitch diagrams, can also be found on www.pinterest.com/whimsicalstitch/whimsicalwednesday.  

Be sure to follow whimsicalstitch.com on FacebookPinterestInstagram, and Twitter.

If you like what you see on this blog, want to learn some very creative decorative stitches, and how to put them all together, whimsicalstitch.com sells stitch guides for seasonal Melissa Shirley designs.  Seventeen guides are currently available and more are in the pipeline.

I hope you have the perfect space for this stitch and enjoy it!

Balancing on a Thread

The Star Octagon* is one of the first stitches I remember connecting with as it is decorative, allows a fun combo of threads, and has the perfect, balanced look I love (meaning not overtly diagonal). It's a simple concept.  The base pattern is over 1-2-1-2-1 in alternating directions as you go across the canvas.  

The intersection is where the fun begins.  A larger bead adds shine, simplicity, and a pop of surprising texture.  A 2X2 "X" keeps it clean and understated.  A Smyrna Cross adds a different level of texture.  Appropriately sized beads bring glamour and texture. You can also keep the intersections empty to show the shading or fill them with Plain Needlepoint to downplay the area.

There's no end to the thread combos that work here.  This stitch is great for clothing, baskets, ground cover, roofs, or trees and works in both small and large spaces.  

I really need to remember to use this stitch more often again! This stitch diagram, along with other #whimsicalwednesday and #smallspacesunday stitch diagrams, can also be found on www.pinterest.com/whimsicalstitch/whimsicalwednesday.  

Be sure to follow whimsicalstitch.com on FacebookPinterestInstagram, and Twitter.

If you like what you see on this blog, want to learn some very creative decorative stitches, and how to put them all together, whimsicalstitch.com sells stitch guides for seasonal Melissa Shirley designs.  Seventeen guides are currently available and more are in the pipeline.

I hope you have the perfect space for this stitch and enjoy!

*  A huge thank you to Suzanne Howren and Beth Robertson for giving me the name of this stitch.  I always called it "1-2-1-2-1" until today! 

Kneedlepoint

The Knit Stitch is, quite possibly, the most obvious, underused, and appropriate small space stitch for almost any situation.

It's Plain Needlepoint with columns alternating directions.  As its name suggests, it mimics knitting and is one of the cleanest ways to dress up Plain Needlepoint in a small space.

The most obvious use is for scarves, mittens, sweaters, and other articles of clothing.  There are so many wonderful wool threads available now that allow you to shade to your heart's delight, add fuzzy texture with a Bunca Brush, or stay with a traditional flat knitted look.  Some of my favorite wools include Amy's Burmilana, &more's Baby Alpaca, or Fleur de Paris' Bella Lusso Merino Wools.

The Knit Stitch also works well for small nature objects such as tree trunks, ground cover, or bushes.  It's fun to use two different colors to make more of a statement, say on a small Christmas tree ornament or a pair of socks.

Use your imagination and have fun with it.  It may be a small stitch, but it is a mighty stitch. 

This stitch diagram, along with other #whimsicalwednesday and #smallspacesunday stitch diagrams, can also be found on www.pinterest.com/whimsicalstitch/whimsicalwednesday.  

Be sure to follow whimsicalstitch.com on FacebookPinterestInstagram, and Twitter.

If you like what you see on this blog, want to learn some very creative decorative stitches, and how to put them all together, whimsicalstitch.com sells stitch guides for seasonal Melissa Shirley designs.  Seventeen guides are currently available and more are in the pipeline.

I hope you have the perfect space for this stitch and enjoy!

Don't Say No to Nobuko

This is another stitch that defies my limited memory.  Just like last week's post about the Ribbon Background, I always return to a stitched piece or a book to refresh my memory on this one.

It's called Nobuko and I love its pattern and symmetry.  It's one of the few stitches I don't automatically balance matte threads with a metallic accent.  I don't necessarily have a rational reason, except for the fact I first used this stitch for the leaves on a tree.  

The only trick is to remember to put the yellow accent stitches in the same direction as the wider stitches in the same column.  Once you catch that pattern, it is my opinion this stitch becomes easier.

This stitch diagram, along with other #whimsicalwednesday and #smallspacesunday stitch diagrams, can also be found on www.pinterest.com/whimsicalstitch/whimsicalwednesday.  

Be sure to follow whimsicalstitch.com on FacebookPinterestInstagram, and Twitter.

If you like what you see on this blog, want to learn some very creative decorative stitches, and how to put them all together, whimsicalstitch.com sells stitch guides for seasonal Melissa Shirley designs.  17 guides are currently available and more are in the pipeline.

I hope you have the perfect space for this stitch and enjoy!

My Head Explodes

This stitch always perplexes me, yet I love it.  Kinda like my grumpy cat, Max.

I take pride in identifying and remembering the pattern, sequence, and matching points on stitches.  This one?  Not so much.  Ok, never is more accurate.

Yet, it is perfect for most large spaces such as a background, walls, Santa bags or coats, sand, or sky, especially if you want those areas to recede a little bit.  So, whenever I want to do this stitch, I whip out a book or an already stitched piece to refresh my memory.

If it has a name, I can't remember it.  I identify it as the Ribbon Background.

Ribbon Background.jpg

It's a great way to mix thread finishes.  You can use a matte thread for the gray lines and a metallic for the yellow lines or vice versa depending on the look you are going for.  I've provided four alternatives for the intersections (stitched in yellow on the main diagram) that can help you glam up or dress down as much as you would like.

These stitch diagrams, along with other #whimsicalwednesday and #smallspacesunday stitch diagrams, can also be found on www.pinterest.com/whimsicalstitch/whimsicalwednesday.  

Be sure to follow whimsicalstitch.com on FacebookPinterestInstagram, and Twitter.

If you like what you see on this blog, want to learn some very creative decorative stitches, and how to put them all together, whimsicalstitch.com sells stitch guides for seasonal Melissa Shirley designs.  Seventeen guides are available and more are in the pipeline.

I hope you have the perfect space for this stitch and enjoy!

PS Now if I could just remember to visit my own Pinterest page when I want to refresh myself on this stitch.

Cross My Heart


Today's #smallspacesunday shares the Extended Cross Stitch.  It's a versatile stitch suiting many stitch needs, including small spaces (duh), shading enhancement, and texture.  

The concept is very simple.  For a vertical cross, it's over one row and up three rows.  For a horizontal cross, it's over three rows and up one row.  It's always important to have the second stitch is the cross going from the lower left to the upper right.  (It's one of the "Purist Principles" I follow in needlepoint.)

Extended Cross Stitch.jpg

For shading to show through, leave the intersection between the crosses empty.  You can fill that space with a French Knot, bead, or traditional cross stitch to add glamour or texture.

The cross stitch over one row condenses the stitch and adds a small level of bulk.  If you do not want that added texture, your thread choice should be lighter than you normally use for the specific canvas size.  As an example, I like to use DMC Pearl #5 or Kreinik Metallics Fine Braid (#8) or Tapestry Braid (#12) on 13 mesh.  Elegance or 4-ply floss is a good choice for 18 mesh.  

Truth be told, just last night, I used this stitch with a 4-ply floss on 13 mesh because 6-ply floss added way too much bulk for the stitched area.  It was a great reminder that there are guidelines in needlepoint, but you need to let your eye tell you what the right thing to do is.

These stitch diagrams, along with other #whimsicalwednesday and #smallspacesunday stitch diagrams, can also be found on www.pinterest.com/whimsicalstitch/whimsicalwednesday.  

Be sure to follow whimsicalstitch.com on FacebookPinterestInstagram, and Twitter.

If you like what you see on this blog, want to learn some very creative decorative stitches, and how to put them all together, whimsicalstitch.com sells stitch guides for seasonal Melissa Shirley designs.  Ten guides are currently available and more are in the pipeline.

I hope you have the perfect space for this stitch and enjoy!

Tramme Time Part 2

I get excited when I come across the perfect stitch for an area.  Still.  And I am more excited when it is an all-new stitch to me.

I found this stitch in a random book and can't figure out a. how I never discovered it before or b. why no one shared it with me before.  It is a derivative of the Tramme concept I shared with you in July but has enough unique qualities to warrant its own post.

What drew me in was the amount of space in between the base rows.  I loved the openness of this stitch as it was very understated yet a nice whimsical touch.

Add the base thread in vertical rows, with three empty rows in between threads (numbered steps on the diagram).  When you reach the bottom or top of a row, simply go across four rows from where you are and insert the needle and return in the opposite direction.  

The only trick is how to finish off the base thread.  If you have a stitched area nearby, insert and tie off the base thread there.  If not, while it is still on the needle, take the base thread and pull it up through the canvas in an unused area just out of the way.  Once you tie down the rows with the accent threads, there will be plenty of space for you to tie off the base thread in the accent thread on the back.

Add the accent threads (lettered steps) on top of the base thread.  The sequence of subsequent crosses is a little different than I normally recommend.  The beginning of each cross ends on the upper right and the next one begins on the upper left.  This sequence aids in tying down the base threads on the back of the canvas.

These stitch diagrams, along with other #whimsicalwednesday and #smallspacesunday stitch diagrams, can also be found on www.pinterest.com/whimsicalstitch/whimsicalwednesday.  

Be sure to follow whimsicalstitch.com on FacebookPinterestInstagram, and Twitter.

If you like what you see on this blog, want to learn some very creative decorative stitches, and how to put them all together, whimsicalstitch.com sells stitch guides for seasonal Melissa Shirley designs.  Ten guides are currently available and more are in the pipeline.

I hope you have the perfect space for this stitch and enjoy!

I Call It Cheating

And I fully endorse it!

Okay, today's post is about padding.  But it's so easy, I consider it cheating.

On the off chance you don't know, Melissa Shirley does great holiday stuff.  And holiday stuff often involves snow.  The big snow spaces are a lot of fun as you can do fun and creative stitches.  The smaller snow spaces can be a challenge.  Plain needlepoint often works, but it's not always the perfect choice.

Enter padding.  I love it, especially for snow.  It's a great technique for snow on trees, on a window sill, or chimney, just as thought starters.

There are two steps and two threads.  The first step, with the base thread, adds depth to the padded area.  The second thread is the top thread.  It covers the base thread and is the only visible thread when the padding is complete.

The base thread is a strand of thicker thread.  Very Velvet or a larger than normal Pearl Cotton work well here.  You should choose a color similar to the top thread. The top thread covers the base thread in the opposite direction and provides the final look.  Be sure to cover the first and last rows of the base thread so the base thread isn't visible (step 1-2 and final step in Step 2).

Padding.jpg

Most padding requires only one layer of base thread.  If you want to create more pronounced padding, add 1-2 more layers of base thread.  Be careful to not add so many layers that the canvas holes get stretched.

If you don't like the coverage one round of top thread provides, cover the padding with a second round of the top thread.  

Very Velvet and Pearl Cotton make excellent base rows.  I prefer wider threads for the top thread, such as Flair, Fyre Werks, Treasure Ribbon, Frosty Rays, or plied floss (with a laying tool to maximize its width and coverage).

These stitch diagrams, along with other #whimsicalwednesday and #smallspacesunday stitch diagrams, can also be found on www.pinterest.com/whimsicalstitch/whimsicalwednesday.  

Be sure to follow whimsicalstitch.com on FacebookPinterestInstagram, and Twitter.

If you like what you see on this blog, want to learn some very creative decorative stitches, and how to put them all together, whimsicalstitch.com sells stitch guides for seasonal Melissa Shirley designs.  Ten guides are currently available and more are in the pipeline.

Enjoy!

I Can See Clearly Now

I vividly remember when I was taught how to do glass by Wendy Harwood. Like it was yesterday. It was a glass jar full of candy on a Melissa Shirley stocking. I loved the colors of the candies and looked forward to bringing them to life with bright threads. In the back of my mind, I was bummed it wouldn't be obvious the pretty candies were in a jar, but couldn't verbalize that thought. Turned out it didn't matter. Wendy shared a great solution that showed off the pretty candies in what was very clearly a jar.

Open stitches with Kreinik Metallics.

Jars, eye glasses, vases, windows...everything glass.  It was and is a great solution.  My go-to stitch for windows is Reverse Basketweave in a Kreinik Metallic Braid.  My favorite is #032 Very Fine Braid (#4) for 18 mesh and #032 Fine Braid (#8) for 13 mesh.

Another favorite glass stitch is Alicia's Lace.  It's Plain Needlepoint in alternating directions.  So easy.

Click on image to see on whimsicalstitch.com's Pinterest account. Visit pinterest.com/whimsicalstitch/whimsicalwednesday for a library of all #whimsicalwednesday and #smallspacesunday stitch diagrams.

Click on image to see on whimsicalstitch.com's Pinterest account. Visit pinterest.com/whimsicalstitch/whimsicalwednesday for a library of all #whimsicalwednesday and #smallspacesunday stitch diagrams.

Click on image to see on whimsicalstitch.com's Pinterest account. Visit pinterest.com/whimsicalstitch/whimsicalwednesday for a library of all #whimsicalwednesday and #smallspacesunday stitch diagrams.

Click on image to see on whimsicalstitch.com's Pinterest account. Visit pinterest.com/whimsicalstitch/whimsicalwednesday for a library of all #whimsicalwednesday and #smallspacesunday stitch diagrams.

Click here to see the stitched sample for Reverse Basketweave and here for the stitched sample for Alicia’s Lace.

Experiment with some of your favorite open stitches and share what you learn with us!  I hope you enjoy this solution!

These stitch diagrams, along with other #whimsicalwednesday and #smallspacesunday stitch diagrams, can also be found on www.pinterest.com/whimsicalstitch/whimsicalwednesday.  

Be sure to follow whimsicalstitch.com on FacebookPinterestInstagram, and Twitter.

If you like what you see on this blog, want to learn some very creative decorative stitches, and how to put them all together, whimsicalstitch.com sells stitch guides for seasonal Melissa Shirley designs.  Ten guides are currently available and more are in the pipeline.

Enjoy!

P.S.  I miss you, Wendy.  A lot.

Trifecta Stitch


Honestly, I can not find a name for this stitch.  I call it the "Trifecta Stitch" because the core element includes three identical stitches.  

What is great about this stitch, other than its clean, classic look, is its versatility.  The base stitch is straightforward.  Three horizontal lines, over six rows, in a column.  Subsequent rows are offset from the first, and then you return to the original pattern.

Horizontal Trifecta.jpg

For the record, it works great on the vertical as well.  It's a great stitch to help focus the eye in the desired direction for the specific area.

Vertical Trifecta.jpg

The intersection between the columns is where it gets fun.  The top two diagrams have a simple X stitch (2X2) in the spot.  And so much more can be done.

In the next example, I added a single bead, stitched over two rows on the vertical to keep it clean and straight.

Horizontal Trifecta with Beads.jpg

In the next example, the intersection is filled with simple columns of three over two rows.  This version works very well with contrasting thread types (matte and metallic).  I've also used two different metallics (Crystal Braid and Flair) to create a snowy landscape.  

Horizontal Trifecta Alt.jpg

These stitch diagrams, along with other #whimsicalwednesday and #smallspacesunday stitch diagrams, can also be found on www.pinterest.com/whimsicalstitch/whimsicalwednesday.  

Be sure to follow whimsicalstitch.com on FacebookPinterestInstagram, and Twitter.

If you like what you see on this blog, want to learn some very creative decorative stitches, and how to put them all together, whimsicalstitch.com sells stitch guides for seasonal Melissa Shirley designs.  Ten guides are currently available and more are in the pipeline.

Enjoy!