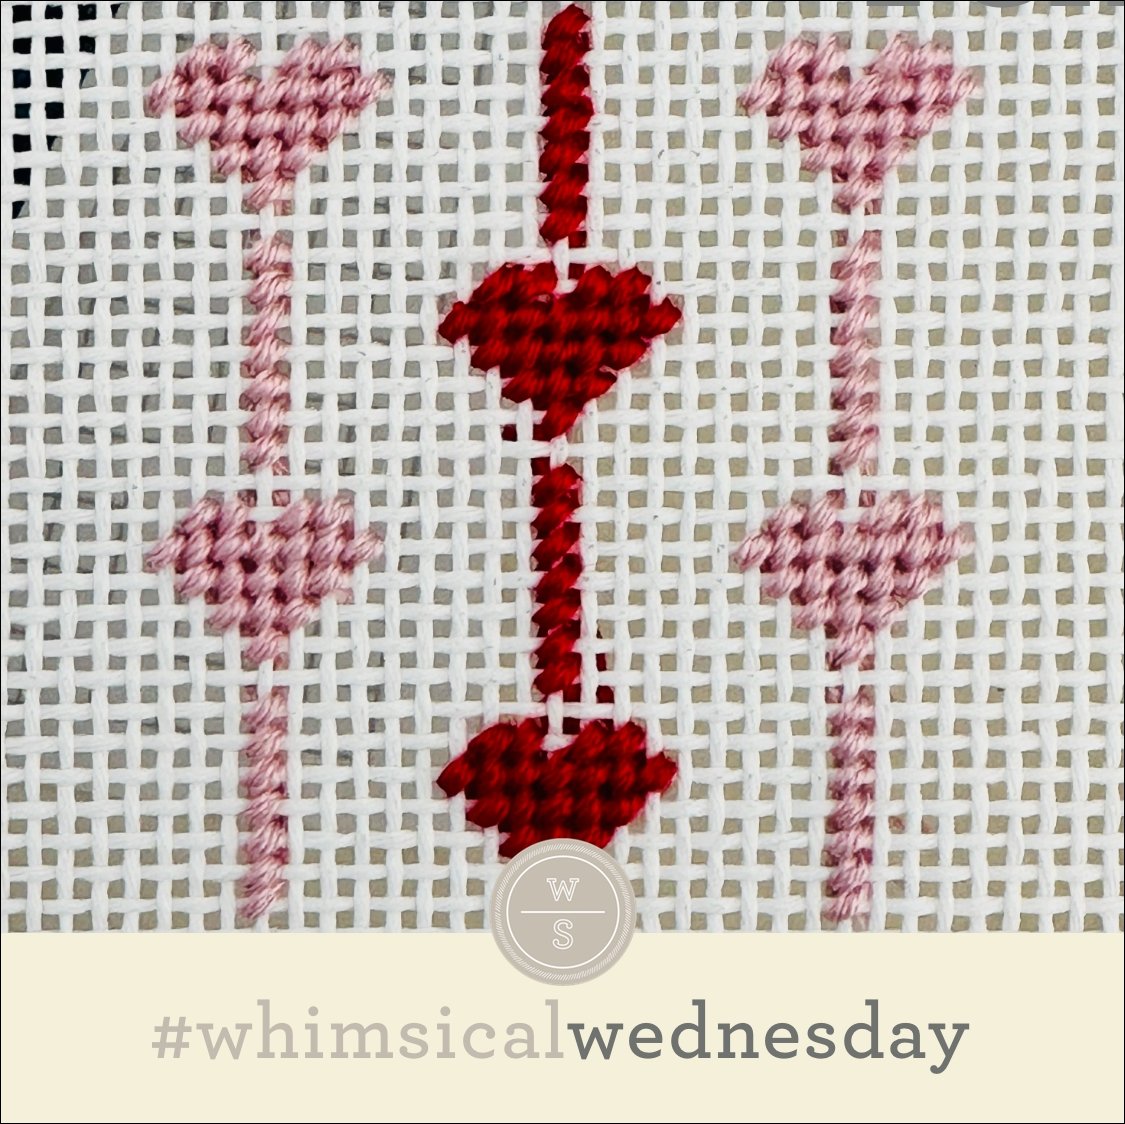
Sparking Joy

Today’s stitch is one of my new faves. It has a crispness to it, and I love how it pops on a canvas.

Click the image to see the whimsicalstitch.com Stitch Library on pinterest.com. Includes all #whimsicalwednesday and #smallspacesunday stitch diagrams.

Click the image to see #whimsicalwednesday and #smallspacesunday Stitched Sample Gallery on Instagram.

The stitched sample uses pink and white Elegance on 18M. For me, the key to the pattern is not the group of eight stitches that create a single circle. Take a look at the aqua highlighted square in the upper left corner. Four groups of stitches meet there. The stitches on the right and left sides of it (black lines) use the same color thread. The stitches on the top and bottom are the second color of thread. Subsequent circles reverse the thread colors of this pattern. Identifying this pattern helped me navigate the remainder of the stitching.

I love the Elizabeth Crane Swartz vibe of this stitch. It’s great for backgrounds, especially for a graphic monogram or initials. It will make darling dresses and skirts with two shades of silk floss. If you want to use the same color for both sides, consider substituting a metallic for one set of lines. I recommend a bright metallic that lays flat and will distinguish itself against the second thread. Fyre Werks, Neon Rays, or even Flair will work. I love the idea of using nothing but gold and silver Fyre Werks for this stitch.

I hope you have the perfect spot for this stitch. Enjoy!
Click on image to see the whimsicalstitch.com Stitch Library on pinterest.com. Includes all #whimsicalwednesday and #smallspacesunday stitch diagrams.

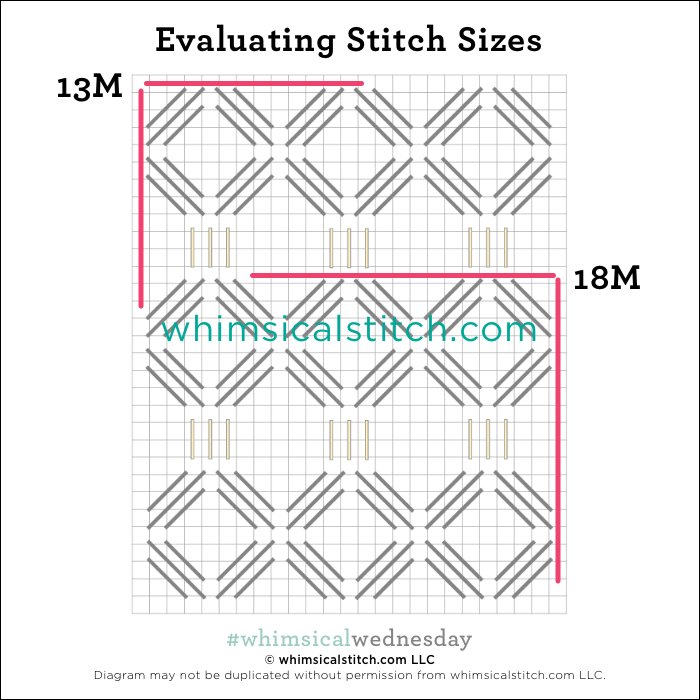
As you are auditioning stitches (from any stitch source), count the number of canvas threads on the diagram that match your mesh size. And there you have what an inch of the stitch will look like. Evaluate that against the area where you plan to use the stitch and make your final decision. If you start integrating this step into your stitch selection process, you may be surprised at how many stitches you think are large are much smaller than you realize.

By (sometimes) including this step in my own process, I find I am now integrating much longer stitches than I ever thought I would. I used to think a stitch six rows long was super big. I have very much changed my tune, which has helped me expand my creativity, especially for large-space stitches.

Today’s stitch diagram, along with all other #whimsicalwednesday and #smallspacesunday stitch diagrams, can also be found on a Pinterest board here. Be sure to follow whimsicalstitch.com on FacebookPinterestInstagram, and Twitter.

If you like what you see on this blog, there's more. Mary’s Whimsical Stitches is a series of four books offering contemporary how-to collections of more than 200 stitches (in each volume) for all stitchers, regardless of skill level. All books include updated and sequenced diagrams from this blog, plus a collection of all-new stitches from private lessons and other class projects. Visit here to find a needlepoint retailer that carries my books.

New to needlepoint or looking for a refresher? Please download a handy how-to guide covering basic needlepoint stitches and stitch compensation techniques along with new top-line information on needlepoint materials and tools, how to handle threads, and other helpful needlepoint resources.

whimsicalstitch.com also sells Stitch Guides and Stitch Concepts for Melissa Shirley Designs, Zecca DesignsSandra Gilmore, Purple Palm, Maggie, and Penny MacLeod, and many more. Click here to see the newest guides and click here to see the entire collection.

I hope you have the perfect spot for this stitch! Please enjoy! Have a wonderful #whimsicalwednesday!

A Note about Diagrams
I use color in diagrams to make them as clear as possible.  The primary function of different colored lines is to illustrate a stitch sequence.  For example, the layering of colors demonstrates you add them in that order.  They can also provide ideas on integrating additional threads (one line for each color).  Or, you can use the same thread for all color lines.  That's where I encourage you to use your imagination for the space you are stitching!

A New Go-to

One of the most popular stitches from Volume 3 (using the absolutely statistically relevant data points of how many posts I remember seeing about it on Instagram) is gingham. I talk a lot about scalable stitches and gingham is the perfect example. The book version was three rows wide. A student of mine went six rows wide for an adorable sports field, and I am so excited to share it with you.

Click the image to see #whimsicalwednesday and #smallspacesunday Stitched Sample Gallery on Instagram.

Click the image to see the whimsicalstitch.com Stitch Library on pinterest.com. Includes all #whimsicalwednesday and #smallspacesunday stitch diagrams.

Click the image to see the whimsicalstitch.com Stitch Library on pinterest.com. Includes all #whimsicalwednesday and #smallspacesunday stitch diagrams.

The stitched sample uses two shades of green Vineyard Silk. Starting in the upper right-hand corner, add six rows of tent stitches in the first color following the diagonal path, leaving an empty row between the stitches, from the top edge down to the right side of the canvas (first diagram). Repeat with six rows in the same pattern in the second color. Continue to switch between colors every six rows. When complete, do the exact same thing, starting at the upper right edge and going down towards the lower left edge with the second color. Voila! You have gingham.

My favorite part of gingham is where the two colors mingle. My late grandmother, the math teacher, would absolutely love this stitch. Your two threads can be two of the same color family, a mix of matte and metallic, or two of your favorite colors. White and black are also great companions with a second color for a gingham stitch.

You can see how my student has already started the work to compensate around the soccer player. She is adding the rows on one side of the soccer player and will connect the areas when she gets around him. Again, the fact that every block is six rows wide or tall makes the counting easy. And, yes, you will find yourself counting to six a lot while doing this stitch. But it’s all good

Gingham is great for grass, fields, wrapping paper, linens, clothing, beach umbrellas, and virtually anything else. And once you master gingham, creating plaids will be really easy!

I hope you have the perfect spot for this stitch. Enjoy!

Click on image to see the whimsicalstitch.com Stitch Library on pinterest.com. Includes all #whimsicalwednesday and #smallspacesunday stitch diagrams.

As you are auditioning stitches (from any stitch source), count the number of canvas threads on the diagram that match your mesh size. And there you have what an inch of the stitch will look like. Evaluate that against the area where you plan to use the stitch and make your final decision. If you start integrating this step into your stitch selection process, you may be surprised at how many stitches you think are large are much smaller than you realize.

By (sometimes) including this step in my own process, I find I am now integrating much longer stitches than I ever thought I would. I used to think a stitch six rows long was super big. I have very much changed my tune, which has helped me expand my creativity, especially for large-space stitches.

Today’s stitch diagram, along with all other #whimsicalwednesday and #smallspacesunday stitch diagrams, can also be found on a Pinterest board here. Be sure to follow whimsicalstitch.com on FacebookPinterestInstagram, and Twitter.

If you like what you see on this blog, there's more. Mary’s Whimsical Stitches is a series of four books offering contemporary how-to collections of more than 200 stitches (in each volume) for all stitchers, regardless of skill level. All books include updated and sequenced diagrams from this blog, plus a collection of all-new stitches from private lessons and other class projects. Visit here to find a needlepoint retailer that carries my books.

New to needlepoint or looking for a refresher? Please download a handy how-to guide covering basic needlepoint stitches and stitch compensation techniques along with new top-line information on needlepoint materials and tools, how to handle threads, and other helpful needlepoint resources.

whimsicalstitch.com also sells Stitch Guides and Stitch Concepts for Melissa Shirley Designs, Zecca DesignsSandra Gilmore, Purple Palm, Maggie, and Penny MacLeod, and many more. Click here to see the newest guides and click here to see the entire collection.

I hope you have the perfect spot for this stitch! Please enjoy! Have a wonderful #whimsicalwednesday!

A Note about Diagrams
I use color in diagrams to make them as clear as possible.  The primary function of different colored lines is to illustrate a stitch sequence.  For example, the layering of colors demonstrates you add them in that order.  They can also provide ideas on integrating additional threads (one line for each color).  Or, you can use the same thread for all color lines.  That's where I encourage you to use your imagination for the space you are stitching!

Playing with Diamonds

Today’s stitch combines some of my favorite things and has lots of ways to create variations.

Click the image to see the whimsicalstitch.com Stitch Library on pinterest.com. Includes all #whimsicalwednesday and #smallspacesunday stitch diagrams.

Click the image to see #whimsicalwednesday and #smallspacesunday Stitched Sample Gallery on Instagram.

The stitched sample uses three plies of Splendor for the black lines, Soie Perlee for the yellow lines, and two plies of the same Splendor for the aqua lines on 18M. It’s the background for cute saying from & More Threads.

In addition to a great background, I’m looking forward to using it for clothing, especially coats. I love the idea of it for wrapping paper, replacing the green thread used for the yellow lines with a silver or gold metallic, such as Fyre Werks.

The fun begins with the yellow and aqua lines. To start, you can play with the direction of the yellow lines. Horizontal (as pictured) or vertical…it does not matter. I chose horizontal because it was unexpected. You can replace the Upright Tied Cross (aqua lines) with a small batch of Brick Beading, leave it empty, add a straight diamond over 2-4-2 rows, or even add a sequin or more elaborate flat-ish embellisment.

I hope the ideas for modifications are helpful and that you have a spot for this stitch. Enjoy!

Click on image to see the whimsicalstitch.com Stitch Library on pinterest.com. Includes all #whimsicalwednesday and #smallspacesunday stitch diagrams.

As you are auditioning stitches (from any stitch source), count the number of canvas threads on the diagram that match your mesh size. And there you have what an inch of the stitch will look like. Evaluate that against the area where you plan to use the stitch and make your final decision. If you start integrating this step into your stitch selection process, you may be surprised at how many stitches you think are large are much smaller than you realize.

By (sometimes) including this step in my own process, I find I am now integrating much longer stitches than I ever thought I would. I used to think a stitch six rows long was super big. I have very much changed my tune, which has helped me expand my creativity, especially for large-space stitches.

Today’s stitch diagram, along with all other #whimsicalwednesday and #smallspacesunday stitch diagrams, can also be found on a Pinterest board here. Be sure to follow whimsicalstitch.com on FacebookPinterestInstagram, and Twitter.

If you like what you see on this blog, there's more. Mary’s Whimsical Stitches is a series of four books offering contemporary how-to collections of more than 200 stitches (in each volume) for all stitchers, regardless of skill level. All books include updated and sequenced diagrams from this blog, plus a collection of all-new stitches from private lessons and other class projects. Visit here to find a needlepoint retailer that carries my books.

New to needlepoint or looking for a refresher? Please download a handy how-to guide covering basic needlepoint stitches and stitch compensation techniques along with new top-line information on needlepoint materials and tools, how to handle threads, and other helpful needlepoint resources.

whimsicalstitch.com also sells Stitch Guides and Stitch Concepts for Melissa Shirley Designs, Zecca DesignsSandra Gilmore, Purple Palm, Maggie, and Penny MacLeod, and many more. Click here to see the newest guides and click here to see the entire collection.

I hope you have the perfect spot for this stitch! Please enjoy! Have a wonderful #whimsicalwednesday!

A Note about Diagrams
I use color in diagrams to make them as clear as possible.  The primary function of different colored lines is to illustrate a stitch sequence.  For example, the layering of colors demonstrates you add them in that order.  They can also provide ideas on integrating additional threads (one line for each color).  Or, you can use the same thread for all color lines.  That's where I encourage you to use your imagination for the space you are stitching!

Meow

Today’s stitch is an example of one I would have never been able to piece together without my occasionally beloved computer. Yes, I had an idea in my head but how the pieces fit together eluded me.

Click the image to see the whimsicalstitch.com Stitch Library on pinterest.com. Includes all #whimsicalwednesday and #smallspacesunday stitch diagrams.

Click the image to see #whimsicalwednesday and #smallspacesunday Stitched Sample Gallery on Instagram.

The stitched sample is the background on a striking Colors of Praise leopard and uses a strand of pink Elegance on 18M. I can already identify some variations for future posts. It may very well become the stitch that keeps on giving.

It makes a fascinating background because it is intriguing yet allows other areas on the canvas to shine. For the leopard, the plan is to draw attention to the flowers with silk ribbons, so this background should be a perfect match.

The stitch is an example of blackwork, an embroidery technique that mimics graphic design. The repeated element resembles a short and wide cross. I used two colors in the image on the right to illustrate how those elements fit together. This block on the right is 22 rows tall and 22 rows wide. That’s almost two square inches on a 13M canvas. Keeping all of that open space clear was a puzzle.

I used a technique I call pivoting. The sequence alternates back and forth between shared holes to create an open stitch without dragging threads across the canvas. Full disclosure. I had absolutely no shame in dragging threads across the areas in between the tiny squares where the groups of stitches meet (illustrated by the gray squares).

I hope the sequencing notes are helpful and that you have a spot for this stitch. Enjoy!

Click on image to see the whimsicalstitch.com Stitch Library on pinterest.com. Includes all #whimsicalwednesday and #smallspacesunday stitch diagrams.

As you are auditioning stitches (from any stitch source), count the number of canvas threads on the diagram that match your mesh size. And there you have what an inch of the stitch will look like. Evaluate that against the area where you plan to use the stitch and make your final decision. If you start integrating this step into your stitch selection process, you may be surprised at how many stitches you think are large are much smaller than you realize.

By (sometimes) including this step in my own process, I find I am now integrating much longer stitches than I ever thought I would. I used to think a stitch six rows long was super big. I have very much changed my tune, which has helped me expand my creativity, especially for large-space stitches.

Today’s stitch diagram, along with all other #whimsicalwednesday and #smallspacesunday stitch diagrams, can also be found on a Pinterest board here. Be sure to follow whimsicalstitch.com on FacebookPinterestInstagram, and Twitter.

If you like what you see on this blog, there's more. Mary’s Whimsical Stitches is a series of four books offering contemporary how-to collections of more than 200 stitches (in each volume) for all stitchers, regardless of skill level. All books include updated and sequenced diagrams from this blog, plus a collection of all-new stitches from private lessons and other class projects. Visit here to find a needlepoint retailer that carries my books.

New to needlepoint or looking for a refresher? Please download a handy how-to guide covering basic needlepoint stitches and stitch compensation techniques along with new top-line information on needlepoint materials and tools, how to handle threads, and other helpful needlepoint resources.

whimsicalstitch.com also sells Stitch Guides and Stitch Concepts for Melissa Shirley Designs, Zecca DesignsSandra Gilmore, Purple Palm, Maggie, and Penny MacLeod, and many more. Click here to see the newest guides and click here to see the entire collection.

I hope you have the perfect spot for this stitch! Please enjoy! Have a wonderful #whimsicalwednesday!

A Note about Diagrams
I use color in diagrams to make them as clear as possible.  The primary function of different colored lines is to illustrate a stitch sequence.  For example, the layering of colors demonstrates you add them in that order.  They can also provide ideas on integrating additional threads (one line for each color).  Or, you can use the same thread for all color lines.  That's where I encourage you to use your imagination for the space you are stitching!

A Toast

Let’s raise a toast to today’s cute little stitch. It’s a long overdue variation of Skipping Nobuko from volume 3 of my books.

Click the image to see the whimsicalstitch.com Stitch Library on pinterest.com. Includes all #whimsicalwednesday and #smallspacesunday stitch diagrams.

Click the image to see #whimsicalwednesday and #smallspacesunday Stitched Sample Gallery on Instagram.

This stitch is the label on a darling Veuve Clicquot bottle by the one and only C’ate La Vie (instagram.com/catelavie). I used two plies of Soie D'Alger on 18M canvas. It’s definitely a light touch as I want the Veuve name to stand out even more. One is always encouraged to increase the ply count on a stitch to their comfort level.

The stitch is deceptively challenging, especially with compensation. I worked through the compensation by identifying how identical stitches lined up. In this case, the diagonal stitches over three rows and the single stitches over one row (from the lower left to the upper right) were four rows apart from their matching counterparts in both horizontal and vertical directions. The same was true for the stitches stitched from the lower right to the upper left. I began stitching at the top right corner, following horizontal paths. When I hit the Veuve, I counted up four rows from where my needle was to determine if it was a stitch over three rows or one row and what direction it was in. I’m not worried about the dragged threads because I know the Plain Needlepoint I am going to use for the lettering will cover that up.

I’m looking forward to using this stitch on greenery, such as a field or a large tropical leaf, with an appropriate overdyed silk floss or Petite Silk Lame. It will also work well for water with a lovely metallic, such as Radiance. If you want to add a little extra flair, consider using a metallic thread for the stitches over one row. Another fun change is to add a second color to the mix for a more dramatic pop.

I hope the compensation notes are helpful and that you have a spot for this stitch. Enjoy!

Click on image to see the whimsicalstitch.com Stitch Library on pinterest.com. Includes all #whimsicalwednesday and #smallspacesunday stitch diagrams.

As you are auditioning stitches (from any stitch source), count the number of canvas threads on the diagram that match your mesh size. And there you have what an inch of the stitch will look like. Evaluate that against the area where you plan to use the stitch and make your final decision. If you start integrating this step into your stitch selection process, you may be surprised at how many stitches you think are large are much smaller than you realize.

By (sometimes) including this step in my own process, I find I am now integrating much longer stitches than I ever thought I would. I used to think a stitch six rows long was super big. I have very much changed my tune, which has helped me expand my creativity, especially for large-space stitches.

Today’s stitch diagram, along with all other #whimsicalwednesday and #smallspacesunday stitch diagrams, can also be found on a Pinterest board here. Be sure to follow whimsicalstitch.com on FacebookPinterestInstagram, and Twitter.

If you like what you see on this blog, there's more. Mary’s Whimsical Stitches is a series of four books offering contemporary how-to collections of more than 200 stitches (in each volume) for all stitchers, regardless of skill level. All books include updated and sequenced diagrams from this blog, plus a collection of all-new stitches from private lessons and other class projects. Visit here to find a needlepoint retailer that carries my books.

New to needlepoint or looking for a refresher? Please download a handy how-to guide covering basic needlepoint stitches and stitch compensation techniques along with new top-line information on needlepoint materials and tools, how to handle threads, and other helpful needlepoint resources.

whimsicalstitch.com also sells Stitch Guides and Stitch Concepts for Melissa Shirley Designs, Zecca DesignsSandra Gilmore, Purple Palm, Maggie, and Penny MacLeod, and many more. Click here to see the newest guides and click here to see the entire collection.

I hope you have the perfect spot for this stitch! Please enjoy! Have a wonderful #whimsicalwednesday!

A Note about Diagrams
I use color in diagrams to make them as clear as possible.  The primary function of different colored lines is to illustrate a stitch sequence.  For example, the layering of colors demonstrates you add them in that order.  They can also provide ideas on integrating additional threads (one line for each color).  Or, you can use the same thread for all color lines.  That's where I encourage you to use your imagination for the space you are stitching!

Be Still My Heart

My go-to heart background stitch was a little big for a stitching friend of mine, so I played around and created some adorable hearts for her, and now you!

Click the image to see the whimsicalstitch.com Stitch Library on pinterest.com. Includes all #whimsicalwednesday and #smallspacesunday stitch diagrams.

Click the image to see #whimsicalwednesday and #smallspacesunday Stitched Sample Gallery on Instagram.

The stitched sample is me playing around on a 13M canvas with two shades of Soie d’Alger. As you can imagine, there are quite a few color and finish combos you can play with here. You can go monotone with a matte and a metallic thread in the same shade of blue. You can stitch all in a single color of a thread. You could add more colors to the mix. For example, why not add a column of blue hearts to the duo in the stitched sample? How about a patriotic mix of red, white, and blue metallics for a July 4th piece. I suspect you might get the idea.

It will be charming, no matter what you choose. Have fun with it.

Click on image to see the whimsicalstitch.com Stitch Library on pinterest.com. Includes all #whimsicalwednesday and #smallspacesunday stitch diagrams.

As you are auditioning stitches (from any stitch source), count the number of canvas threads on the diagram that match your mesh size. And there you have what an inch of the stitch will look like. Evaluate that against the area where you plan to use the stitch and make your final decision. If you start integrating this step into your stitch selection process, you may be surprised at how many stitches you think are large are much smaller than you realize.

By (sometimes) including this step in my own process, I find I am now integrating much longer stitches than I ever thought I would. I used to think a stitch six rows long was super big. I have very much changed my tune, which has helped me expand my creativity, especially for large-space stitches.

Today’s stitch diagram, along with all other #whimsicalwednesday and #smallspacesunday stitch diagrams, can also be found on a Pinterest board here. Be sure to follow whimsicalstitch.com on FacebookPinterestInstagram, and Twitter.

If you like what you see on this blog, there's more. Mary’s Whimsical Stitches is a series of four books offering contemporary how-to collections of more than 200 stitches (in each volume) for all stitchers, regardless of skill level. All books include updated and sequenced diagrams from this blog, plus a collection of all-new stitches from private lessons and other class projects. Visit here to find a needlepoint retailer that carries my books.

New to needlepoint or looking for a refresher? Please download a handy how-to guide covering basic needlepoint stitches and stitch compensation techniques along with new top-line information on needlepoint materials and tools, how to handle threads, and other helpful needlepoint resources.

whimsicalstitch.com also sells Stitch Guides and Stitch Concepts for Melissa Shirley Designs, Zecca DesignsSandra Gilmore, Purple Palm, Maggie, and Penny MacLeod, and many more. Click here to see the newest guides and click here to see the entire collection.

I hope you have the perfect spot for this stitch! Please enjoy! Have a wonderful #whimsicalwednesday!

A Note about Diagrams
I use color in diagrams to make them as clear as possible.  The primary function of different colored lines is to illustrate a stitch sequence.  For example, the layering of colors demonstrates you add them in that order.  They can also provide ideas on integrating additional threads (one line for each color).  Or, you can use the same thread for all color lines.  That's where I encourage you to use your imagination for the space you are stitching!

All the Feels

A mix of matte and metallic threads? Check. An open stitch that highlights the beautiful shading? Check. This stitch includes everything I love about needlepoint.

Click the image to see the whimsicalstitch.com Stitch Library on pinterest.com. Includes all #whimsicalwednesday and #smallspacesunday stitch diagrams.

Click the image to see #whimsicalwednesday and #smallspacesunday Stitched Sample Gallery on Instagram.

The stitched sample uses a single strand of Impressions (black lines), size 8 Kreinik (aqua lines), and Fyre Werks (yellow lines). I love how the lighter threads, especially with the Impressions and Kreinik, still allow the shading to peak through ever so gently, even where stitches exist. The stitched sample is an apple from a long-forgotten canvas peaking out from a work-in-progress box.

This stitch is begging to be used on a coat with Petite Very Velvet (black lines), size 12 Kreinik (aqua lines), and a Silk Lame (yellow lines). Yes, it’s a heavier look, but those threads' richness will make for a beautiful coat.

If you want a really open stitch that prioritizes the shading, eliminate the Oblique Upright Crosses (aqua lines with yellow lines on top). Toss in your favorite silk floss (black lines) and a Kreinik for the Smryna Crosses (remaining yellow lines), and you’ll have beautiful clouds or water. Or, replace the Smyrna Cross with a single bead over the center of the intersection or fill the 2X2 square with two rows of beading. Mix and match to your heart’s content.

It will be beautiful, no matter what you choose.

Click on image to see the whimsicalstitch.com Stitch Library on pinterest.com. Includes all #whimsicalwednesday and #smallspacesunday stitch diagrams.

As you are auditioning stitches (from any stitch source), count the number of canvas threads on the diagram that match your mesh size. And there you have what an inch of the stitch will look like. Evaluate that against the area where you plan to use the stitch and make your final decision. If you start integrating this step into your stitch selection process, you may be surprised at how many stitches you think are large are much smaller than you realize.

By (sometimes) including this step in my own process, I find I am now integrating much longer stitches than I ever thought I would. I used to think a stitch six rows long was super big. I have very much changed my tune, which has helped me expand my creativity, especially for large-space stitches.

Today’s stitch diagram, along with all other #whimsicalwednesday and #smallspacesunday stitch diagrams, can also be found on a Pinterest board here. Be sure to follow whimsicalstitch.com on FacebookPinterestInstagram, and Twitter.

If you like what you see on this blog, there's more. Mary’s Whimsical Stitches is a series of four books offering contemporary how-to collections of more than 200 stitches (in each volume) for all stitchers, regardless of skill level. All books include updated and sequenced diagrams from this blog, plus a collection of all-new stitches from private lessons and other class projects. Visit here to find a needlepoint retailer that carries my books.

New to needlepoint or looking for a refresher? Please download a handy how-to guide covering basic needlepoint stitches and stitch compensation techniques along with new top-line information on needlepoint materials and tools, how to handle threads, and other helpful needlepoint resources.

whimsicalstitch.com also sells Stitch Guides and Stitch Concepts for Melissa Shirley Designs, Zecca DesignsSandra Gilmore, Purple Palm, Maggie, and Penny MacLeod, and many more. Click here to see the newest guides and click here to see the entire collection.

I hope you have the perfect spot for this stitch! Please enjoy! Have a wonderful #whimsicalwednesday!

A Note about Diagrams
I use color in diagrams to make them as clear as possible.  The primary function of different colored lines is to illustrate a stitch sequence.  For example, the layering of colors demonstrates you add them in that order.  They can also provide ideas on integrating additional threads (one line for each color).  Or, you can use the same thread for all color lines.  That's where I encourage you to use your imagination for the space you are stitching!

Ooh La La

Today’s stitch is yet another variation of diamonds with a lot of variations within itself.

Click the image to see the whimsicalstitch.com Stitch Library on pinterest.com. Includes all #whimsicalwednesday and #smallspacesunday stitch diagrams.

Click the image to see #whimsicalwednesday and #smallspacesunday Stitched Sample Gallery on Instagram.

The stitched sample is the chest on a vintage Melissa Shirley piece featuring a somewhat dramatic rooster. I used ThreadWorx cotton floss (black lines), Petite Very Velvet (yellow lines), and size 12 Kreinik (aqua lines) on 13M.

In all honesty, I don’t know if I would have considered using Petite Very Velvet for the center if I was stitching this today…and I would regret not using it. The metallic is now a subtle accent, and I love its surprising contrast in both finish and weight.

This stitch would make a beautiful coat for a snowman or Santa with red velvet (black lines, a solid silk floss in a slightly different hue of red for the yellow lines, and a gold Fyre Werks for the aqua lines. I would love to see this stitch on a tree with a beautiful overdyed silk floss for the black lines, a rich green single strand silk for the yellow lines, and a green Kreinik for the aqua lines.

To dress this stitch up even more, consider replacing the Upright Tied Cross with a small bit of Brick Beading in the center. I would love to use that on a dress or coat on an angel with silk floss and beads. I would not include the aqua lines BUT feel free to add that extra something something.

Click on image to see the whimsicalstitch.com Stitch Library on pinterest.com. Includes all #whimsicalwednesday and #smallspacesunday stitch diagrams.

As you are auditioning stitches (from any stitch source), count the number of canvas threads on the diagram that match your mesh size. And there you have what an inch of the stitch will look like. Evaluate that against the area where you plan to use the stitch and make your final decision. If you start integrating this step into your stitch selection process, you may be surprised at how many stitches you think are large are much smaller than you realize.

By (sometimes) including this step in my own process, I find I am now integrating much longer stitches than I ever thought I would. I used to think a stitch six rows long was super big. I have very much changed my tune, which has helped me expand my creativity, especially for large-space stitches.

Today’s stitch diagram, along with all other #whimsicalwednesday and #smallspacesunday stitch diagrams, can also be found on a Pinterest board here. Be sure to follow whimsicalstitch.com on FacebookPinterestInstagram, and Twitter.

If you like what you see on this blog, there's more. Mary’s Whimsical Stitches is a series of four books offering contemporary how-to collections of more than 200 stitches (in each volume) for all stitchers, regardless of skill level. All books include updated and sequenced diagrams from this blog, plus a collection of all-new stitches from private lessons and other class projects. Visit here to find a needlepoint retailer that carries my books.

New to needlepoint or looking for a refresher? Please download a handy how-to guide covering basic needlepoint stitches and stitch compensation techniques along with new top-line information on needlepoint materials and tools, how to handle threads, and other helpful needlepoint resources.

whimsicalstitch.com also sells Stitch Guides and Stitch Concepts for Melissa Shirley Designs, Zecca DesignsSandra Gilmore, Purple Palm, Maggie, and Penny MacLeod, and many more. Click here to see the newest guides and click here to see the entire collection.

I hope you have the perfect spot for this stitch! Please enjoy! Have a wonderful #whimsicalwednesday!

A Note about Diagrams
I use color in diagrams to make them as clear as possible.  The primary function of different colored lines is to illustrate a stitch sequence.  For example, the layering of colors demonstrates you add them in that order.  They can also provide ideas on integrating additional threads (one line for each color).  Or, you can use the same thread for all color lines.  That's where I encourage you to use your imagination for the space you are stitching!

Guilty as Charged

I have been wanting to expand my woven stitches beyond my typical simple patterns of alternating straight stitches to create weaves. I recently stumbled across some cute mish-mashes of woven stitches on social media that offered some great inspiration…only to find a stitched sample of what I was looking for in my basement. Someone is looking to make my job easier!

Click the image to see the whimsicalstitch.com Stitch Library on pinterest.com. Includes all #whimsicalwednesday and #smallspacesunday stitch diagrams.

Click the image to see #whimsicalwednesday and #smallspacesunday Stitched Sample Gallery on Instagram.

The stitched sample is a pathway on a vintage Melissa Shirley countryside scene. I used ThreadWorx Perle Cotton on 13M.

This stitch will work well for greenspaces with your favorite silk floss (overdyed or solid). It will make a great roof for a country house with Rainbow Linen. I’m also thinking baskets, hats, rugs or floors. It’s really a wonderful stitch that will fit nicely in small-ish spaces but also do well in larger spaces.

Consider adding a contrasting thread (color, finish, or both) for the groups of three horizontal stitches…or even all the horizontal stitches…for slightly more interest. I’m looking forward to going down this rabbit hole of woven stitches. So, more to come!

Click on image to see the whimsicalstitch.com Stitch Library on pinterest.com. Includes all #whimsicalwednesday and #smallspacesunday stitch diagrams.

As you are auditioning stitches (from any stitch source), count the number of canvas threads on the diagram that match your mesh size. And there you have what an inch of the stitch will look like. Evaluate that against the area where you plan to use the stitch and make your final decision. If you start integrating this step into your stitch selection process, you may be surprised at how many stitches you think are large are much smaller than you realize.

By (sometimes) including this step in my own process, I find I am now integrating much longer stitches than I ever thought I would. I used to think a stitch six rows long was super big. I have very much changed my tune, which has helped me expand my creativity, especially for large-space stitches.

Today’s stitch diagram, along with all other #whimsicalwednesday and #smallspacesunday stitch diagrams, can also be found on a Pinterest board here. Be sure to follow whimsicalstitch.com on FacebookPinterestInstagram, and Twitter.

If you like what you see on this blog, there's more. Mary’s Whimsical Stitches is a series of four books offering contemporary how-to collections of more than 200 stitches (in each volume) for all stitchers, regardless of skill level. All books include updated and sequenced diagrams from this blog, plus a collection of all-new stitches from private lessons and other class projects. Visit here to find a needlepoint retailer that carries my books.

New to needlepoint or looking for a refresher? Please download a handy how-to guide covering basic needlepoint stitches and stitch compensation techniques along with new top-line information on needlepoint materials and tools, how to handle threads, and other helpful needlepoint resources.

whimsicalstitch.com also sells Stitch Guides and Stitch Concepts for Melissa Shirley Designs, Zecca DesignsSandra Gilmore, Purple Palm, Maggie, and Penny MacLeod, and many more. Click here to see the newest guides and click here to see the entire collection.

I hope you have the perfect spot for this stitch! Please enjoy! Have a wonderful #whimsicalwednesday!

A Note about Diagrams
I use color in diagrams to make them as clear as possible.  The primary function of different colored lines is to illustrate a stitch sequence.  For example, the layering of colors demonstrates you add them in that order.  They can also provide ideas on integrating additional threads (one line for each color).  Or, you can use the same thread for all color lines.  That's where I encourage you to use your imagination for the space you are stitching!

Yum

Today’s stitch is a really fun variation of an octagon stitch, courtesy of our friends at Aristeia Needlepoint. Full disclosure: I’m confident I would not have thought of this on my own, which makes me love it all the more.

Click the image to see the whimsicalstitch.com Stitch Library on pinterest.com. Includes all #whimsicalwednesday and #smallspacesunday stitch diagrams.

Click the image to see #whimsicalwednesday and #smallspacesunday Stitched Sample Gallery on Instagram.

The stitched sample the tabletop for a Melissa Shirley basket. Amanda stitched all the lines in the diagram with white DMC perle cotton. I illustrated the diagram with two threads to distinguish the two steps of a complete pie as well as offer a little inspiration for thread ideas. Whether or not you use one or two threads, I strongly recommend stitching the black lines first, and ending with the aqua lines.

This stitch is also a great illustration of the second way you can stitch octagons. Most of my octagon stitches share diagonal edges. Today’s octagons share straight edges for a slightly different look.

Amanda’s use of this for a tabletop is always a good choice. I think it will also make a beautiful bedspread with silk floss (black lines) and a Kreinik metallic in a contrasting color (aqua lines). This also reminds me a great deal of kitchen tile, so why not use it for a backsplash or floor with two contrasting metallic threads, such as Petite Silk Lame or Twinkle.

Click on image to see the whimsicalstitch.com Stitch Library on pinterest.com. Includes all #whimsicalwednesday and #smallspacesunday stitch diagrams.

As you are auditioning stitches (from any stitch source), count the number of canvas threads on the diagram that match your mesh size. And there you have what an inch of the stitch will look like. Evaluate that against the area where you plan to use the stitch and make your final decision. If you start integrating this step into your stitch selection process, you may be surprised at how many stitches you think are large are much smaller than you realize.

By (sometimes) including this step in my own process, I find I am now integrating much longer stitches than I ever thought I would. I used to think a stitch six rows long was super big. I have very much changed my tune, which has helped me expand my creativity, especially for large-space stitches.

Today’s stitch diagram, along with all other #whimsicalwednesday and #smallspacesunday stitch diagrams, can also be found on a Pinterest board here. Be sure to follow whimsicalstitch.com on FacebookPinterestInstagram, and Twitter.

If you like what you see on this blog, there's more. Mary’s Whimsical Stitches is a series of four books offering contemporary how-to collections of more than 200 stitches (in each volume) for all stitchers, regardless of skill level. All books include updated and sequenced diagrams from this blog, plus a collection of all-new stitches from private lessons and other class projects. Visit here to find a needlepoint retailer that carries my books.

New to needlepoint or looking for a refresher? Please download a handy how-to guide covering basic needlepoint stitches and stitch compensation techniques along with new top-line information on needlepoint materials and tools, how to handle threads, and other helpful needlepoint resources.

whimsicalstitch.com also sells Stitch Guides and Stitch Concepts for Melissa Shirley Designs, Zecca DesignsSandra Gilmore, Purple Palm, Maggie, and Penny MacLeod, and many more. Click here to see the newest guides and click here to see the entire collection.

I hope you have the perfect spot for this stitch! Please enjoy! Have a wonderful #whimsicalwednesday!

A Note about Diagrams
I use color in diagrams to make them as clear as possible.  The primary function of different colored lines is to illustrate a stitch sequence.  For example, the layering of colors demonstrates you add them in that order.  They can also provide ideas on integrating additional threads (one line for each color).  Or, you can use the same thread for all color lines.  That's where I encourage you to use your imagination for the space you are stitching!