Rectangles Everywhere You Turn

This stitch has been percolating in my head for a bit and I’m really happy how it turned out.

Click the image to see the whimsicalstitch.com Stitch Library on pinterest.com. Includes all #whimsicalwednesday and #smallspacesunday stitch diagrams.

Click the image to see #whimsicalwednesday and #smallspacesunday Stitched Sample Gallery on Instagram.

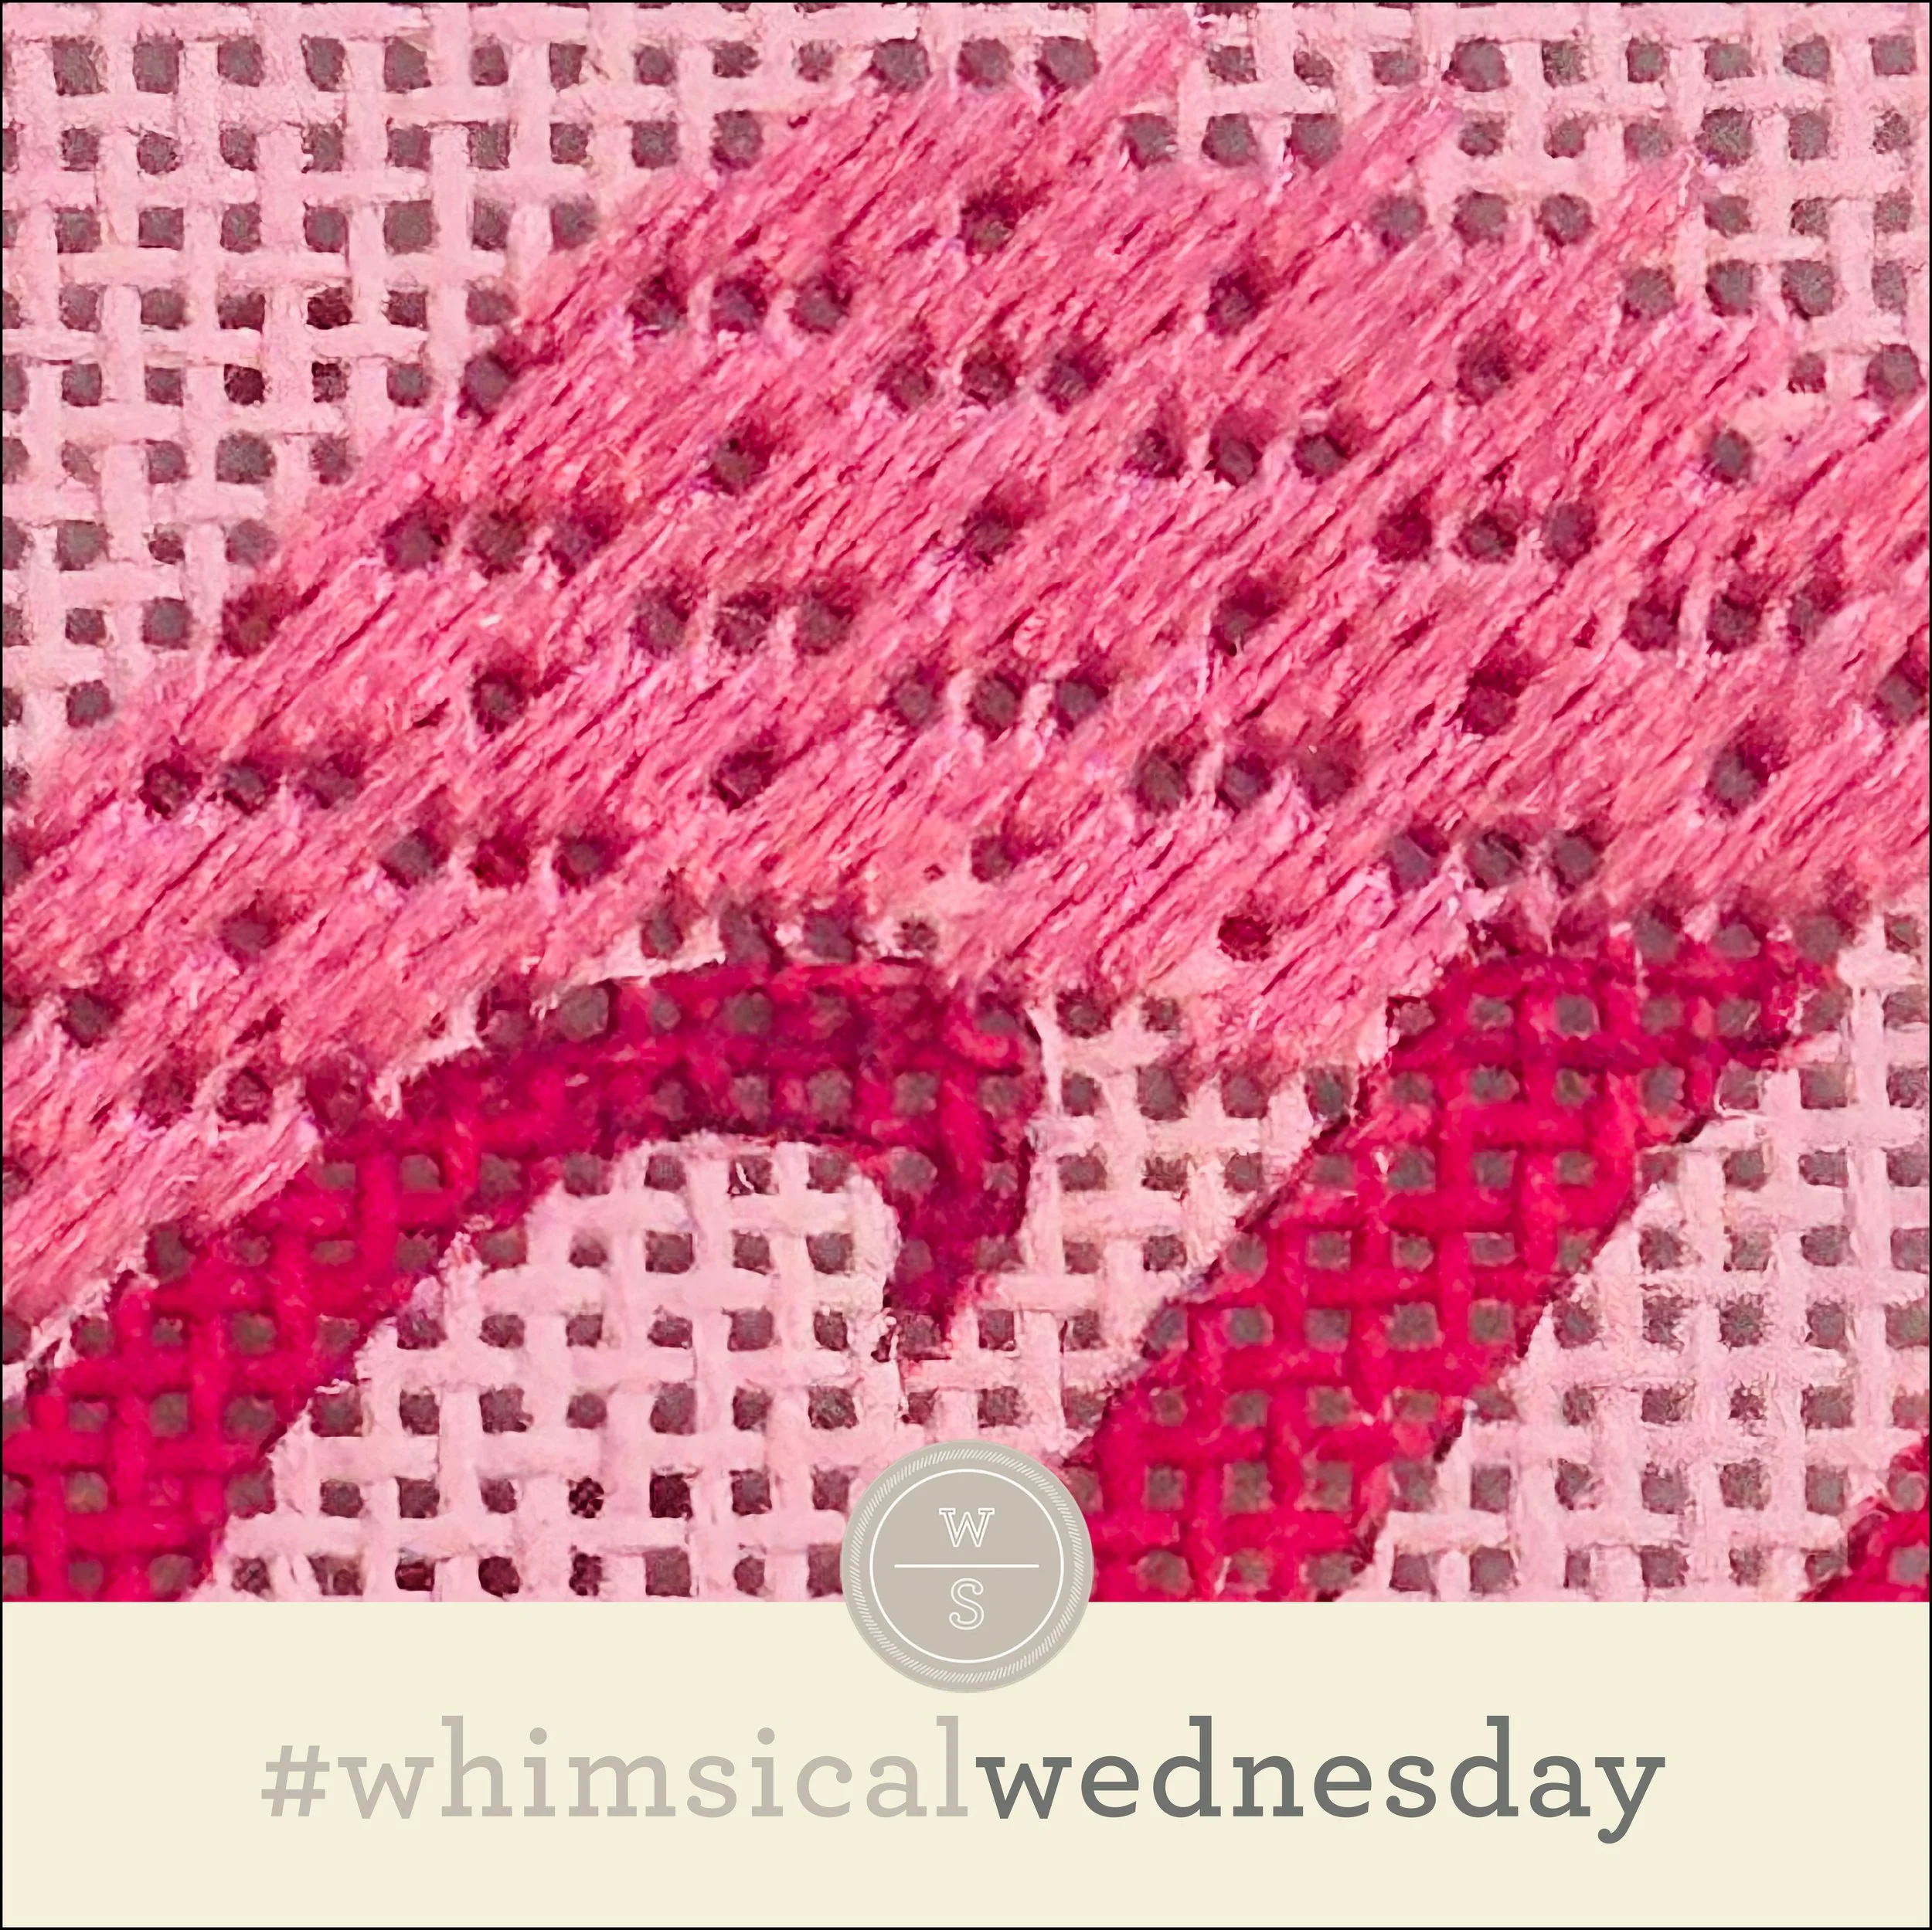
The stitched sample serves as a background for a cute saying and utilizes three plies of Splendor for the black lines and a single strand of Floche for the aqua lines.

My go-to thread combo for most stitches is a matte thread paired with a metallic one. I used contrasting colors for the two threads because that’s what was handy in my stash. And I’m happy with this combo and will keep it for the day (or long in the future) when I finally finish this.

I love the idea of using this for a roof with two shades of brown Rainbow Linen. It will also work well for a skirt with silk floss and a contrasting metallic (color, finish, or both) for a little pop. If you want to add a bit of texture, replace the aqua lines with a Smyrna Cross. If you want to add a bit of glam, use beads!

There’s a lot to work with here. I hope you have the perfect spot for this stitch. Enjoy!

Click on image to see the whimsicalstitch.com Stitch Library on pinterest.com. Includes all #whimsicalwednesday and #smallspacesunday stitch diagrams.

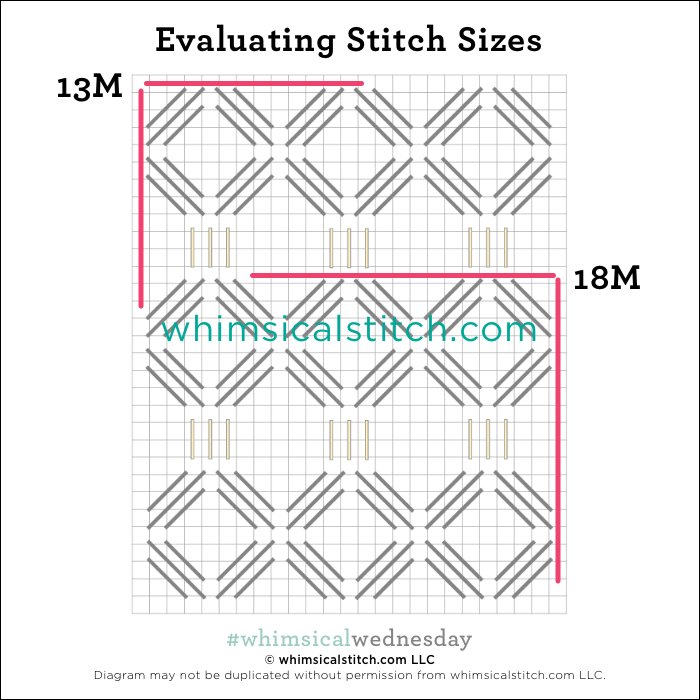
As you are auditioning stitches (from any stitch source), count the number of canvas threads on the diagram that match your mesh size. And there you have what an inch of the stitch will look like. Evaluate that against the area where you plan to use the stitch and make your final decision. If you start integrating this step into your stitch selection process, you may be surprised at how many stitches you think are large are much smaller than you realize.

By (sometimes) including this step in my own process, I find I am now integrating much longer stitches than I ever thought I would. I used to think a stitch six rows long was super big. I have very much changed my tune, which has helped me expand my creativity, especially for large-space stitches.

Today’s stitch diagram, along with all other #whimsicalwednesday and #smallspacesunday stitch diagrams, can also be found on a Pinterest board here. Be sure to follow whimsicalstitch.com on FacebookPinterestInstagram, and Twitter.

If you like what you see on this blog, there's more. Mary’s Whimsical Stitches is a series of four books offering contemporary how-to collections of more than 200 stitches (in each volume) for all stitchers, regardless of skill level. All books include updated and sequenced diagrams from this blog, plus a collection of all-new stitches from private lessons and other class projects. Visit here to find a needlepoint retailer that carries my books.

New to needlepoint or looking for a refresher? Please download a handy how-to guide covering basic needlepoint stitches and stitch compensation techniques along with new top-line information on needlepoint materials and tools, how to handle threads, and other helpful needlepoint resources.

whimsicalstitch.com also sells Stitch Guides and Stitch Concepts for Melissa Shirley Designs, Zecca DesignsSandra Gilmore, Purple Palm, Maggie, and Penny MacLeod, and many more. Click here to see the newest guides and click here to see the entire collection.

I hope you have the perfect spot for this stitch! Please enjoy! Have a wonderful #whimsicalwednesday!

A Note about Diagrams
I use color in diagrams to make them as clear as possible.  The primary function of different colored lines is to illustrate a stitch sequence.  For example, the layering of colors demonstrates you add them in that order.  They can also provide ideas on integrating additional threads (one line for each color).  Or, you can use the same thread for all color lines.  That's where I encourage you to use your imagination for the space you are stitching!

So Darn Cute

Our friends at Heirloom Designs Studio recently shared this sweet stitch on Instagram. Sure, it was part of a finishing tutorial, but I couldn’t take my eyes off the stitch.

Click the image to see the whimsicalstitch.com Stitch Library on pinterest.com. Includes all #whimsicalwednesday and #smallspacesunday stitch diagrams.

Click the image to see #whimsicalwednesday and #smallspacesunday Stitched Sample Gallery on Instagram.

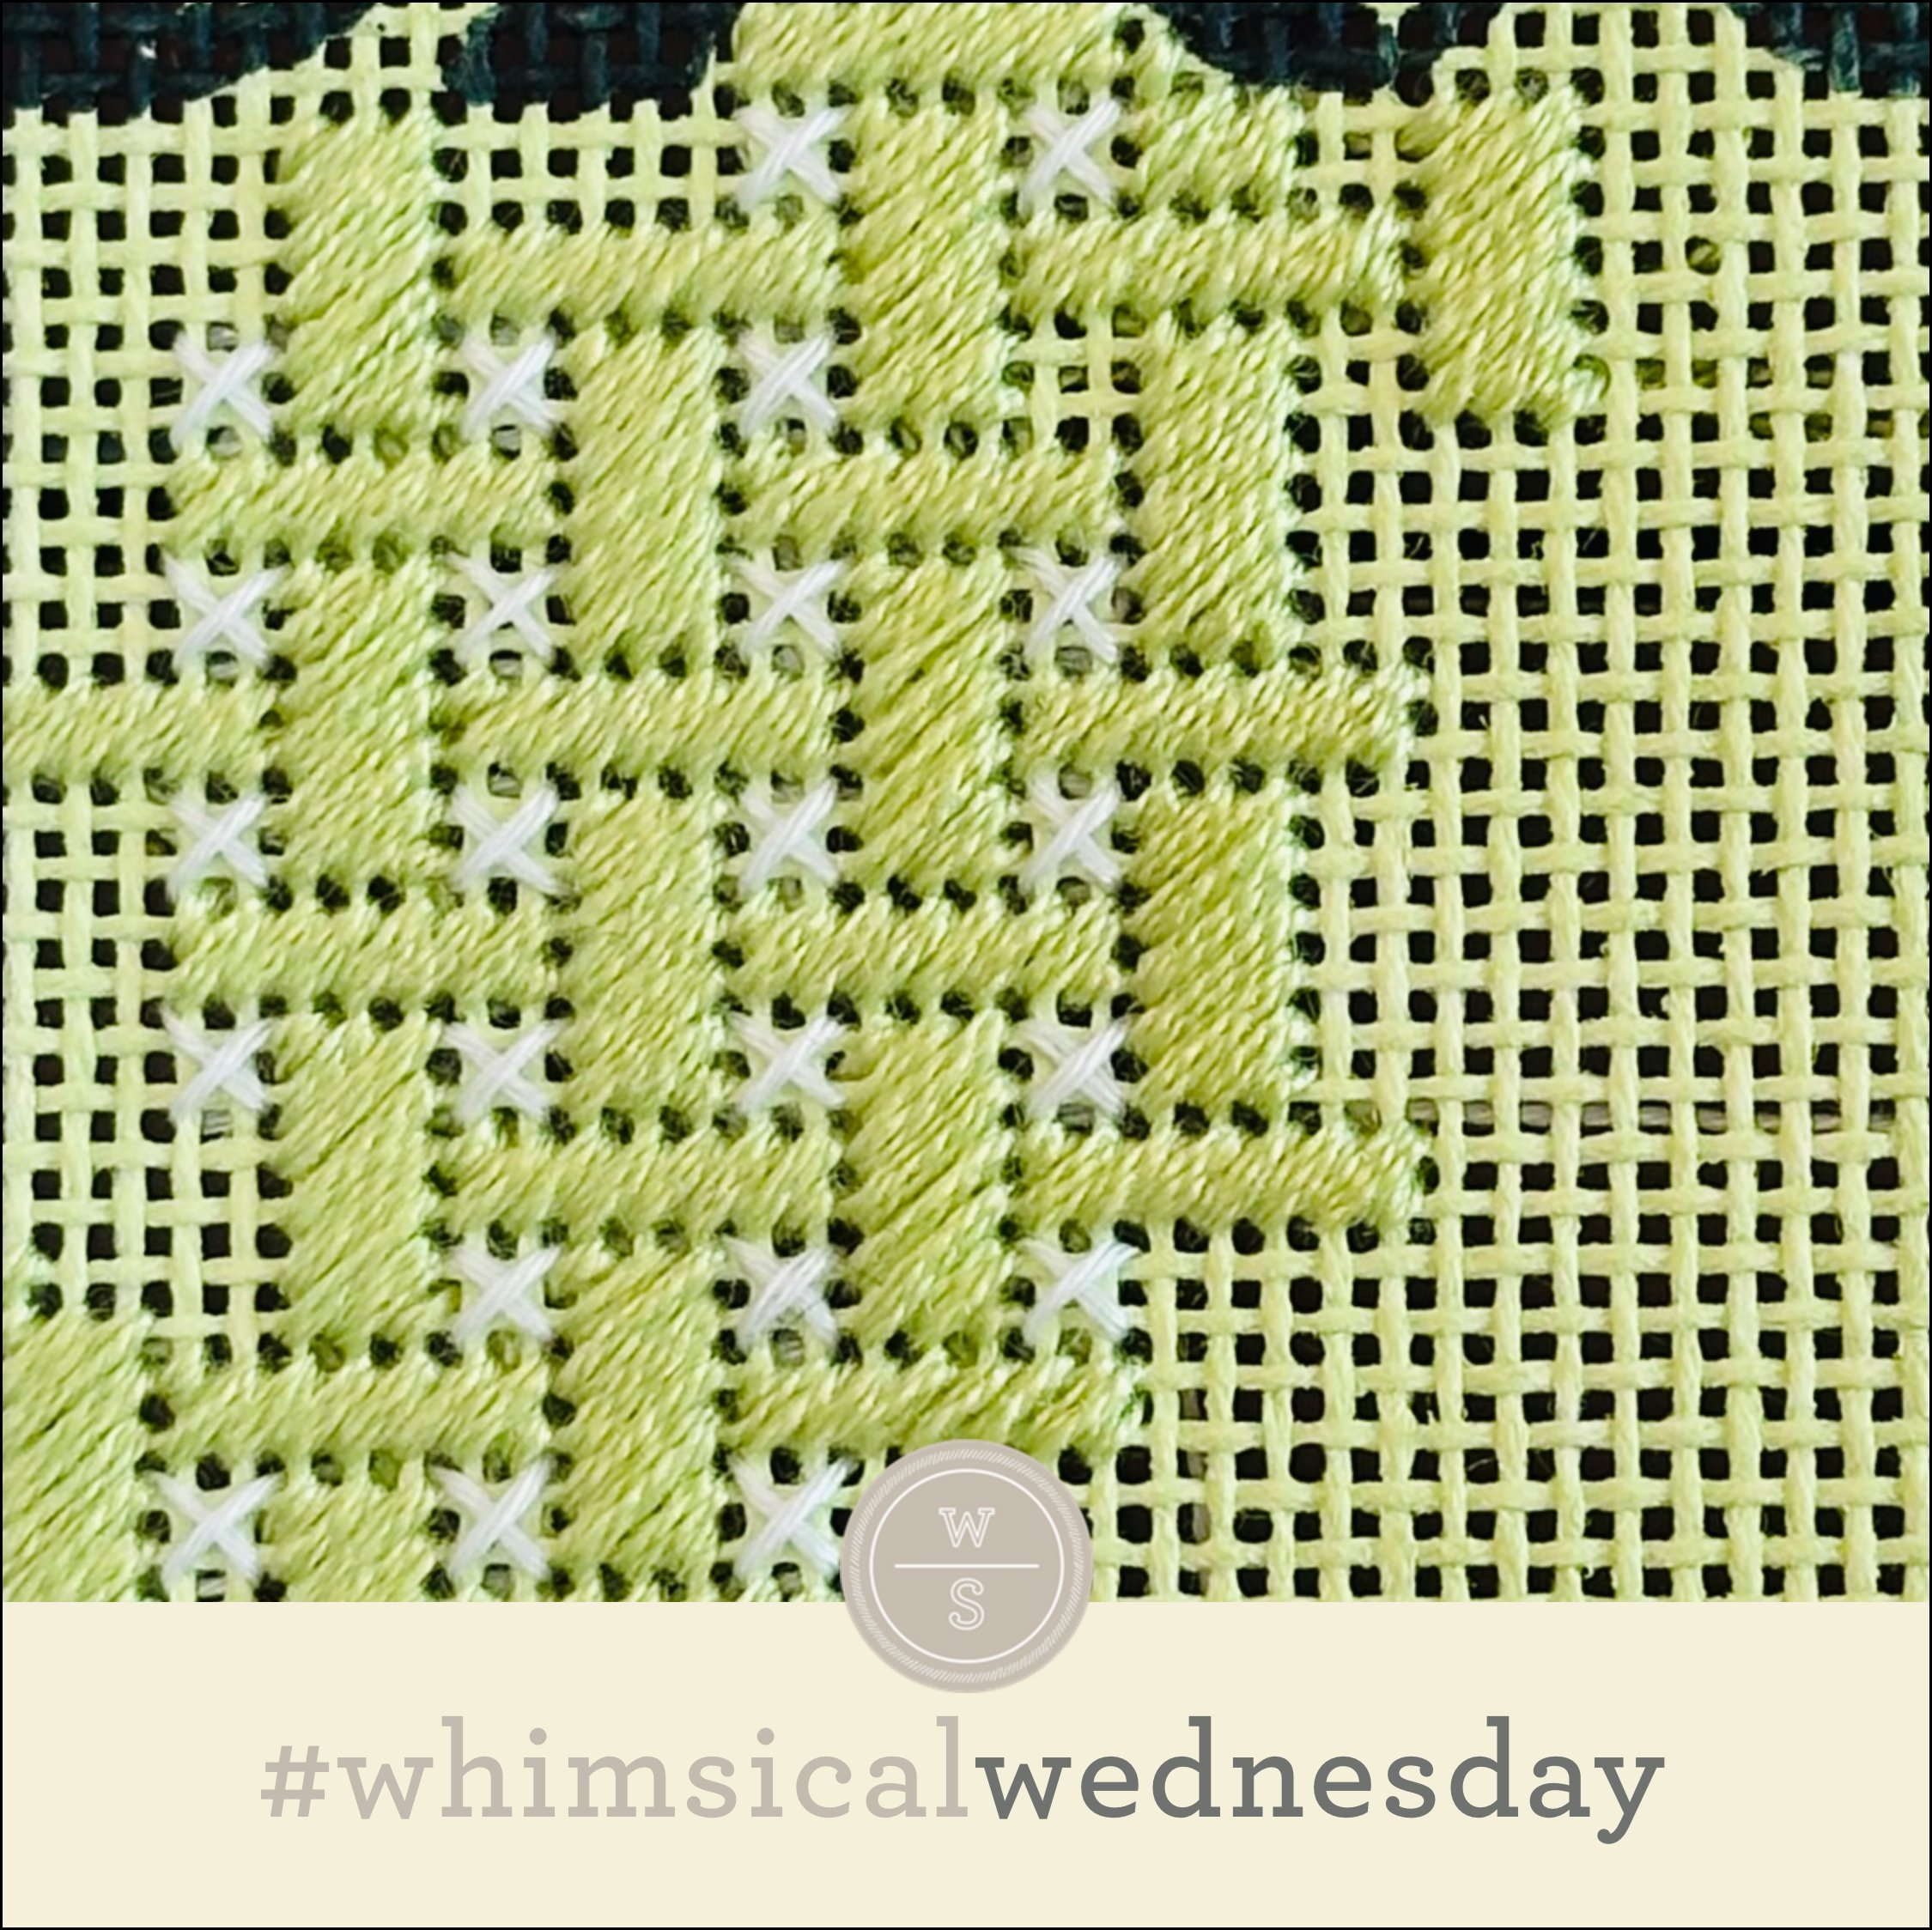
The stitched sample uses white and light blue Pepper Pot Silk (yellow and black lines, respectively) and Essentials for the two darker blue stitches in between the white and wider light blue stripes (aqua and gray lines). The single skipped stitches between the darker blue stitches (aqua and gray lines) jump out at me. I consider this a full-coverage stitch, but those skipped rows make me happy because they are so unexpected.

It’s a charming background. The number of colors you use in this stitch is up to you. You need a minimum of 2-3, in my opinion. But four colors is certainly a sweet spot.

I imagine I will be sharing this a lot for backgrounds and walls, and using metallics for the aqua and gray lines. Also, being me, I imagine I may replace the solid columns of Plain Needlepoint with the same pattern as between the other columns (the column with skipped stitches). It will also be great for clothing, such as a jacket or pants, with Petite Very Velvet for the black lines and three shades of Vineyard or Pepper Pot Silk for the remaining lines.

There’s a lot to work with here, and I look forward to sharing some variations of this in the future. I hope you have the perfect spot for this stitch. Enjoy!

Click on image to see the whimsicalstitch.com Stitch Library on pinterest.com. Includes all #whimsicalwednesday and #smallspacesunday stitch diagrams.

As you are auditioning stitches (from any stitch source), count the number of canvas threads on the diagram that match your mesh size. And there you have what an inch of the stitch will look like. Evaluate that against the area where you plan to use the stitch and make your final decision. If you start integrating this step into your stitch selection process, you may be surprised at how many stitches you think are large are much smaller than you realize.

By (sometimes) including this step in my own process, I find I am now integrating much longer stitches than I ever thought I would. I used to think a stitch six rows long was super big. I have very much changed my tune, which has helped me expand my creativity, especially for large-space stitches.

Today’s stitch diagram, along with all other #whimsicalwednesday and #smallspacesunday stitch diagrams, can also be found on a Pinterest board here. Be sure to follow whimsicalstitch.com on FacebookPinterestInstagram, and Twitter.

If you like what you see on this blog, there's more. Mary’s Whimsical Stitches is a series of four books offering contemporary how-to collections of more than 200 stitches (in each volume) for all stitchers, regardless of skill level. All books include updated and sequenced diagrams from this blog, plus a collection of all-new stitches from private lessons and other class projects. Visit here to find a needlepoint retailer that carries my books.

New to needlepoint or looking for a refresher? Please download a handy how-to guide covering basic needlepoint stitches and stitch compensation techniques along with new top-line information on needlepoint materials and tools, how to handle threads, and other helpful needlepoint resources.

whimsicalstitch.com also sells Stitch Guides and Stitch Concepts for Melissa Shirley Designs, Zecca DesignsSandra Gilmore, Purple Palm, Maggie, and Penny MacLeod, and many more. Click here to see the newest guides and click here to see the entire collection.

I hope you have the perfect spot for this stitch! Please enjoy! Have a wonderful #whimsicalwednesday!

A Note about Diagrams
I use color in diagrams to make them as clear as possible.  The primary function of different colored lines is to illustrate a stitch sequence.  For example, the layering of colors demonstrates you add them in that order.  They can also provide ideas on integrating additional threads (one line for each color).  Or, you can use the same thread for all color lines.  That's where I encourage you to use your imagination for the space you are stitching!

Sparking Joy

Today’s stitch is one of my new faves. It has a crispness to it, and I love how it pops on a canvas.

Click the image to see the whimsicalstitch.com Stitch Library on pinterest.com. Includes all #whimsicalwednesday and #smallspacesunday stitch diagrams.

Click the image to see #whimsicalwednesday and #smallspacesunday Stitched Sample Gallery on Instagram.

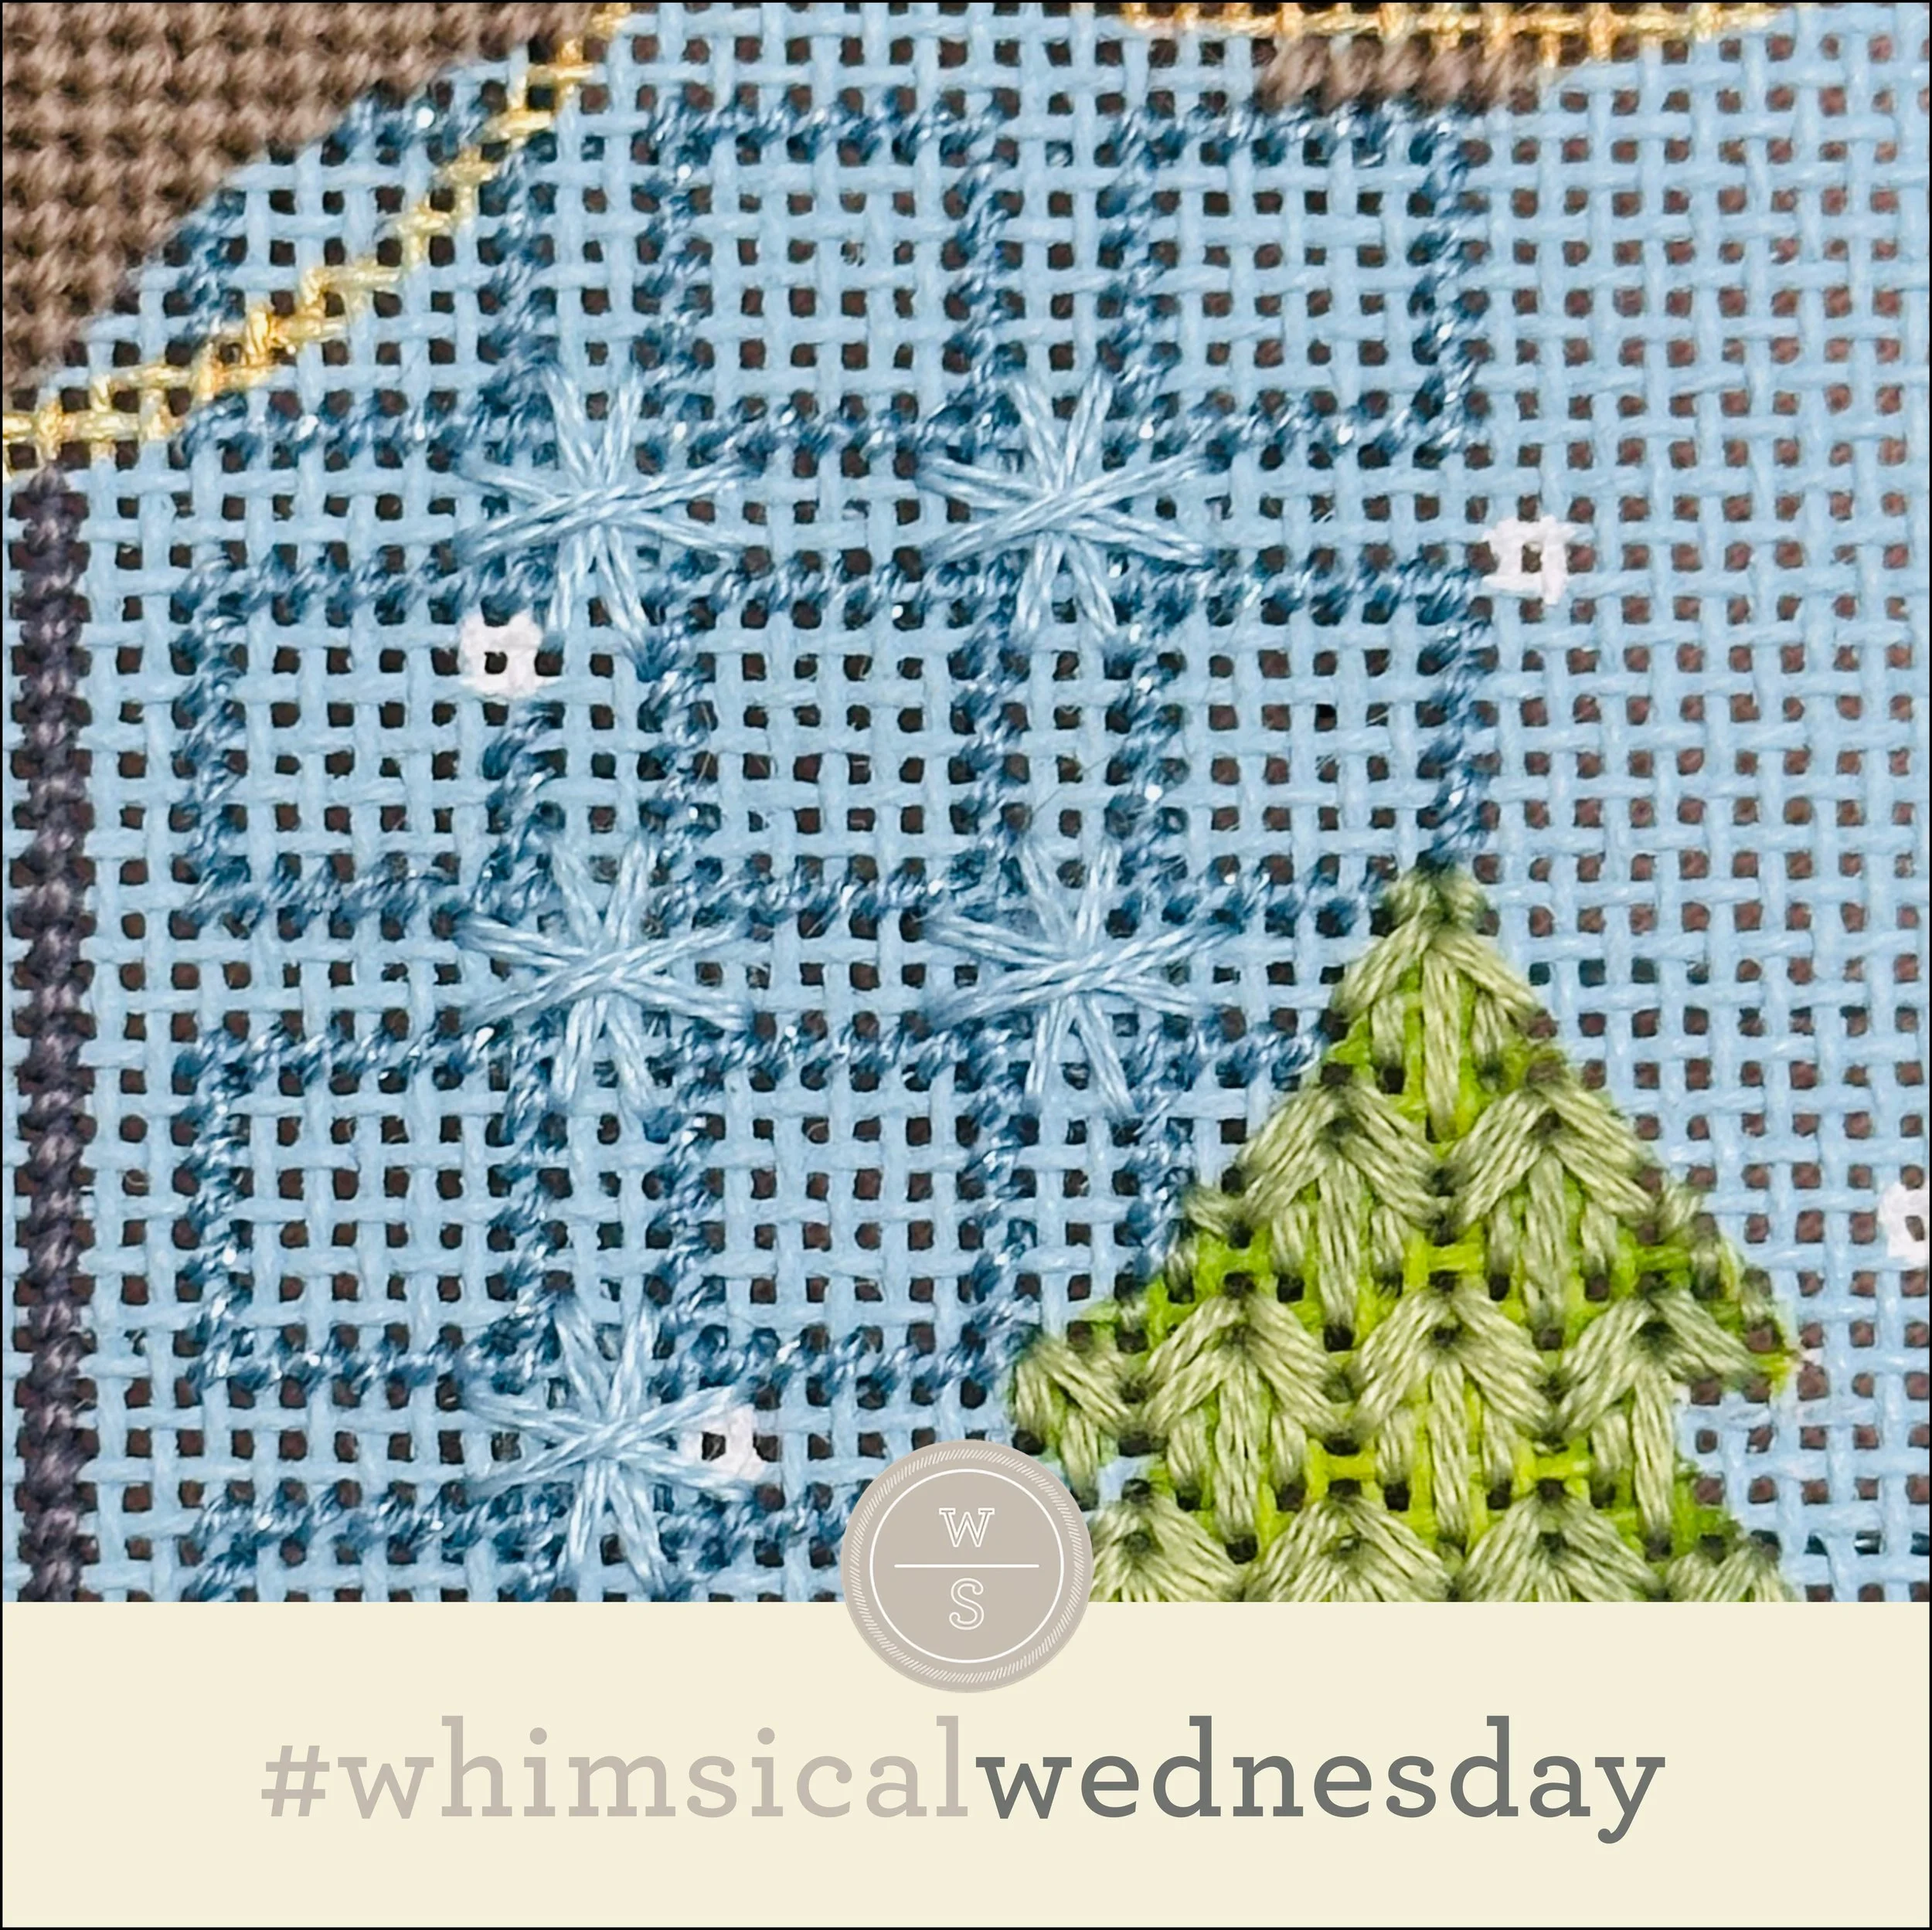
The stitched sample uses pink and white Elegance on 18M. For me, the key to the pattern is not the group of eight stitches that create a single circle. Take a look at the aqua highlighted square in the upper left corner. Four groups of stitches meet there. The stitches on the right and left sides of it (black lines) use the same color thread. The stitches on the top and bottom are the second color of thread. Subsequent circles reverse the thread colors of this pattern. Identifying this pattern helped me navigate the remainder of the stitching.

I love the Elizabeth Crane Swartz vibe of this stitch. It’s great for backgrounds, especially for a graphic monogram or initials. It will make darling dresses and skirts with two shades of silk floss. If you want to use the same color for both sides, consider substituting a metallic for one set of lines. I recommend a bright metallic that lays flat and will distinguish itself against the second thread. Fyre Werks, Neon Rays, or even Flair will work. I love the idea of using nothing but gold and silver Fyre Werks for this stitch.

I hope you have the perfect spot for this stitch. Enjoy!

Click on image to see the whimsicalstitch.com Stitch Library on pinterest.com. Includes all #whimsicalwednesday and #smallspacesunday stitch diagrams.

As you are auditioning stitches (from any stitch source), count the number of canvas threads on the diagram that match your mesh size. And there you have what an inch of the stitch will look like. Evaluate that against the area where you plan to use the stitch and make your final decision. If you start integrating this step into your stitch selection process, you may be surprised at how many stitches you think are large are much smaller than you realize.

By (sometimes) including this step in my own process, I find I am now integrating much longer stitches than I ever thought I would. I used to think a stitch six rows long was super big. I have very much changed my tune, which has helped me expand my creativity, especially for large-space stitches.

Today’s stitch diagram, along with all other #whimsicalwednesday and #smallspacesunday stitch diagrams, can also be found on a Pinterest board here. Be sure to follow whimsicalstitch.com on FacebookPinterestInstagram, and Twitter.

If you like what you see on this blog, there's more. Mary’s Whimsical Stitches is a series of four books offering contemporary how-to collections of more than 200 stitches (in each volume) for all stitchers, regardless of skill level. All books include updated and sequenced diagrams from this blog, plus a collection of all-new stitches from private lessons and other class projects. Visit here to find a needlepoint retailer that carries my books.

New to needlepoint or looking for a refresher? Please download a handy how-to guide covering basic needlepoint stitches and stitch compensation techniques along with new top-line information on needlepoint materials and tools, how to handle threads, and other helpful needlepoint resources.

whimsicalstitch.com also sells Stitch Guides and Stitch Concepts for Melissa Shirley Designs, Zecca DesignsSandra Gilmore, Purple Palm, Maggie, and Penny MacLeod, and many more. Click here to see the newest guides and click here to see the entire collection.

I hope you have the perfect spot for this stitch! Please enjoy! Have a wonderful #whimsicalwednesday!

A Note about Diagrams
I use color in diagrams to make them as clear as possible.  The primary function of different colored lines is to illustrate a stitch sequence.  For example, the layering of colors demonstrates you add them in that order.  They can also provide ideas on integrating additional threads (one line for each color).  Or, you can use the same thread for all color lines.  That's where I encourage you to use your imagination for the space you are stitching!

A Toast

Let’s raise a toast to today’s cute little stitch. It’s a long overdue variation of Skipping Nobuko from volume 3 of my books.

Click the image to see the whimsicalstitch.com Stitch Library on pinterest.com. Includes all #whimsicalwednesday and #smallspacesunday stitch diagrams.

Click the image to see #whimsicalwednesday and #smallspacesunday Stitched Sample Gallery on Instagram.

This stitch is the label on a darling Veuve Clicquot bottle by the one and only C’ate La Vie (instagram.com/catelavie). I used two plies of Soie D'Alger on 18M canvas. It’s definitely a light touch as I want the Veuve name to stand out even more. One is always encouraged to increase the ply count on a stitch to their comfort level.

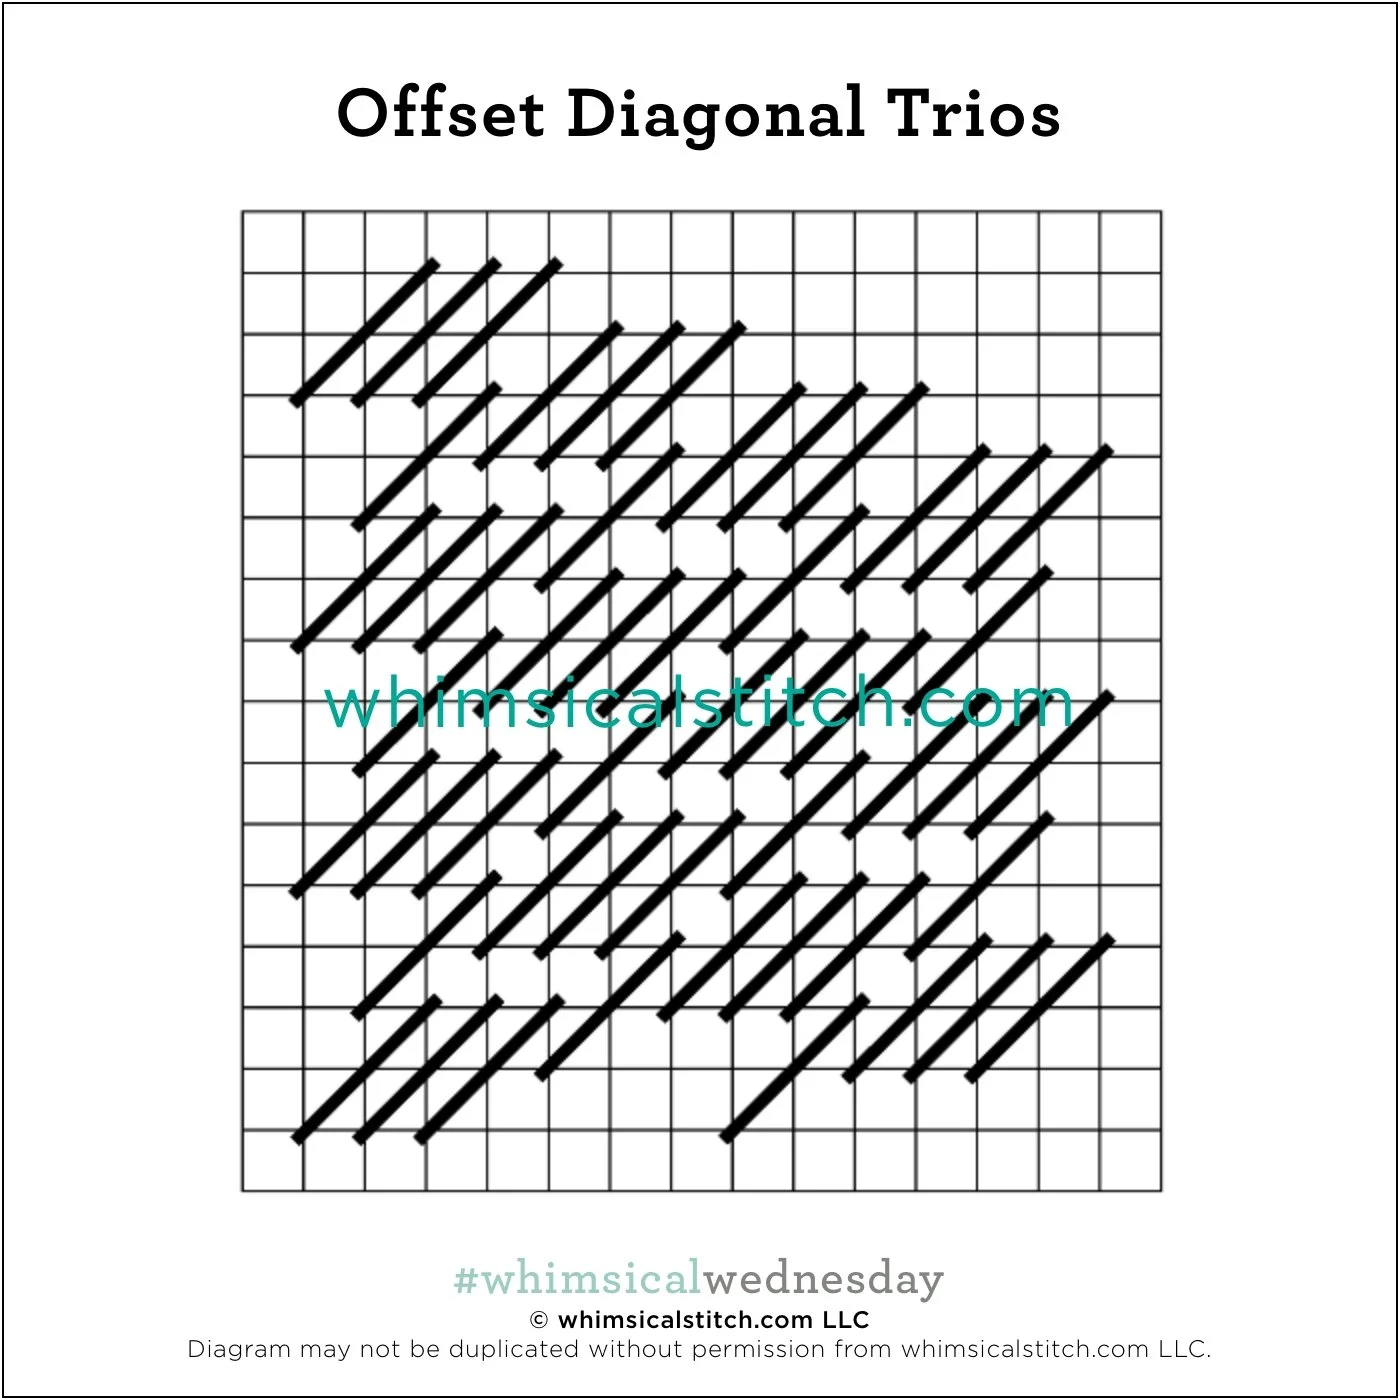
The stitch is deceptively challenging, especially with compensation. I worked through the compensation by identifying how identical stitches lined up. In this case, the diagonal stitches over three rows and the single stitches over one row (from the lower left to the upper right) were four rows apart from their matching counterparts in both horizontal and vertical directions. The same was true for the stitches stitched from the lower right to the upper left. I began stitching at the top right corner, following horizontal paths. When I hit the Veuve, I counted up four rows from where my needle was to determine if it was a stitch over three rows or one row and what direction it was in. I’m not worried about the dragged threads because I know the Plain Needlepoint I am going to use for the lettering will cover that up.

I’m looking forward to using this stitch on greenery, such as a field or a large tropical leaf, with an appropriate overdyed silk floss or Petite Silk Lame. It will also work well for water with a lovely metallic, such as Radiance. If you want to add a little extra flair, consider using a metallic thread for the stitches over one row. Another fun change is to add a second color to the mix for a more dramatic pop.

I hope the compensation notes are helpful and that you have a spot for this stitch. Enjoy!

Click on image to see the whimsicalstitch.com Stitch Library on pinterest.com. Includes all #whimsicalwednesday and #smallspacesunday stitch diagrams.

As you are auditioning stitches (from any stitch source), count the number of canvas threads on the diagram that match your mesh size. And there you have what an inch of the stitch will look like. Evaluate that against the area where you plan to use the stitch and make your final decision. If you start integrating this step into your stitch selection process, you may be surprised at how many stitches you think are large are much smaller than you realize.

By (sometimes) including this step in my own process, I find I am now integrating much longer stitches than I ever thought I would. I used to think a stitch six rows long was super big. I have very much changed my tune, which has helped me expand my creativity, especially for large-space stitches.

Today’s stitch diagram, along with all other #whimsicalwednesday and #smallspacesunday stitch diagrams, can also be found on a Pinterest board here. Be sure to follow whimsicalstitch.com on FacebookPinterestInstagram, and Twitter.

If you like what you see on this blog, there's more. Mary’s Whimsical Stitches is a series of four books offering contemporary how-to collections of more than 200 stitches (in each volume) for all stitchers, regardless of skill level. All books include updated and sequenced diagrams from this blog, plus a collection of all-new stitches from private lessons and other class projects. Visit here to find a needlepoint retailer that carries my books.

New to needlepoint or looking for a refresher? Please download a handy how-to guide covering basic needlepoint stitches and stitch compensation techniques along with new top-line information on needlepoint materials and tools, how to handle threads, and other helpful needlepoint resources.

whimsicalstitch.com also sells Stitch Guides and Stitch Concepts for Melissa Shirley Designs, Zecca DesignsSandra Gilmore, Purple Palm, Maggie, and Penny MacLeod, and many more. Click here to see the newest guides and click here to see the entire collection.

I hope you have the perfect spot for this stitch! Please enjoy! Have a wonderful #whimsicalwednesday!

A Note about Diagrams
I use color in diagrams to make them as clear as possible.  The primary function of different colored lines is to illustrate a stitch sequence.  For example, the layering of colors demonstrates you add them in that order.  They can also provide ideas on integrating additional threads (one line for each color).  Or, you can use the same thread for all color lines.  That's where I encourage you to use your imagination for the space you are stitching!
Poof!

Today’s decorative stitch reflects the canvas exactly how it is painted. That’s the beauty of composite stitches.

Click the image to see the whimsicalstitch.com Stitch Library on pinterest.com. Includes all #whimsicalwednesday and #smallspacesunday stitch diagrams.

Click the image to see #whimsicalwednesday and #smallspacesunday Stitched Sample Gallery on Instagram.

Click the image to see #whimsicalwednesday and #smallspacesunday Stitched Sample Gallery on Instagram.

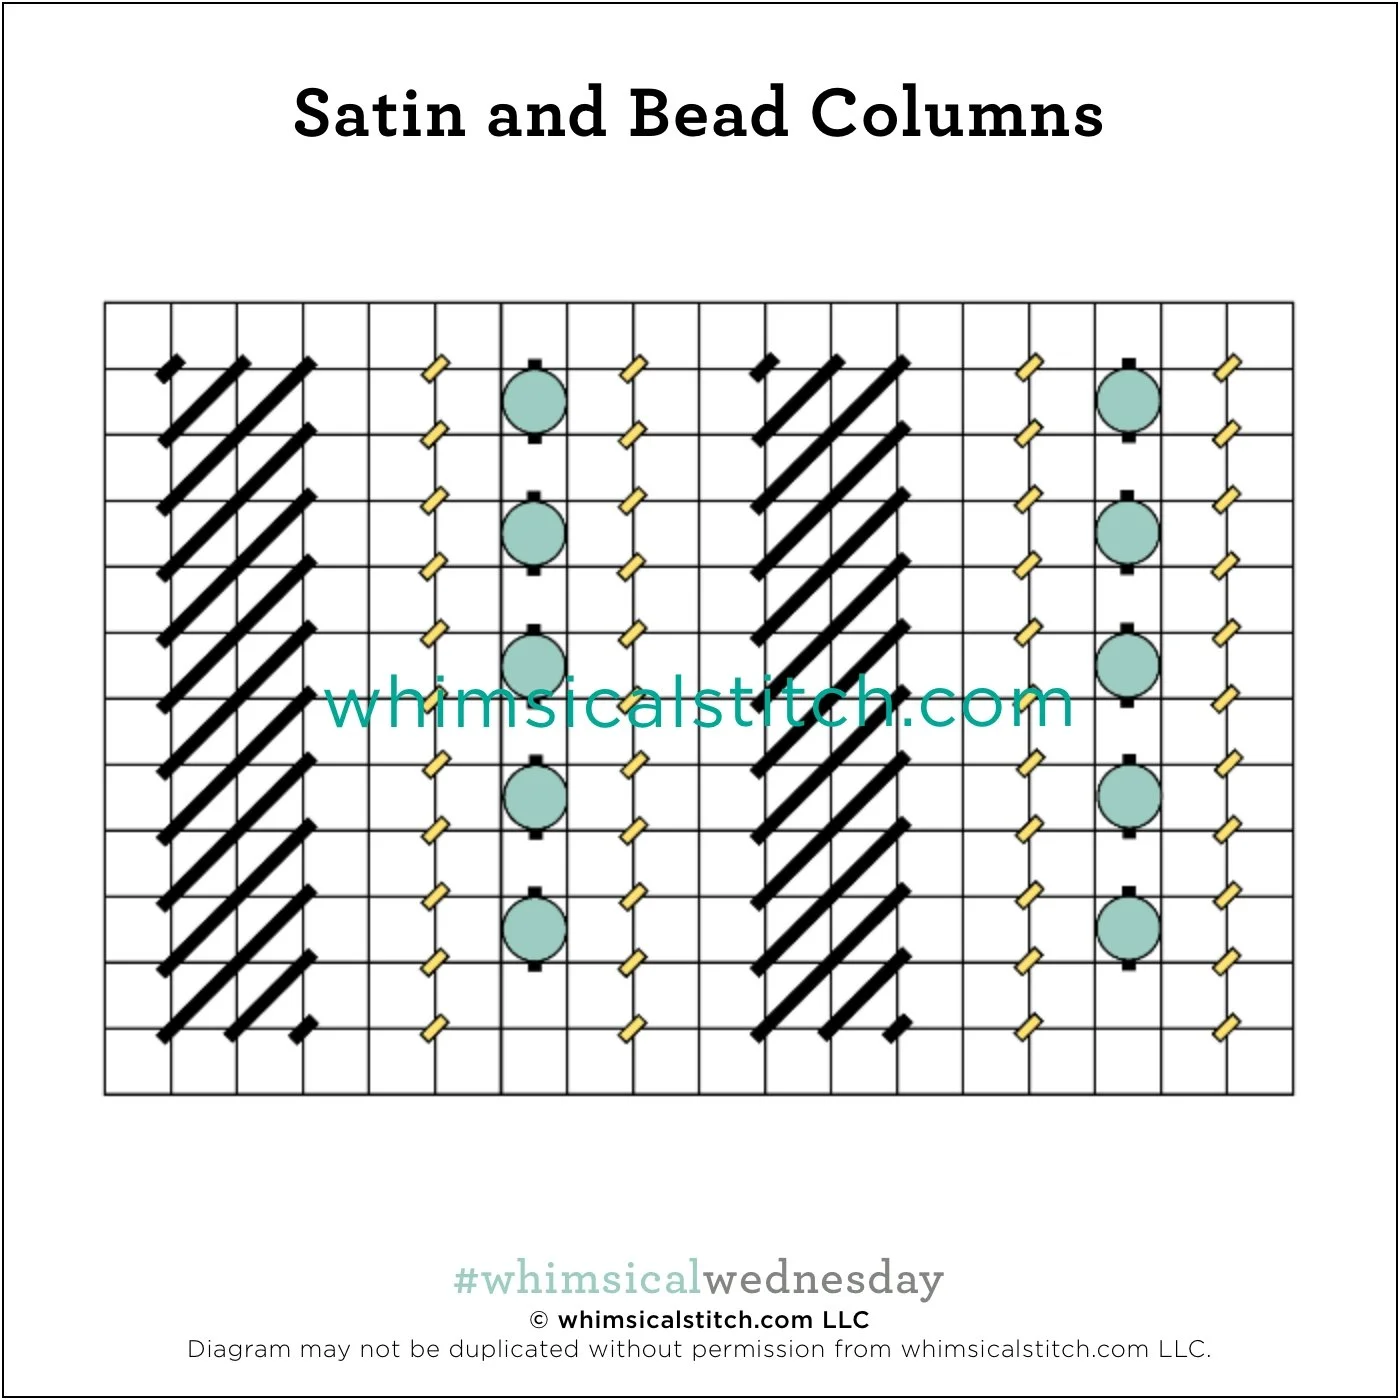
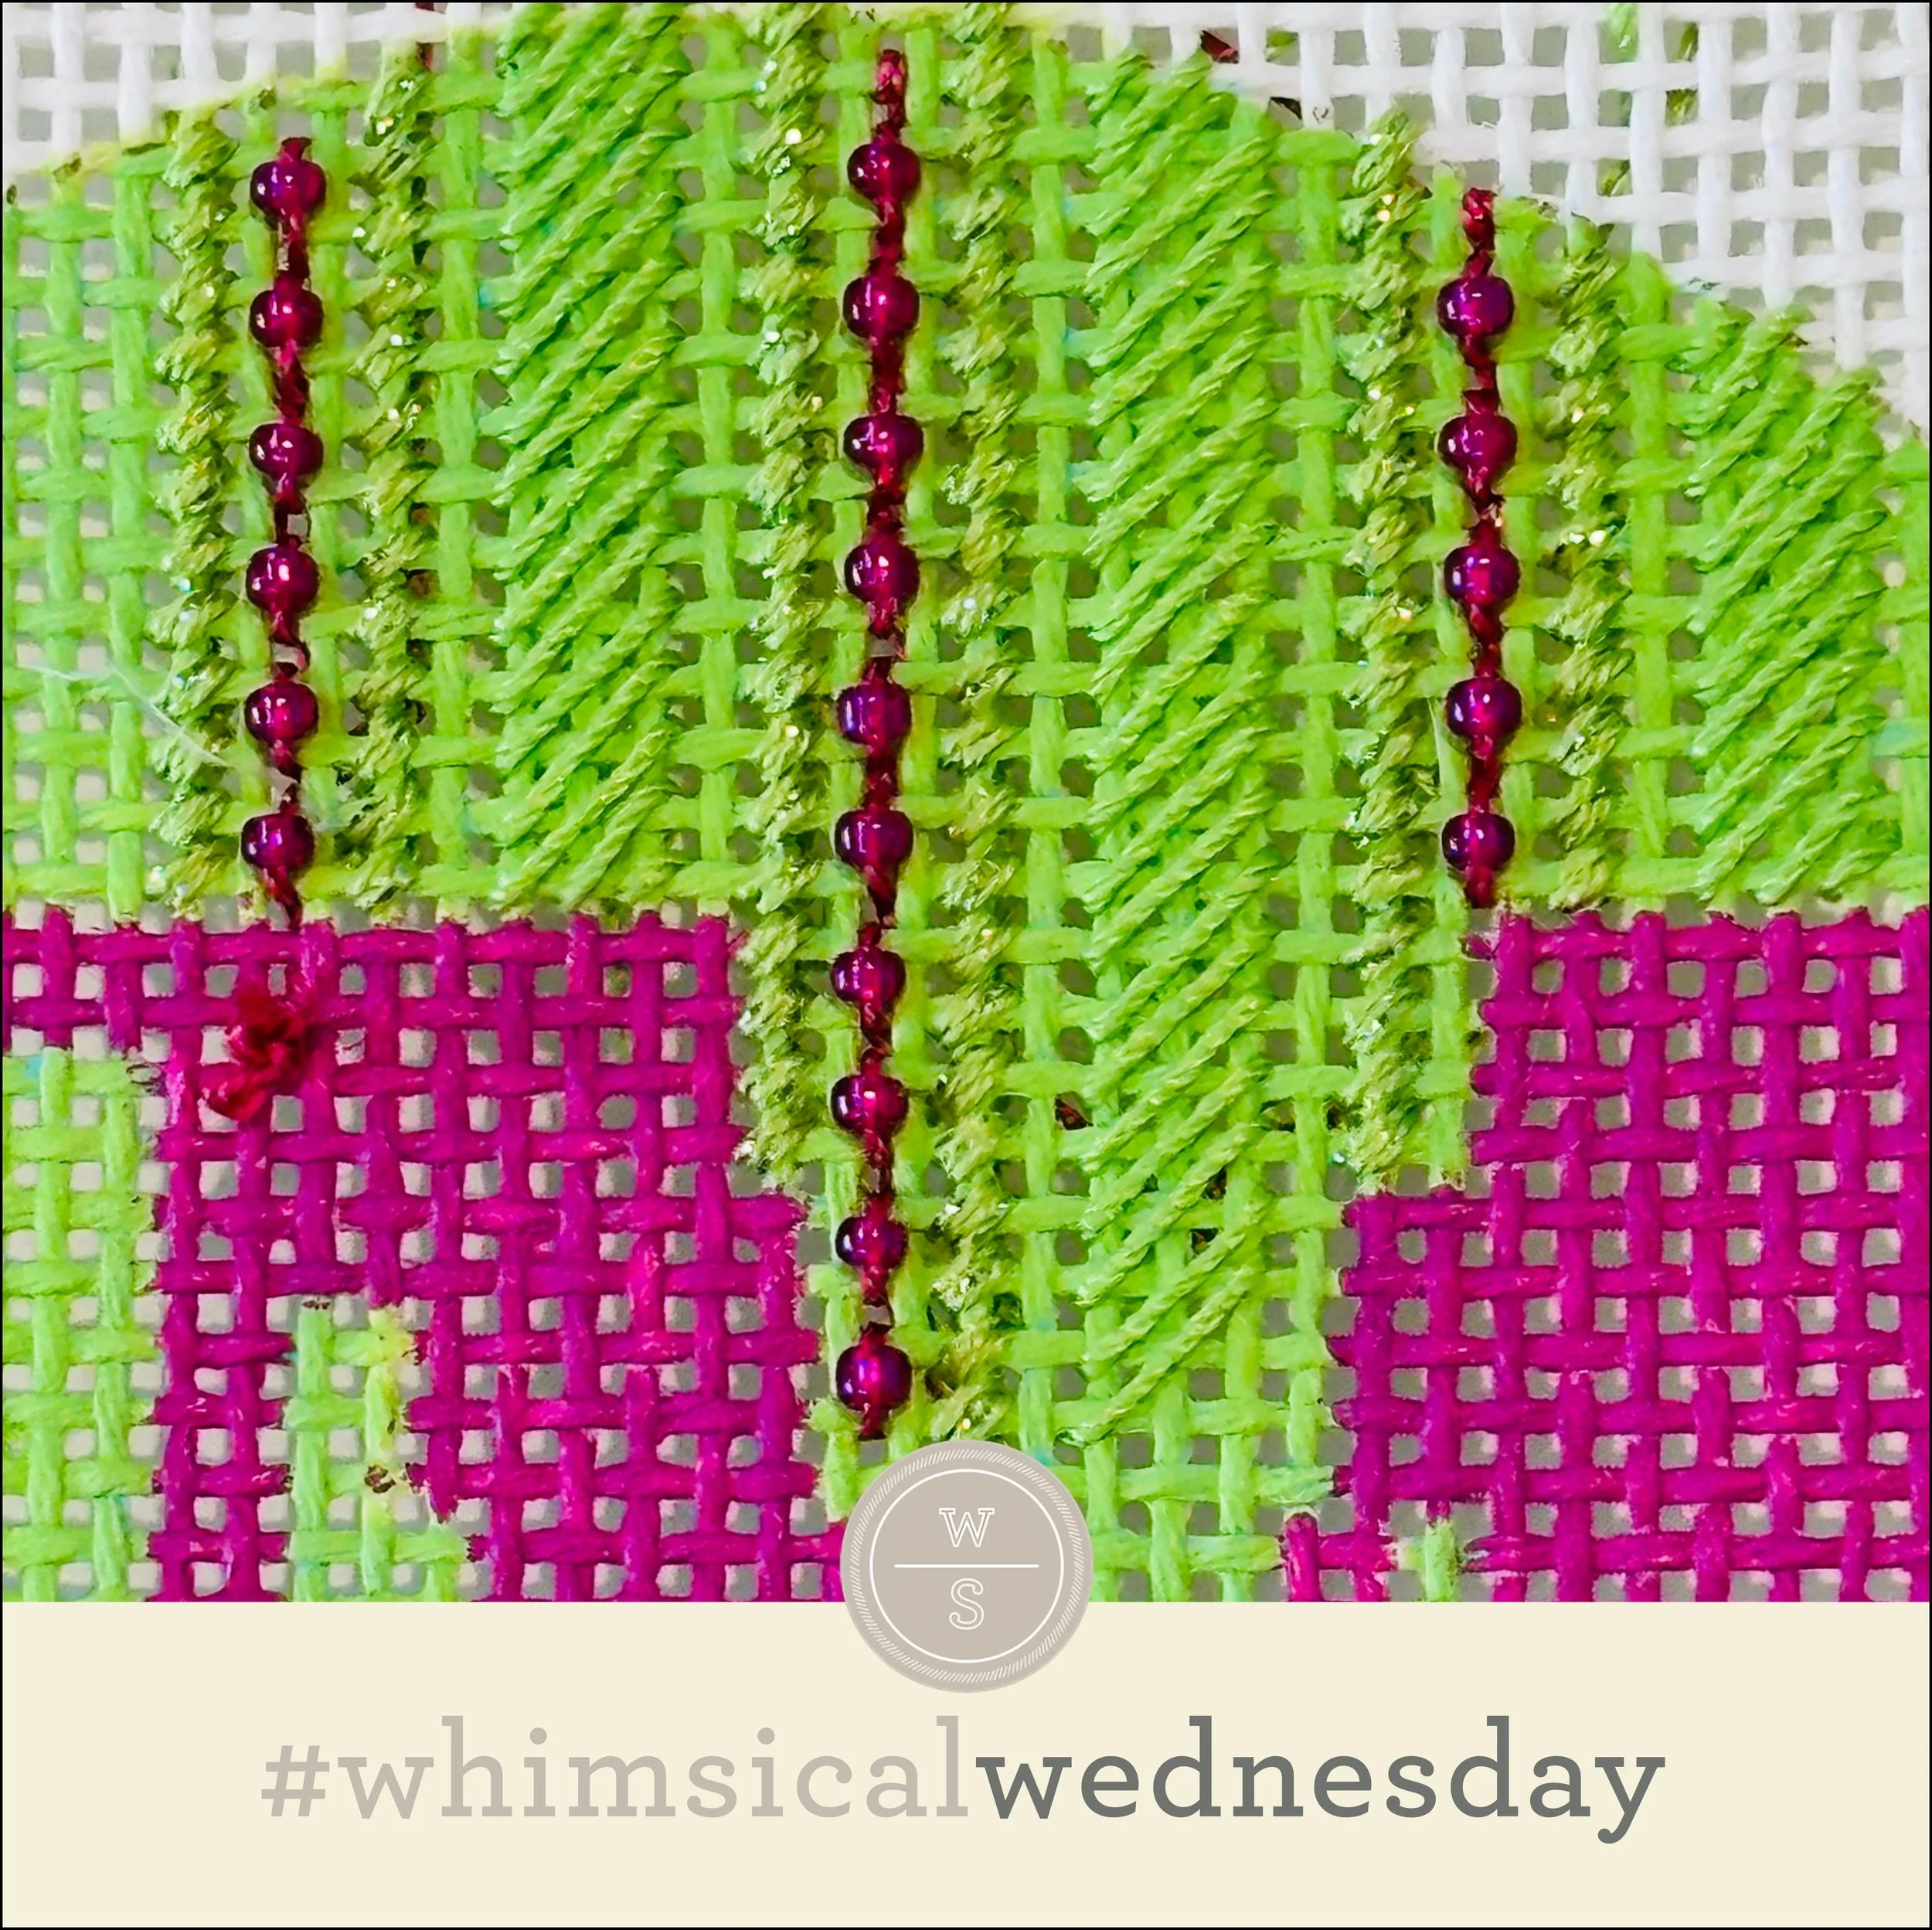
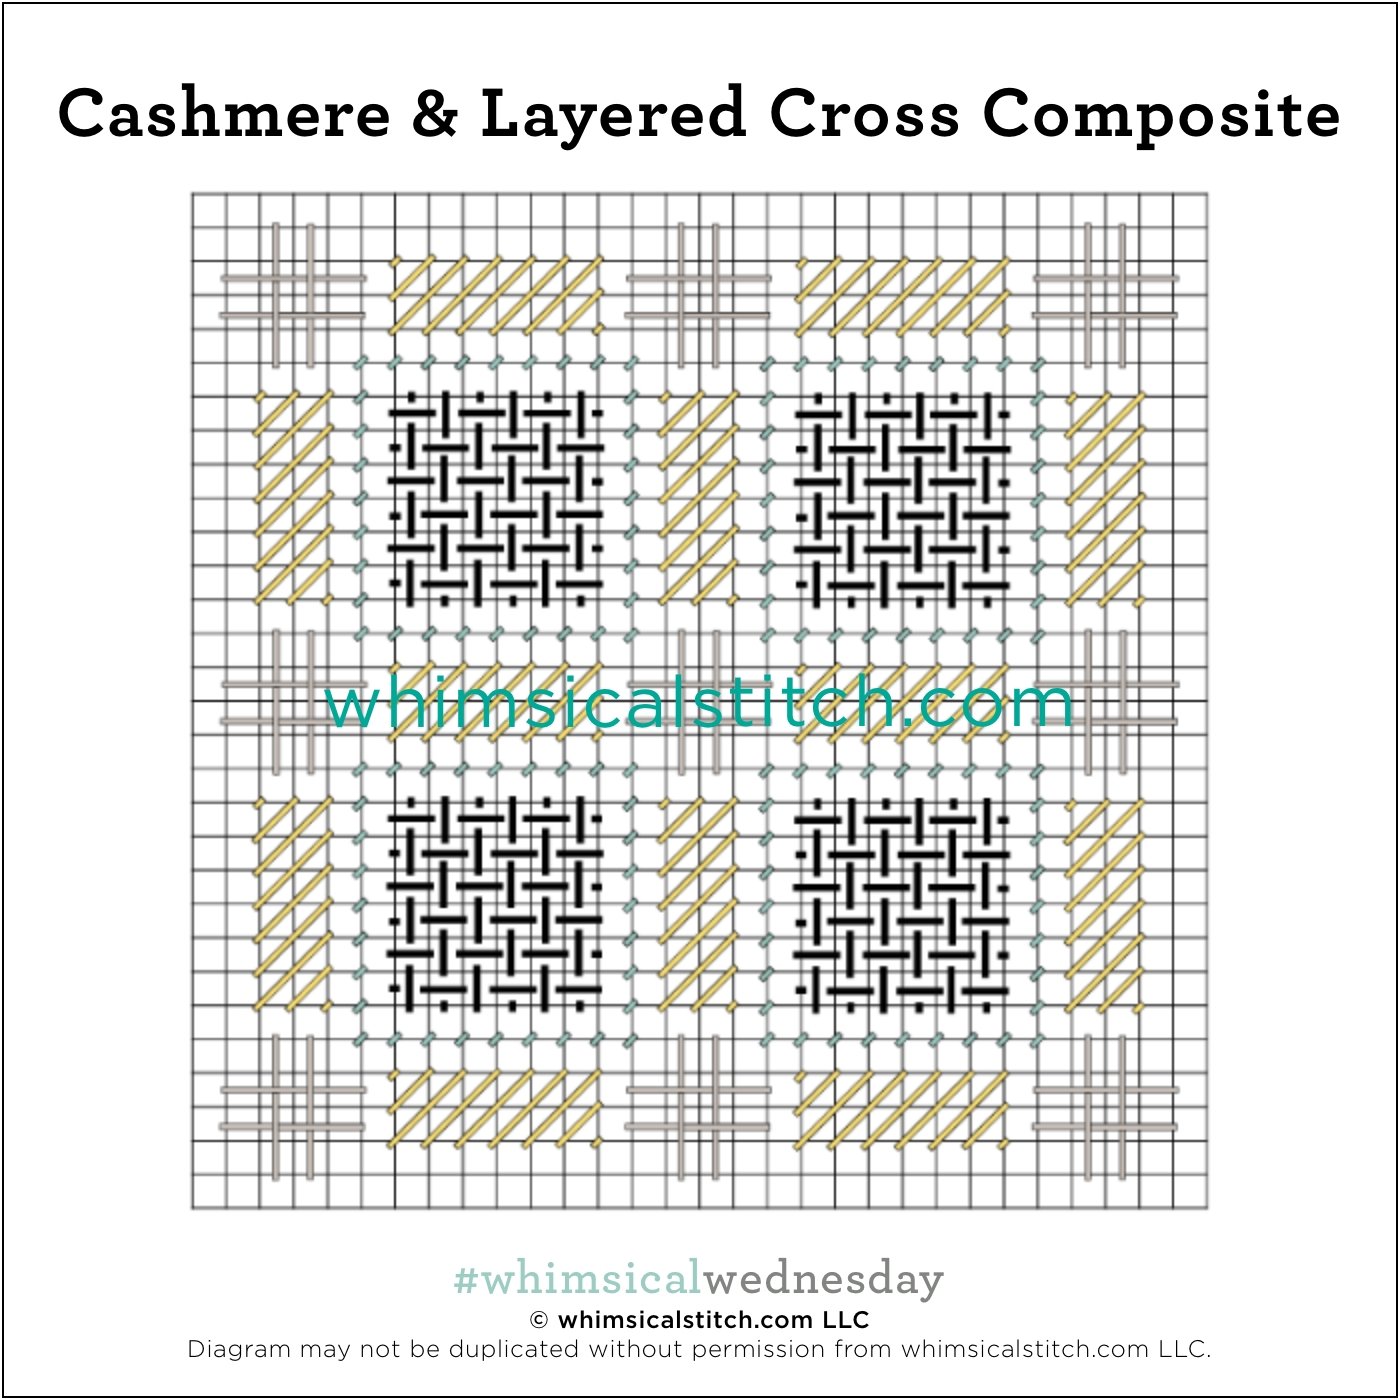
This stitch is the quilt on a couch on Sandra Gilmore’s lovely canvas, At The Seashore. If you google “Sandra Gilmore at the seashore,” you will see the quilt exactly as it is stitched: red crosses surrounded by white. After identifying what I wanted to do with the red crosses, the squares emerged, and I knew the single intersection between them would be a bead, French knot, or cross stitch. Poof! A composite stitch!

This project is from my in-between-jobs era of the mid-2010s, so thread identifications are a best guess. The yellow lines are four plies of red Splendor, the black lines are white Elegance, and the aqua lines are Neon Rays+. I love the idea of using this stitch for a jacket with Burmilana for the yellow lines, Glisten for the aqua lines, and Vineyard Silk for the black lines.

I hope you have a spot for this stitch. Enjoy!

Click on image to see the whimsicalstitch.com Stitch Library on pinterest.com. Includes all #whimsicalwednesday and #smallspacesunday stitch diagrams.

As you are auditioning stitches (from any stitch source), count the number of canvas threads on the diagram that match your mesh size. And there you have what an inch of the stitch will look like. Evaluate that against the area where you plan to use the stitch and make your final decision. If you start integrating this step into your stitch selection process, you may be surprised at how many stitches you think are large are much smaller than you realize.

By (sometimes) including this step in my own process, I find I am now integrating much longer stitches than I ever thought I would. I used to think a stitch six rows long was super big. I have very much changed my tune, which has helped me expand my creativity, especially for large-space stitches.

Today’s stitch diagram, along with all other #whimsicalwednesday and #smallspacesunday stitch diagrams, can also be found on a Pinterest board here. Be sure to follow whimsicalstitch.com on FacebookPinterestInstagram, and Twitter.

If you like what you see on this blog, there's more. Mary’s Whimsical Stitches is a series of four books offering contemporary how-to collections of more than 200 stitches (in each volume) for all stitchers, regardless of skill level. All books include updated and sequenced diagrams from this blog, plus a collection of all-new stitches from private lessons and other class projects. Visit here to find a needlepoint retailer that carries my books.

New to needlepoint or looking for a refresher? Please download a handy how-to guide covering basic needlepoint stitches and stitch compensation techniques along with new top-line information on needlepoint materials and tools, how to handle threads, and other helpful needlepoint resources.

whimsicalstitch.com also sells Stitch Guides and Stitch Concepts for Melissa Shirley Designs, Zecca DesignsSandra Gilmore, Purple Palm, Maggie, and Penny MacLeod, and many more. Click here to see the newest guides and click here to see the entire collection.

I hope you have the perfect spot for this stitch! Please enjoy! Have a wonderful #whimsicalwednesday!

A Note about Diagrams
I use color in diagrams to make them as clear as possible.  The primary function of different colored lines is to illustrate a stitch sequence.  For example, the layering of colors demonstrates you add them in that order.  They can also provide ideas on integrating additional threads (one line for each color).  Or, you can use the same thread for all color lines.  That's where I encourage you to use your imagination for the space you are stitching!