My Favorite Technique

#teamopenstitches

February focuses on open stitches from pillows on display in my front window for 15+ years as well as a stitch I accidentally created by not transferring a diagram correctly.  (Seriously.)

A little background.  When I returned to the world of needlepoint, I was #teamfullcoverage for several years. I could not get my head around what I called "naked canvas."  Oh, how wrong I was.  Without a doubt, it took some coaxing and hand-holding.  Here I am, twenty-some years later, I can't imagine a single piece of needlepoint I've stitched, or am stitching, without the dreaded...I mean gorgeous...naked canvas.  It's about balance, focus areas, and symmetry.  

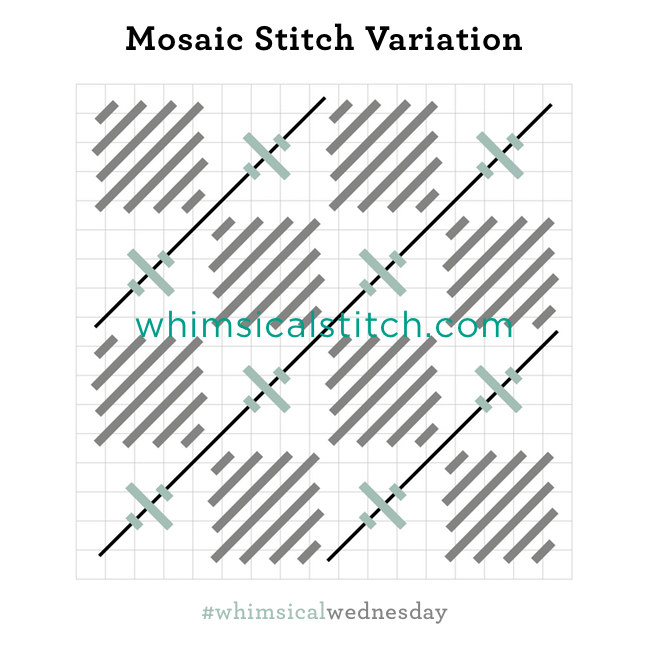
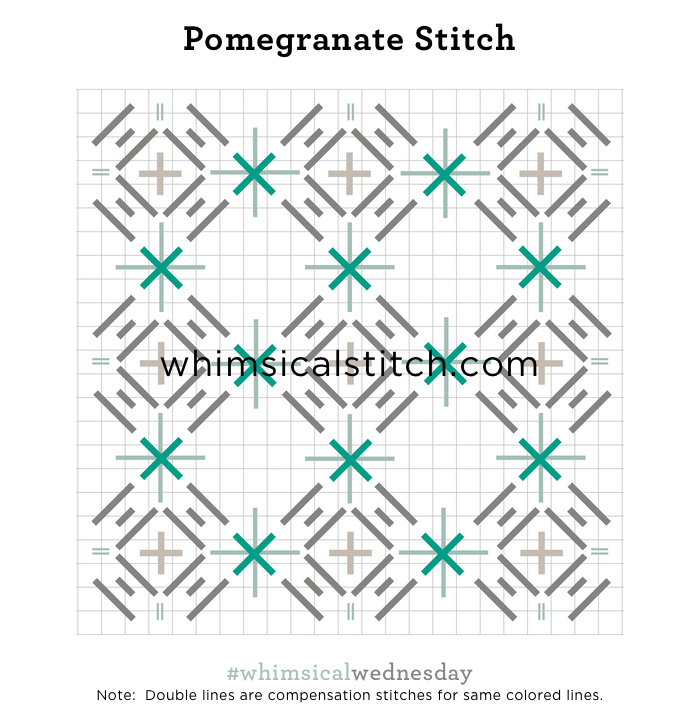
I begin with the Pomegranate Stitch.  I have no other name for it.  This is because the stitch is comprised of several small stitches that create a gorgeous pattern and I used it on a pomegranate.  Makes sense, right?

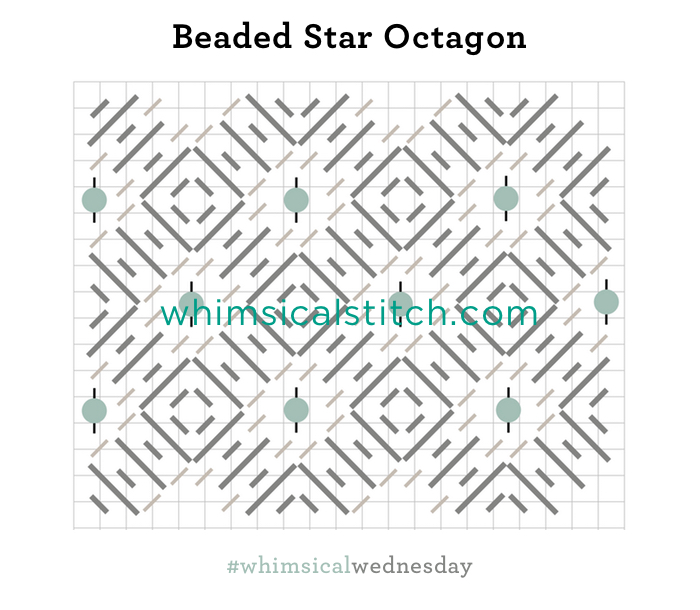
The first diagram is the first group of stitches that would be fine just as they are, especially with a piece with gorgeous shading.

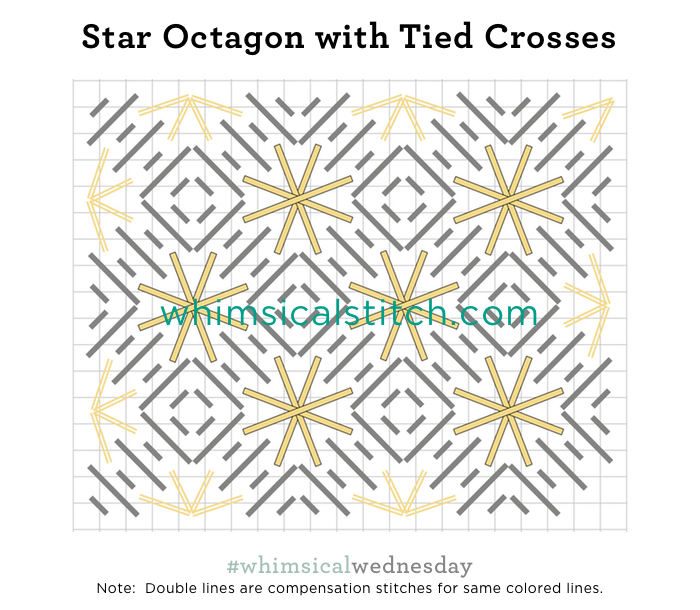
But, no.  I needed more stitches, so I added an Upright Cross (the light gray lines) inside the small diamonds.

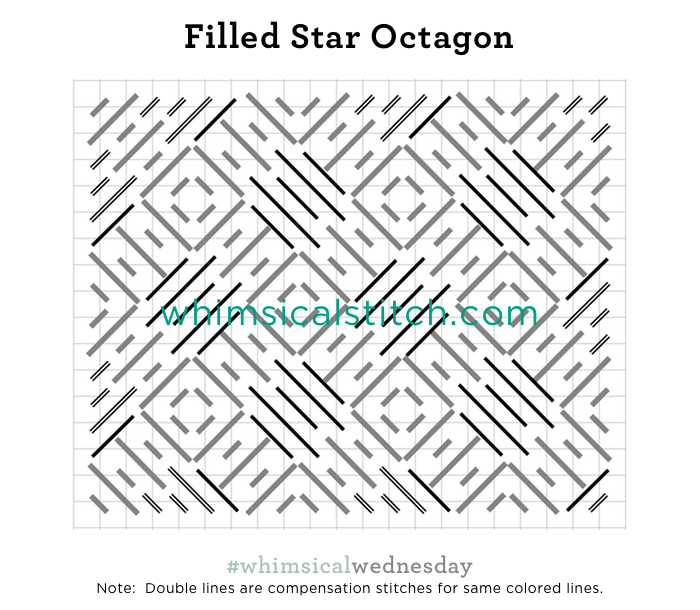
Was that the end?  Of course not.  More oblique layered crosses were added.  And some tiny Mosaic stitches.

The stitched sample on Instagram reflects the final diagram.  I included all three steps because I wanted to make a point.  Any of these three combinations work as a group of stitches.  Truth be told, if I re-stitched this piece today, I would stitch it with the middle diagram so I could have more naked canvas.

It's all a matter of taste and your desired coverage level.  What is universal, regardless of which diagram you prefer, is the threads.  When doing open work, it's important to integrate thread weight into the equation.  Generally speaking, I choose lighter weight threads as a secondary way to let the shading show through.  Case in point, I used size 5 pearl cotton and size 12 Kreinik Metallics Tapestry Braid on 13-mesh for the pomegranate.  I would even use size 8 pearl cotton and size 8 Kreinik Metallics on 13-mesh to make a point.  It works, I promise.  And, as with all things needlepoint, it is all a matter of taste.  So, experiment to find what works for you.

These stitch diagrams, along with all other #whimsicalwednesday and #smallspacesunday stitch diagrams, can also be found on a Pinterest board here.

Be sure to follow whimsicalstitch.com on FacebookPinterestInstagram, and Twitter.

If you like what you see on this blog, want to learn some very creative decorative stitches, and how to put them all together, whimsicalstitch.com sells stitch guides for Melissa Shirley Designs, Zecca Designs, and Patience Brewster.  30 guides are currently available and more are in the pipeline.

I hope you have the perfect spot for this stitch!  Enjoy!

Just the Beginning

I was desperately seeking an open, lightweight background for an upcoming stitch guide series (for a group of adorable standups...more to come soon, I promise!)

Today is an example of Pinterest (or any stitch book or stitched piece) providing the catalyst for a stitch.   This pin was the beginning of something wonderful.  I expanded it beyond the original diagram because I needed the additional space for the snowflakes (Smyrna Crosses).  

2017 Pavilion Flower Variation.jpg

The stitched sample on Instagram goes for a lighter touch, using only two plies of Splendor for the flowers (on 18-mesh).  If you want fuller coverage, use four plies of any strandable silk or cotton floss on 18-mesh and six strands on 13-mesh.  A laying tool is critical here to keep the individual strands flat and untangled.  

This stitch diagram, along with all other #whimsicalwednesday and #smallspacesunday stitch diagrams, can also be found on a Pinterest board here.

Be sure to follow whimsicalstitch.com on FacebookPinterestInstagram, and Twitter.

If you like what you see on this blog, want to learn some very creative decorative stitches, and how to put them all together, whimsicalstitch.com sells stitch guides for Melissa Shirley Designs, Zecca Designs, and Patience Brewster.  30 guides are currently available, including two new guides from Patience (here and here), and more are in the pipeline.  My events page includes teaching events at stores I will be visiting over the next few months.  More events are in the works and the events page will always include the latest available information.

I hope you have the perfect spot for this stitch!  Enjoy!

Triplets

Today's #smallspacesunday is a hybrid stitch inspired by two separate posts in my Pinterest feed.  The first is a stitch diagram and the second is a photo of a different stitch.  Needless to say, I couldn't find the photo again so I started playing to recreate what I thought I found.

The end result is what I am calling the Triplet stitch.  It's a riff on the Horizontal Pairs I shared earlier this month, but with groups of three stitches (instead of two).  

Triplets.jpg

This is really a perfect multi-purpose stitch.  It's ideal for tall narrow spaces.  I like it for a floor, chimney, sweater, small toy bag, water, greenery.  Really, almost anything.

This stitch diagram, along with all other #whimsicalwednesday and #smallspacesunday stitch diagrams, can also be found on a Pinterest board here.

Be sure to follow whimsicalstitch.com on FacebookPinterestInstagram, and Twitter.

If you like what you see on this blog, want to learn some very creative decorative stitches, and how to put them all together, whimsicalstitch.com sells stitch guides for Melissa Shirley Designs, Zecca Designs, and Patience Brewster (Kate Dickerson Designs).  30 guides are currently available, including two new additions for Patience Brewster (visit them here and here), and more are (still!) in the pipeline. 

I hope you have the perfect spot for this stitch.  Enjoy!

Sweet Stalks

Today's post is another riff on the influence of embroidery in needlepoint.  Common embroidery techniques used in needlepoint include the stem stitch, the back stitch, and French Knots.  I've had a lot of fun trying to recreate some of the more unique embroidery stitches as needlepoint.  Today's stitch is a perfect example.  First, this is the original pin that helped me create the stitch below.

Stalk Stitch.jpg

I thought it was important to make these stalks look as natural as possible, so I offset the middle column by one row (on the vertical) so the stalks wouldn't be even.  With the lazy daisy loop (the black lines), it was also possible to make this stitch follow a curved line.  

You can see that curved line in the lower left hand corner of the stitched sample on Instagram.  I used a single color of Vineyard Silk in the stitched sample.  The painting of the canvas enhanced the stitch as well.  (I can always find an argument for open stitches.)

It would be a lot of fun to do the loops in a different color to make the "flower" part of this stitch pop.  Another idea is to add French Knots in some of the open spaces for a different version of a flower.  Have fun with it.

This stitch diagram, along with all other #whimsicalwednesday and #smallspacesunday stitch diagrams, can also be found on a Pinterest board here.

Be sure to follow whimsicalstitch.com on FacebookPinterestInstagram, and Twitter.

If you like what you see on this blog, want to learn some very creative decorative stitches, and how to put them all together, whimsicalstitch.com sells stitch guides for seasonal Melissa Shirley designs.  28 guides are currently available and more are in the pipeline.

Enjoy!

A Pinterest TBT

Today's TBT is Horizontal Pairs, the first stitch I discovered via Pinterest.

01.12.2017 TBT.jpg

The diagram for this stitch, along with other #whimsicalwednesday and #smallspacesunday stitch diagrams, can also be found on a Pinterest board here.   

Be sure to follow whimsicalstitch.com on FacebookPinterestInstagram, and Twitter.

If you like what you see on this blog, want to learn some very creative decorative stitches, and how to put them all together, whimsicalstitch.com sells stitch guides for Melissa Shirley Designs and Zecca Designs.  28 guides are currently available and more are in the pipeline.

Enjoy!

Love at First Sight

This stitch stumbled into my Pinterest feed and I knew immediately I had to include it in something.  Anything.  I love how it appears to be full coverage, yet some open canvas sneaks through.  I love the right amount of open canvas to let the beautiful shading shine through.

The only change I made was to do a single thread for the long diagonal base stitch (the black line on the diagram).  

Sequence:  1. Gray lines  2. Black lines  3. Aqua lines

Sequence:  1. Gray lines  2. Black lines  3. Aqua lines

The stitched sample combines Planet Earth Silk Opal, Very Velvet, and Kreinik Metallics Tapestry Braid (#12).

While I didn't do it in my experiment, I am obsessed with the idea of using Very Velvet for the aqua lines.  I think that little pop of texture and surprising finish would be a fun touch, especially for clothing.

This stitch diagram, along with all other #whimsicalwednesday and #smallspacesunday stitch diagrams, can also be found on a Pinterest board here.

Be sure to follow whimsicalstitch.com on FacebookPinterestInstagram, and Twitter.

If you like what you see on this blog, want to learn some very creative decorative stitches, and how to put them all together, whimsicalstitch.com sells stitch guides for Melissa Shirley Designs and Zecca Designs.  28 guides are currently available and more are in the pipeline.  

I hope you enjoy this stitch and have the perfect spot for it!  Enjoy!

Herringbone, Gobelin, Whatever

The original pin for this stitch did not include a name.  When I first came across it on Pinterest, I thought it was a Gobelin stitch.  When I started to diagram it, I realized it is a Herringbone.  And that, my friends, is how you come up with a blog post title.

Unlike most stitches using a single thread, the sequence is critical.  The core single stitch is easy; it is over two rows and up three.  The graph below illustrates it three ways.

The layered effect of this stitch results from a consistent starting point, specifically the top (or the bottom) for every row.  In addition, to keep the integrity of the stitch intact, note the first stitch is a compensation stitch (the double aqua lines).  

Personally, I have no preference between starting from the bottom or top (or the far right or far left if you are doing this on a horizontal axis).  However, I strongly believe you should do one or the other and not do alternating.  It's a subtle difference but I prefer the consistent pattern presented by the top or bottom starting point.

I am not aware of any trick to make this easier.  It will involve tying off the thread at the end of every row and beginning the next row at the top (or bottom).  If the space is not overly large, you could drag the thread across the back to begin the next row, but that is not always the best solution as it can add bulk to the back of the canvas which can impact finishing, especially framing.

While I may not favor the "Alternating" sequence, that doesn't mean you shouldn't do it!  It could work on a basket or shrubbery stitch, where the alternating directions could enhance the woven appearance.

The stitched sample on Instagram is a small taste of the "starting from bottom" version.

This stitch diagram, along with all other #whimsicalwednesday and #smallspacesunday stitch diagrams, can also be found on a Pinterest board here.

Be sure to follow whimsicalstitch.com on FacebookPinterestInstagram, and Twitter.

If you like what you see on this blog, want to learn some very creative decorative stitches, and how to put them all together, whimsicalstitch.com sells stitch guides for Melissa Shirley Designs and Zecca Designs.  28 guides are currently available and more are in the pipeline.

Enjoy!

New Year...New Source

Happy New Year!  I hope your new year brings you everything you wish for.  And I certainly hope you continue to wish for needlepoint stitches because that is what I'm here for (other than keeping the cats housed, warm, and fed).

The month of January will be dedicated to stitches and techniques I discovered on Pinterest.  This does not mean these stitches don't exist elsewhere; it's simply I discovered them (and their corresponding source website or blog) on Pinterest.  And, for that, thank you to all who knowingly or unknowingly contributed to my library.

I must acknowledge the complicating factors with Pinterest, specifically permissions.  I make every effort to repost all things needlepoint from websites or blogs, meaning they can be linked to the original source.  I prefer to post items with the responsible party (or site) clearly marked in the photo.  This allows me to give credit where credit is due, whether that is Sheena's Sweet Stitches, Robin King, or the Needle Works (three of the most common diagram sources I stumble across in Pinterest-land).

I will not pin photos of pages from stitch diagram books, as that is an outright copyright violation.  (So, stop it!)  I can't figure out where photos of hand-drawn stitch diagrams fall on this spectrum, so I try to avoid pinning them altogether.  I re-pin photographs of stitched objects because, technically, they are in the public domain once anyone posts a photograph of their work in progress on a social media site.  I view them as stitched samples in stores...great inspirations and sometimes mysterious because they don't come with a detailed diagram.  The bottom line?  I try to learn as much as I can while respecting the original teachers.  With all of these caveats aside, let's get back to Pinterest inspiration.  

Embroidery on Pinterest has been a huge inspiration for me.  It aligns with my fondness for stumpwork and helps me broaden my own style.  

Stumpwork is an embroidery style where elements are raised from the surface of the canvas to form a 3-dimensional effect.   I knew I wanted the leaves to pop with a small accent on Sprung, but also wanted to make it easy for students of all skill levels.  Here's the original pin that provided the inspiration.  The black leaf was the catalyst for the leaves on Sprung. Here is how it worked (from the actual whimsicalstitch.com stitch guide).

And here is a close up of the end result.

Sprung is now one of my personal favorites...for several reasons.  It challenged me to stretch my style, it makes me smile when I look at it, and it's adorable.

This stitch diagram, along with all other #whimsicalwednesday and #smallspacesunday stitch diagrams, can also be found on a Pinterest board here.

Be sure to follow whimsicalstitch.com on FacebookPinterestInstagram, and Twitter.

If you like what you see on this blog, want to learn some very creative decorative stitches, and how to put them all together, whimsicalstitch.com sells stitch guides for Melissa Shirley Designs and Zecca Designs.  28 guides are currently available and more are in the pipeline.

I hope you have the perfect spot for this stitch!  Enjoy!

Quadfecta

I've been a little obsessed with Star Octagon lately.  Today's post is a perfect example of why and it's a quadfecta of a post. What a great way to close out #whimsicalwednesday for the year.

Let's start with the base stitch.  I expanded Star Octagon by a couple of rows all the way around.  What makes this stitch so infinitely fascinating to me is a. its neutral direction and b. the countless ways to fill the centers. 

Frankly, this stitch is perfect on its own.  It mimics diamonds yet adds a little extra jazz to them.  This would make a great floor, sky, coat...you get the idea.

Once you start filling the centers, it changes everything.  You can go elegant with a contrasting accent and a bead.

You could also fill that 2X2 center space with a Smyrna Cross, a 2X2 Mosaic stitch, French Knots, or four beads.  I like the idea of the single bead (as illustrated) with an oversized bead, say a size 8 or size 6 bead on 13-mesh, or a size 11 on 18-mesh.  A Tila bead could be a truly unique approach.

The next idea integrates tied crosses.

The tied crosses add a slight elevation.  This would be great for a cushion, clothing, or even a cloud.  If you wanted to go really nuts, add a bead over the tied crosses over two rows on the vertical, crossing over the center intersection.  

The last idea offers a unique twist for a completely filled center.  I just used this stitch for a background of a Melissa Shirley Poinsettia Cat.  

I'm hoping you will overlook the lack of stitched samples with the offer of four stitch diagrams this week!  

Speaking of stitch diagrams, these stitch diagrams, along with all other #whimsicalwednesday and #smallspacesunday stitch diagrams, can also be found on a Pinterest board here.

Be sure to follow whimsicalstitch.com on FacebookPinterestInstagram, and Twitter.

If you like what you see on this blog, want to learn some very creative decorative stitches, and how to put them all together, whimsicalstitch.com sells stitch guides for Melissa Shirley Designs and Zecca Designs.  28 guides are currently available, including the newest Tea by the Sea, and more are in the pipeline.

I hope you have the perfect spot for this stitch!  Enjoy and happy new year!

A Sweet and Simple #smallspacesunday

And a very sincere Merry Christmas, Happy Hanukkah, and Happy Holidays to one and all.  To get over the hangover of the holidays, here's a sweet and easy small space stitch that adds a little somethin' somethin' to what may be a boring space.

While this is an absolute riff on the Alternating Plain Needlepoint post I did a few weeks ago, there is something about the texture of the French Knots that make this stand out.  On the stitched sample below, you can see I had nothing but small spaces.  The French Knot texture, along with the thread color, helped further differentiate the area.

These stitch diagrams, along with all other #whimsicalwednesday and #smallspacesunday stitch diagrams, can also be found on a Pinterest board here.

Be sure to follow whimsicalstitch.com on FacebookPinterestInstagram, and Twitter.

If you like what you see on this blog, want to learn some very creative decorative stitches, and how to put them all together, whimsicalstitch.com sells stitch guides for Melissa Shirley Designs and Zecca Designs.  28 guides are currently available and more are in the pipeline.  I'm hoping to have some definitive news to share about projects in the pipeline very soon!

Okay, back to whatever you are doing!  I hope it is not cleaning up as that is what children and grandchildren are for.  Hope you have/had a wonderful holiday.   Only nine months until next year's holiday finishing deadline!  Hurry!