Woven Whimsy

There is something to be said for the tried and true stitches.  And when they can serve in multiple roles, all the better.  

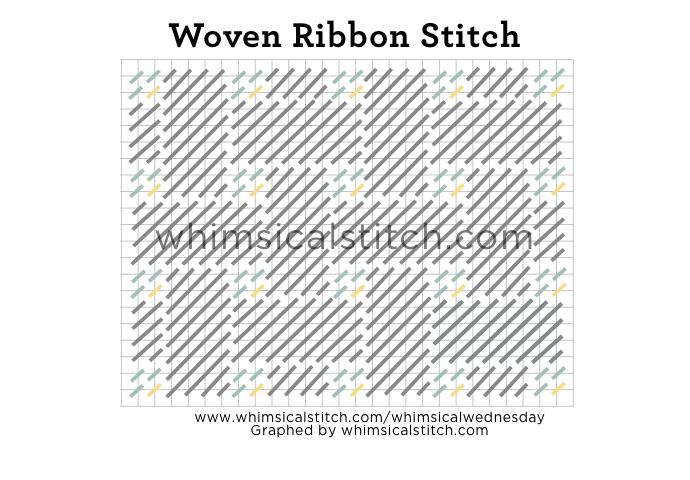
Allow me to introduce you to (what I call) the Woven Ribbon stitch.  There are far too many things I like about it.  It is a clean, symmetrical design.  It serves well in large spaces without overpowering the piece.  The 2X2 row of stitches in between the larger squares can be glammed up with beads or a Smyrna Cross or dressed down with simple single stitches.

My favorite thing about it is that it does the job for a variety of larger spaces.  I've used it as a sky, a coat, a basket, a table top, wallpaper.

Enjoy the stitch!  Help inspire us by letting us know how you use it!

PS  I admit I might be more excited I figured out how to insert the image in the original blog post.  That said, I'm still posting all #whimsicalwednesday stitches on Pinterest (www.pinterest.com/whimsicalstitch) and Instagram (www.instagram.com/whimsicalstitch).  Enjoy!

A Small #whimsicalwednesday

Small spaces are often the most challenging spaces to be creative.  I have a variety of go-to stitches for small spaces and get overly excited when I can add to that library.

I discovered this stitch last night as I thumbing through books for a new piece I'm working on.  The beauty of this stitch is that it works as an open stitch with a lighter thread and a skipped row (as diagrammed) or as a full coverage stitch with a heavier thread and no skipped row.

I'm using it for a sky but it would work really well as ground covering (grass, dirt, or even snow).  

Small Space Stitch.jpg

#whimsicalwednesday

I'm shocked at how much I use the simplest of darning stitches...and how many things I use it for.  Just in the past month, I used the darning stitch for snow on the ground, a window, furniture, the sky, and a background.  It is an understated stitch with amazing versatility.

I used Kreinik Very Fine Braid #4 on 18 mesh to stitch the window.  I used white Flair to create the snow...a decision made because the shading of the snow would show through.  And, alternating rows of thread types (Elegance and Shimmer Ribbon), I created a background.  It's easy and the end result is gorgeous as it truly highlights the artistry of the painted canvas.  

Darning stitches run a straight line (in any direction) across the canvas, providing a softer feel, versus the traditional diagonal needlepoint with crisp wrapped rows.    

Darning stitches start from the outer edge of the area to be stitched.  When you reach the end of the row, move to next row immediately below where you ended and stitch back across.  Always ensure you have enough thread to complete a row as a darning stitch should only be ended at the end of a row.  If you end it in the middle of a row, there will be a crisp pull on the thread, disrupting the soft flow of the darning stitch.

The darning stitch I use the most is the basic running stitch.  Over three, down one, over one and up again to repeat the pattern from one side of the canvas to the other.  Then repeat on the row below centering the over three beneath the skipped row in the row above.  


I googled "needlepoint darning stitch" as I prepared this blog and was stunned to find articles on it that go as far back as 1982.  This simply means I'm not the first person to share this with you.  However, I hope you can see some additional possibilities for it. 

Happy Stitching!

#whimsicalwednesday

Welcome to our first #whimsicalwednesday.  The purpose of #whimsicalwednesday is to share fun stitches.  This week's theme is FAQ...FAQ from my first TNNA trade show in Columbus.  

One of the most commonly asked questions involved beading.  As far as I am concerned, Brick Beading is the best thing that ever happened to beading.  So, I'm here to answer the first question, "What is brick beading?"

Brick beading is the same as the Brick Stitch, with a bead and thread instead of yarn.  


Simply thread your beading needle, come up from the back through a hole, string the needle with your bead, and return the needle through the canvas two rows up (on the vertical).  Skip a row on the horizontal and repeat.  When you complete the horizontal row, go down one row and repeat the same steps in the vertical rows you just skipped.

The second question was, "And how do you pronounce your last name?"  (Trust me, it's not the first and won't be the last time anyone asks that question.)  Yes, it's French and it's pronounced Leg - uh -ley.  Just like cabaret, except with a leg and a ley instead of a cab and a rey.

I hope you enjoy #whimsicalwednesday.  Please let me know if you have any suggestions for topics you would like to see covered.

Enjoy!

whimsicalstitch is here!

Welcome to the whimsicalstitch.com blog!

My hope is my blog will be a "go to" place for you to find needlepoint inspiration, a new stitch, a different way of looking at a canvas, or a reminder that plain needlepoint is the only perfect stitch for some spaces.

My style has been described as crisp, clean, and classic.  Melissa Shirley Designs are the inspiration for my style.  Melissa is my stitch muse.  If you are as crazy for Melissa's designs as I am and/or you want ideas for a crisp, clean, and classic style, I hope I can help with my guides and my blog.

My plan is to post 1-2 times per week.  #whimsicalwednesday posts will be my favorite stitch of the week.  I will also share fun stories and silly observations as we embark on this journey together.

Thanks for stopping by!  I hope you come again soon!