Beware of the Technical Terms

Today’s stitch is a classic embroidery stitch that works so well in needlepoint. The Lazy Daisy is an easy stitch that adds charm and interest to your projects.

Click image to see the whimsicalstitch Stitch Library on pinterest.com. Includes all #whimsicalwednesday and #smallspacesunday stitch diagrams.

Click image to see the whimsicalstitch Stitch Library on pinterest.com. Includes all #whimsicalwednesday and #smallspacesunday stitch diagrams.

Click image to see #whimsicalwednesday and #smallspacesunday Stitched Sample Gallery on Instagram.

Creating a Lazy Daisy is super easy. Come up at 1 and return your needle through the same hole, leaving a small-ish loop (plus some extra thread) on top of the canvas. Bring your needle up two or so holes away and catch the loop with your needle. Continue pulling on the thread until you create a small loop on top of the canvas, returning the thread one hole away to attach the loop to the canvas.

Here is where the technical terms come in. I prefer more oval loops, so I will use my needle to play with the aforementioned extra thread to scooch, finagle, or wrangle the loop into my desired shape before I tack it down.

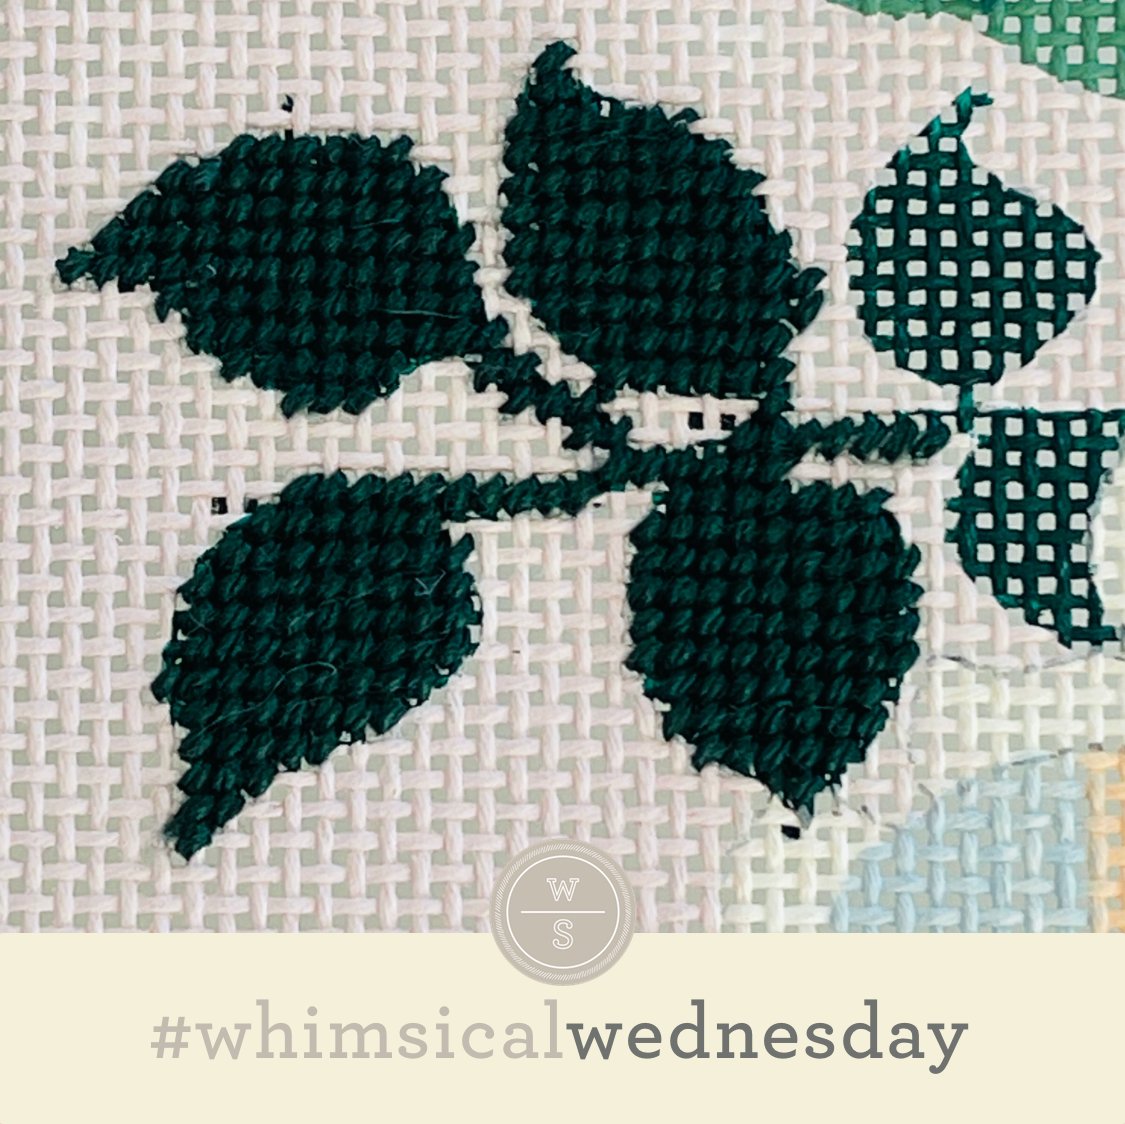
Lazy daisy coverage can be tricky. Sometimes, if you pack every single inch of an area with lazy daisies, the effect can be…a lot. One of my favorite stitchers shared her solution with me. She adds a layer of Plain Needlepoint on the area before she adds any Lazy Daisies, as illustrated by the second diagram and the stitched sample. The end result is a lovely compromise where you can see individual lazy daisies along with a full coverage look. I love how this works out!

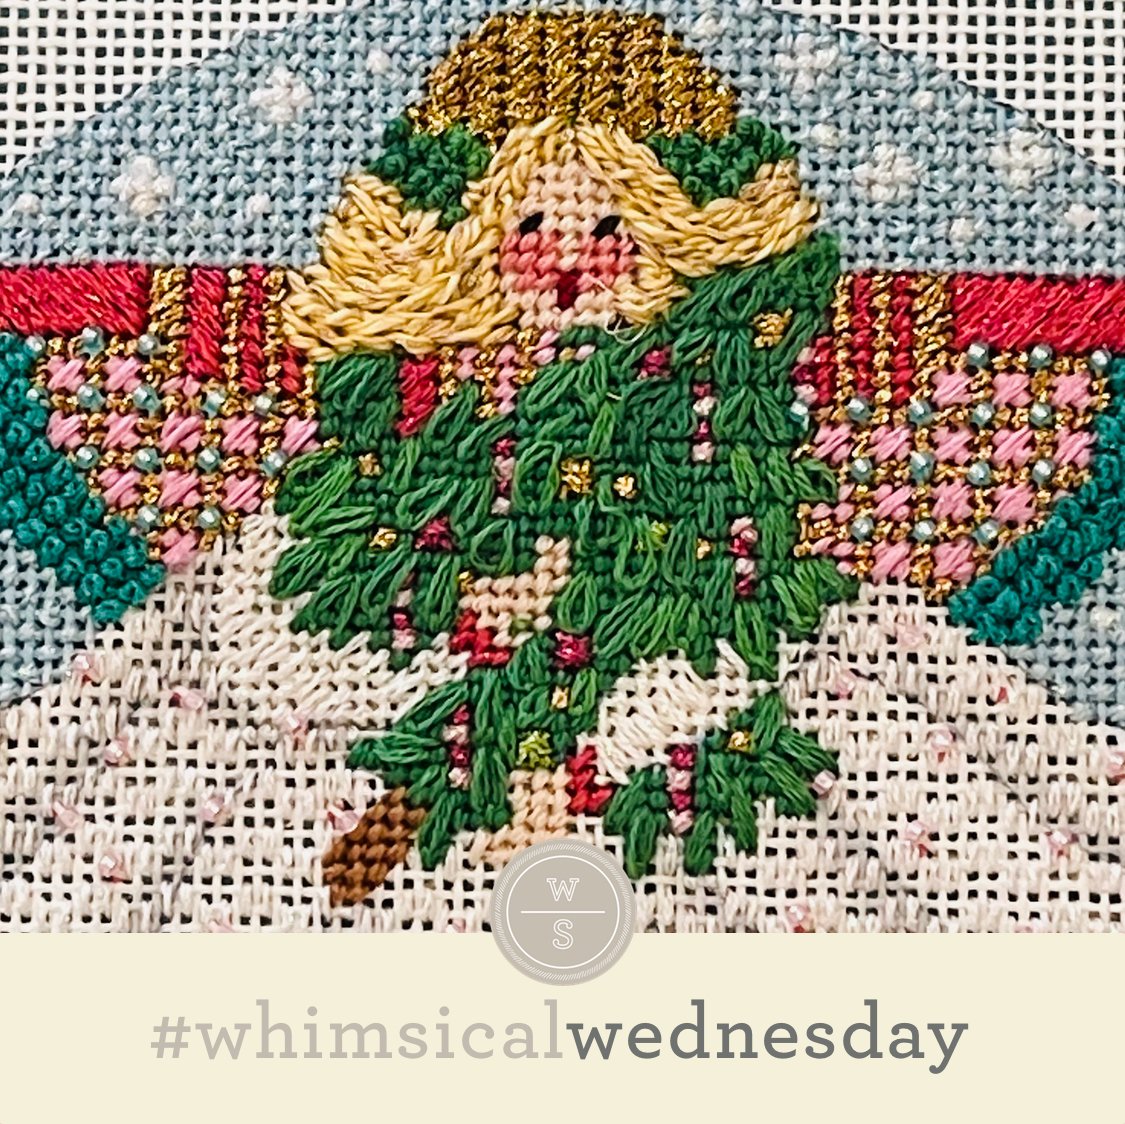
The stitched sample is my friend’s adorable Melissa Shirley angel ornament with DMC Floss (turquoise lines) and ThreadWorx Floss (black lines).

Fun fact. Lazy daisies make fantastic flower petals.

Click image to see #whimsicalwednesday and #smallspacesunday Stitched Sample Gallery on Instagram.

Click image to see #whimsicalwednesday and #smallspacesunday Stitched Sample Gallery on Instagram. (Note: swipe left to see this image in carousel of photos from this blog post.)

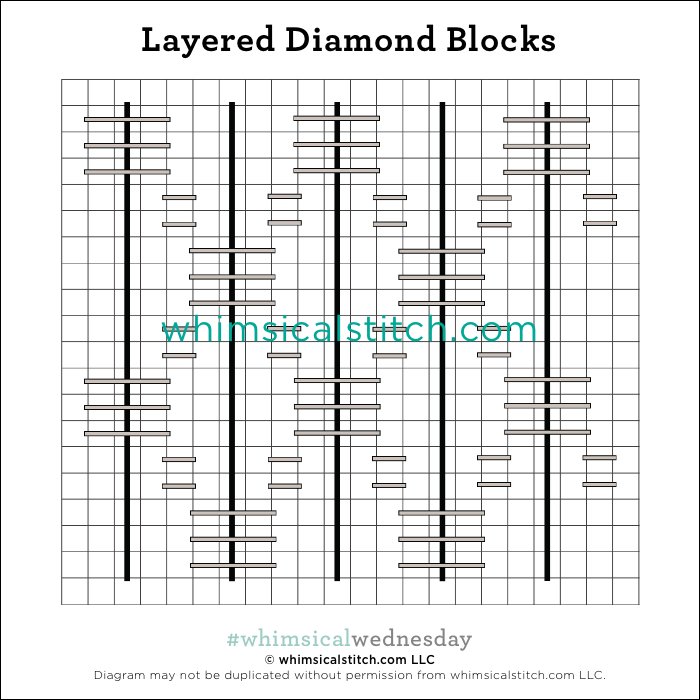
Super easy. The stitched sample is River Silks 7mm ribbon (black lines) with Kreinik (yellow lines) on 18M. Generally speaking, I recommend stitching the Smyrna Cross center first. When I stitched the stitched sample (eons ago), I don’t recall having issues with the silk ribbon versus the Kreinik. However, I would still advise patience and caution with that thread mix.

These stitch diagrams, along with all other #whimsicalwednesday and #smallspacesunday stitch diagrams, can also be found on a Pinterest board here. Be sure to follow whimsicalstitch.com on FacebookPinterestInstagram, and Twitter.

If you like what you see on this blog, there's more: Mary’s Whimsical Stitches Volume 1 is a contemporary how-to collection of more than 250 stitches for stitchers regardless of skill level. The book includes updated and sequenced diagrams from this blog, all-new stitches, and a chapter on the basics of needlepoint; Mary’s Whimsical Stitches Volume 2 features chapters on Balanced, Beading, Diagonal, Layered, Oblique, Small, and Straight stitches.

Also, you can download for free the first chapter from my first book which covers basic needlepoint stitches and stitch compensation techniques along with new top-line information on needlepoint materials and tools, how to handle threads, and other helpful needlepoint resources.

whimsicalstitch.com also sells Stitch Guides and Stitch Concepts for Melissa Shirley Designs, Zecca DesignsSandra Gilmore, Purple Palm, Maggie, and Penny MacLeod, and many more. Click here to see the newest guides and click here to see the entire collection.

I hope you have the perfect spot for this stitch! Please enjoy! Have a wonderful #whimsicalwednesday!

A Note about Diagrams
I use color in diagrams to make them as clear as possible.  The primary function of different colored lines is to illustrate a stitch sequence.  For example, layering of colors demonstrates you add them in that order.  They can also provide ideas on how to integrate additional threads (one line for each color).  Or, you can use the same thread for all color lines.  That's where I encourage you to use your imagination for the space you are stitching!

More Smiles

Today’s stitch is fun, easy, and cute. It doesn’t get much better than that.

Click image to see the whimsicalstitch Stitch Library on pinterest.com. Includes all #whimsicalwednesday and #smallspacesunday stitch diagrams.

Click image to see #whimsicalwednesday and #smallspacesunday Stitched Sample Gallery on Instagram.

The stitched sample is me playing with three plies of Soie d’Alger (black lines) and Flair (yellow lines) on a little skirt (on 13M). To minimize visible threads between the rectangles (in all directions), I added the rectangles starting at the upper left, moving diagonally down towards the lower right. The X’s covered any visible threads between the rectangles in that path. I followed a similar path for the X’s, burying my thread in and behind the pre-existing rectangles to get to the next open space (as needed).

I created this stitch for a background on an upcoming Stitch Concept. I wanted something interesting but nothing too dramatic as the background is behind some lettering. This will add interest and will also be very easy to compensate around the letters. Since I want to keep it really simple, I’ll most likely recommend a single strand matte (such as DMC Perle Cotton, Rainbow Gallery’s Elegance, or a single strand of Impressions) for the black lines and Neon Rays for the yellow lines. (I want to keep the background as flat as possible.)

As with a lot of my stitches here of late, it’s another great all-purpose stitch. I’m looking forward to using Vineyard Silk for the black lines and a Silk Lame for the yellow lines for more substantial clothing, such as a jacket or a pair of slacks.

You can replace the “X” with any of your favorite 2X2 stitches. Also consider replacing the X with four single beads for a glammed-up look, say for a dress or a vase. One other consideration is to fill in the remaining open rectangles at the top, bottom, and sides with smaller Cashmere stitches to fit with either a contrasting metallic (red would be adorable above) or a second blue metallic.

These stitch diagrams, along with all other #whimsicalwednesday and #smallspacesunday stitch diagrams, can also be found on a Pinterest board here. Be sure to follow whimsicalstitch.com on FacebookPinterestInstagram, and Twitter.

IIf you like what you see on this blog, there's more: Mary’s Whimsical Stitches Volume 1 is a contemporary how-to collection of more than 250 stitches for stitchers regardless of skill level. The book includes updated and sequenced diagrams from this blog, all-new stitches, and a chapter on the basics of needlepoint; Mary’s Whimsical Stitches Volume 2 features chapters on Balanced, Beading, Diagonal, Layered, Oblique, Small, and Straight stitches.

Also, you can download for free the first chapter from my first book which covers basic needlepoint stitches and stitch compensation techniques along with new top-line information on needlepoint materials and tools, how to handle threads, and other helpful needlepoint resources.

whimsicalstitch.com also sells Stitch Guides and Stitch Concepts for Melissa Shirley Designs, Zecca DesignsSandra Gilmore, Purple Palm, Maggie, and Penny MacLeod, and many more. Click here to see the newest guides and click here to see the entire collection.

I hope you have the perfect spot for this stitch! Please enjoy! Have a wonderful #whimsicalwednesday!

A Note about Diagrams
I use color in diagrams to make them as clear as possible.  The primary function of different colored lines is to illustrate a stitch sequence.  For example, layering of colors demonstrates you add them in that order.  They can also provide ideas on how to integrate additional threads (one line for each color).  Or, you can use the same thread for all color lines.  That's where I encourage you to use your imagination for the space you are stitching!

Thanks for the Memories

Today’s stitch comes to us straight from…iPhone photo memories. A stitching friend shared this stitch with me, um, years ago and I kinda forgot about it. Shame on me.

Click image to see the whimsicalstitch Stitch Library on pinterest.com. Includes all #whimsicalwednesday and #smallspacesunday stitch diagrams.

Click image to see #whimsicalwednesday and #smallspacesunday Stitched Sample Gallery on Instagram.

It’s a really cute…and interesting…layered stitch creating diamond blocks of sorts. The stitched sample is me playing with size 12 Kreinik (black lines) and Elegance (gray lines) on a cute little skirt.

I’m looking forward to using this stitch on a variety of architectural elements, such as a chimney or a roof with a matte single strand thread, such as Elegance or DMC Perle Cotton, and the matching Splendor or DMC Floss on top (gray lines). I also want to flip the diagram 90° and use it for a medium-size body of water with two shades of Petite Silk Lame or size 8 Kreinik. The stitch, as presented, will work well to accentuate anything tall, such as pants or jackets. Using threads with contrasting colors or finishes (or both) will add even more interest to this stitch.

These stitch diagrams, along with all other #whimsicalwednesday and #smallspacesunday stitch diagrams, can also be found on a Pinterest board here. Be sure to follow whimsicalstitch.com on FacebookPinterestInstagram, and Twitter.

IIf you like what you see on this blog, there's more: Mary’s Whimsical Stitches Volume 1 is a contemporary how-to collection of more than 250 stitches for stitchers regardless of skill level. The book includes updated and sequenced diagrams from this blog, all-new stitches, and a chapter on the basics of needlepoint; Mary’s Whimsical Stitches Volume 2 features chapters on Balanced, Beading, Diagonal, Layered, Oblique, Small, and Straight stitches.

Also, you can download for free the first chapter from my first book which covers basic needlepoint stitches and stitch compensation techniques along with new top-line information on needlepoint materials and tools, how to handle threads, and other helpful needlepoint resources.

whimsicalstitch.com also sells Stitch Guides and Stitch Concepts for Melissa Shirley Designs, Zecca DesignsSandra Gilmore, Purple Palm, Maggie, and Penny MacLeod, and many more. Click here to see the newest guides and click here to see the entire collection.

I hope you have the perfect spot for this stitch! Please enjoy! Have a wonderful #whimsicalwednesday!

A Note about Diagrams
I use color in diagrams to make them as clear as possible.  The primary function of different colored lines is to illustrate a stitch sequence.  For example, layering of colors demonstrates you add them in that order.  They can also provide ideas on how to integrate additional threads (one line for each color).  Or, you can use the same thread for all color lines.  That's where I encourage you to use your imagination for the space you are stitching!

Moo!

Today’s ornament is from the way back machine, aka my early days of decorative stitching. It’s always a good feeling when ornaments from that time still make me smile. And who doesn’t smile at a cow with a red ribbon and a bell around her neck?

Click image to see the whimsicalstitch Stitch Library on pinterest.com. Includes all #whimsicalwednesday and #smallspacesunday stitch diagrams.

Click image to see #whimsicalwednesday and #smallspacesunday Stitched Sample Gallery on Instagram.

Click image to see #whimsicalwednesday and #smallspacesunday Stitched Sample Gallery on Instagram.

My best guess on the threads is Neon Rays (black lines) and Flair (yellow lines) on 18M. (UPDATE: The canvas is from the Susan Roberts Collection. It is not listed on the Susan Roberts website, so my guess is it has been discontinued. For those who want to see if they can find it through private resale, it is called Holstein Black and White Cow Roll up by Liz.)

I’ve shared some Byzantine stitches with you before. Today’s example is very close to one from the earliest days of my blog. The black lines are over two rows in the earlier version. The black lines in today’s version are over three rows, putting more emphasis on that thread and downplaying the yellow lines. And that may be something you want to do for a cute coat, Christmas tree, or animal you are stitching.

As an example, I would use a lightweight matte, such as 2-3 plies of Soie D’Alger, on 18M with a size 8 Kreinik for the yellow lines for clothing. For a Christmas tree, overdyed silk or cotton floss is a great choice for the black lines and a Kreinik Metalic (yellow lines) will add a lovely sparkle. Burmilana or Bella Lusso wool (black lines) are great standards for animals. (Well, except for Christmas cows.) I recommend a mild matte for the yellow lines, such as Petite Silk Lame, or a second color of Burmilana or Bella Lusso (in a slightly darker hue).

This stitch diagram, along with all other #whimsicalwednesday and #smallspacesunday stitch diagrams, can also be found on a Pinterest board here. Be sure to follow whimsicalstitch.com on FacebookPinterestInstagram, and Twitter.

IIf you like what you see on this blog, there's more: Mary’s Whimsical Stitches Volume 1 is a contemporary how-to collection of more than 250 stitches for stitchers regardless of skill level. The book includes updated and sequenced diagrams from this blog, all-new stitches, and a chapter on the basics of needlepoint; Mary’s Whimsical Stitches Volume 2 features chapters on Balanced, Beading, Diagonal, Layered, Oblique, Small, and Straight stitches.

Also, you can download for free the first chapter from my first book which covers basic needlepoint stitches and stitch compensation techniques along with new top-line information on needlepoint materials and tools, how to handle threads, and other helpful needlepoint resources.

whimsicalstitch.com also sells Stitch Guides and Stitch Concepts for Melissa Shirley Designs, Zecca DesignsSandra Gilmore, Purple Palm, Maggie, and Penny MacLeod, and many more. Click here to see the newest guides and click here to see the entire collection.

I hope you have the perfect spot for this stitch! Please enjoy! Have a wonderful #whimsicalwednesday!

A Note about Diagrams
I use color in diagrams to make them as clear as possible.  The primary function of different colored lines is to illustrate a stitch sequence.  For example, layering of colors demonstrates you add them in that order.  They can also provide ideas on how to integrate additional threads (one line for each color).  Or, you can use the same thread for all color lines.  That's where I encourage you to use your imagination for the space you are stitching!

Let There Be Light

It took my glasses, the iPhone magnifier feature, a window, and turning up the lights in my office to decipher this stitch from my earliest days of decorative stitches. I can tell this is from long ago because it is about as full coverage as a full coverage stitch can be.

Click image to see the whimsicalstitch Stitch Library on pinterest.com. Includes all #whimsicalwednesday and #smallspacesunday stitch diagrams.

Click image to see #whimsicalwednesday and #smallspacesunday Stitched Sample Gallery on Instagram.

Click image to see #whimsicalwednesday and #smallspacesunday Stitched Sample Gallery on Instagram.

My best guess on the threads is Splendor (black lines), Neon Rays (yellow lines), and a size 8 Kreinik (aqua lines) on 18M. The column of tent stitches down the center, underneath the beard, indicate where two edges of the front of the coat meet. As you can see, I used a slightly darker color to make it stand out and compensated the stitch so it matched on both sides.

As much as I love open stitches, I’m kinda thrilled I stumbled across this stitch and am looking forward to using it in an upcoming project. It will make beautiful clothing, as illustrated above. It will also make a beautiful tree that you would like to draw attention to. I would use a solid wool thread such as Bella Lusso for the black lines. Ideas for the two accent threads include Petite Silk Lame (aqua lines) and an overdyed wool for the yellow lines. If you want to simplify it a little, consider changing the yellow diagonal lines over three rows to match the black lines. In addition, consider using a single metallic thread for the Upright Tied Crosses in the open areas.

This stitch diagram, along with all other #whimsicalwednesday and #smallspacesunday stitch diagrams, can also be found on a Pinterest board here. Be sure to follow whimsicalstitch.com on FacebookPinterestInstagram, and Twitter.

IIf you like what you see on this blog, there's more: Mary’s Whimsical Stitches Volume 1 is a contemporary how-to collection of more than 250 stitches for stitchers regardless of skill level. The book includes updated and sequenced diagrams from this blog, all-new stitches, and a chapter on the basics of needlepoint; Mary’s Whimsical Stitches Volume 2 features chapters on Balanced, Beading, Diagonal, Layered, Oblique, Small, and Straight stitches.

Also, you can download for free the first chapter from my first book which covers basic needlepoint stitches and stitch compensation techniques along with new top-line information on needlepoint materials and tools, how to handle threads, and other helpful needlepoint resources.

whimsicalstitch.com also sells Stitch Guides and Stitch Concepts for Melissa Shirley Designs, Zecca DesignsSandra Gilmore, Purple Palm, Maggie, and Penny MacLeod, and many more. Click here to see the newest guides and click here to see the entire collection.

I hope you have the perfect spot for this stitch! Please enjoy! Have a wonderful #whimsicalwednesday!

A Note about Diagrams
I use color in diagrams to make them as clear as possible.  The primary function of different colored lines is to illustrate a stitch sequence.  For example, layering of colors demonstrates you add them in that order.  They can also provide ideas on how to integrate additional threads (one line for each color).  Or, you can use the same thread for all color lines.  That's where I encourage you to use your imagination for the space you are stitching!

It's an Ornamental Time of Year

Happy ornament season! While many of us hang ornaments year round, there’s something special about winter holiday ornaments. My plan for December is to share some new and old ornaments hanging on my office Christmas tree*. None of the new stitches are especially glamorous but they are great for small projects and, dare I say, ornaments in particular? And, yes, we are starting with a frog.

* By office tree, I mean my 4.5’ faux tree that Hank has already tried to climb. (And for those who don’t follow me on Instagram, Hank is my cat who also serves as the Office Manager…who doesn’t do much Office Manager-ing.)

Click image to see the whimsicalstitch Stitch Library on pinterest.com. Includes all #whimsicalwednesday and #smallspacesunday stitch diagrams.

Click image to see #whimsicalwednesday and #smallspacesunday Stitched Sample Gallery on Instagram.

Click image to see #whimsicalwednesday and #smallspacesunday Stitched Sample Gallery on Instagram.

The stitched sample is, well, a Christmas Frog. Duh. It uses two strands of Floche (black lines) and size 12 Kreinik (yellow lines) on 18M. (Full disclosure: those threads are my best guesses as this ornament is what one might call vintage stitching.)

I’ve seen this stitch pop up a lot recently in my needlepoint feeds on Instagram, Facebook, or Pinterest, so I was thrilled to unpack this gem recently. It’s the perfect balance of thread combos and is a great universal stitch for clothing, architectural stitches, or flower petals (as thought starters). I look forward to using a Bella Lusso wool (black lines) and a Silk Lame (yellow lines) for a fall sweater. It would make a pretty chimney with Vineyard Silk (black lines) and a second color of Vineyard Silk (yellow lines) for a chimney. I would go to the other end of the finish spectrum for flower petals with a delicate overdyed metallic for the black lines and a solid contrasting metallic (yellow lines) for a flower petal.

This stitch diagram, along with all other #whimsicalwednesday and #smallspacesunday stitch diagrams, can also be found on a Pinterest board here. Be sure to follow whimsicalstitch.com on FacebookPinterestInstagram, and Twitter.

IIf you like what you see on this blog, there's more: Mary’s Whimsical Stitches Volume 1 is a contemporary how-to collection of more than 250 stitches for stitchers regardless of skill level. The book includes updated and sequenced diagrams from this blog, all-new stitches, and a chapter on the basics of needlepoint; Mary’s Whimsical Stitches Volume 2 features chapters on Balanced, Beading, Diagonal, Layered, Oblique, Small, and Straight stitches.

Also, you can download for free the first chapter from my first book which covers basic needlepoint stitches and stitch compensation techniques along with new top-line information on needlepoint materials and tools, how to handle threads, and other helpful needlepoint resources.

whimsicalstitch.com also sells Stitch Guides and Stitch Concepts for Melissa Shirley Designs, Zecca DesignsSandra Gilmore, Purple Palm, Maggie, and Penny MacLeod, and many more. Click here to see the newest guides and click here to see the entire collection.

I hope you have the perfect spot for this stitch! Please enjoy! Have a wonderful #whimsicalwednesday!

A Note about Diagrams
I use color in diagrams to make them as clear as possible.  The primary function of different colored lines is to illustrate a stitch sequence.  For example, layering of colors demonstrates you add them in that order.  They can also provide ideas on how to integrate additional threads (one line for each color).  Or, you can use the same thread for all color lines.  That's where I encourage you to use your imagination for the space you are stitching!

Max

When one gets THE call that finishing is in and that finishing is Christmas ornaments, it does not matter that Thanksgiving hasn’t arrived yet. You whip out the faux tree and fill it with Christmas ornaments. What makes it even better is one of the ornaments had a great background I could share with you!

Click image to see the whimsicalstitch Stitch Library on pinterest.com. Includes all #whimsicalwednesday and #smallspacesunday stitch diagrams.

Click image to see #whimsicalwednesday and #smallspacesunday Stitched Sample Gallery on Instagram.

Click image and keep swiping to see the needlepoint version of the king and then Sir Max of Legallet himself.

Today’s stitched sample (center photo) is a cute little cat ornament honoring my never-ending love for orange cats. It’s from so long ago I don’t even remember stitching it, so I’m going to give you my best guesses on the threads. The background is stitched with two plies of Impressions (black lines) and Flair (yellow lines). This is clearly from my “no naked canvas” years, so I’m guessing the late 90’s. (The cat is stitched with a single strand wool of the day, probably Appleton.) The current orange king of the household is Max, so here we are honoring Sir Max of Legallet (one of my vet’s many nicknames for him).

I’m thrilled to discover this overtly diagonal stitch because they are not my go-to stitches. As you can see, it makes a great background. It will also work well for a rug or bedspread with a single strand silk such as Pepper Pot Silk or Vineyard Silk (black lines) and a mild metallic such as Silk Lame (yellow lines). It will also be a very pretty coat or skirt with a silk floss and a size 8 Kreinik. It will also work well for slightly rough water with two shades of metallics, such as Petite Silk Lame or Kreiniks.

I’m going to play with it for a future project by leaving a single empty row between the yellow and black blocks to see what that adds to the equation. I suspect that could make a pretty hillside or field. And, if it doesn’t work, I will fill those empty rows with tent stitches for an even more elegant version of today’s stitch.

These stitch diagrams, along with all other #whimsicalwednesday and #smallspacesunday stitch diagrams, can also be found on a Pinterest board here. Be sure to follow whimsicalstitch.com on FacebookPinterestInstagram, and Twitter.

IIf you like what you see on this blog, there's more: Mary’s Whimsical Stitches Volume 1 is a contemporary how-to collection of more than 250 stitches for stitchers regardless of skill level. The book includes updated and sequenced diagrams from this blog, all-new stitches, and a chapter on the basics of needlepoint; Mary’s Whimsical Stitches Volume 2 features chapters on Balanced, Beading, Diagonal, Layered, Oblique, Small, and Straight stitches.

Also, you can download for free the first chapter from my first book which covers basic needlepoint stitches and stitch compensation techniques along with new top-line information on needlepoint materials and tools, how to handle threads, and other helpful needlepoint resources.

whimsicalstitch.com also sells Stitch Guides and Stitch Concepts for Melissa Shirley Designs, Zecca DesignsSandra Gilmore, Purple Palm, Maggie, and Penny MacLeod, and many more. Click here to see the newest guides and click here to see the entire collection.

I hope you have the perfect spot for this stitch! Please enjoy! Have a wonderful #whimsicalwednesday!

A Note about Diagrams
I use color in diagrams to make them as clear as possible.  The primary function of different colored lines is to illustrate a stitch sequence.  For example, layering of colors demonstrates you add them in that order.  They can also provide ideas on how to integrate additional threads (one line for each color).  Or, you can use the same thread for all color lines.  That's where I encourage you to use your imagination for the space you are stitching!

HHHello!

I stumbled across today’s stitch last night and was shocked I hadn’t shared it with you before. It checks all the boxes for me…an appropriate amount of openness, lots of metallic and, frankly, pink and silver. Pink and silver (or gold) always make me happy. Always.

Click image to see the whimsicalstitch Stitch Library on pinterest.com. Includes all #whimsicalwednesday and #smallspacesunday stitch diagrams.

Click image to see #whimsicalwednesday and #smallspacesunday Stitched Sample Gallery on Instagram.

Basketweave with Vineyard Silk on 13M.

Today’s stitched sample (center photo) is me playing with Vineyard Silk (black lines) and Kreinik size 8 (yellow lines) on 13M. I purposefully selected Kreinik as the metallic because it retains its shape, allowing the accent stitches (yellow lines) to remain distinct and not “melt” into a solid horizontal line. I’m also a huge fan of Vineyard Silk (or Pepper Pot Silk) on 13M. I like the less than full coverage it provides for straight stitches but also LOVE the excellent coverage it offers for other diagonal stitches, especially basketweave (far right image).

I’m looking forward to using this stitch for jacket or pants with a single strand silk or wool (black lines) and a second single strand silk or wool in a related color (yellow lines). What I’m really looking forward to is using this for a fence. It could work as a chain link fence with two colors of lighter weight Kreinik’s. For example, use a silver for the black lines and a darker silver (essentially gray) for the yellow lines. Or a black metallic with a gray metallic. It will also work well for other architectural items, especially roofs. I plan on using silk floss (black lines) and a Petite Silk Lame (yellow lines) for the roof.

These stitch diagrams, along with all other #whimsicalwednesday and #smallspacesunday stitch diagrams, can also be found on a Pinterest board here. Be sure to follow whimsicalstitch.com on FacebookPinterestInstagram, and Twitter.

IIf you like what you see on this blog, there's more: Mary’s Whimsical Stitches Volume 1 is a contemporary how-to collection of more than 250 stitches for stitchers regardless of skill level. The book includes updated and sequenced diagrams from this blog, all-new stitches, and a chapter on the basics of needlepoint; Mary’s Whimsical Stitches Volume 2 features chapters on Balanced, Beading, Diagonal, Layered, Oblique, Small, and Straight stitches.

Also, you can download for free the first chapter from my first book which covers basic needlepoint stitches and stitch compensation techniques along with new top-line information on needlepoint materials and tools, how to handle threads, and other helpful needlepoint resources.

whimsicalstitch.com also sells Stitch Guides and Stitch Concepts for Melissa Shirley Designs, Zecca DesignsSandra Gilmore, Purple Palm, Maggie, and Penny MacLeod, and many more. Click here to see the newest guides and click here to see the entire collection.

I hope you have the perfect spot for this stitch! Please enjoy! Have a wonderful #whimsicalwednesday!

A Note about Diagrams
I use color in diagrams to make them as clear as possible.  The primary function of different colored lines is to illustrate a stitch sequence.  For example, layering of colors demonstrates you add them in that order.  They can also provide ideas on how to integrate additional threads (one line for each color).  Or, you can use the same thread for all color lines.  That's where I encourage you to use your imagination for the space you are stitching!

This Stitch Gets Around

Today’s stitch has been making the rounds on several projects in my stash, so there are two stitched samples! It’s a cute and almost full coverage stitch that adds a little something-something to a project it graces.

Click image to see the whimsicalstitch Stitch Library on pinterest.com. Includes all #whimsicalwednesday and #smallspacesunday stitch diagrams.

Click image to see #whimsicalwednesday and #smallspacesunday Stitched Sample Gallery on Instagram.

Click image to see #whimsicalwednesday and #smallspacesunday Stitched Sample Gallery on Instagram.

You’ve seen the first stitched sample twice before. (The sky and the white walls were previous blog posts). Today’s stitch is used on the roof with three plies of Soie D’Alger (black lines) and Petite Silk Lame (yellow lines) on 18M. The sample on the far right is on a soon-to-be-announced Stitch Concept. It uses four plies of Splendor (black lines) and a size 12 Kreinik Metallic (yellow lines) on 13M. In both samples, the metallic accent adds the perfect little something to this stitch that makes it stand out.

Outdoor spaces…architectural elements. Clearly, there’s a lot that can be done with this stitch. I’m looking forward to using it on a jacket with an overdyed wool and Silk Lame (for 18M). I like what I call the chunkiness of the larger Silk Lames with wools or single strand silks.

These stitch diagrams, along with all other #whimsicalwednesday and #smallspacesunday stitch diagrams, can also be found on a Pinterest board here. Be sure to follow whimsicalstitch.com on FacebookPinterestInstagram, and Twitter.

IIf you like what you see on this blog, there's more: Mary’s Whimsical Stitches Volume 1 is a contemporary how-to collection of more than 250 stitches for stitchers regardless of skill level. The book includes updated and sequenced diagrams from this blog, all-new stitches, and a chapter on the basics of needlepoint; Mary’s Whimsical Stitches Volume 2 features chapters on Balanced, Beading, Diagonal, Layered, Oblique, Small, and Straight stitches.

Also, you can download for free the first chapter from my first book which covers basic needlepoint stitches and stitch compensation techniques along with new top-line information on needlepoint materials and tools, how to handle threads, and other helpful needlepoint resources.

whimsicalstitch.com also sells Stitch Guides and Stitch Concepts for Melissa Shirley Designs, Zecca DesignsSandra Gilmore, Purple Palm, Maggie, and Penny MacLeod, and many more. Click here to see the newest guides and click here to see the entire collection.

I hope you have the perfect spot for this stitch! Please enjoy! Have a wonderful #whimsicalwednesday!

A Note about Diagrams
I use color in diagrams to make them as clear as possible.  The primary function of different colored lines is to illustrate a stitch sequence.  For example, layering of colors demonstrates you add them in that order.  They can also provide ideas on how to integrate additional threads (one line for each color).  Or, you can use the same thread for all color lines.  That's where I encourage you to use your imagination for the space you are stitching!

Whew!

Today’s stitch comes to us via…my living room. The stitch itself is the result of one of those journeys where you are confident it’s going to be one thing and you end up with something very different. Naturally.

Click image to see the whimsicalstitch Stitch Library on pinterest.com. Includes all #whimsicalwednesday and #smallspacesunday stitch diagrams.

Click image to see #whimsicalwednesday and #smallspacesunday Stitched Sample Gallery on Instagram.

The stitched sample is from one of my favorite stitch guides, Walking in the Rain. It uses Vineyard Silk (black lines) and Petite Very Velvet (yellow lines).

I love how the longer (relatively speaking) oblique stitches enhance the monkey’s long body. The stitched sample illustrates the deceptiveness of the stitch. Due to the layering of the threads, the yellow threads appear to look like smaller tent stitches in the final appearance.

I’m looking forward to using this for outdoor landscapes. Flip it 90° for a hillside or green space with Vineyard Silk (black lines) and an overdyed single strand silk or overdyed silk floss (yellow lines). I love tiny accents of overdyed threads as they add interest without overwhelming an area. It will also work well for household objects such as a blanket or upholstered chair. For either of those, I would use silk or cotton floss (black lines) and add a metallic accent (yellow lines).

These stitch diagrams, along with all other #whimsicalwednesday and #smallspacesunday stitch diagrams, can also be found on a Pinterest board here. Be sure to follow whimsicalstitch.com on FacebookPinterestInstagram, and Twitter.

IIf you like what you see on this blog, there's more: Mary’s Whimsical Stitches Volume 1 is a contemporary how-to collection of more than 250 stitches for stitchers regardless of skill level. The book includes updated and sequenced diagrams from this blog, all-new stitches, and a chapter on the basics of needlepoint; Mary’s Whimsical Stitches Volume 2 features chapters on Balanced, Beading, Diagonal, Layered, Oblique, Small, and Straight stitches.

Also, you can download for free the first chapter from my first book which covers basic needlepoint stitches and stitch compensation techniques along with new top-line information on needlepoint materials and tools, how to handle threads, and other helpful needlepoint resources.

whimsicalstitch.com also sells Stitch Guides and Stitch Concepts for Melissa Shirley Designs, Zecca DesignsSandra Gilmore, Purple Palm, Maggie, and Penny MacLeod, and many more. Click here to see the newest guides and click here to see the entire collection.

I hope you have the perfect spot for this stitch! Please enjoy! Have a wonderful #whimsicalwednesday!

A Note about Diagrams
I use color in diagrams to make them as clear as possible.  The primary function of different colored lines is to illustrate a stitch sequence.  For example, layering of colors demonstrates you add them in that order.  They can also provide ideas on how to integrate additional threads (one line for each color).  Or, you can use the same thread for all color lines.  That's where I encourage you to use your imagination for the space you are stitching!