It's About the Stitches...and the Threads

Today's stitch is a variation on a common theme on whimsicalstitch.com.  I do love my Oblique upright crosses.  But what I really like about this is the understated thread combination.

Click on image to see on whimsicalstitch.com's Pinterest account. Visit pinterest.com/whimsicalstitch/whimsicalwednesday for a library of all #whimsicalwednesday and #smallspacesunday stitch diagrams.

Click on image to see on whimsicalstitch.com's Pinterest account. Visit pinterest.com/whimsicalstitch/whimsicalwednesday for a library of all #whimsicalwednesday and #smallspacesunday stitch diagrams.

Click on image to see on whimsicalstitch.com's Instagram account. Visit instagram.com/whimsicalstitch to see a library of stitched samples for select #whimsicalwednesday and #smallspacesunday stitch diagrams.

Click on image to see on whimsicalstitch.com's Instagram account. Visit instagram.com/whimsicalstitch to see a library of stitched samples for select #whimsicalwednesday and #smallspacesunday stitch diagrams.

This is the shirt from Joachin by Sandra Gilmore that I stitched in the early 2000's.  The threads are a single strand of Impressions (gray lines) and an overdyed floss for the vertical straight stitches in the center (aqua lines). I'm so used to mixing thread finishes in a stitch, this popped out to me.  It's a nice reminder contrast isn't exclusively thread finish.

As with most perfectly symmetrical stitches, this would be great for architectural elements such as a roof, floor, tabletop, or walls.  We see it works for clothing.  It would also make a great tree trunk or other greenery.  Not all greenery needs to be dramatic.  This is a good companion stitch where you have multiple green spaces.  Put the drama in the one you want to stand out and use this stitch for the other.  

Consider replacing the vertical straight stitch (aqua lines) with a single bead over two rows (in either direction!) for water, clothing, or even flower petals.  The bead technique makes this a more open stitch, so the shading will show through.

This stitch diagram, along with all other #whimsicalwednesday and #smallspacesunday stitch diagrams, can also be found on a Pinterest board here.

Be sure to follow whimsicalstitch.com on FacebookPinterestInstagram, and Twitter.

If you like what you see on this blog, want to learn some very creative decorative stitches, and how to put them all together, whimsicalstitch.com sells stitch guides and stitch concepts for Melissa Shirley Designs, Zecca Designs, and Patience Brewster.  61 guides are currently available, with 13 new Stitch Concepts just added! Click here to see the newest guides and click here to see the entire collection.

I hope you have the perfect spot for this stitch!  Please enjoy!

Kismet

I wanted a stitch.  I wanted a different kind of stitch.  I wanted a different kind of stitch that I liked.  Voila!  Enter the Marquis sisters.  We now have a stitch! 

Click on image to see on whimsicalstitch.com's Pinterest account. Visit pinterest.com/whimsicalstitch/whimsicalwednesday for a library of all #whimsicalwednesday and #smallspacesunday stitch diagrams.

Click on image to see on whimsicalstitch.com's Pinterest account. Visit pinterest.com/whimsicalstitch/whimsicalwednesday for a library of all #whimsicalwednesday and #smallspacesunday stitch diagrams.

Click on image to see on whimsicalstitch.com's Instagram account. Visit instagram.com/whimsicalstitch to see a library of stitched samples for select #whimsicalwednesday and #smallspacesunday stitch diagrams.

Click on image to see on whimsicalstitch.com's Instagram account. Visit instagram.com/whimsicalstitch to see a library of stitched samples for select #whimsicalwednesday and #smallspacesunday stitch diagrams.

Eleanor and Liz (the aforementioned sisters) used this as a background for an Art Deco Melissa Shirley witch.  It's quite perfect as the background available to stitch was somewhat narrow and tall.  Eleanor used a single strand of Floche.  (Heart, be still.  I love Floche.)

This stitch offers a respectable amount of coverage for such an open stitch.  The doubling up of the hexagons is a nice touch and enhances the openness when paired with the long connectors. 

We already know it makes a great background.  I would love to flip it 90 degrees and use it as a sky or a body of water.  It will be great for architectural elements such as a roof, floor, wallpaper, etc.  When I play with it, I'm already thinking about stitch columns in alternating colors or finishes, or both.  For example, alternate a brown overdyed wool or cotton with a solid brown wool for a roof.  Another idea is to alternate two values of blue Kreiniks for a water stitch.

This stitch diagram, along with all other #whimsicalwednesday and #smallspacesunday stitch diagrams, can also be found on a Pinterest board here.

Be sure to follow whimsicalstitch.com on FacebookPinterestInstagram, and Twitter.

If you like what you see on this blog, want to learn some very creative decorative stitches, and how to put them all together, whimsicalstitch.com sells stitch guides and stitch concepts for Melissa Shirley Designs, Zecca Designs, and Patience Brewster.  61 guides are currently available, with 13 new Stitch Concepts just added! Click here to see the newest guides and click here to see the entire collection.

I hope you have the perfect spot for this stitch!  Please enjoy! And thank you, Eleanor! 

Skinny Minny

I needed something different for a narrow and tall tree.  I love the Upright Cross Stitch for a tree, so I just put it on a diet. 

Click on image to see on whimsicalstitch.com's Pinterest account. Visit pinterest.com/whimsicalstitch/whimsicalwednesday for a library of all #whimsicalwednesday and #smallspacesunday stitch diagrams.

Click on image to see on whimsicalstitch.com's Pinterest account. Visit pinterest.com/whimsicalstitch/whimsicalwednesday for a library of all #whimsicalwednesday and #smallspacesunday stitch diagrams.

Click on image to see on whimsicalstitch.com's Instagram account. Visit instagram.com/whimsicalstitch to see a library of stitched samples for select #whimsicalwednesday and #smallspacesunday stitch diagrams.

Click on image to see on whimsicalstitch.com's Instagram account. Visit instagram.com/whimsicalstitch to see a library of stitched samples for select #whimsicalwednesday and #smallspacesunday stitch diagrams.

The stitched sample uses six plies of DMC Cotton Floss and a cute pearl from SJ Designs on 13-mesh.  The open intersection is 2X2 rows.  If a large embellishment isn't the right thing for your space, consider a size 11 bead over two rows, four French Knots, four beads, an Upright Cross, or even a Smryna Cross.  If you would like less texture, consider four tent stitches, a 2X2 Mosaic stitch, or leaving it open.

In case you haven't figured it out yet, I love Lorikeet for greenery.  In my opinion, mixing Lorikeet with a solid color thread is always a good look.  Consider Lorikeet for the gray lines and Glisten or Planet Earth Silk Opal for the accent stitch.   

This would make really pretty clothing with silk floss, such as Soie D'Alger or Waterlilies, combined with beads or a bright metallic.

Flip it 90 degrees and I think you have a wonderful water stitch.  For that, I would use a lightweight metallic and a bead, such as Kreinik size 8 and a size 11 bead (on 13-mesh) or Kreinik size 4 and a size 14/15 bead (on 18-mesh).   

This stitch diagram, along with all other #whimsicalwednesday and #smallspacesunday stitch diagrams, can also be found on a Pinterest board here.

Be sure to follow whimsicalstitch.com on FacebookPinterestInstagram, and Twitter.

If you like what you see on this blog, want to learn some very creative decorative stitches, and how to put them all together, whimsicalstitch.com sells stitch guides and stitch concepts for Melissa Shirley Designs, Zecca Designs, and Patience Brewster.  61 guides are currently available, with 13 new Stitch Concepts just added! Click here to see the newest guides and click here to see the entire collection.

I hope you have the perfect spot for this stitch!  Please enjoy!

An Oldie but Goodie

Today's stitch is from one of my favorite workshop pieces.  I remember it well because this was one of the first times I changed a stitch on a workshop piece.  I felt like I was being so naughty!  To this day, I have no regrets.

Click on image to see on whimsicalstitch.com's Pinterest account. Visit pinterest.com/whimsicalstitch/whimsicalwednesday for a library of all #whimsicalwednesday and #smallspacesunday stitch diagrams.

Click on image to see on whimsicalstitch.com's Pinterest account. Visit pinterest.com/whimsicalstitch/whimsicalwednesday for a library of all #whimsicalwednesday and #smallspacesunday stitch diagrams.

Click on image to see on whimsicalstitch.com's Instagram account. Visit instagram.com/whimsicalstitch to see a library of stitched samples for select #whimsicalwednesday and #smallspacesunday stitch diagrams.

Click on image to see on whimsicalstitch.com's Instagram account. Visit instagram.com/whimsicalstitch to see a library of stitched samples for select #whimsicalwednesday and #smallspacesunday stitch diagrams.

So, the bad news is I can't find the original stitched piece.  While that is embarrassing on many levels, it turns out to be a wonderful opportunity for us.  I stitched the sample using two different thread approaches.  The blue is the lovely and glorious Pashmina from Gloriana Threads.  The red is a matte/metallic combo with Vineyard Silk and Entice.  The point in providing both is the combo illustrates that the bottom thread is still visible, even clearly so.  (And I'm kinda digging the stripes.)

The original inspiration (that I'm still looking for) is a Vineyard Silk for a bush in a lovely yard scene.  This stitch is perfect for greenery and the like because it adds texture that is always good for shrubs.  Using the stitched sample as a thought-starter, play with it for a Santa's bag, basket, winter clothing, or even a rug.  If you are looking for a little less texture, try using flatter threads, such as Fyre Werks or silk or cotton floss, may reduce the texture a bit.  Also mix it up a little by using a metallic for the black lines and a matte thread for the gray lines.  

This stitch diagram, along with all other #whimsicalwednesday and #smallspacesunday stitch diagrams, can also be found on a Pinterest board here.

Be sure to follow whimsicalstitch.com on FacebookPinterestInstagram, and Twitter.

If you like what you see on this blog, want to learn some very creative decorative stitches, and how to put them all together, whimsicalstitch.com sells stitch guides and stitch concepts for Melissa Shirley Designs, Zecca Designs, and Patience Brewster.  61 guides are currently available, with 13 new Stitch Concepts just added! Click here to see the newest guides and click here to see the entire collection.

I hope you have the perfect spot for this stitch!  Please enjoy!

Still Wishing I Was Tall

Today's stitch is something that has been flitting in and out of my Pinterest feed.  It's an easy way to add height to any area and looks good to boot.  Win win!

Click on image to see on whimsicalstitch.com's Pinterest account. Visit pinterest.com/whimsicalstitch/whimsicalwednesday for a library of all #whimsicalwednesday and #smallspacesunday stitch diagrams.

Click on image to see on whimsicalstitch.com's Pinterest account. Visit pinterest.com/whimsicalstitch/whimsicalwednesday for a library of all #whimsicalwednesday and #smallspacesunday stitch diagrams.

Click on image to see on whimsicalstitch.com's Instagram account. Visit instagram.com/whimsicalstitch to see a library of stitched samples for select #whimsicalwednesday and #smallspacesunday stitch diagrams.

Click on image to see on whimsicalstitch.com's Instagram account. Visit instagram.com/whimsicalstitch to see a library of stitched samples for select #whimsicalwednesday and #smallspacesunday stitch diagrams.

The stitched sample is me playing with Kreinik 1/16" Ribbon and Gloriana Florimel (silk floss) that I had laying around to be put away.  I'm happy I did it in an atypical color combo because it illustrates the tall drama of this otherwise unassuming stitch.

Frankly, the Cross Stitch accent is completely optional, so the stitch could also enhance any beautiful painting. This would be wonderful as a field of grass, on either the horizontal or vertical axis.   Keeping the Cross Stitch intact, this would make an intriguing tree trunk.  Any wool or cotton floss would work for the turquoise lines.  Have fun with the Cross Stitch here.  Use Rainbow LInen or Straw Silk, as thought-starters.

This tall symmetry of this stitch also lends itself for elegant architectural applications, such as the columns of a fireplace mantle, or a door.   It would make a fantastic roof, especially on the horizontal axis.

This stitch diagram, along with all other #whimsicalwednesday and #smallspacesunday stitch diagrams, can also be found on a Pinterest board here.

Be sure to follow whimsicalstitch.com on FacebookPinterestInstagram, and Twitter.

If you like what you see on this blog, want to learn some very creative decorative stitches, and how to put them all together, whimsicalstitch.com sells stitch guides and stitch concepts for Melissa Shirley Designs, Zecca Designs, and Patience Brewster.  61 guides are currently available, with 13 new Stitch Concepts just added! Click here to see the newest guides and click here to see the entire collection.

I hope you have the perfect spot for this stitch!  Please enjoy!

Weaving In and Out

And here we are at the end of February and glorious Spring is almost here!  In honor of the pending spring, I bring you a cute little woven stitch! 

Click on image to see on whimsicalstitch.com's Pinterest account. Visit pinterest.com/whimsicalstitch/whimsicalwednesday for a library of all #whimsicalwednesday and #smallspacesunday stitch diagrams.

Click on image to see on whimsicalstitch.com's Pinterest account. Visit pinterest.com/whimsicalstitch/whimsicalwednesday for a library of all #whimsicalwednesday and #smallspacesunday stitch diagrams.

Click on image to see on whimsicalstitch.com's Instagram account. Visit instagram.com/whimsicalstitch to see a library of stitched samples for select #whimsicalwednesday and #smallspacesunday stitch diagrams.

Click on image to see on whimsicalstitch.com's Instagram account. Visit instagram.com/whimsicalstitch to see a library of stitched samples for select #whimsicalwednesday and #smallspacesunday stitch diagrams.

While this looks like a Tramme stitch, it uses a different sequence.  Add the black lines first.  When complete, and only when complete, start at an outer edge and weave the thread under the groups of vertical stitches, alternating between two separate horizontal rows of stitches.

For this example, start at the upper right corner.  Weave the thread under the groups of stitches on the top row and the groups of stitches two rows BELOW.  Return to the top row, take the needle under the next group of stitches, and return to the next group on the axis below.  Repeat until you reach the end.  When you get to the end, repeat this sequence in reverse.  Start on the third row of groups of five stitches and weave UP to include the second row of stitches. 

This stitch is quick and easy...seriously.  I used a variation of this stitch for the back panel of a wicker chair.  It was a perfect fit for the chair and maximized the beautiful shading behind the chair.   Other ideas include a basket using Rainbow Linen or Lorikeet.  It would make a great fence with wools.   It would also make a really charming roof.  The stitched sample uses Pepper Pot (aqua thread) and Gloriana Princess Perle (white thread).  I urge you to use single strand threads, especially for the top threads, to avoid any snagging when weaving the second thread underneath.

This stitch diagram, along with all other #whimsicalwednesday and #smallspacesunday stitch diagrams, can also be found on a Pinterest board here.

Be sure to follow whimsicalstitch.com on FacebookPinterestInstagram, and Twitter.

If you like what you see on this blog, want to learn some very creative decorative stitches, and how to put them all together, whimsicalstitch.com sells stitch guides and stitch concepts for Melissa Shirley Designs, Zecca Designs, and Patience Brewster.  61 guides are currently available, with 13 new Stitch Concepts just added! Click here to see the newest guides and click here to see the entire collection.

I hope you have the perfect spot for this stitch!  Please enjoy!

Blackwork...in Blue & Gold

Today's stitch is another adventure down my favorite rabbit hole of pattern stitching (aka blackwork).  This is a beautiful embroidery pattern I discovered on Pinterest and translated for needlepoint.

Click on image to see on whimsicalstitch.com's Pinterest account. Visit pinterest.com/whimsicalstitch/whimsicalwednesday for a library of all #whimsicalwednesday and #smallspacesunday stitch diagrams.

Click on image to see on whimsicalstitch.com's Pinterest account. Visit pinterest.com/whimsicalstitch/whimsicalwednesday for a library of all #whimsicalwednesday and #smallspacesunday stitch diagrams.

Click on image to see on whimsicalstitch.com's Instagram account. Visit instagram.com/whimsicalstitch to see a library of stitched samples for select #whimsicalwednesday and #smallspacesunday stitch diagrams.

Click on image to see on whimsicalstitch.com's Instagram account. Visit instagram.com/whimsicalstitch to see a library of stitched samples for select #whimsicalwednesday and #smallspacesunday stitch diagrams.

The stitched sample uses Gloriana Duchess Silk and Kreinik Metallics Medium Braid (#16).  Let's talk about the sequence for a moment.  Speaking from my vast experience stitching this stitch (okay...the stitched sample), I strongly recommend adding the pinwheels first (black lines on the diagram/blue lines on the stitched sample).  Since the pinwheels fit into each other and are offset, there's no easy way to do this.  I strongly recommend starting near the center and stitching outwards. 

With the diagram nearby, use a simple backstitch to create the pinwheels.  Drag the thread as needed to begin or connect new pinwheels.  The stitch sequence will vary with each pinwheel, so be patient and pay close attention to the diagram.  Try to stay one step ahead of a pinwheel, meaning always look for the pinwheel shape to guide your stitching.  (I hope that will make sense as you stitch it.)  Adding the large X's in the center will be so easy when you're done! 

This stitch would be wonderful for so many areas.  The first thing that pops into my head is what a wonderful floor it would make, using a silk or cotton perle in two different colors.  It would make a wonderful coat with Very Velvet, Pepper Pot Silk, or Gloriana Duchess Silk and a rich Kreinik Metallic. Have fun with it.  It's a really special stitch.

This stitch diagram, along with all other #whimsicalwednesday and #smallspacesunday stitch diagrams, can also be found on a Pinterest board here.

Be sure to follow whimsicalstitch.com on FacebookPinterestInstagram, and Twitter.

If you like what you see on this blog, want to learn some very creative decorative stitches, and how to put them all together, whimsicalstitch.com sells stitch guides and stitch concepts for Melissa Shirley Designs, Zecca Designs, and Patience Brewster.  61 guides are currently available, with 13 new Stitch Concepts just added! Click here to see the newest guides and click here to see the entire collection.

I hope you have the perfect spot for this stitch!  Please enjoy!

Ooh Tall La La!

Today's stitch is a whole lot easier than last week's...and much more pink.  Somehow pink makes so many things better.

The stitch is a very straightforward Parisian Variation.  Instead of the traditional over-4 and over-2 rows, I added height to it by changing the over-4 to over-6. 

Click on image to see on whimsicalstitch.com's Pinterest account. Visit pinterest.com/whimsicalstitch/whimsicalwednesday for a library of all #whimsicalwednesday and #smallspacesunday stitch diagrams.

Click on image to see on whimsicalstitch.com's Pinterest account. Visit pinterest.com/whimsicalstitch/whimsicalwednesday for a library of all #whimsicalwednesday and #smallspacesunday stitch diagrams.

Click on image to see on whimsicalstitch.com's Instagram account. Visit instagram.com/whimsicalstitch to see a library of stitched samples for select #whimsicalwednesday and #smallspacesunday stitch diagrams.

Click on image to see on whimsicalstitch.com's Instagram account. Visit instagram.com/whimsicalstitch to see a library of stitched samples for select #whimsicalwednesday and #smallspacesunday stitch diagrams.

The stitched sample uses Rainbow Gallery Cashmere and Silk Lame.  

This stitch would be great for any number of areas that you want to add a little something-something to, yet don't want to go nuts.  The over-6 stitch adds height to this stitch, making it great for walls, tree trunks, pants, chimneys...all kinds of essential needlepoint-y things.

Don't overlook flipping it 90 degrees and stitching it on the horizontal axis.  That would work really well for wide fields, sand, or distant mountains.

This stitch diagram, along with all other #whimsicalwednesday and #smallspacesunday stitch diagrams, can also be found on a Pinterest board here.

Be sure to follow whimsicalstitch.com on FacebookPinterestInstagram, and Twitter.

If you like what you see on this blog, want to learn some very creative decorative stitches, and how to put them all together, whimsicalstitch.com sells stitch guides and stitch concepts for Melissa Shirley Designs, Zecca Designs, and Patience Brewster.  61 guides are currently available, with 13 new Stitch Concepts just added! Click here to see the newest guides and click here to see the entire collection.

I hope you have the perfect spot for this stitch!  Please enjoy!

Confession Time

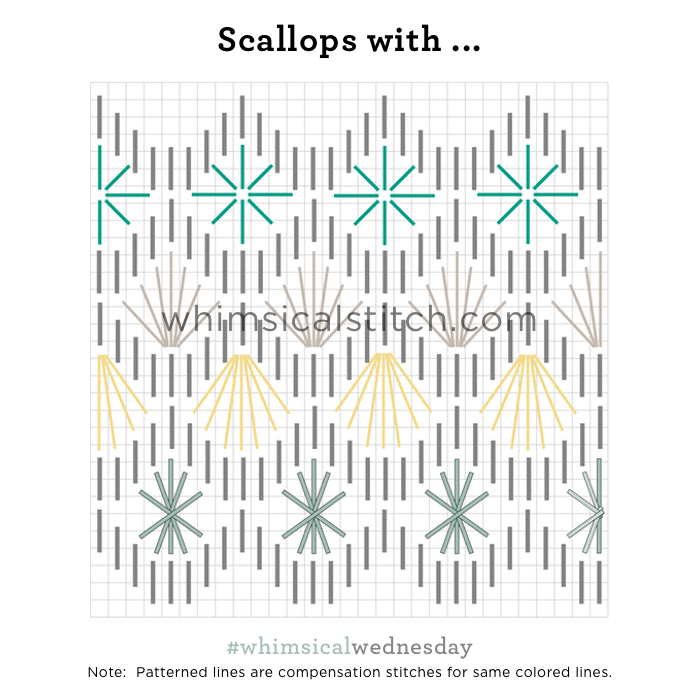
Today is a blog in two parts.  First, I'm offering up a fun Scallop Stitch with four(!) different and fun options for filling.  The second part spends a little extra time on one of the fillings.  

The stitch is a scallop stitch over three rows.  The topmost points of the scallops in subsequent rows are centered along the lowest point of the row above, creating small shell-shaped spaces in between the horizontal columns of scallops. 

Click on image to see on whimsicalstitch.com's Pinterest account. Visit pinterest.com/whimsicalstitch/whimsicalwednesday for a library of all #whimsicalwednesday and #smallspacesunday stitch diagrams.

Click on image to see on whimsicalstitch.com's Pinterest account. Visit pinterest.com/whimsicalstitch/whimsicalwednesday for a library of all #whimsicalwednesday and #smallspacesunday stitch diagrams.

Click on image to see on whimsicalstitch.com's Instagram account. Visit instagram.com/whimsicalstitch to see a library of stitched samples for select #whimsicalwednesday and #smallspacesunday stitch diagrams.

Click on image to see on whimsicalstitch.com's Instagram account. Visit instagram.com/whimsicalstitch to see a library of stitched samples for select #whimsicalwednesday and #smallspacesunday stitch diagrams.

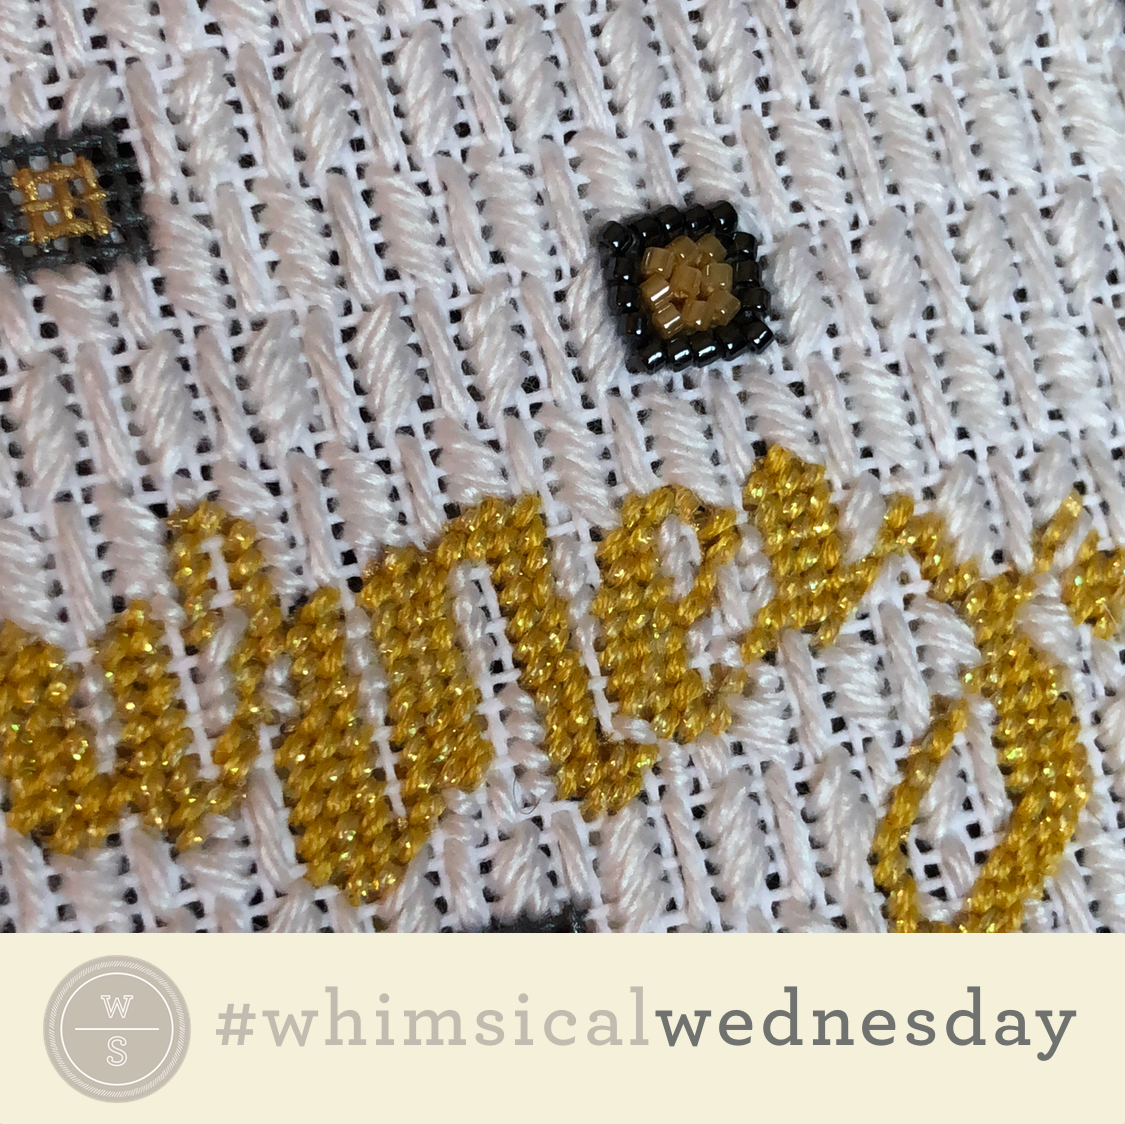
There are four ideas to fill the empty space (from top to bottom):  Eyelet Stitch (turquoise lines on diagram, purple thread in diagram), Traditional Leaf Stitch (light gray lines on diagram, blue thread in diagram), Shell Stitch (yellow lines on diagram, white thread in diagram), Oblique Tied Stitch (aqua lines on diagram, purple thread in diagram).  Feel free to mix and match the scallops and filling stitch to your heart's desire.  The stitched sample uses Gloriana Florimell (yellow thread), Kreinik 1/16" ribbon, Kreinik Medium Braid (#16) (purple thread), and Gloriana Princess Perle (white thread). 

Personally, I like the idea of the Eyelet or Oblique Tied Stitch as a single filling.  Each offers a smidge of open work and lightness to the overall stitch.  Conversely, I like the combination of the Traditional Leaf and Shell Stitch on alternating horizontal rows.  They are very similar in shape (but not exactly the same!) and I like the alternating directions the two fillings offer.  This is all a matter of personal taste!  Mix and match to your delight.

Now it's time for my confession.  This is the first time I've included an eyelet stitch on my blog.  My confession is they make me nervous.  Today, this changes.

Eyelet stitches are adorable and I appreciate what they can add to a piece, as the added element of a larger hole draws the eye in a unique way.  And therein lies my fear...that the larger holes I create will not be identical sizes and chaos reigns.  (I have enough chaos with my new kitten.)

Here's how I navigated this for the eyelet stitch above.  A tapered laying tool is critical, as it provides more control over the size of the final hole.

Use a tapered laying tool as a guide for consistent eyelet hole sizes.  Final knotted ribbon on laying tool.  Just make sure it's tight!

Use a tapered laying tool as a guide for consistent eyelet hole sizes.  Final knotted ribbon on laying tool.  Just make sure it's tight!

Insert the laying tool in the hole from the front of the canvas and gently push it down until the hole is the desired size.  Don't remove the laying tool yet.  Tie a wide piece of a stash thread (e.g., silk ribbon) where the laying tool meets the canvas on the front, creating a guide for future holes.   

Tie the thread tight, pull the laying tool out of the hole, and complete the knot by tying it again, making sure is tight.  Move across the canvas, creating holes as needed.  Revisit any outlier holes and repeat the process if required to make the hole larger. (I recommend silk ribbon because it is not a slippery thread and will, if tied tightly, stay still on the laying tool.) 

Sometimes, you might make a hole a little too large (compared to other eyelet holes).  To make that hole smaller, use the eye end of a size 22 needle to push the canvas threads back into place.  Put the needle in the immediately adjacent hole, and gently push the needle against the canvas thread, helping nudge the thread back into place.  You may need to do this on all four sides of the hole.  It may take a couple pushes, so be patient.  You can push them back and start over again or just push in a bit to get it to the desired size.  Use your judgment.

This stitch diagram, along with all other #whimsicalwednesday and #smallspacesunday stitch diagrams, can also be found on a Pinterest board here.

Be sure to follow whimsicalstitch.com on FacebookPinterestInstagram, and Twitter.

If you like what you see on this blog, want to learn some very creative decorative stitches, and how to put them all together, whimsicalstitch.com sells stitch guides and stitch concepts for Melissa Shirley Designs, Zecca Designs, and Patience Brewster.  60 guides are currently available, with 12 new Stitch Concepts just added! Click here to see the newest guides and click here to see the entire collection.

I hope you have the perfect spot for this stitch!  Please enjoy!

Santa Came in January!

With all the holidays this month, it was a so fun to receive an email giving me a gift.  My new friend, Amy Poore, sent me today's stitch and stitched sample.  It's adorable!

I've seen versions of this stitch around and really like what Amy did with it.  It's a fun mix of diagonal and straight stitches, with some alternating directions thrown in for good measure.

Click on image to see on whimsicalstitch.com's Pinterest account. Visit pinterest.com/whimsicalstitch/whimsicalwednesday for a library of all #whimsicalwednesday and #smallspacesunday stitch diagrams.

Click on image to see on whimsicalstitch.com's Pinterest account. Visit pinterest.com/whimsicalstitch/whimsicalwednesday for a library of all #whimsicalwednesday and #smallspacesunday stitch diagrams.

Click on image to see on whimsicalstitch.com's Instagram account. Visit instagram.com/whimsicalstitch to see a library of stitched samples for select #whimsicalwednesday and #smallspacesunday stitch diagrams.

Click on image to see on whimsicalstitch.com's Instagram account. Visit instagram.com/whimsicalstitch to see a library of stitched samples for select #whimsicalwednesday and #smallspacesunday stitch diagrams.

Amy used a single color of Pepper Pot for this stitch as a background on one of her new pieces and it's adorable.  I recommend stitching it in horizontal columns to keep the straight lines wrapped crisply around the edges.  Don't obsess with dragging threads as needed as it is a pretty full coverage stitch.  This stitch is great for anything you need to add texture and height to, such as pants, a chimney, a tree trunk...you get the idea.

I've seen versions of this on the horizontal and it's equally charming.  It makes a great ground cover, open field, or even clouds. 

Threads are dictated by the area of course.  But, I do have a hankering to see this done with threads in two different finishes (one for the straight lines and one for the diagonal lines).  I have seen this stitch as a ground cover in the combo of an overdyed and solid thread.  It was gorgeous.

This stitch diagram, along with all other #whimsicalwednesday and #smallspacesunday stitch diagrams, can also be found on a Pinterest board here.

Be sure to follow whimsicalstitch.com on FacebookPinterestInstagram, and Twitter.

If you like what you see on this blog, want to learn some very creative decorative stitches, and how to put them all together, whimsicalstitch.com sells stitch guides and stitch concepts for Melissa Shirley Designs, Zecca Designs, and Patience Brewster.  60 guides are currently available, with 12 new Stitch Concepts just added! Click here to see the newest guides and click here to see the entire collection.

I hope you have the perfect spot for this stitch!  Please enjoy!