More Darlingness

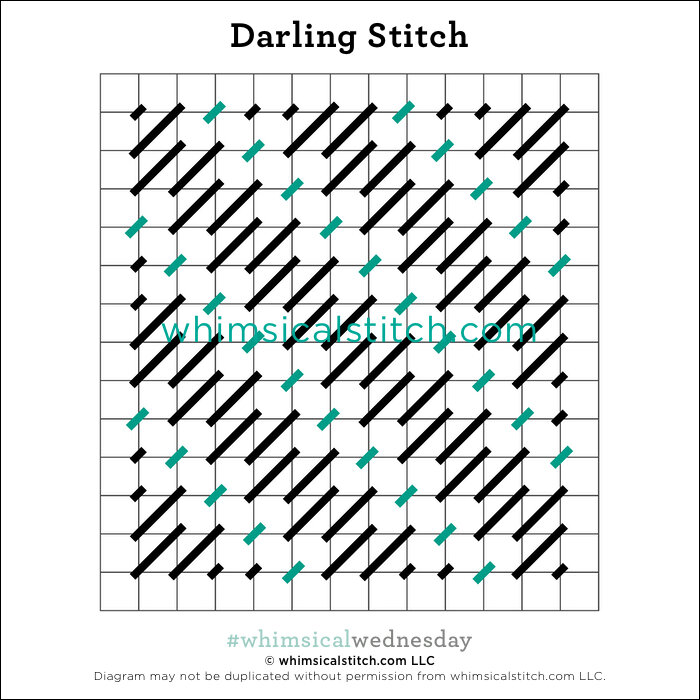
The basis for this stitch is called "Main Network of Four-Way Enlarged Hot Wheels."  I prefer "More Darlingness."  (Thank you to Ann Strite-Kurz for the stitch inspiration and apologies for the name change.)

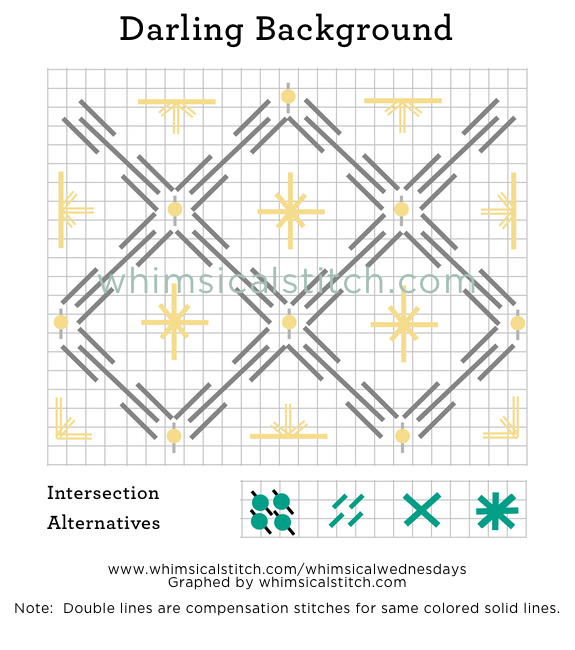
The dark gray lines define the stitch concept.  The heart of the stitch exists in the large diamond center.  The yellow tied cross in the center is just a thought starter.  Consider Smryna Crosses, more diamonds, or leave it blank.  

In my stitched sample, I used a matte thread for the gray lines, a metallic for the yellow lines, and a single bead in the intersection to keep it clean and simple.  There are many alternatives for the intersection spot, including more beads, as illustrated at the bottom of the diagram.  Truly, the only limit is your imagination.  (The stitched sample can be found on whimsicalstitch.com's Instagram account.)

I discovered this stitch years ago and used it once for a solid colored background on a JP piece.  You really need a large space to pull it off.   The pillow still sits on my front window seat...I have yet to tire of it.  That's always a good thing.

This stitch diagram, along with other #whimsicalwednesday and #smallspacesunday stitch diagrams, can also be found on www.pinterest.com/whimsicalstitch/whimsicalwednesday.  

Be sure to follow whimsicalstitch.com on FacebookPinterestInstagram, and Twitter.

If you like what you see on this blog, want to learn some very creative decorative stitches, and how to put them all together, whimsicalstitch.com sells stitch guides for seasonal Melissa Shirley designs.  17 guides are currently available and more are in the pipeline.

I hope you have the perfect space for this stitch and enjoy it!

The Darling Stitch

"I call everyone 'Darling' because I can't remember their name."  - Zsa Zsa Gabor

I call this the Darling Stitch because, despite an hour of book and online research, I could not find a name for this stitch.  Never mind the fact I named the files used to create the stitch diagram for this stitch "Anonymous."

I favor this stitch for an area I want to keep understated but still want to show a little spark with a small color accent.  Think backgrounds for small pieces such as Christmas or Halloween ornaments. 

Click on image to see on whimsicalstitch.com's Pinterest account. Visit pinterest.com/whimsicalstitch/whimsicalwednesday for a library of all #whimsicalwednesday and #smallspacesunday stitch diagrams.

Click on image to see on whimsicalstitch.com's Pinterest account. Visit pinterest.com/whimsicalstitch/whimsicalwednesday for a library of all #whimsicalwednesday and #smallspacesunday stitch diagrams.

Click on image to see on whimsicalstitch.com's Instagram account. Visit instagram.com/whimsicalstitch to see a library of stitched samples for select #whimsicalwednesday and #smallspacesunday stitch diagrams.

Click on image to see on whimsicalstitch.com's Instagram account. Visit instagram.com/whimsicalstitch to see a library of stitched samples for select #whimsicalwednesday and #smallspacesunday stitch diagrams.

The black lines drive the primary pattern.  I like to do the Plain Needlepoint (the light gray lines) in a different color to add a little personality.  Think a very light pink Flair with white Vineyard Silk...or a pewter Kreinik Metallic with a black DMC Floss.  I hope you get the idea.  

These stitch diagrams, along with other #whimsicalwednesday and #smallspacesunday stitch diagrams, can also be found on www.pinterest.com/whimsicalstitch/whimsicalwednesday.  

Be sure to follow whimsicalstitch.com on FacebookPinterestInstagram, and Twitter.

If you like what you see on this blog, want to learn some very creative decorative stitches, and how to put them all together, whimsicalstitch.com sells stitch guides for seasonal Melissa Shirley designs.  Seventeen guides are currently available and more are in the pipeline.

I hope you have the perfect space for this stitch and enjoy it!

Tramme Time

Tramme is a great stitch for contemporary canvases and has a fascinating history (at least to me).

First, today's use.  Tramme is a fantastic symmetrical stitch that is clean and simple, yet provides texture and color.  It is also incredibly, and stupidly, easy as it is a version of couching.

The easiest part is adding the base thread.  It can be horizontal, vertical, or diagonal.  The stitch diagram shows a vertical tramme.  For this example, add the base thread in vertical rows, skipping a row in between threads (numbered steps on the diagram).  When you reach the bottom or top of a row, simply go across two rows from where you are and insert the needle and return in the opposite direction.  Add the accent rows (lettered steps) on top of the base thread.  

The only trick is how to finish off the base thread.  If you have a stitched area nearby, insert and tie off the base thread there.  If not, while it is still on the needle, take the base thread and pull it up through the canvas in an unused area just out of the way.  Once you tie down the rows with the accent thread, there will be plenty of space for you to tie off the base thread in the accent thread on the back.

It's a great stitch for large or small spaces.  My favorite base threads are velour, a larger cotton pearl (#3 or #5), or a single ply silk (Silk & Ivory, Pepper Pot Silk, Vineyard Silk).  I cover those with a complementary metallic in the same or contrasting color.  The stitched sample here illustrates that combo. A fun background is a single strand light sheen metallic (Fyre Werks Soft Sheen, Flair, Neon Rays+) with a lightweight matte accent thread (Elegance, smaller cotton pearl).  The trick here is to ensure the metallic thread lies flat and wide.

Click on image to see on whimsicalstitch.com's Pinterest account. Visit pinterest.com/whimsicalstitch/whimsicalwednesday for a library of all #whimsicalwednesday and #smallspacesunday stitch diagrams.

Click on image to see on whimsicalstitch.com's Pinterest account. Visit pinterest.com/whimsicalstitch/whimsicalwednesday for a library of all #whimsicalwednesday and #smallspacesunday stitch diagrams.

Now, a very brief history.  Tramme is also a type of needlepoint canvas.  On a tramme canvas, a professional stitches the design (not painted nor transferred), using long horizontal stitches of various lengths and colors of wool.  The stitcher purchases the tramme kit with this canvas and the wools required to complete it.  The stitcher stitches over the horizontal wool threads with continental stitches (or cross stitches) of the same color wool, using the horizontal stitch as the guide for color and number of stitches required.  Shading is easier in a tramme needlepoint because there is there is no question what color thread to use as the stitcher is covering the horizontal lines with the exact same color thread and a wider range of colors are available in the wool fibers used. Many of the finest tramme tapestries are stitched on the Portuguese island of Madeira.

Be sure to follow whimsicalstitch.com on FacebookPinterestInstagram, and Twitter.

If you like what you see on this blog, want to learn some very creative decorative stitches, and how to put them all together, whimsicalstitch.com has a book for you! Mary’s Whimsical Stitches is a contemporary how-to collection of more than 250 stitches for stitchers regardless of skill level. The book includes updated and sequenced diagrams from this blog, all-new stitches, and a chapter on the basics of needlepoint. For more information, visit here. My favorite needlepoint retailers that carry the book can be found here.

whimsicalstitch.com also sells Stitch Guides and Stitch Concepts for Melissa Shirley Designs, Zecca DesignsSandra Gilmore, Purple Palm, Maggie, and Penny MacLeod, and many more. Click here to see the newest guides and click here to see the entire collection.

I hope you have the perfect spot for this stitch! Please enjoy! Have a wonderful #whimsicalwednesday!

A Note about Diagrams
I use color in diagrams to make them as clear as possible.  The primary function of different colored lines is to illustrate a stitch sequence.  For example, layering of colors demonstrates you add them in that order.  They can also provide ideas on how to integrate additional threads (one line for each color).  Or, you can use the same thread for all color lines.  That's where I encourage you to use your imagination for the space you are stitching!

More Woven Whimsy

It's always fun to pull out old pieces and see what stitches I may have forgotten.  I started a new stitch guide yesterday with one of my favorite Melissa Shirley Halloween pieces.  (More about that in a future blog.)

I found a perfect example of a stitch I enjoy but never remember to use.  For some reason, I remember Woven Hungarian as a great small space stitch.  This stitch is similar and just as versatile.

I call it Diagonal Woven Ribbon.  It's a great way to integrate multiple colors or multiple thread finishes (e.g., matte and metallic) into a small space.  Typically, I use a matte thread for the gray lines and metallics for the colored lines in between.  That said, there are many ways this stitch will fit your stitching needs.

You can use threads of the same color for the entire section, or integrate multiple colors (as shown below).

You can alternate colors by row.  In this example, each row is defined by the direction the stitches are facing.  Even here, I would use a matte thread for the thin lines and a metallic for the wider line in between. 

You can leave the middle stitch out all together for a nice open stitch where the shading of the canvas shows through.

Enjoy!  Let us know how you use it!

Woven Whimsy

There is something to be said for the tried and true stitches.  And when they can serve in multiple roles, all the better.  

Allow me to introduce you to (what I call) the Woven Ribbon stitch.  There are far too many things I like about it.  It is a clean, symmetrical design.  It serves well in large spaces without overpowering the piece.  The 2X2 row of stitches in between the larger squares can be glammed up with beads or a Smyrna Cross or dressed down with simple single stitches.

My favorite thing about it is that it does the job for a variety of larger spaces.  I've used it as a sky, a coat, a basket, a table top, wallpaper.

Enjoy the stitch!  Help inspire us by letting us know how you use it!

PS  I admit I might be more excited I figured out how to insert the image in the original blog post.  That said, I'm still posting all #whimsicalwednesday stitches on Pinterest (www.pinterest.com/whimsicalstitch) and Instagram (www.instagram.com/whimsicalstitch).  Enjoy!

A Small #whimsicalwednesday

Small spaces are often the most challenging spaces to be creative.  I have a variety of go-to stitches for small spaces and get overly excited when I can add to that library.

I discovered this stitch last night as I thumbing through books for a new piece I'm working on.  The beauty of this stitch is that it works as an open stitch with a lighter thread and a skipped row (as diagrammed) or as a full coverage stitch with a heavier thread and no skipped row.

I'm using it for a sky but it would work really well as ground covering (grass, dirt, or even snow).  

Small Space Stitch.jpg